-
What is a Heading Indicator?
-
How Does the Heading Indicator Work?
-
What are the Heading Indicator Errors? 7 Things to Watch Out for
- Parallax
- Precession (Apparent Drift)
- Gimbal Error
- Friction (Real Drift)
- Suction Errors
- Alignment Error
- Caging Error
-
Why Use a Heading Indicator Instead of a Compass?
- Increased Situational Awareness
- Heading Indicators are More Stable
- Magnetism
-
Final Thoughts
A key component when navigating in an airplane is to make sure you are heading in the right direction. The easiest way to do this is to consult your heading indicator. It’s an essential piece of kit, and we will tell you all about them and how they work. We will touch on a few areas that you need to be aware of.
The heading indicator is an instrument forming one of the basic ‘six pack’ of main cockpit instruments. The line on the heading indicator will indicate the direction you are pointing with reference to magnetic North. Heading indicators have many advantages over the traditional compass.
While this instrument is vital and is pretty reliable, it is vital to understand what it is showing you and how it works.
Here’s what you need to know…
What is a Heading Indicator?
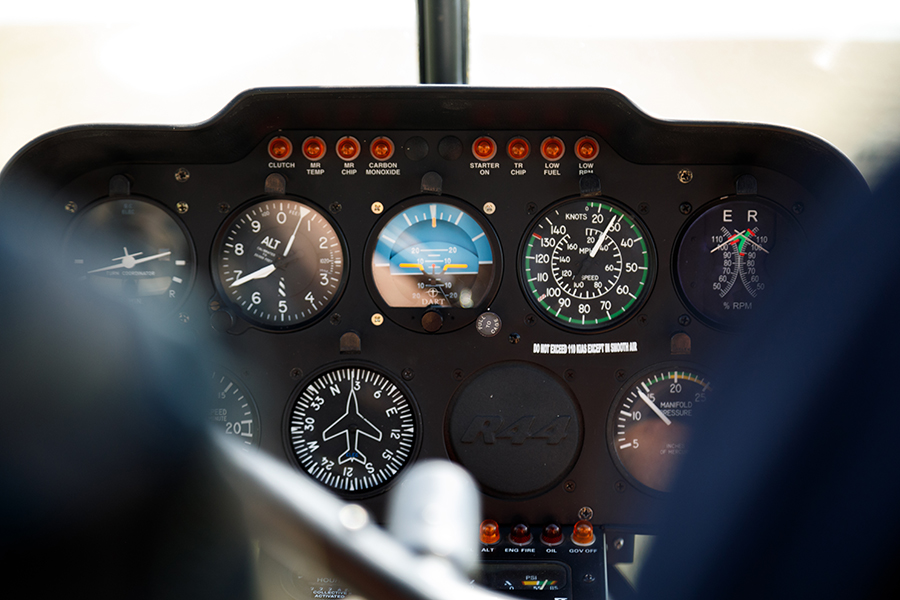
The heading indicator is referred to as a primary flight instrument. In a normal cockpit configuration, you’ll normally find it is located in the middle of the instrument panel, just underneath the artificial horizon.
The name should give away its purpose…
The heading indicator allows the pilot to see, at-a-glance, the direction the aircraft’s nose (or ‘longitudinal axis’ if you want to be all ‘technical’) is pointing. Reading the instrument will tell you your magnetic heading.
The heading indicator, just like the compass, is a disc divided into 360 equal segments, called ‘degrees’. There may be a letter denoting which direction the aircraft is facing at each cardinal point. These ‘cardinal points’ are demonstrated in the table below, along with clockwise associated degrees from the North.
| Cardinal Point | Magnetic Heading |
| North | 000°/360° |
| North East | 045° |
| East | 090° |
| South East | 135° |
| South | 180° |
| South West | 225° |
| West | 270° |
| North West | 315° |
Obviously, we may want to fly between these cardinal points. As the heading indicator card is divided into tiny 1° segments, this is easily possible. So, you could fly a heading of somewhere between North and Northeast, and your heading might be something like 028°… or whatever you choose.
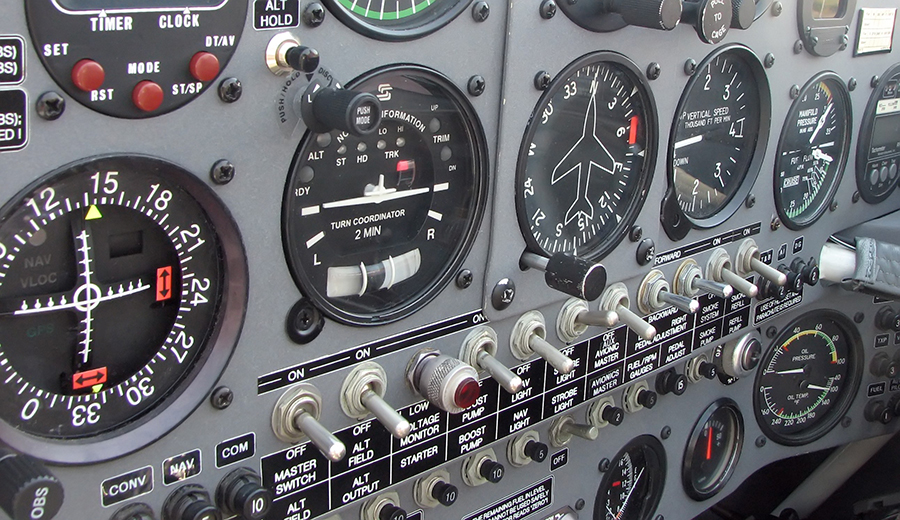
The heading indicator is normally a large disc. To avoid confusion, many have an airplane symbol slap bang in the middle with the nose pointing forward, up towards the top of the instrument panel.
Normally there will be a distinctive and easy-to-see line at the instrument’s top. This is called a ‘lubber line’. To read your heading, just read the number underneath this line.
However, at this stage, it is important to note one thing…
Note it is called a ‘heading indicator’, which differs from a course indicator.
Wait, what’s the difference?
Actually, it’s quite significant, but keep the following in mind, and you should be able to keep out of trouble.
- A heading indicator displays the direction in which the aircraft is pointing
- The course is the direction in which the aircraft is flying
Why are the two different?
Namely the wind. The course will match the heading in completely still air (which is rare). However, suppose there is an element of crosswind where the aircraft is pointing. In that case, its course over the ground will be somewhat different.
The heading indicator doesn’t work automatically. In fact, during cross-country navigation, it is vital that you ‘slave’ (another word for ‘calibrate’) the heading indicator to read the same as the magnetic compass on board. There is a very good reason for this, which is easier to understand once we have discovered how the heading indicator works.
It goes something like this.
How Does the Heading Indicator Work?
While you may think that a heading indicator is the same as a compass, it works entirely differently.
Actually, it doesn’t rely on magnets to be aligned to North at all.
Compasses work by using magnetic North as their ‘datum’, a fixed reference point.
Heading indicators work by using an arbitrary datum defined purely by the mechanical workings inside the instrument.
Or, to put it another way.
A heading indicator is what is known as a ‘gyroscopic’ instrument.
While gyroscopes can be seen as something of a ‘dark art’, the basics are pretty easy to understand.
Gyroscopes maintain something called ‘rigidity in space’. Rigidity is the operable word.
Sounds complex, right? But actually, it’s pretty easy.
A gyroscope is a weighted wheel that spins around an axis. If the wheel is spinning fast enough and with enough mass around its edges, the axis around which it is spinning will always point to the same place. This is called ‘rigidity’.
Here’s a quick video showing this concept in real life: –
Note the axis going through the center of the gold-colored wheel. Keep an eye on the direction it points, regardless of how the gyroscope moves.
It stays the same, right?
Gyroscopic instruments rely heavily on rigidity. Without it, they tumble and we can’t use them as a reference.
But, airplanes move, right? What stops them from falling over in a turn or a climb?
Allow us to introduce you to the gimbal…
This spinning wheel is mounted in a frame that allows full and free movement on every axis, up, down, left, right, and everything in between.
By aligning the gyro axis with a known direction, we can measure our deviation from this direction.
In essence, that’s exactly what a heading indicator does.
It measures how much the aircraft has turned around the axis. Through a series of gears, it outputs this data as a heading, which the pilot can read to work out the aircraft’s direction.
The gears inside the artificial horizon rotate a ‘card’ (the part of the display with the numbers and cardinal points) to display the heading. The lubber line and central aircraft symbol remain fixed in position and always point up towards the top of the instrument panel. If you want to envisage how an artificial horizon works. Remember, the gyro axis always points in the direction that it was aligned to in its gimbal and should stay fixed in position. The aircraft simply rotates around the gimbal.
What are the Heading Indicator Errors? 7 Things to Watch Out for
Is the heading indicator useful? Absolutely. Is it perfect? Absolutely not!
As with most airplane instruments, there are a few areas in which the heading indicator can give false or misleading information. Here are the causes of heading indicator errors.
Parallax
While parallax isn’t a big deal, it can impede navigational accuracy. Parallax refers to a difference in readings created by reading the instrument from different angles. Normally it will only make a few degrees difference.
However…
If you look at the heading indicator from anything other than straight ahead, expect a consistent difference between your actual heading and the heading that you read.
Precession (Apparent Drift)
Remember how we said that gyros and their axis will maintain their rigidity in space?
While this is true, one or two things get in the way.
Note, we said rigidity in space. While a point in space might be fixed, the earth turns at a rate of 15° per hour, or, to put it another way, around 4° every 15 minutes…
This means that the gyro will gradually begin to drift away from the heading at which you set it due to the rotation of the earth.
Or, to put it in basic terms…
We navigate relative to ground features, which move in relation to a point in space due to the earth’s rotation. We align the heading indicator to a point space, which doesn’t move. Therefore we have to ‘correct’ apparent drift.
With enough time, this error will add up and become significant…
Luckily there is an easy fix.
A knob on the heading indicator allows you to perform a quick ‘cage and alignment’. The heading indicator should be realigned with the magnetic heading from the compass once every 15 minutes.
And something is interesting to note about apparent drift.
The greater your latitude (or, the closer to the North or south pole you go), the more significant this error becomes. There is a mathematical formula to work out how much drift you can expect: –
- Drift per hour = SINE x 15
To explain this in the simplest terms. ‘SINE’ above represents the aircraft’s altitude. At the pole, it is at maximum effect and will match the earth’s rotation. It is at its lowest at the Equator and shouldn’t be apparent at all.
Not into math? Here’s a quick table so you can see the above applied in real terms over a range of latitudes:
| Airplane Latitude | Apparent Drift of Artificial Horizon (per hour) |
| 0° (at the Equator) | 0° drift per hour |
| 20° | 6.8° drift per hour |
| 40° | 9.6° drift per hour |
| 60° | 13°drift per hour |
| 90° (At the North Pole) | 15° drift per hour |
Note that as we get higher in latitude, the apparent drift also increases.
Gimbal Error
In an ideal world, the gimbal in which the gyro is fixed would stay exactly aligned to where we put it.
However, sadly, this is not the case.
The gimbal sometimes can’t react as fast as you can turn the airplane. While they are pretty robust, they may topple if subject to enough force caused by hard maneuvers (like aerobatics). The axis will lose rigidity and begin toppling, giving false heading information.
You must cage your gyro and realign it if you have undertaken any particular steep or aggressive maneuvers.
Friction (Real Drift)
For a gyro to maintain its position, it needs to maintain a high spin rate. The gyro is mounted on a gimbal, and this gimbal creates friction. As a result, the gyro may slow down, losing rigidity. This will cause your heading indicator to wander.
With newer instruments, this isn’t so much of an issue. Older instruments suffer from worn bearings and, as a result, are more likely to encounter real drift.
Suction Errors
Most gyro instruments in light aircraft are powered by suction.
This suction is normally powered by an engine-driven pump, but can also form part of the pitot static system.
Air blows over a wheel that spins the gyro to the required speed. If this air is blocked or otherwise reduced, the wheel on the gyro won’t spin as fast.
The end result?
You guessed it. A loss of gyro rigidity. As with ‘real drift,’ the heading will begin to wander.
If you suffer a failure of the suction system for your instruments, immediately check your heading as the heading indicator may begin displaying erroneous data.
Alignment Error
This is another one that falls firmly under the ‘pilot error’ category.
Hey, don’t feel bad. We all make mistakes.
The instrument may be in perfect working order. But you know the saying…
“Garbage in, garbage out”.
Suppose the heading indicator is incorrectly aligned to a heading that doesn’t match the aircraft’s magnetic heading. In that case, it will be misread all day long.
Be sure to carefully check that the heading indicator exactly matches the heading displayed on your compass during straight and level in smooth air.
Caging Error
The final one is big.
Most systems will allow you to ‘cage’ or ‘slave’ the gyro when aligning the heading indicator.
What does this mean?
Simply. You stop the gyro gimbal from moving while you realign the ‘card’ on the instrument.
A problem can arise if you forget to ‘uncage’ the gyro. You can turn the airplane left or right, and the heading displayed will stay the same. The obvious implication is that you may be blissfully unaware as you fly off in completely the wrong direction.
So…
Be sure to uncage the gyro once you have realigned your heading.
Why Use a Heading Indicator Instead of a Compass?
If they are used properly, heading indicators are much more reliable than a magnetic compass. Here are some really great reasons why pilots use them: –
Increased Situational Awareness
The heading indicator is one of the easiest instruments to read. Provided it is calibrated correctly, what you see is what you get when it comes to heading. The display itself works well to promote excellent situational awareness.
Magnetic compasses can be useful, but the heading is normally displayed through a small plastic ‘bubble’ and not much else. Conversely, the heading indicator shows all the 360° of directions at a glance. It normally has the cardinal points denoted on the circular card.
And there’s more…
Most good artificial heading indicators will also denote points at 45° and 90° intervals, allowing for easy calculation of headings and bearings. Many will also have a ‘bug’ located on the outer circular bezel. This allows the pilot to move a plastic slider around to a new heading and then fly towards it.
Heading Indicators are More Stable
It can be challenging navigating only using a compass. The inherent nature of how they are manufactured makes compasses a little troublesome.
For a start, compasses turn in either direction when the aircraft accelerates and decelerates. They also bounce around significantly in anything other than completely smooth air.
On the other hand, heading indicators are rock solid. They aren’t prone to acceleration errors and are supremely easy to read.
Magnetism
Magnetic compasses can be affected by a host of errors. Lightning strikes, loose metal items (or even flight headphones) left nearby can give a false reading, and aircraft electronic equipment also causes a deviation from the actual heading.
Guess how much of the above affects the heading indicator.
That’s right, none.
Final Thoughts
As long as you understand the limitations of heading indicators and ensure that they are always aligned to the correct heading, they can be an exceptionally useful navigational tool. They are easy to read, intuitive to use, and increase situational awareness. If flying on instruments is of interest to you, why not embark on an easy-to-understand online course. There are plenty to choose from, and they can be completed entirely at home!