-
Key Takeaways
-
1. Know the Standards Before You Fly
- ACS vs. Legacy PTS
- How Examiners Use the ACS
-
2. Building Your Master Maneuvers Checklist
- Paper or EFB?
- Four-Part Flow for Every Maneuver
-
3. Preflight & Ground Operations (ACS Areas I–II)
- Engine Start, Taxi, Run-up
- Normal & Crosswind Takeoff
-
4. Performance Takeoffs & Landings
- Short-Field Takeoff
- Soft-Field Takeoff & Landing
- Forward Slip to Landing
- Go-Around / Rejected Landing
-
5. Airwork: Mastering Core Maneuvers
- Slow Flight
- Stalls
- Ground Reference Maneuvers
-
6. Emergencies & Abnormals
- Engine Failure (Simulated)
-
The Checkride Flight Profile
- Workload Management Tips
- Day-of-Checkride Checklist
-
Conclusion
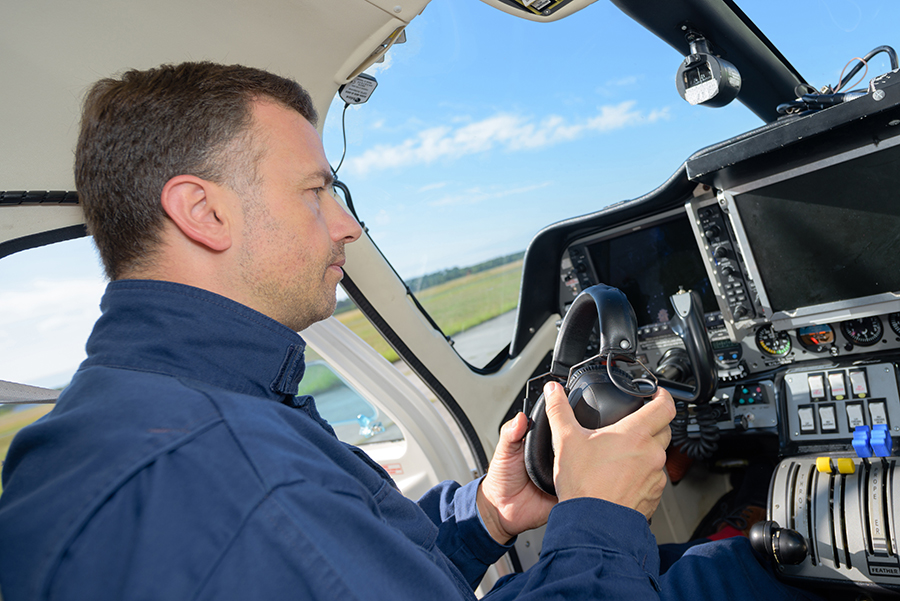
You can imagine the moment. The DPE looks over at you and says, “Show me a power-off stall.”
Your hand pulls the throttle to idle, and your heartbeat jumps a little. For some applicants, this is where the chaos begins.
But for others, it’s calm and easy because they flip one page and read the exact flow they’ve practiced. Their body reacts like second nature.
The ACS tells you what to meet, but it doesn’t give you a kneeboard-ready way how. That’s what this guide delivers.
You’ll get a clear, maneuver-by-maneuver blueprint plus a printable template you can bring into your next training flight.
Key Takeaways
- A clear maneuvers checklist turns tasks into predictable, manageable procedures.
- Understanding ACS standards helps you match examiner expectations and correct errors quickly.
- Practice full flight profiles to build recall and workload management skills.
- Organizing tools keep your controls focused and structured.
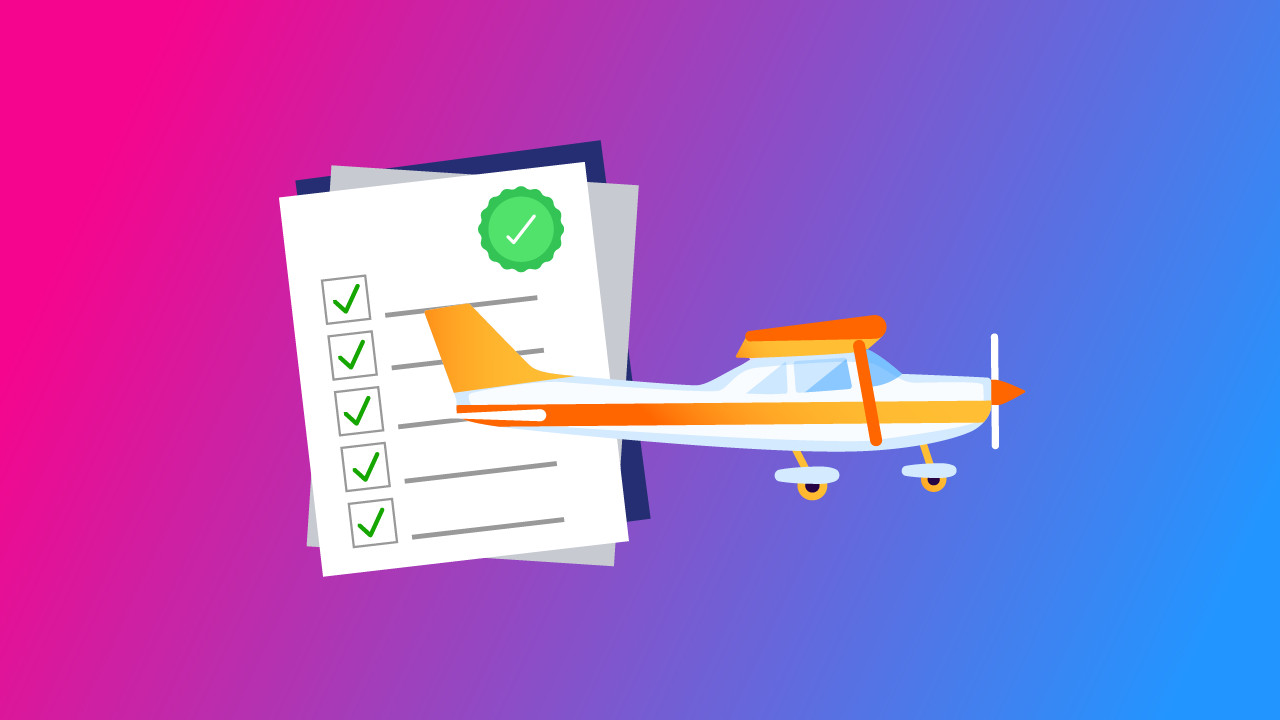
1. Know the Standards Before You Fly
These days, pilots aren’t just tested on their ability to do the maneuvers. What you know and how you manage risk matter too.
Before you take your checkride, you’ll want to be completely clear on what the standards behind the assessment really are.
ACS vs. Legacy PTS
You might be aware of the old system called the Practical Test Standards (PTS). That was the standard in place for many years. But starting in June 2016, the Airman Certification Standards (ACS) took over for the private pilot-airplane certificate and the instrument-airplane rating.
The ACS adds two more layers: aeronautical knowledge and risk management. Now, each Task under ACS lists the following elements:
- Knowledge – what you know. Your understanding of key aeronautical concepts. You need to master everything that goes on in your flight, from airspace rules to aircraft systems.
- Risk Management – what you need to consider: This will gauge your ability to assess situations, identify risks, and make safe decisions.
- Flight Skills – what you need to do: This is all up to your execution of maneuvers, including takeoffs, landings, stalls, steep turns, and emergency procedures, all performed to FAA standards.
When did the switch happen? The private pilot-airplane certificate and instrument-airplane rating ACS became effective in June 2017, along with the first version of the commercial pilot-airplane ACS.
How Examiners Use the ACS
The examiner uses the Airman Certification Standards (ACS) as the roadmap for both the oral and flight portions of the test.
The process typically begins with oral questions on topics like aircraft performance and decision-making. From there, you move into the flight portion, where that same knowledge and risk-management threads get woven into actual flying tasks.
A scenario might start on the ground, continue with in-flight maneuvers and emergency planning, and wrap up at landing, so your responses and actions follow a logical flow.
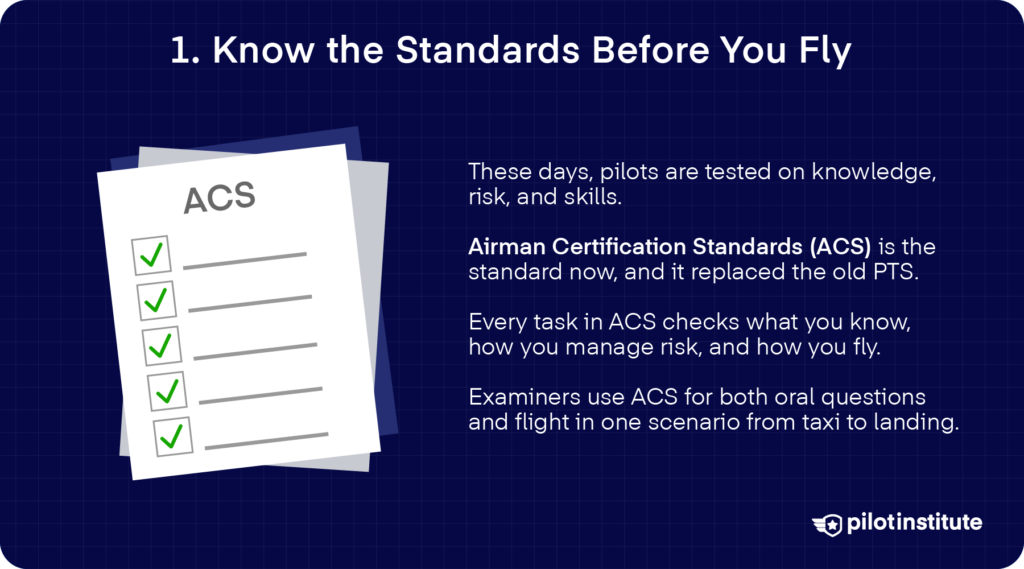
2. Building Your Master Maneuvers Checklist
Paper or EFB?
You have plenty of options when you’re choosing how you carry your checklist. If you’re a traditional sort, you might prefer keeping your checklists printed or written down on paper.
Paper never gets old. It never runs out of battery power, and it only gets easier to read the brighter it is outside. Plus, that tactile feel of flipping through sheets of paper can make browsing feel more intuitive, if that’s how your mind works.
An electronic flight bag (EFB) takes you to the 2020s. It gives you that (almost) same paper feel, but all the procedures and charts you need are conveniently mounted on your lap. And with a couple of taps on the screen, you’ll have easily located the checklist you need.
Four-Part Flow for Every Maneuver
Do you get overwhelmed easily in high-stakes or testing scenarios? If so, then you’ll find it helpful to break each maneuver down into four clear parts.
This structure keeps you focused and consistent on your checkride. Let’s break it down:
- Setup: This is where you prepare the aircraft and yourself for the maneuver. You clear the area, set altitude, power, configuration, and pick your entry point.
- Entry & Call-outs: You configure the aircraft to enter the maneuver. At the same time, you’re announcing key changes or actions and establishing initial references.
- Primary References & Tolerances: During the maneuver, you monitor specific parameters (airspeed, altitude, bank, heading) and ensure they stay within acceptable limits.
- Recovery & Cleanup: Roll out to the entry heading or desired heading, reduce the bank smoothly, return to cruise configuration and power, and verify stability.
How will that look in the checkride? Here’s an example: let’s say the DPE asked you to make a steep turn.
First, start with the setup. You begin straight and level at, say, 3,500 ft (±100 ft).
Configure your airspeed to stay at 95 knots indicated. Trim set, power and mixture appropriately adjusted, traffic cleared, and the heading bug set to mark the entry and roll-out heading.
You’ve set yourself up for success. Now, you announce your intention. You can say something like, “Clearing turn complete, initiating 45° bank left.”
As you begin the roll, you maintain coordination. Increase back-pressure appropriately, and raise power if required.
Inside the turn, you reference the horizon outside. This is also the time to check the primary references and whether you’re within tolerances.
Look at the attitude indicator, altimeter, and airspeed indicator (±10 knots). Make sure the bank angle is approximately 45° (±5°), and you stay on altitude (±100 ft).
Check the heading indicator to know when to roll out on entry heading (±10°). With about half your bank angle remaining to the target heading, you begin to roll out.
Reduce power as needed and level the wings smoothly. Make sure you match the heading bug, but retract any unnecessary control inputs.
As your aircraft levels off, trim for straight and level flight and verify that your airspeed and altitude are stabilized.
3. Preflight & Ground Operations (ACS Areas I–II)
Engine Start, Taxi, Run-up
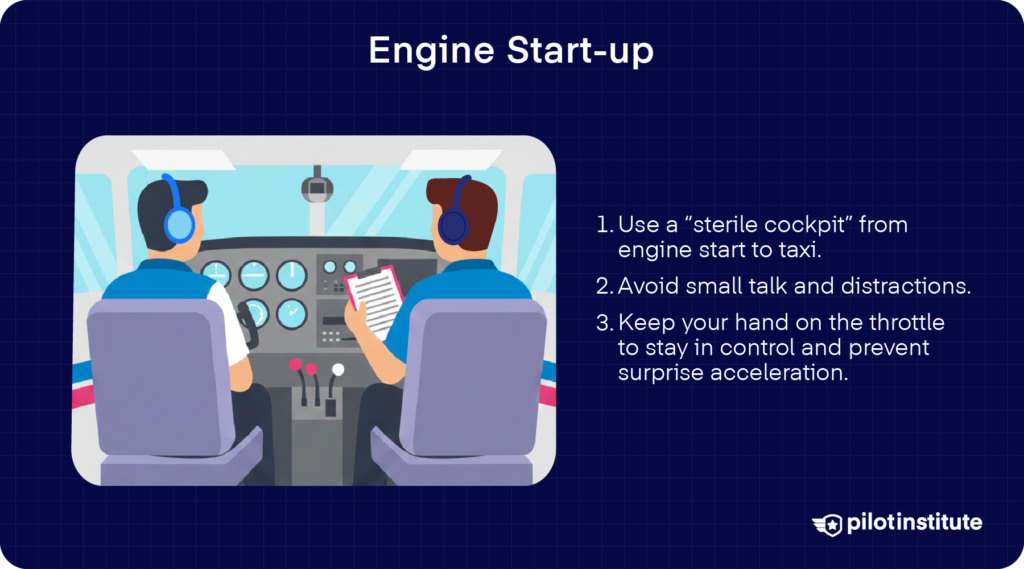
When you initiate engine start and begin taxiing, you should enter a “sterile cockpit” mindset. What does that mean? You should minimize non-essential conversation and distractions, so your full focus stays on the task at hand.
Keep your hand on the throttle (or power control) as the aircraft begins moving to stay in control. Plus, it helps prevent unintended acceleration and signals to yourself that you’re actively managing the taxi phase.
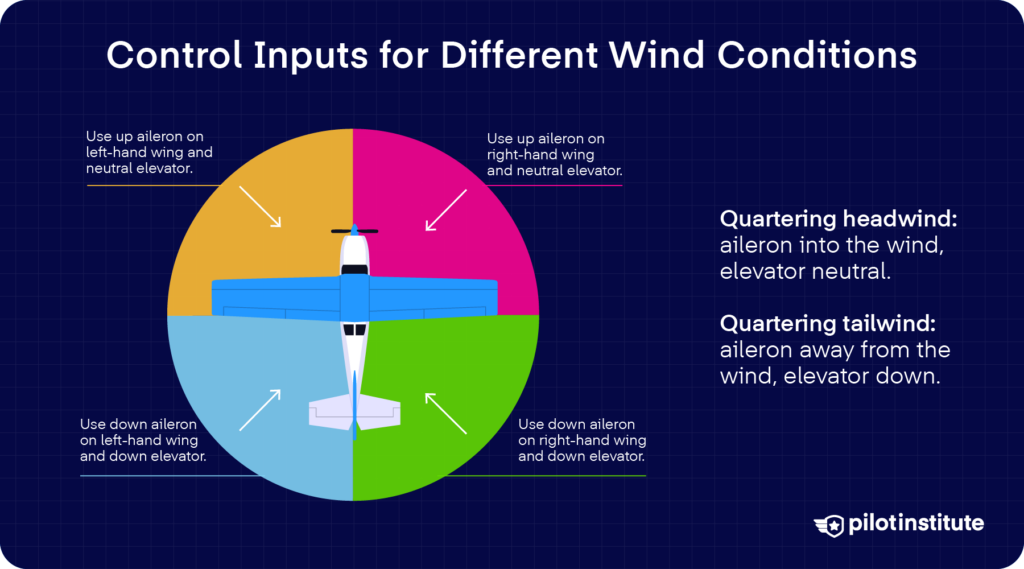
Taxiing with a quartering tailwind makes things a little different. With wind coming from behind and to one side, you should hold the upwind aileron down and the elevator down.
This helps maintain directional control. It prevents the tail from rising or the aircraft from shearing sideways as you move.
Normal & Crosswind Takeoff
Comply with ATC instructions and continue to taxi into the takeoff position. Then, align the aircraft on the runway centreline.
That would also be the best time to establish your sight picture. Look straight ahead down the runway centreline, and pick a point far enough out that you can keep the aircraft aligned.
What’s that sight picture for? It’ll help you gauge the proper landing attitude later on. That sight picture should be the exact same thing you see just before you touch down.
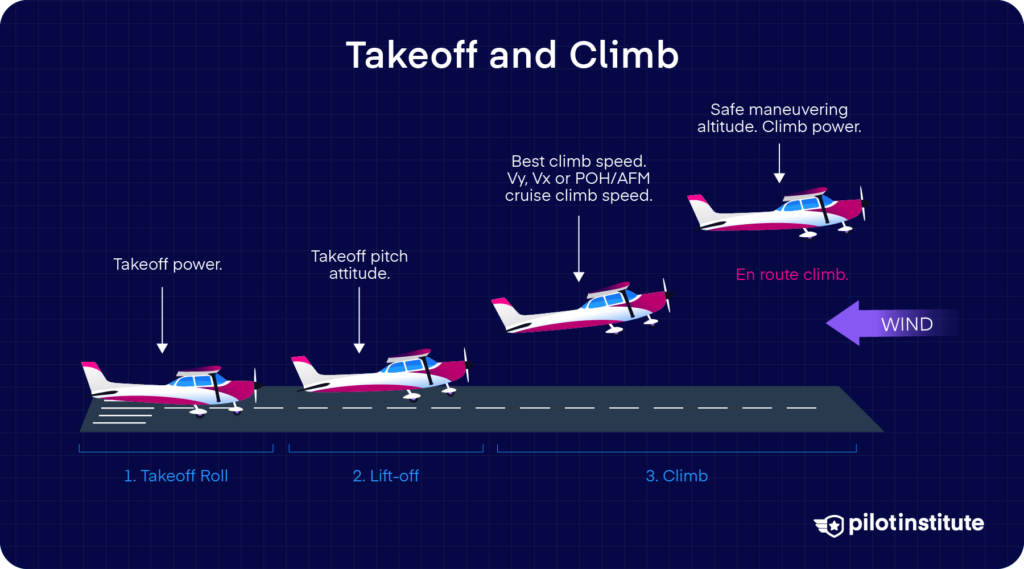
Once you’ve done the checklist, it’s time to initiate the roll. Call out your takeoff speeds, which could either be VX (best angle-of-climb speed) or VY (best rate-of-climb speed) as appropriate for your aircraft performance.
After rotation, you transition to the climb. Follow your POH for lift-off, then accelerate to VY (or the manufacturer’s recommended climb speed) and maintain it within +10/-5 knots.
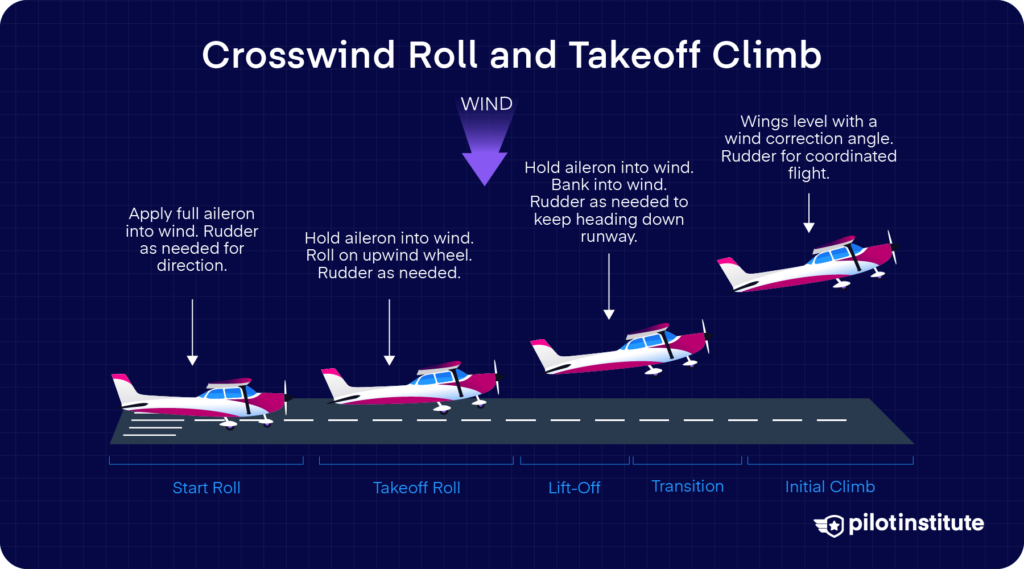
Taking off in a crosswind or quartering tailwind? You must maintain control of the aircraft’s lateral alignment. You apply aileron into the wind during the takeoff roll so the upwind wing stays down and the aircraft stays aligned with the runway centreline.
A common mistake during takeoff is forgetting to check the engine gauges in the first 500 feet after lift-off. You might be so focused on staying aligned and keeping your speed right that you miss the engine instruments.
Always check the engine instrument even before you release the brakes. Otherwise, it could come back to bite you later on.
4. Performance Takeoffs & Landings
Short-Field Takeoff
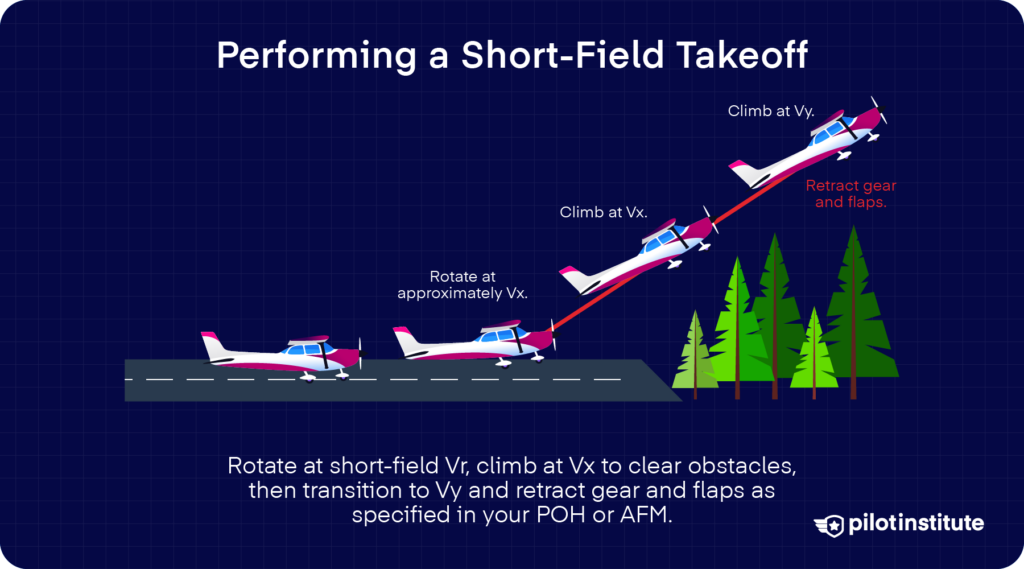
So, you’re asked to make a short-field takeoff. Of course, you begin by aligning the aircraft at the very start of the usable runway and clearing the area.
But unlike a normal takeoff, you hold the brakes (if available) before applying full power. Then, turn up the throttle smoothly and continuously.
Don’t forget to check the engine gauges for power, oil pressure, and temperature. Once everything’s confirmed on the green, release the brakes.
As you reach the recommended rotation speed, you gently pull the control to rotate and lift off at or near that speed.
Soft-Field Takeoff & Landing
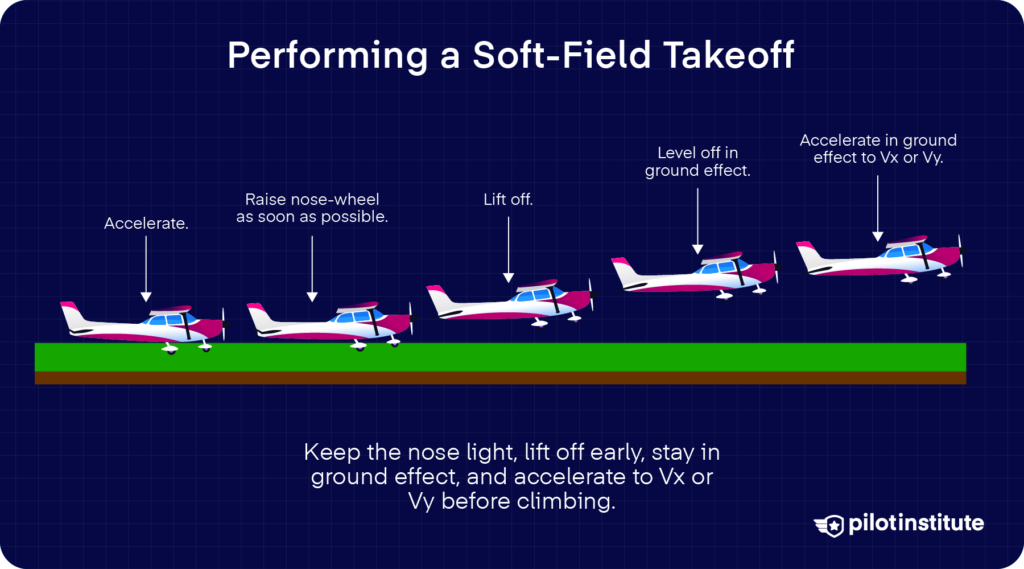
Now, imagine a grocery cart that’s been pushed over grass instead of a smooth supermarket floor. Obviously, the wheels can easily bog down in the grass if you’re not careful. The push is harder, and you instinctively lift the handle to ease the rolling.
The same principle applies more or less to soft-field takeoffs and landings. But not only is there the danger of bogging down, but tipping up onto the nose. So, how can you pull off the takeoff?
You begin on the surface without stopping (if you can). The goal is continuous motion, so you don’t sink into the ground. If the manufacturer recommends it, you can lower the wing flaps even before takeoff to add extra lift.
As you roll, apply full power smoothly and keep the nose-wheel lightly supported (back-pressure on the elevator). That will make the wings progressively relieve the wheels of more and more of the airplane’s weight.
Forward Slip to Landing

We use a forward slip to increase the rate of descent if you haven’t lost altitude fast enough on downwind. You could also be tasked to demonstrate a forward slip to landing. Do you remember how it’s done?
First, you reduce the power to idle. Then, make a coordinated turn to base. At this point, ongoing evaluation of height takes place. Still too high? Then keep slipping as needed.
As you turn toward final, you return to coordinated flight so you can line up with the runway. Once established on final, you should be at an altitude that lets you use a slip to shape a stable approach toward the aiming point.
And when the roundout begins, you remove the slip and transition smoothly into a normal landing.
Go-Around / Rejected Landing

When a landing is no longer safe, your ability to break it off and climb away smoothly makes all the difference.
The examiner wants to see that you notice the signs early. Anything that threatens safety should trigger a go-around.
Once you make that call, add takeoff power right away and pitch for the proper climb speed. Then, hold VX or VY as needed, keeping VY +10/-5 knots.
After you confirm a positive rate of climb, or as directed by your aircraft’s manual, you clean up the configuration. That means retracting the gear and adjusting the flaps as required.
If you have to angle away from the runway to avoid a conflict, you do so while maintaining full control. You also follow proper procedures to avoid runway incursions as you climb out.
5. Airwork: Mastering Core Maneuvers
Slow Flight
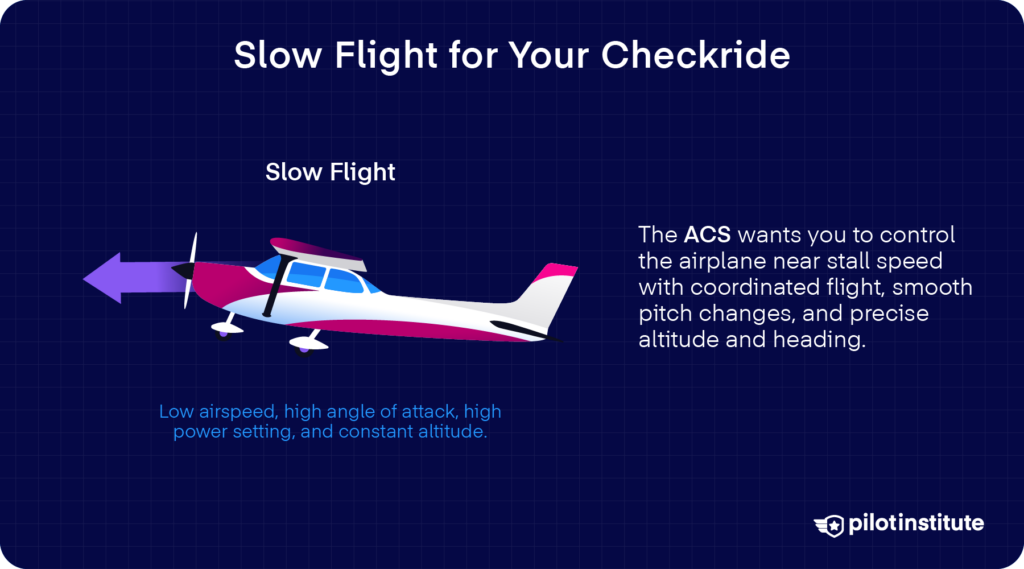
The main idea behind slow flight is your ability to demonstrate coordination and awareness of how the airplane behaves when flying at low speeds and with a high angle of attack.
How do you set it up? You start by selecting a safe altitude (often above 1,500 ft AGL for single-engine aircraft) and clearing the area.
Once you’re set up, you bring the airplane to an airspeed where any increase in angle of attack, added load factor, or reduction in power would trigger a stall warning signal.
You then fly straight and level, make gentle turns, and perform small climbs and descents. Everything should stay coordinated, and you hold the configuration that the evaluator specifies. You accomplish all of this without setting off a stall warning.
Stalls
Power-Off Stalls

To enter a straight-ahead power-off stall, you begin by putting the airplane in a landing setup if it has flaps or retractable gear. You extend the gear, add carb heat if needed, and smoothly reduce the throttle.
Hold altitude as the airspeed slows to your normal approach speed. Once there, pitch to a normal approach attitude and extend the flaps, adjusting the pitch to keep the airspeed steady. When the approach is stable, bring the power to idle.
Next, you raise the nose smoothly to an attitude that will produce a stall. Keep the wings level with coordinated aileron and rudder, and maintain directional control.
Once the nose is in a stall-inducing position, hold that pitch with the elevator until the stall actually occurs. You’ll recognize it by the usual full-stall cues.
To recover, you lower the angle of attack by pushing forward just enough to remove the stall warning. Level the wings, stay coordinated, and add power as needed.
As the power comes in and the nose drops, you may need to add right rudder to counter torque before returning to a normal climb attitude.
Power-On Stall
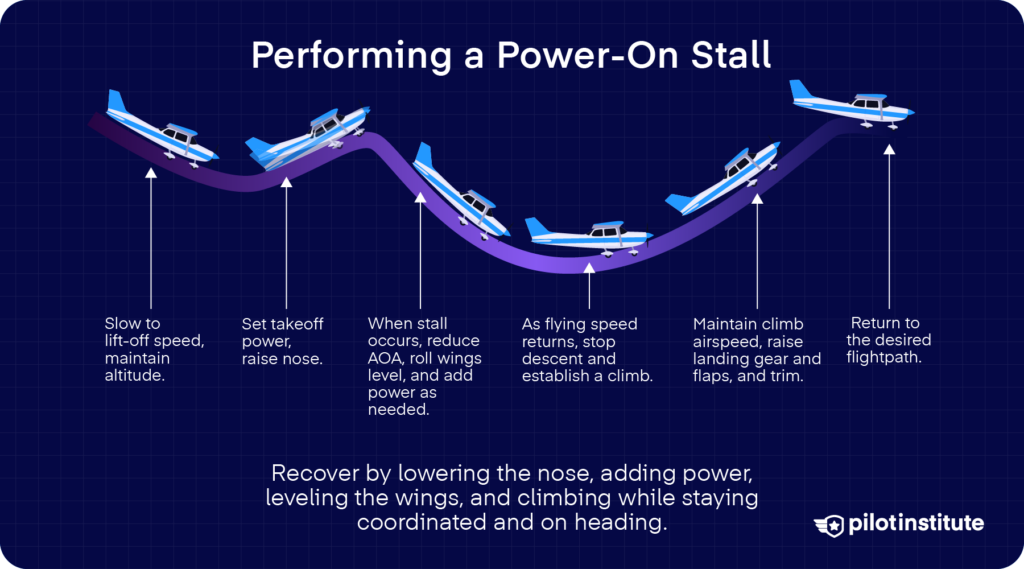
You could also be asked to perform a power-on stall. Start by putting the airplane in takeoff or climb configuration and slow to normal lift-off speed while keeping the area clear of other traffic.
Once at the desired speed, apply takeoff or recommended climb power and establish a climb attitude. What’s the point of slowing down first? It helps prevent the nose from pitching up too steeply for too long before the stall occurs.
After setting the climb attitude, smoothly raise the nose to increase the angle of attack and hold it until the stall happens. Adjust aileron, elevator, and rudder as needed to keep the airplane coordinated.
In most airplanes, you’ll need to pull the elevator back progressively as airspeed drops, and add right rudder to keep the turn coordinator centered until the full stall is reached.
Then comes the stall. You need to act promptly to avoid a prolonged stall.
Reduce the angle of attack, apply enough forward elevator input to stop the stall warning, level the wings with ailerons, coordinate with rudder, and smoothly confirm or adjust power as needed.
Since the throttle is already set to climb power, you just have to make sure the setting is correct before returning to normal flight.
Ground Reference Maneuvers
The goal in ground reference maneuvers is to use visual points on the ground to sharpen your control. This is also a test of wind‑drift awareness and situational scanning.
These are flown low, so you really get a feel for how wind affects your ground track. Here’s a quick rundown of the three types for your checkride:
Rectangular Course

You enter at a 45° angle to the downwind leg, at 600-1,000 feet AGL, flying around a reference area in a “box” pattern. You apply wind‑drift corrections on the straight and turning legs so your ground track stays constant.
S‑Turns
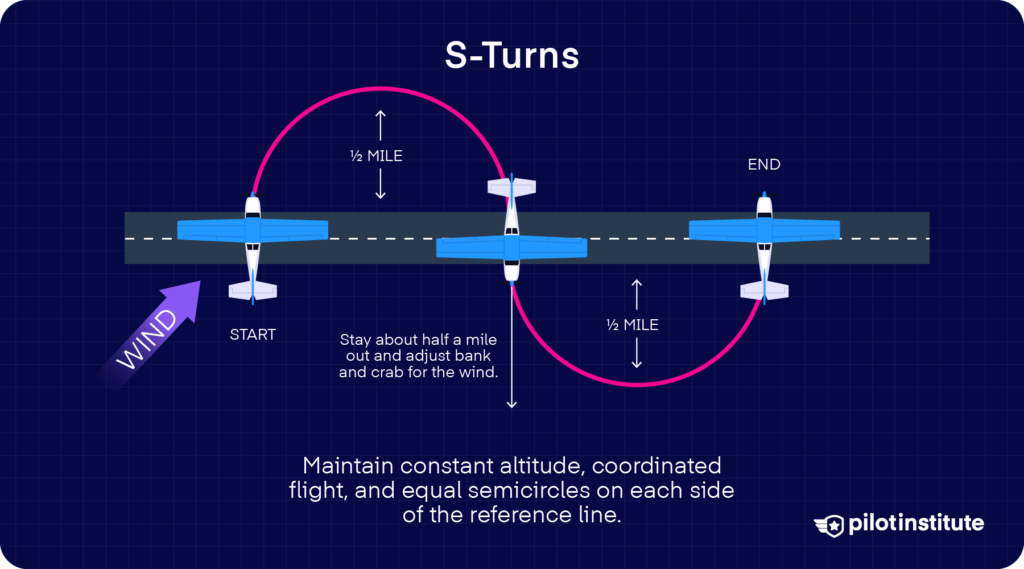
For S-turns, you cross a straight reference line (like a road). Then, perform semicircles first to one side, then the other. The banks change to keep a constant radius relative to the line as your groundspeed changes.
Turns Around a Point
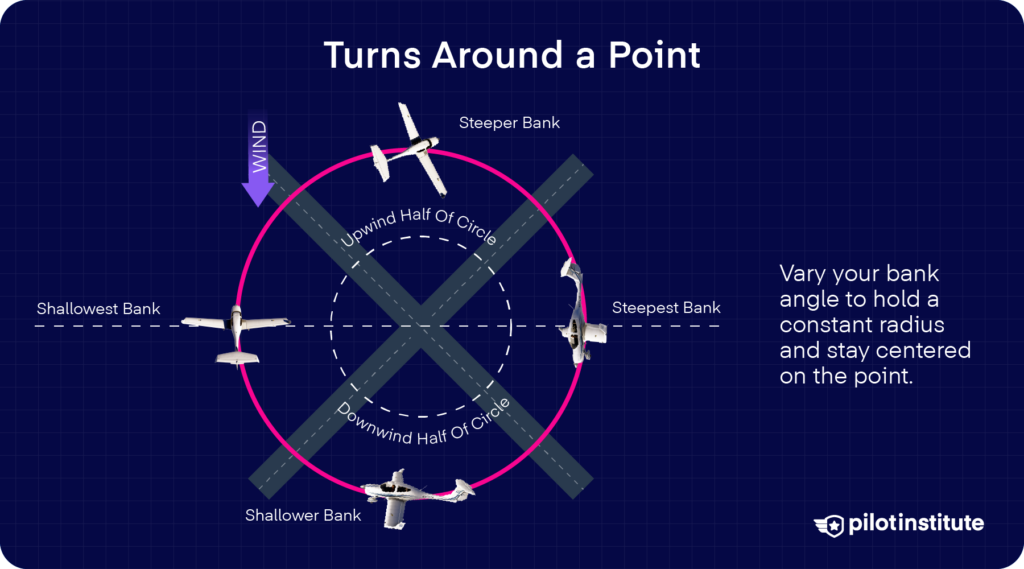
You pick a distinct point on the ground and fly full 360° turns around it. As the wind pushes you, adjust bank to keep the turn radius constant while maintaining coordinated flight.
To pull off this maneuver, your eyes, hands, and mind all have to work together constantly. You correct for wind, watch for traffic, manage the attitude, and keep your eyes on both your instruments and the ground.
6. Emergencies & Abnormals
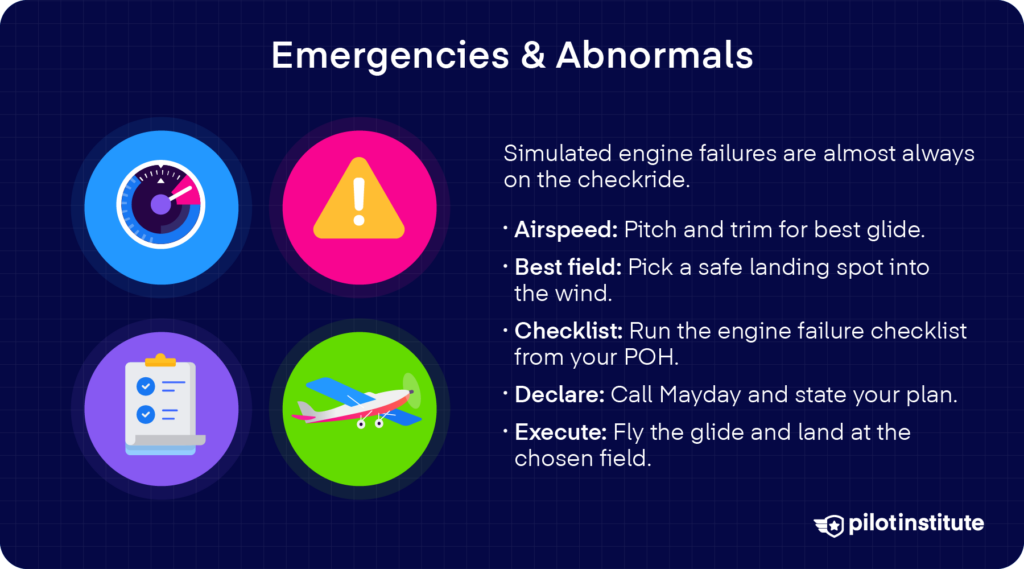
A simulated emergency is not something that examiners usually skip on the checkride. When you practice a simulated engine failure, your examiner will be watching your composure and how well you follow a disciplined flow under pressure.
Engine Failure (Simulated)
Do you remember the ABCDE method for engine-out emergencies? It’s common practice in training for a reason. Let’s refresh your memory, in the context of a single-engine aircraft like a Cessna 172:
- Airspeed: As soon as you determine that your engine has quit, pitch and trim for your best-glide speed. You can find this in your aircraft’s POH/AFM. In a Cessna 172, you should pitch for 65 KIAS with a clean configuration. That should give you a steady glide of 1.5 nautical miles per 1,000 feet that you descend.
- Best Field/Best Landing Site: Thoroughly scan the area and terrain below and select a suitable forced-landing site. This part can go smoothly if you’ve been making clearing turns. What factors should you consider? Be aware of obstacles, wind, and terrain.
- Checklist: Go through your emergency checklist as described in the POH/AFM or your school’s procedures. Generally, the goal is to restart the engine. This could include the fuel selector, mixture control, carburetor heat, ignition switch, master switch, and other related components.
- Declare/Declare Mayday: Communicate with ATC or UNICOM to advise you’re in an engine-out situation. Declare your intentions clearly, so the tower (or other traffic) knows you’re not just gliding through. It’s best to already have a template in mind so you’re just filling in the blanks. You’ll avoid forgetting important details, too.
- Execute: Carry out the forced-landing plan, whether it’s with power or deadstick. Configure aircraft per your POH and fly toward your chosen field. Make sure you’re still maintaining the best glide and alignment throughout.
The Checkride Flight Profile
When you walk into your checkride, it helps to have a mental map of what the flight is likely going to look like: the takeoff, climb, maneuver blocks, an emergency, then your return and landings.
That said, every examiner is different. They might switch the order of things, or ask for the emergency scenario earlier or later.
Workload Management Tips
How can you stay organized during your checkride? One smart way is to use color tabs for your maneuver checklist. Assign a different color for each ACS Area.
For example, green can be used for takeoffs and climbs, yellow for maneuver blocks, and red for emergencies. You can flip to the right section as soon as the time is right.
You can also tape a strip listing tolerances (airspeed, bank, altitude) to your yoke, where you can glance down quickly mid-maneuver without fumbling around.
But perhaps one of the best strategies is “chair-flying” the full checkride profile ahead of time. You could use a poster of your panel or a printout to set up a mock cockpit. Then, sit in a chair while going through your entire sequence, from departure through emergency and return.
Chair flying is a powerful technique to strengthen your memory and spot any weak areas. After consistent practice, the call-outs and procedures will come to you like second nature.
Private Pilot
Study Sheet

Grab a printable PDF that highlights must-know PPL topics for the written test and checkride.
- Airspace at-a-glance.
- Key regs & V-speeds.
- Weather quick cues.
- Pattern and radio calls.
Day-of-Checkride Checklist
Plan to arrive 60 minutes early on the day of your checkride. That gives you space to settle and mentally prepare.
One thing you must never forget: recalculate your weight & balance on the actual airplane with the DPE. Use their scale (if available) or verify your numbers against a certified scale, then walk through your W&B sheet together so there are no surprises.
Also, don’t forget to sync your EFB’s NOTAM cache before engine start. That’ll make sure you won’t miss critical airport or airspace information during your ride.
Drink about 16 oz of water when you arrive, but stop drinking about 45 minutes before engine start. That way, you stay well-hydrated for your flight without risking a full bladder once you’re strapped in.
Conclusion
When you put all these pieces together, you end up with a checkride workflow that feels organized and manageable. Every maneuver becomes easier when you’ve already practiced the flow and understand what your examiner expects.
You’ve already done the hard work, and this flight is simply your chance to show it.
Trust your training and treat each task as one more step toward that certificate. If you keep rehearsing your profile, you’ll walk into your checkride confident and ready.
Now, go fly your best and earn the license you’ve been working for!