-
Key Takeaways
-
What Is Slow Flight?
-
Why Do We Practice Slow Flight?
-
The Aerodynamics of Slow Flight
- The Power Curve
-
Preparing for Slow Flight
- Target Altitude
- Target Airspeed
- Aircraft Configuration
- Situational Awareness
- Maneuver Tolerances
-
Slow Flight Procedures (Step-By-Step)
- Pre-Maneuver Check
- Clearing Turns
- Entry
- Straight-and-Level Slow Flight
- Turns During Slow Flight
- Climbs and Descents During Slow Flight
- Recovery from Slow Flight
-
Common Slow Flight Mistakes
- Not Clearing the Area
- Not Maintaining Altitude
- Not Maintaining Heading
- Fixating on Instruments
- Flying Too Fast
- Flying Too Slow
- Not Recovering at the First Sign of Stall
-
Applying Slow Flight Techniques
- Short Field Takeoffs and Landings
- Soft Field Takeoffs and Landings
- Emergencies
- Performance Maneuvers
-
Conclusion
Slow flight is one of those maneuvers that sounds easy enough. Until you try it.
If slow flight makes you feel like you’re always one step behind the aircraft, we get it. There is a lot going on during this aeronautical balancing act.
If your slow flight isn’t as smooth and stable as it needs to be, we can help.
With this step-by-step guide, you’ll ace slow flight with accuracy and ease.
Key Takeaways
- Slow flight trains pilots to handle the aircraft at speeds just above stalling.
- Common mistakes include neglecting clearing turns, delaying stall recovery, and misusing the rudder.
- Practicing slow flight improves proficiency in short-field operations and emergency situations.
What Is Slow Flight?
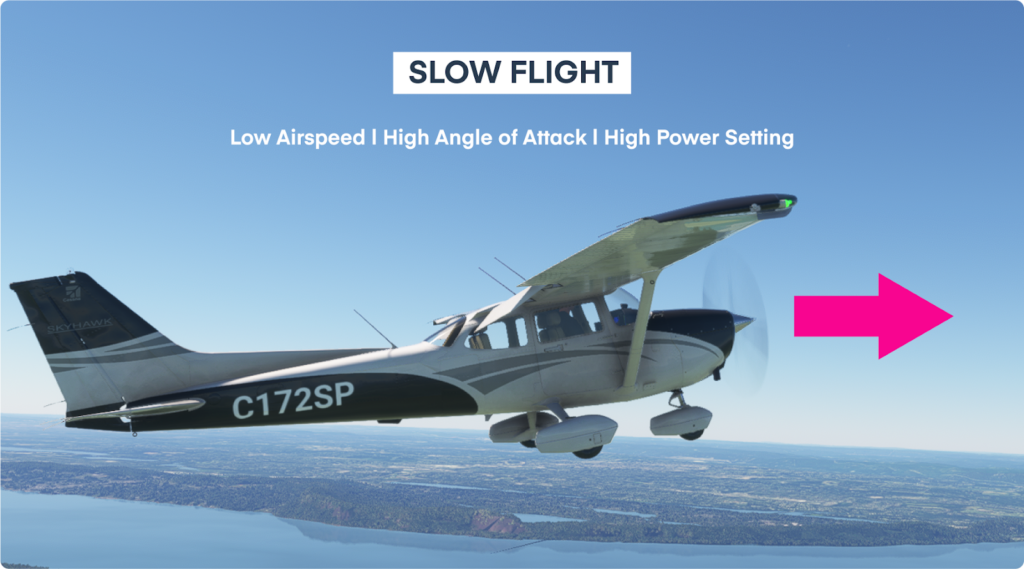
Slow flight refers to controlled flight just above stall speed.
Aircraft are easiest to fly at cruise speed. They are stable, and the controls are very effective. The aircraft responds to control inputs in ways we expect.
All this changes in slow flight. The flight controls operate unintuitively. Stall conditions loom nearby.
Why Do We Practice Slow Flight?
We use elements of the slow flight technique during takeoff and landing.
During these phases, you operate at low airspeeds with a high Angle of Attack (AOA). This combination leaves the aircraft vulnerable to a stall.
The aircraft’s proximity to the ground leaves you with little to no room to recover from a loss of control.
That’s why it’s crucial for pilots to learn aircraft control at low speeds. Additionally, both private and commercial pilot checkrides require the demonstration of slow flight.
The Aerodynamics of Slow Flight
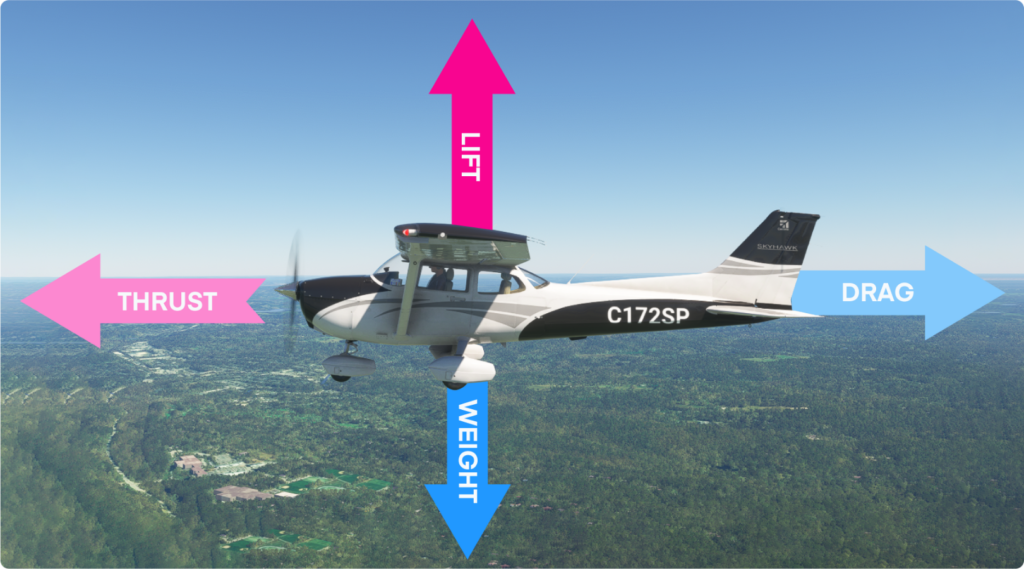
Every pilot knows the four basic forces an aircraft experiences in flight.
- Lift: The aerodynamic force generated due to airflow over the wings.
- Weight: The force gravity exerts on the aircraft.
- Thrust: The force generated by the engine that propels the aircraft forward.
- Drag: The aerodynamic force opposing the aircraft’s forward motion.
Let’s see what happens when the aircraft slows down in the clean configuration.
The aircraft’s deceleration reduces the airflow over the wings, which reduces lift. When the lift force is less than the force of gravity, the aircraft descends.
So, how do we increase lift to maintain altitude?
Let’s look at the lift equation:
Lift = ½ x (Coefficient of Lift) x (Air Density) x (Wing Area) x (Velocity2)
We can’t change air density. We won’t change the aircraft configuration, so the wing area will remain constant. That leaves us with increasing the coefficient of lift (CL).
CL represents the wing’s ability to create lift and varies with the AOA.
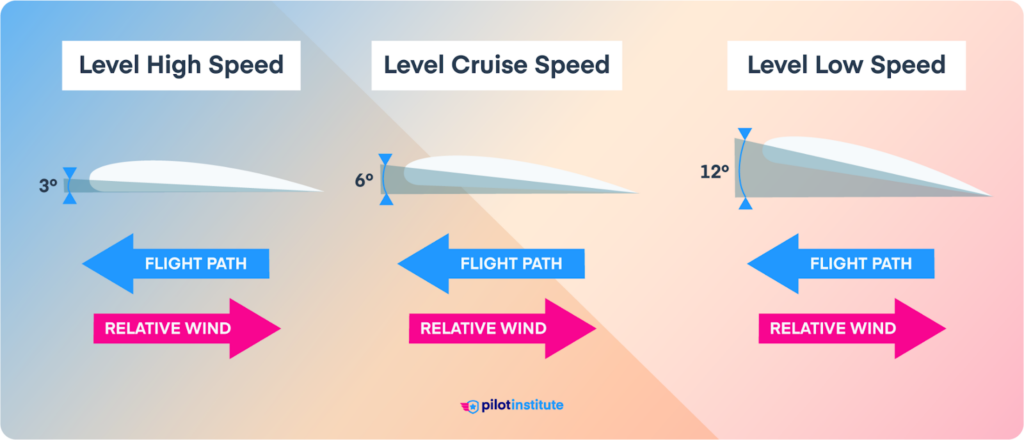
The AOA is the angle at which the wing chord meets the relative airflow. Raising the aircraft’s nose increases the AOA, generating additional lift.
We can only increase the AOA to a certain limit before the airflow detaches from the wing. This condition is called a stall. The corresponding AOA is called the critical AOA.
Always keep in mind that exceeding the critical AOA is what causes a stall. The airspeed has no direct relation to a stall. In fact, you can stall at any airspeed.
The Power Curve
At low airspeeds, the aircraft operates within the region of reversed command. This is also called the backside of the power curve. The aircraft requires more power to maintain level flight at these speeds.
Why does this happen?
The wings are less efficient at generating lift at slower speeds. To compensate, pilots raise the wing’s AOA by increasing pitch. This increases lift but comes at the cost of increased induced drag. Pilots must counteract the additional drag with more thrust to maintain altitude.

The slower the aircraft gets below the minimum power airspeed, the more power we need to add.
Preparing for Slow Flight
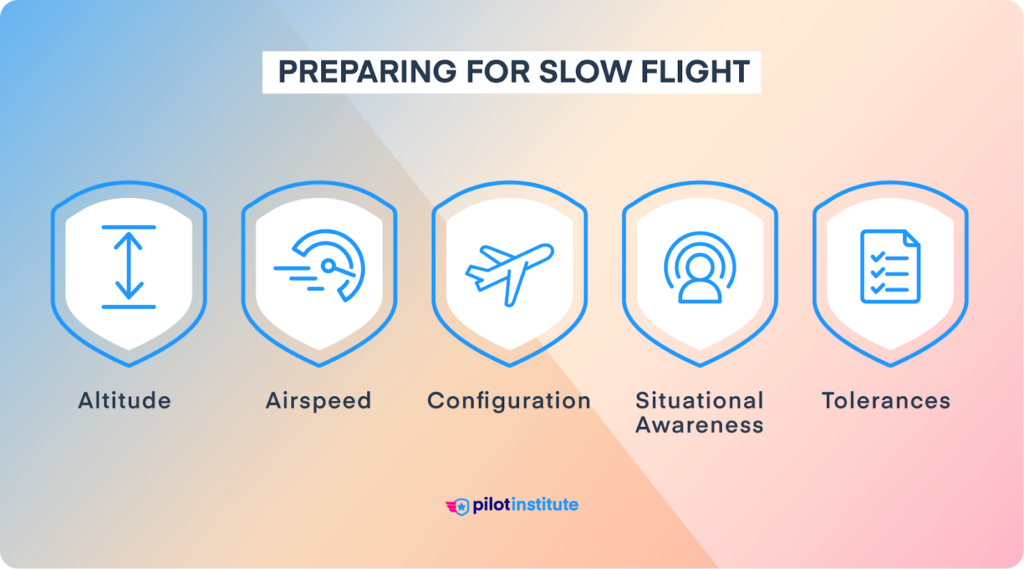
The best way to become proficient at slow flight is to start each attempt consistently. This reduces variables and helps you pinpoint where you make your mistakes.
Before you begin the maneuver, select your entry altitude, airspeed, and aircraft configuration.
Target Altitude
Pick a safe altitude. Fly at least 1,500 feet above ground level (AGL) to allow room for recovery in case you stall the aircraft. For a greater margin of safety, select an altitude that leaves you 1,500 feet AGL after recovery from a stall.
Inexperienced pilots may drop up to 200 feet in a single stall. Plus, botched stall recoveries can put you into a secondary stall.
Higher altitudes are also less prone to turbulence and have fewer birds. Your limited control authority at slow speeds makes you extra vulnerable to both.
So, if you’re inexperienced or out of practice, consider starting at 3,000 feet AGL. Work your way down as you increase proficiency.
The legal minimum altitude increases to 3,000 feet AGL for multi-engine aircraft.
Target Airspeed
AOA is not easy to measure without using specialized instruments. Pilots use reference stalling speeds instead.
VS0 is the stall speed in the landing configuration.
VS1 is the stall speed in a specific configuration. This is often the clean configuration at max gross weight. Check your POH for specifics.
Slow flight is sustained controlled flight, so we add a margin to the stall speed to get our target airspeed.
The stall warning horn sounds at least 5 knots above the actual stall speed. Since you need to fly without triggering the warning, select a target airspeed of about 2 to 5 knots more. Turbulent air will require a larger airspeed margin.
Aircraft Configuration
Your instructor may ask you to perform slow flight in different simulated situations. Takeoffs, landings, and go-arounds are common scenarios.
Clean configuration means flying with the flaps retracted. If the aircraft has retractable landing gear, the gear will be up.
“Dirty” configuration involves using full or landing flaps with the landing gear down (often referred to as the “landing” condition). This simulates go-arounds and landings.
Remember, your aircraft’s stall speed is different for each configuration. Ensure you’re using the correct reference speed.
Situational Awareness
Slow flight is a visual maneuver. You need to be fully aware of your surroundings.
Stay away from highly populated areas. Look out for high obstructions like radio towers or wires. Orient yourself with ground references, such as landmarks, rivers, or distinctive roads. Select an emergency landing spot nearby and mentally track it as you maneuver.
Align the aircraft with a cardinal direction or note your heading before you start. Pick a reference ground feature that aligns with your starting heading.
Monitor CTAF or practice area frequencies to get a good picture of traffic near you. If you’re in controlled airspace, advise ATC before starting performance maneuvers.
Maneuver Tolerances
Set a high bar for your flying. Aim to meet or exceed practical test standards every time you practice slow flight.

Slow Flight Procedures (Step-By-Step)
Pre-Maneuver Check
Ensure your aircraft is ready for the maneuver.
Give the panel a quick scan and perform the pre-maneuver checklist. Check the oil pressure and temperature. Verify the Heading Indicator is aligned with the compass. Set the mixture to rich, and the carb heat off.
Secure loose objects in the cabin. You don’t want to get conked in the head with an iPad if a wing drops.
Clearing Turns
This is a visual maneuver, so traffic avoidance is your responsibility. Check for traffic by performing two consecutive clearing turns.
- Fly the first 90 degrees to the left to scan the area behind you.
- Then, turn right 90 degrees to your original heading.
Don’t forget to scan above and below your level while turning.
Entry
Establish the aircraft on your entry heading.
Gradually reduce thrust from cruise power. Don’t go all the way back to idle. We want this to be a slow and controlled deceleration.
Keep adding back pressure to maintain altitude as the nose tries to drop. Note the sound of the wind changing and the controls going mushy. Trim the aircraft to relieve control pressure.
As the aircraft approaches the target airspeed, add power to ensure you don’t slow down past it. Remember that P-factor is greatest at high power settings and high AOA. As you increase the throttle, anticipate the need to add more right rudder.
Trim for level flight once you’re stabilized at your target speed.
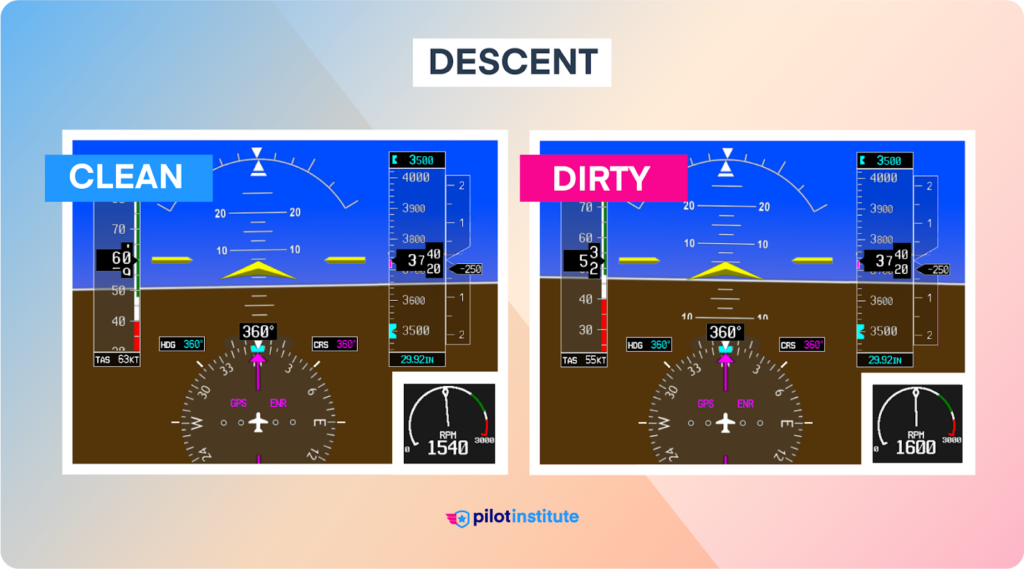
Straight-and-Level Slow Flight
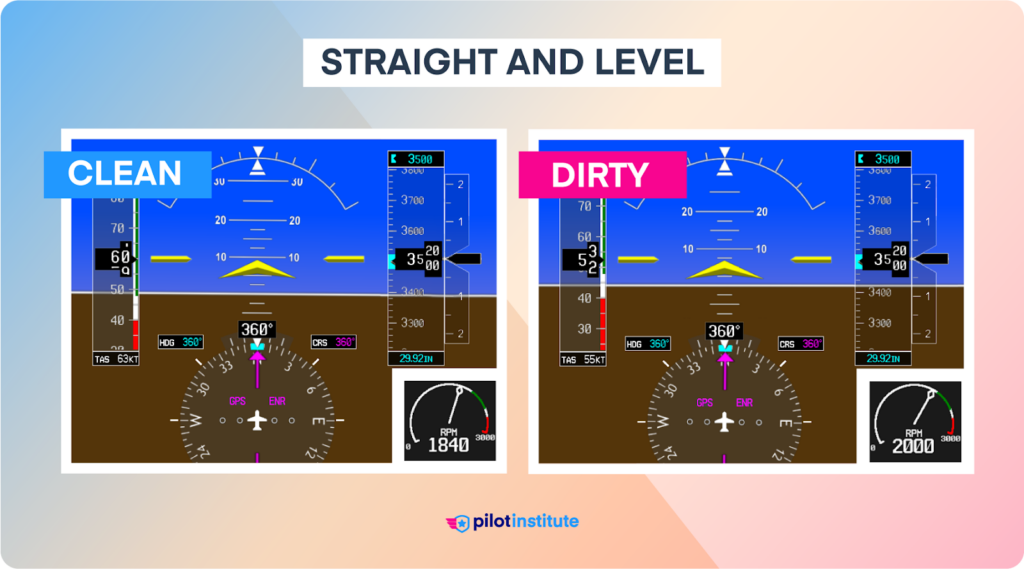
In the clean configuration, the aircraft settles into a nose-high position to maintain altitude. Your target airspeed should be 5 knots above the speed that triggers the stall warning horn.
The aircraft is within the backside of the power curve at this airspeed. Your pitch attitude controls airspeed; power controls altitude.
You can transition to a dirty configuration to practice simulated landings and go-arounds. Start by adding flaps, one notch at a time. Take your time while adding flaps. The goal is to avoid abrupt control adjustments that can upset the aircraft.
The first few notches primarily add lift, generally raising the nose due to the increase in AoA. Later flap stages add mostly drag. You’ll fly slower with the nose lower than in the clean configuration.
If you’re equipped with retractable landing gear, only lower it after you’ve added a few notches of flaps. The gear adds lots of drag but zero lift.
The increased drag will require more power to maintain altitude. Readjust trim to reduce pressure on the controls.
Turns During Slow Flight
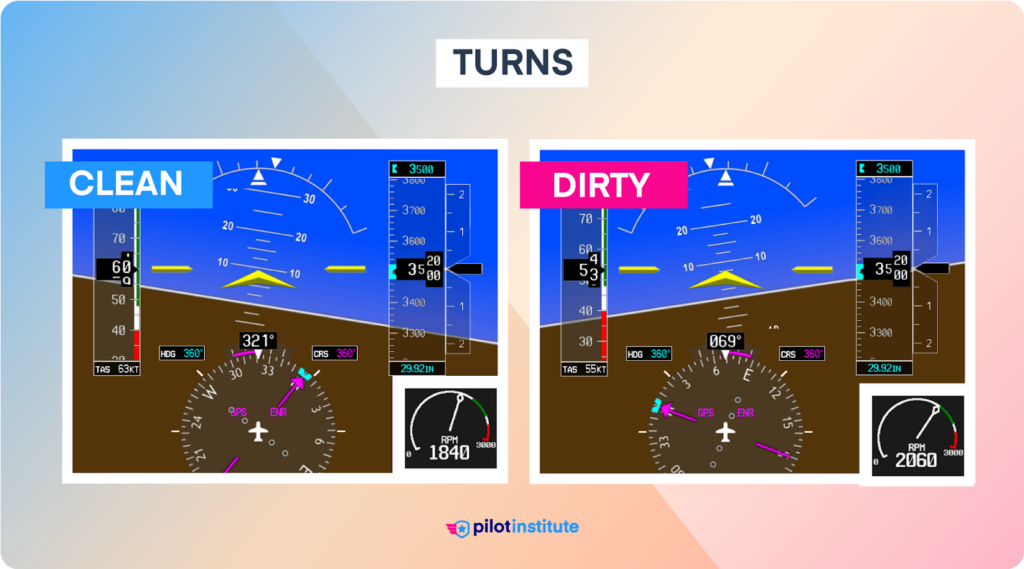
You may have to raise power slightly to maintain altitude while turning, particularly in the dirty configuration.
Because the aircraft is so slow, even shallow banks cause a high turn rate. A bank angle of 5 to 10 degrees is more than enough. A higher bank angle can make maneuvering difficult and increase the stall speed.
During the turn, the wing on the outside of the turn travels slightly faster than the inside wing. This causes the aircraft to increase the bank angle without control input. To fight this overbanking tendency, add light aileron pressure in the opposite direction.
Stay coordinated throughout the turn. Keep an eye on the turn coordinator and nudge the rudder in the direction it indicates. Slipping turns are not good, but skidding turns are even worse as they can induce a spin.
Take the increased turn rate into consideration as you roll out on your desired heading.
Climbs and Descents During Slow Flight
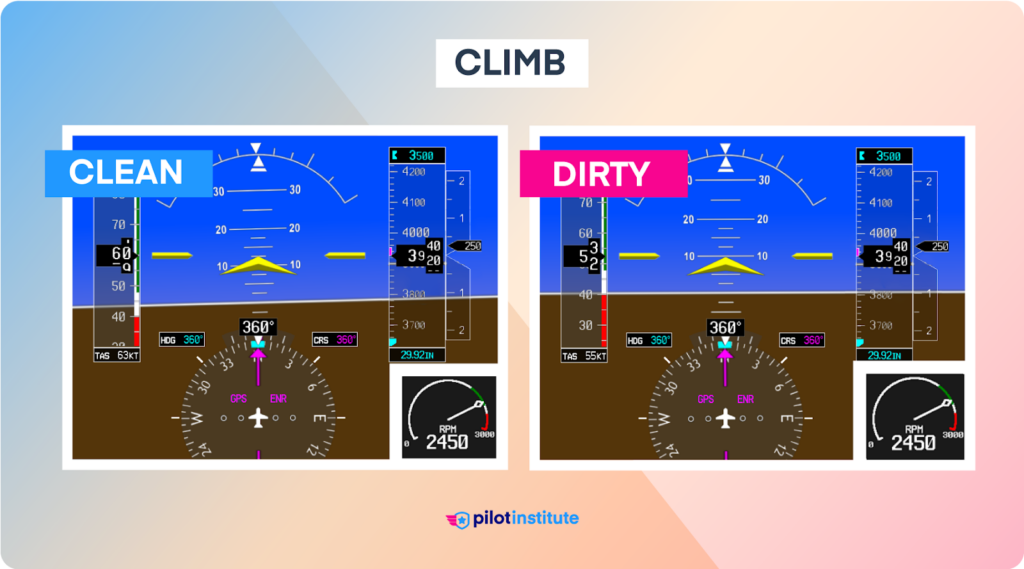
It’s counterintuitive, but pitching up will not result in a climb during slow flight.
Remember, you’re on the backside of the power curve. Pitch affects airspeed; power affects altitude. If you were to pitch up, the aircraft would slow down – reducing lift and subsequently descending.
To climb, maintain pitch, and add power. To descend, maintain pitch, and reduce power. Correct airspeed changes with small pitch corrections.
Practice manipulating the power and see how the aircraft responds. When you change power at slow speeds, you’ll notice increased yaw. Use the rudder to stay coordinated.
Recovery from Slow Flight
Exit slow flight by gradually increasing to full power. Stay sharp on the rudder as the high power tries to swing the aircraft to the left.
Retract flaps in stages – just like you extended them. Relax back pressure on the controls progressively as the aircraft accelerates.
Once you’re at cruise speed, set power and pitch for level flight. Readjust trim to remove control pressure.
Common Slow Flight Mistakes
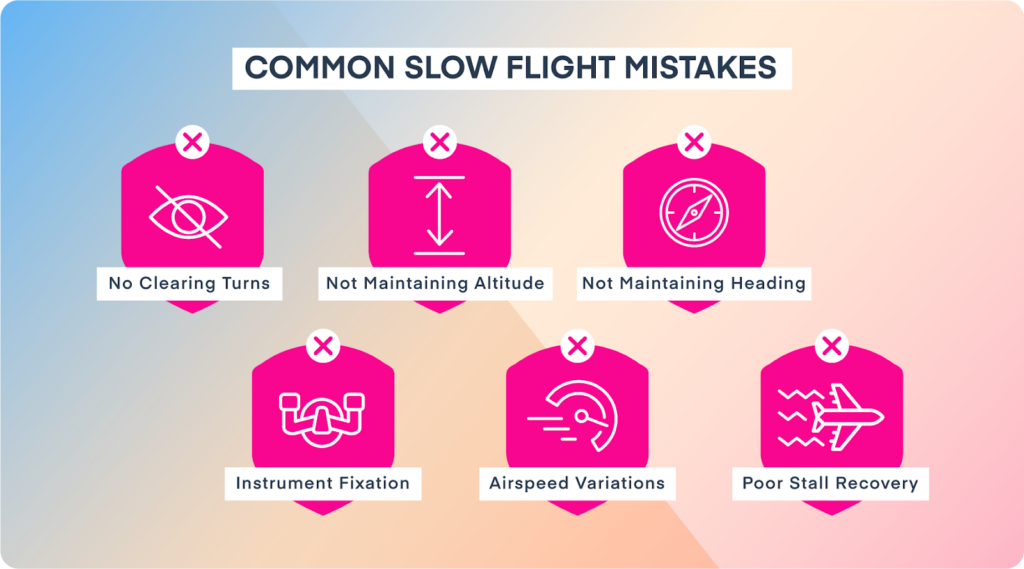
Slow flight demands significant concentration from the pilot. Here are common pitfalls to avoid.
Not Clearing the Area
You’ll fail a checkride before even starting your slow flight task if you forget to clear the area. Execute clearing turns and keep an eye out for traffic throughout the maneuver.
Not Maintaining Altitude
Altitude control is one of the parameters you’re tested on. You can lose altitude on the entry by not applying adequate back pressure as the aircraft slows down.
While in slow flight, stay sharp on the throttle to maintain altitude. At first, the amount of power you’ll need to add might surprise you.
Adjust the throttle friction nut so it doesn’t slip but is loose enough to move the controls. Keep one hand on the throttle throughout slow flight.
Not Maintaining Heading
Once you’ve practiced slow flight a few times, you’ll realize just how ineffective the ailerons are. Use shallow 5-degree banks when starting out. Your top priority is rudder control to stay coordinated.
You’ll have to manage adverse yaw due to the ailerons and left yawing from the high power setting. Wind gusts and turbulence can also throw you off your heading. Low speeds exacerbate all these factors.
Get comfortable using the rudder. It’s really the key to control in slow flight.
Fixating on Instruments
Slow flight practice is a visual maneuver!
Your gaze should generally remain outside the aircraft. Quick, orderly scans of the panel are all you need.
Instruments suffer from lag, so you’ll always be one step behind the aircraft if you follow them. Use the instruments for verification, but look outside most of the time.
The position of the aircraft’s nose and wingtips will give you your attitude information. Use a spot on the windshield or cowling as a horizon reference.
Flying Too Fast
Students are often wary of approaching the stall speed. But you can’t practice slow flight if the aircraft isn’t operating on the backside of the power curve.
Flying Too Slow
Remember, the objective of this maneuver is to fly slowly without stalling.
The checkride parameters offer a margin for flying a little fast but have zero tolerance for flying too slow.
Not Recovering at the First Sign of Stall
If you do end up close to the stall, don’t panic. Identify the upset and recover the aircraft. The checkride involves testing you on your recognition of potential stall conditions. That means taking corrective action if the stall warning sounds.
Applying Slow Flight Techniques
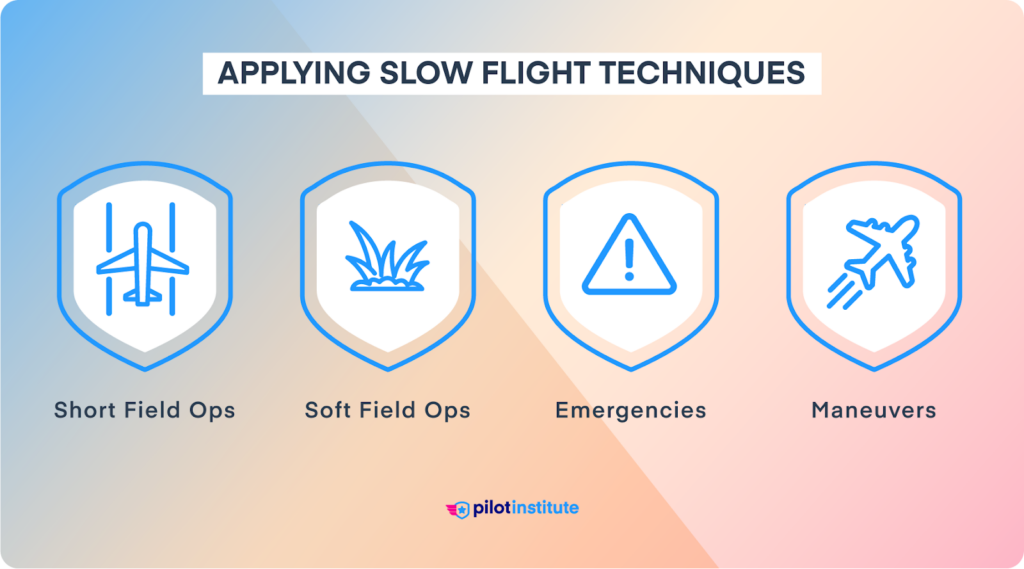
Mastering slow flight makes you a better pilot all around. Here’s how you can apply your newfound skills.
Short Field Takeoffs and Landings
Short field operations have slim margins of error. Pilots must maintain tight control over their airspeed on approach to avoid floating. Clearing obstacles on departure can require climbs at the best angle of climb airspeed (Vx). This is close to the target airspeed you use for slow-flight practice.
Soft Field Takeoffs and Landings
In soft field landings, the objective is to touch down gently to avoid sinking into the surface. Your improved judgment of airspeed and altitude will help you make a controlled approach.
When taking off, you’ll want to become airborne as soon as possible to avoid drag from the surface. You’ll have to accelerate to Vx while staying within ground effect. When you’re proficient, you’ll confidently maintain altitude a few feet off the ground while accelerating from slow flight.
Emergencies
Facing power loss or need to make a forced landing? Practicing slow flight gives you better energy management skills.
You’ll also be keenly aware of the signs of a stall. This helps you prevent an emergency from going from bad to worse.
Performance Maneuvers
You’ll be tested on advanced performance maneuvers if upgrading to a commercial license. These include chandelles and lazy eights.
Use your improved stick and rudder skills to ace this tricky part of the commercial checkride. You’ll encounter slow flight at the apex of a chandelle. Lazy eights require coordinated use of all three flight controls for smooth movements.
Conclusion
As a pilot, your primary responsibility is to fly the aircraft with control and precision. After mastering slow flight, you’ll have more confidence in your skills – even at the edge of a stall.
What should you do if you end up in a stall? To learn more, check out this article on stalls and stall recovery.