
-
Key Takeaways
-
What Is a Hold?
-
Why Do Airplanes Use Holding Procedures?
- 1. Traffic
- 2. Bad Weather
- 3. Runway Changes (or Closure)
- 4. Emergencies
- 5. Pilot Planning
-
What Types of Holding Patterns Are There?
- Arrival Patterns
- Missed Approach Holds
- Holding in Lieu of Procedure Turns
-
How Do You Do a Holding Pattern?
- How to Fly a Hold Procedure
-
Wind Corrections During Holding Procedures
- Headwind and Tailwind Corrections While Holding
- Crosswind Corrections While Holding
-
How Do You Enter a Holding Pattern? (The 3 FAA Recommendations)
- The Direct Hold Entry
- The Teardrop Hold Entry
- The Parallel Entry
- Hold Entry Procedures – 5 Great Tips
-
Holding Procedure Timing
-
Holding Procedures – FAQ
- What Are the Holding Speeds?
- Where Can I Find More Information About Holding Procedures?
-
Conclusion
Holding procedures often leave many prospective IFR pilots in a cold sweat. However, it doesn’t have to be this way. There are a few key techniques you can remember to make it really easy.
Today we will explain airplane holding patterns in detail, answer some common questions, and even teach you a few ‘hacks’ to make flying a hold a real breeze. Here’s what you need to know.
Key Takeaways
- A holding pattern keeps an aircraft in a controlled area using a racetrack-shaped course.
- Pilots use holds for traffic delays, weather, emergencies, planning, or runway changes.
- There are three standard entry types: direct, teardrop, and parallel.
- Wind correction is critical, especially crosswind drift on the outbound leg.
What Is a Hold?
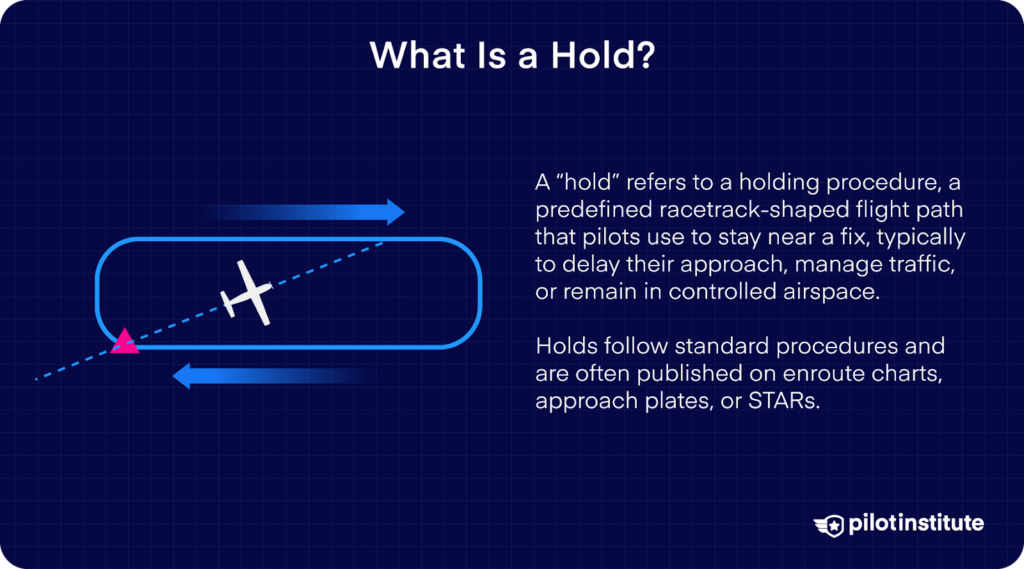
A holding procedure is when an airplane flies in a pattern to maintain its geographic location using its onboard navigational instruments. Normally, an oval-shaped ‘racetrack’ pattern, holds are often published on Standard Terminal Arrival (STAR) charts and are based on navigational fixes.
Are holding procedures complicated?
While they may at first appear somewhat daunting, you will use a set technique to fly them. Once you have the routine dialed in, they are actually really easy. In fact, holding procedures are designed to reduce workload and allow you to stay in one place with minimal effort.
Neat, right?
Here’s everything you need to know about holding procedures.
Why Do Airplanes Use Holding Procedures?
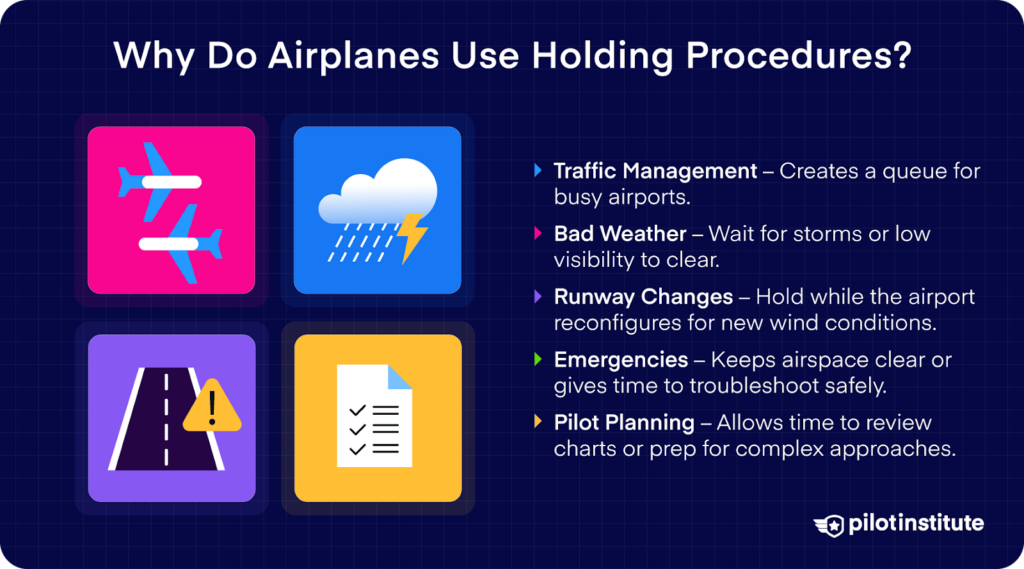
Airplanes are great at moving forward but not so good at staying in one place. Holding procedures allow an airplane to stay in a relatively small geographic position and behave predictably. Holding is vital for several reasons.
Here’s why airplanes take up the hold.
1. Traffic
Busy airports can only accommodate a certain number of airplanes safely at any one time. The ramp may be busy, or air traffic control may have reached its limit regarding how many airplanes they can safely monitor within their airspace.
By asking aircraft to take up a holding pattern, airport authorities can easily manage traffic flow predictably.
The simple version?
Holding creates a queuing system for traffic in busy airports.
2. Bad Weather
Sometimes the airport may not be busy, but conditions at the time aren’t suitable for an airplane to make a safe landing.
If it is obvious that the bad weather is transitory, air traffic control may ask approaching aircraft to take up a holding pattern while the weather subsides.
Want an example?
Cumulonimbus clouds. They are relatively localized and are a real nuisance if located directly over an airport.
3. Runway Changes (or Closure)
Where possible, airplanes normally like to land in the wind. If the wind changes significantly, the airport authority may decide to change the runway.
Yep, those runway numbers do mean something.
This can sometimes take a little time. To avoid airplanes constantly changing direction and approach procedures, ATC may ask them to take up the hold while the airport is reconfigured.
4. Emergencies
If an airplane is undergoing an emergency, it is a good idea to keep all other traffic safely out of the way.
Holding procedures are an easy way to achieve this.
By flying a hold, airplanes will be kept in a single place. They will behave predictably, allowing all involved in managing an emergency to focus on the task at hand.
But, there is more…
Sometimes, an airplane subject to an emergency will take up a hold.
Why?
There are several reasons for emergency holding procedures. These can include:
- Staying near a suitable airport.
- Burning excess fuel to avoid making an overweight landing.
- Avoiding overflying populated areas.
- Completing checklists and emergency drills.
- Preparing the cockpit and cabin.
5. Pilot Planning
Nobody likes being put under pressure.
Suppose an airport has a complex arrival, or the pilot has not planned sufficiently. In that case, they may need a little time to familiarize themselves with the approach’s important parts. Taking up the hold buys pilots time to plan.
With practice, flying a holding procedure will become second nature. By keeping the workload low in a holding pattern, pilots can use this time to think about the decisions they will make in the future.
What Types of Holding Patterns Are There?
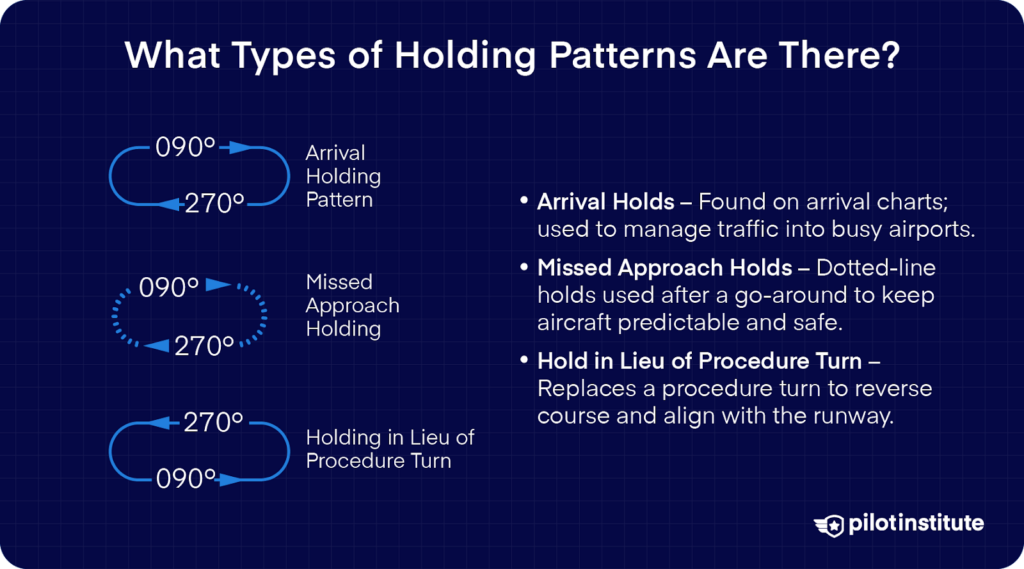
Generally, there are 3 types of holding procedures flown by airplanes.
Arrival Patterns
Arrival patterns are normally depicted on airport arrival charts.
They look a little like an oval ‘racetrack’ and are typically depicted using a thin black line.
These holds are used to manage traffic flow into an airport. Airplanes will be ‘stacked’ on top of each other as they arrive. And one at a time will shuffle down until it is their turn to commence the approach.
Missed Approach Holds
If an airplane has executed a missed approach or ‘go around,’ it makes sense that they fly toward a known and predictable reference point. That way, air traffic control can keep other traffic around the airport clear.
The missed approach looks very similar to arrival patterns. Still, there is a key difference in how they are denoted on charts.
You’ll find that missed approach holds are depicted with dotted lines.
Take a look at this chart. The hold over “Kingston” VOR? Yep, that’s a missed approach hold.
Holding in Lieu of Procedure Turns
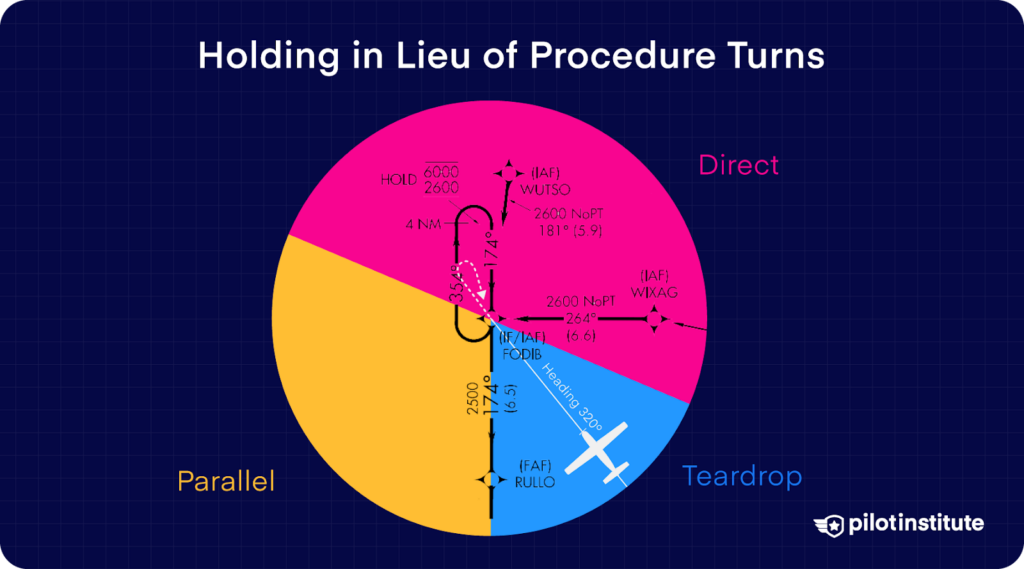
Flying a ‘holding pattern’ is a great way to reverse your course and leave yourself pointing towards the runway threshold.
For airports without a procedure turn, pilots can easily fly downwind and then turn inbound towards the field. It is normally depicted on charts with a thick black line and is called a hold in lieu of a procedure turn.
It is important to note that this is a published procedure and should not be attempted if it is not depicted on the chart.
Holding patterns are a great way to keep your position and ensure clearance from terrain and other aircraft. To effectively use them, you must understand how to fly them.
See our guide below to get to grips with holding procedures.
How Do You Do a Holding Pattern?
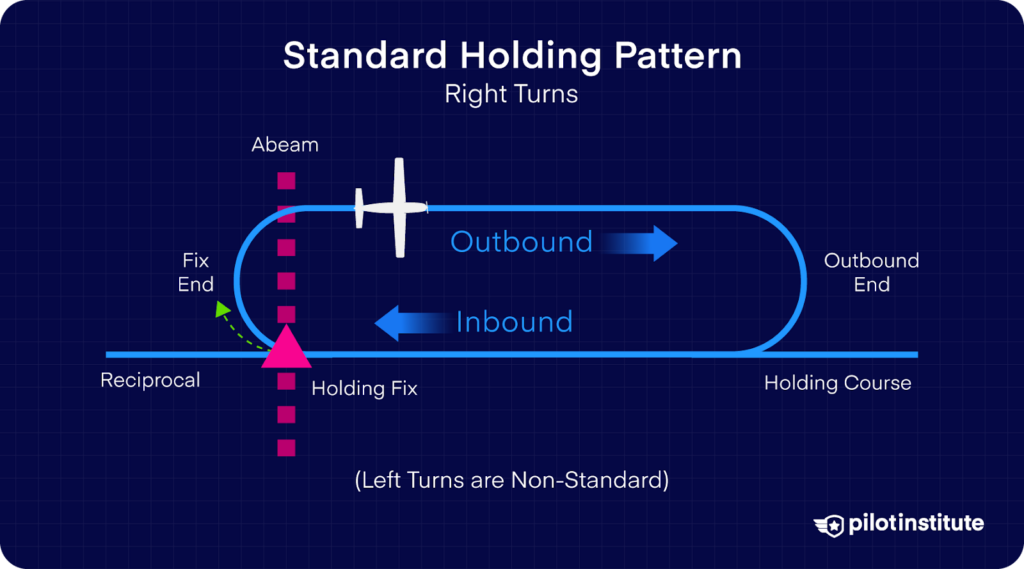
A holding pattern, while simple in appearance, comprises several elements.
And here’s the thing.
All of them are important. Here are the common elements of a holding pattern. After we have explained what they are, we’ll use them to explain how to fly a hold.
Before we begin, take a look at the picture above to get a really good idea of the terms used and where they fit into the pattern.
To hold effectively, you’ll need to know the following:
- The Fix – Where the hold is based.
- The inbound course.
- The outbound course.
- The direction of turns in the hold.
- Minimum Hold Altitude.
- Timings for the hold or DME distance.
- Speed for the hold.
- The crosswind component.
The Fix
All holds are based around a ‘fix’. This is a geographical reference around which the hold takes place.
This fix can be defined in several ways. Usually, it will be a ground-based navigational aid such as a VOR or NDB. Occasionally, for advanced aircraft, it can also be a GPS position or ‘phantom’ waypoint.
Is that it?
Not quite.
Sometimes, the local topography or airspace may mean that a hold can’t be fixed above a navaid. In this case, your holding fix may be a bearing and distance away from the navaid.
The Inbound Course or ‘Leg’
It would make little sense for everyone to arrive over the fix and fly in random circles.
Remember, holds are an easy way to keep aircraft apart.
To counter this, all holds will have an inbound course published. This will be a number given in degrees magnetic and is the track you are expected to take when flying toward the fix while holding.
Note we say “track,” not “heading”. You’ll need to correct your heading for the wind to fly the correct inbound course.
It’s a good idea to learn more about true course vs true heading.
The inbound course will normally be the line that has your ‘fix’ at the end.
The Outbound Bearing
Once you’ve reached your fix, you’ll need to fly ‘outbound’.
What does this mean?
The outbound leg of a hold is normally the reciprocal of the inbound course.
In plain English?
It is typically 180 degrees different from the inbound course.
Holding Direction and Turn
All pilots in the hold must turn in the same direction. This direction will normally be depicted on your chart.
The vast majority of holds are right-hand turns. However, an airport’s geography may dictate that the hold is a non-standard left turn. Pay careful attention when planning your hold, as it can lead to accidents if you get it wrong.
While discussing direction, it is worth mentioning how to turn in a hold.
All turns in a hold should be standard rate turns. Or, in simple terms, 3 degrees per second. You’ll find an easy way to work out what bank is required in a standard rate turn in our article: The Turn Coordinator Explained.
Hold Altitude
Holding procedures, flown correctly, will always allow for sufficient terrain clearance.
And remember this…
Holding is an instrument procedure, meaning you might not be visual with the terrain beneath you.
Our point?
You must check the minimum holding altitude, check the altitude of your aircraft, and make sure your altimeter is set to the correct pressure setting.
Time or Distance?
How long you fly on the outbound radial will depend on the hold in question. The standard time for most light aircraft is 1 minute. However, this can change depending on altitude and speed.
Some holds rely on distance from the fix instead of time, so pay attention to the chart before taking up the hold.
When do you start timing in a hold?
Easy.
When flying outbound, you start timing your leg from when the wings are level. If you’ve done it right, this is normally abeam the fix.
Holding Speed
Compare a fighter jet to a light aircraft.
It is safe to say that they will probably travel different distances over a given time, right?
Holding procedures are designed to keep aircraft within a certain area. If you were going really fast, you might bust out of this protected area.
To keep it simple, holding procedures normally have a maximum speed limit. It may be denoted on your chart, but standard speeds can also be used.
Crosswind Component
You’ll have noticed we have referenced ‘course’ a fair bit when discussing holds. It is important to note that your course is the path the aircraft takes over the ground.
The course you fly will be affected by the crosswind component, and it is vital that you fly it accurately in the hold.
You’ll need to carefully consider where the wind is coming from and how strong it is.
Below is our “how to” guide, you’ll find some great information on applying crosswind corrections during holding procedures.
How to Fly a Hold Procedure
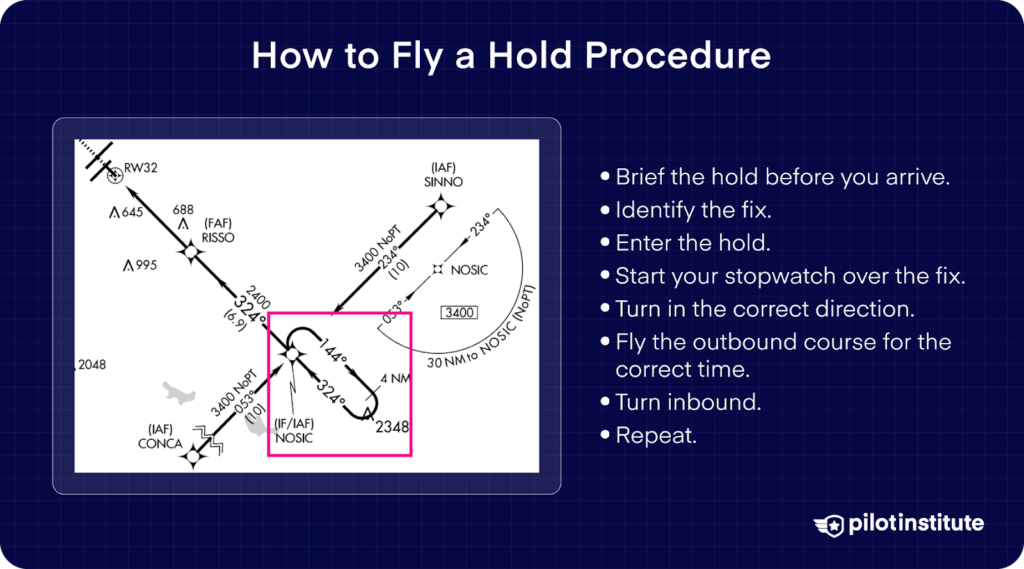
Taking up a holding procedure is supposed to be easy. And it is! Here are the common steps to take when flying a hold. You’ll find a quick ‘checklist’ followed by a more detailed explanation of holding procedures.
- Brief the hold before you arrive.
- Identify the fix.
- Enter the hold.
- Start your stopwatch over the fix.
- Turn in the correct direction.
- Fly the outbound course for the correct time.
- Turn inbound.
- Repeat.
Tip: Remember the 5 T’s at the fix: Time, Turn, Twist, Throttle, Talk.
Step 1) Brief Yourself Before Entering the Hold
If you take a look at our bulleted list of information above. You will need to know all the above information before entering the hold.
Want to make it easy?
Here’s a quick “cut out and keep” table that you can pin to your kneeboard. Fill in the details, and you will be good to go.
| Briefing Item | Details |
| Holding Fix | |
| Type of Hold Entry | |
| Inbound Course | |
| Outbound Course | |
| Direction of Turn | |
| Minimum Holding Altitude | |
| Holding Time/Distance | |
| Crosswind Component | |
| Single Drift |
Step 2) Identify the Fix
All holds are based on a fix. If you are using a navaid, it is crucial that you ensure the fix you are using is working and is correct.
For VOR and NDB holding procedures, you’ll have to constantly monitor the audible ident to ensure that the beacon is radiating and providing you with reliable information before entering the hold.
Step 3) Enter the Hold
All briefed, and the fix is correct?
All good.
It’s time to take up the hold.
Hold entry procedures can be varied, and there are a few options. You’ll find them explained in our dedicated guide below.
Step 4) Start Your Stopwatch Over the Fix
It is easy to know where you are, provided you know where you were and at what time. A standard holding procedure is normally based on timing, so you’ll need to start your stopwatch at a fixed reference point.
The holding fix is normally where you will start your stopwatch. You’ll also start it again at the start of the outbound leg. And again when flying inbound.
Step 5) Turn in the Correct Direction
Once over the fix, you’ll need to turn in the correct direction. Remember, as we explained above, all turns in the hold should be standard rate turns.
If you have completed the turn successfully, your course should be 180 degrees different from the inbound leg after 30 seconds.
Step 6) Fly Outbound on the Correct Course and Start Timing Again
Once you are established on the outbound course, start timing again. The standard is a 1-minute leg; however, it is vital to remember the effects of head or tailwind and those of crosswind.
Check our separate section on the wind in the hold to find out why…
Step 7) Turn Inbound
Once your time is up, it is time to turn inbound in the correct direction. Normally, the inbound turn is the easiest part of a hold.
If you’ve done it correctly, your course will match what is published on the chart when you roll the wings level facing the fix.
Step 8) Repeat!
All you need to do from here is fly inbound to the fix on the correct course. Once overhead the fix, you’ll complete the above steps to continue holding.
Wind Corrections During Holding Procedures
In an ideal world, the shape and timings for your hold would match exactly what is written on the chart.
Except, it doesn’t.
Why?
One word–wind.
There are two elements in play regarding the wind and holding. They are:
- Headwind/Tailwind Component
- Crosswind Component
Headwinds and tailwinds affect your hold timings during the inbound and outbound legs.
The crosswind component means you’ll have to fly a different heading to maintain the course.
Below you’ll find a few simple rules that will keep you on the right track during holding procedures, literally.
Headwind and Tailwind Corrections While Holding
Headwind or tailwind components are easy to apply when holding. The time you’ll most likely need them is on the outbound leg, particularly in those holds that rely on standard timings.
Here’s why.
Your ground speed is affected by wind. Too much ground speed means you may bust the limits of the hold. Too little groundspeed, and you may turn too soon, making a mess of the hold.
Want a simple rule to go by when calculating holding times?
- For tailwind on the outbound leg, subtract 1 second per knot of tailwind component.
- For a headwind on the outbound leg, add 1 second per knot of headwind component.
Crosswind Corrections While Holding
Crosswind and drift are slightly more complex than head/tailwind components.
You’ll actually use a few different corrections depending on whether you fly inbound or outbound.
Wait, what? Why?
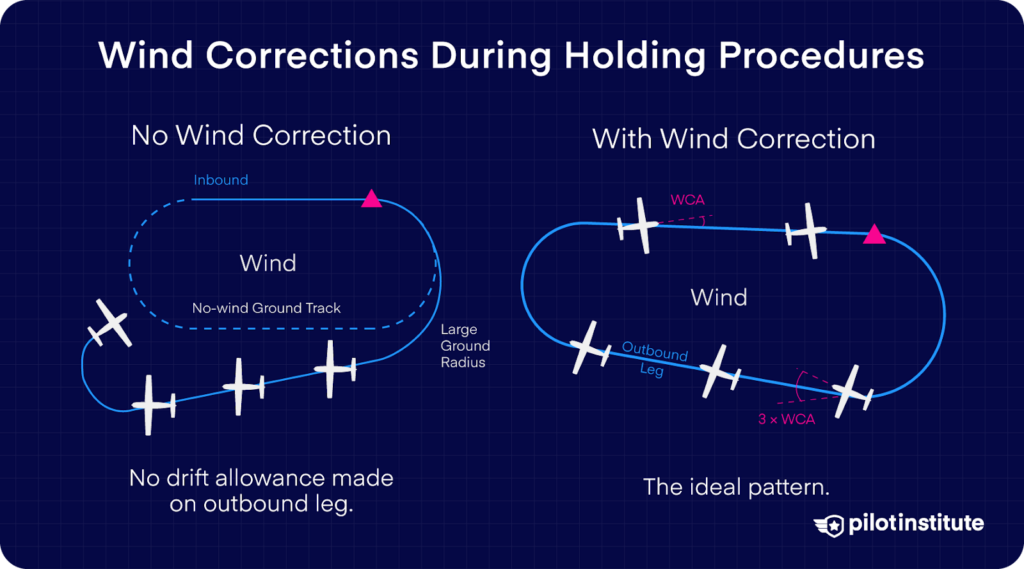
The truth is that when flying a wind-corrected holding pattern, you don’t actually fly a racetrack pattern like it is depicted on the chart.
Really?
Yup, instead, you’ll actually fly a sort of pear-shaped pattern.
Here’s why.
If you were to fly your outbound leg directly parallel to the inbound (as the chart depicts), you’d be pushed back towards the inbound leg if there was a strong crosswind. (Assuming the wind was coming from the holding side).
And remember…
When you turn, a crosswind component becomes a tailwind or a headwind component, compounding the problem.
When you start your rate one turn outbound, you won’t travel as far from the fix as you would in still air. You’d go through the inbound radial when you turn inbound, taking you outside the protected holding area.
For these reasons, we apply a larger correction to counter the crosswind effect when flying outbound.
To make accurate corrections, we must work out the crosswind and our single drift.
Here’s how to do it.
- Work out the speed you’ll be flying and divide by 60. Make a note of this number. It is ok if you want to do a little rounding up or down to make it a whole number.
- Work out the maximum single drift by dividing the wind speed by the above number.
- Work out the actual single drift based on the difference between the hold inbound/outbound course and the wind direction. (Easy with our handy table below)
- Apply the single drift using the following rules:
- When flying inbound to the fix, use 1 x single drift in all cases.
- When the crosswind component comes from the same side as the hold, use 3 x single drift to correct your heading when flying outbound.
- When the crosswind comes from the non-holding side, use 2 x single drift to correct your heading when flying outbound.
| Difference Between Hold Axis and Wind Direction | Correction to Apply to Maximum Drift to work out single drift |
| 15 ° | One quarter |
| 30° | Half |
| 45° | Three quarters |
| 60° | Full |
Want a quick example of all of the above in practice? Draw the hold on a piece of paper and the wind to get a great visual understanding of what is going on.
So, say our inbound hold course was 020° with right-hand turns. The wind is 050° at 25 knots. Our airspeed is 120 knots.
Have you drawn it out?
Good.
When working out the headings to fly in the hold, what is our single drift following the above steps?
- 120/60 = 2
- 25/2 = 12°. This is our maximum drift.
- There is a 30° difference between the wind and our hold courses… According to our table, we’ll use half of the maximum drift. So that gives us a single drift of 6.
The wind is from the holding side, so on our inbound leg, we’d fly a heading of 026° to accurately track the inbound course and counter the effect of the crosswind (one-time single drift).
On the outbound leg, we’d fly a heading of 182° (three times single drift) to counter the effect of the wind pushing us into the hold during wings level phases and how it would affect us during our turns.
Remember we talked about hold entry procedures above?
This is normally the most complex part of a hold and requires its own special section.
Here’s all you need to know.
How Do You Enter a Holding Pattern? (The 3 FAA Recommendations)
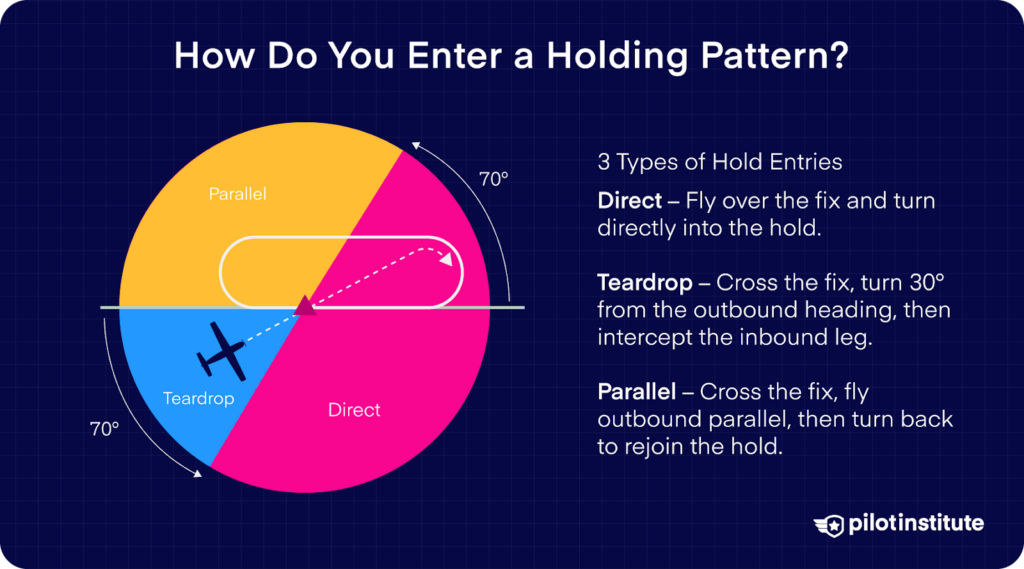
There are three types of standard entry into the hold. In order of difficulty, they are:
- The direct entry,
- The teardrop procedure.
- The parallel entry.
Which entry you make depends entirely on the area from where you approach the holding fix.
We’ll offer some great tips below, regardless of the entry you make, but here is each hold entry explained in a little more detail.
Before we begin, we’d like you to draw out a right-hand hold. We are then going to draw two lines that intersect the holding fix.
The first line is easy. It is simply the hold inbound axis extended.
The second line intersects the holding fix, but instead of 90°, we’d like you to draw it at around 70°. It should look like the image above.
The Direct Hold Entry
The Simple Explanation:
You’ll fly straight over the fix and then turn in the direction of the hold. It’s really easy.
You’ll Generally Use This Hold Entry When…:
You are broadly aligned with the inbound hold leg. If you are coming from the side the hold is on, your heading must be within 70 degrees of the inbound course. If you are approaching from the non-holding side, within 110 of the inbound course, you can fly over the fix and turn onto the outbound leg.
How to Make a Direct Hold Entry
- Fly towards the Fix.
- Arrive overhead the fix and start your stopwatch.
- Turn in the direction of holding to establish on the outbound leg.
The Teardrop Hold Entry
The Simple Explanation:
You’ll overfly the fix and then turn to proceed directly to the end of the outbound leg. The shape of this entry makes a sort of teardrop shape, hence the name.
You’ll Generally Use This Hold Entry When…:
You are approaching from the non-hold side within a 70-degree segment.
How to Make a Teardrop Hold Entry:
- Fly towards the fix.
- Arrive overhead the fix and start your stopwatch.
- Turn 30° to the reciprocal of the inbound leg (180° of inbound +/- 30°) towards the furthest outbound portion of the hold.
- Fly wings level for one minute.
- Turn in the direction of the hold to establish the inbound radial.
The Parallel Entry
The Simple Explanation:
You’ll fly towards the fix from the holding side and parallel the inbound course once you have crossed the fix.
You’ll then turn back into the holding area and keep the turn going until you can establish on the inbound course. An easy way to think of this is as if you were positioning yourself for a direct entry and using the ‘safety’ of the interior of the hold to do it.
You’ll Generally Use This Hold Entry When…:
You are approaching from a 110° segment on the holding side, facing opposite to the hold inbound leg.
How to Make a Parallel Hold Entry:
- Fly towards the fix.
- Crossing the fix, fly the same heading as the outbound leg, on the non-holding side for 1 minute, wings level.
- Turn towards the fix in the opposite direction to the turns in the hold (so for a right-hand hold, you’ll be turning left. For a left-hand hold, you’ll be turning right).
- Establish the inbound course to take up the hold.
Hold Entry Procedures – 5 Great Tips
Hold entry isn’t always the easiest to understand. However, some simple ideas can make it easier to grasp. Here are a few things to remember when considering hold-entry procedures.
Aim To Always Stay on The Holding Side
Whether making a direct, teardrop, or parallel entry, the entry procedures all aim to do one thing. To keep you within the area of the hold.
Do you see that racetrack pattern?
That’s designed with safety in mind. You can see the tolerances in the US TERPS 17.3. As long as you are within the holding area, you can be assured of terrain clearance.
Take a look at the hold entry procedures again. If you trace them around with your finger, you’ll see that they all keep you close or even within this protected area.
Draw Your Hold Out
Visualizing the hold can be tricky. However, whenever we are stuck, we remember an acronym.
We always run to DAD.
DAD?
Yeah, “Draw-A-Diagram,”…
By drawing a diagram, you can more easily visualize how your hold entry will work and how you will do it.
If you haven’t got time to draw during the flight, take the approach chart, work out where you are coming from, and visualize your airplane moving across the chart to the hold. Which direction are you coming from? Which sector is it? Which way will you turn?
Observe Minimum Safe Altitude
One thing will definitely stop any holding entry in its tracks.
Terrain.
Pay careful attention to the minimum holding altitude and the terrain surrounding the hold.
Plan in Advance
A hold isn’t something that should be impromptu. Even if traffic flows smoothly at your destination, it is well worth thinking about what you will do if you do have to take up the hold.
As a general rule, work out which direction you are most likely to be approaching from. Tune the required navaids and identify them. Brief yourself on which entry will be required in advance and determine your fuel reserves to see how long you can hold.
Work Out Reciprocals the Easy Way
Holding does require some mental gymnastics. And there’s loads of talk of reciprocals.
Here’s an easy way to work them out.
Just remember the number “2”.
2?
Yes indeed.
If you can add and subtract the number 2, that’s all the math you need.
Here’s how to do it:
- Take the last zero off your heading to be left with two numbers.
- If the first number is 2 or greater, subtract 2 from it. Then add two to the second number.
- If the first number is 1, you will add to it. Subtract 2 from the second number.
- Add a zero on the end, and that is your reciprocal heading!
Holding Procedure Timing
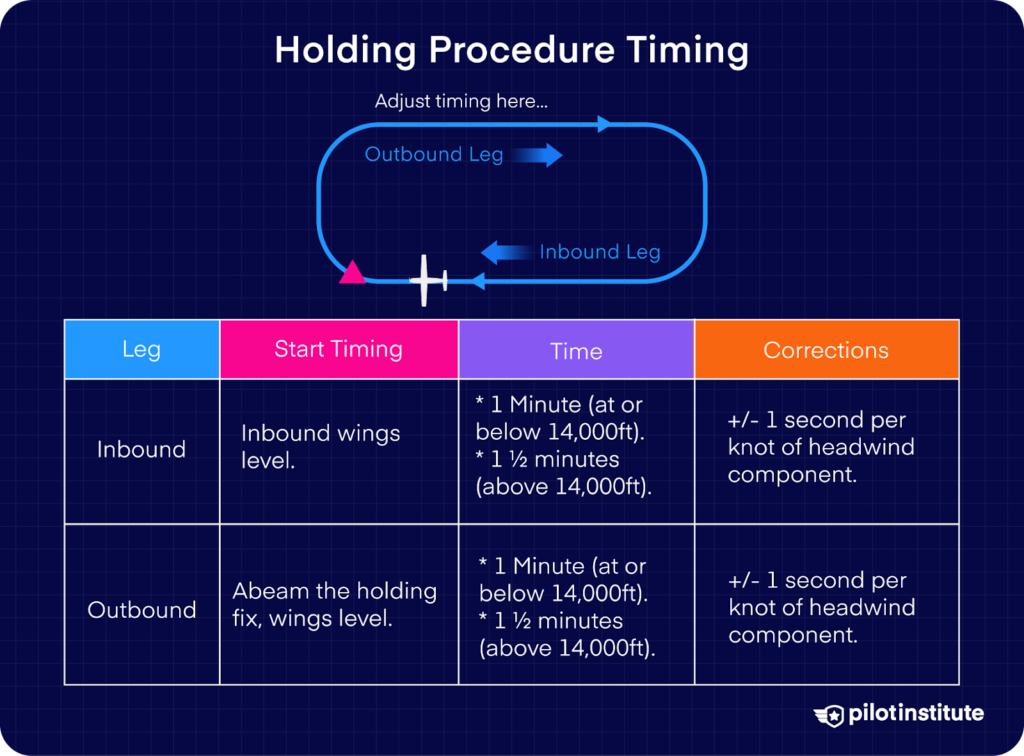
To hold accurately, you will need to become very familiar with your stopwatch. You will fly the various legs of the hold based on time.
It is actually pretty simple to do. See our table below to work out which hold timings you need to observe.
| Leg | Start Timing | Time | Corrections |
| Inbound | Inbound wings level. | * 1 Minute (at or below 14,000ft)* 1 ½ minutes (above 14,000ft) | +/- 1 second per knot of headwind component. |
| Outbound | Abeam the holding fix, wings level. | * 1 Minute (at or below 14,000ft)* 1 ½ minutes (above 14,000ft) | +/- 1 second per knot of headwind component. |
Holding Procedures – FAQ
There are a couple of more questions that you may want to know when discussing holding procedures. Here’s what we get asked all the time.
What Are the Holding Speeds?
The speed at which you will be expected to hold will vary based on your aircraft type and altitude. Holding procedures are designed to keep aircraft within boundaries, so it is important not to breach these speed limits. Below you’ll find a table detailing the holding speeds according to the FAA Instrument Flying Handbook.
| Altitude | Maximum Hold Speed (KIAS) |
| MHA – 6000ft | 200kts |
| 6001ft – 14,000ft | 230kts |
| 14,001ft + | 265kts |
Where Can I Find More Information About Holding Procedures?
There are several resources you can use to learn more about holding procedures. The “master” document is the FAA Aeronautical Information Publication, ENR 1.5. There you will find further details of everything you need to know.
Conclusion
Holding procedures may seem complex at first, but with practice, there really is nothing to it. Ensure you make the correct entry, fly accurately, and carefully monitor your timings. If flying on instruments is your thing, why not check out our online ground school to help you get up to speed?