-
Parts Of A Holding Pattern
- Holding Fix
- Protected Airspace
- Inbound and Outbound Legs
- Inbound Leg Length
-
Why Is The Holding Pattern Shaped Like A Racetrack?
-
Which Way Do You Fly The Holding Pattern?
-
Procedures Before Entering The Hold
- What’s Included In A Holding Clearance?
- How Do You Use EFC Time?
-
How To Enter The Holding Pattern
- Parallel Entry
- Teardrop Entry
- Direct Entry
- Entering A Non-standard Pattern
-
How Do You Figure Out Which Entry To Use?
- How To Use The Thumb Rule
-
How Much Time Does A Circuit Take?
- Leg Times
- Turn Times
- Total Time
-
What Is Distance-Based Holding?
- The Difference Between RNAV And DME Holding
- What To Look Out For When Using RNAV For Holding?
-
The Effect Of Wind On The Holding Pattern
- Drift Correction
- Correcting For Headwinds And Tailwinds
-
What’s the Speed Limit On The Hold?
- What Should Be Your Speed?
-
What are the 5 Ts?
-
Leaving The Hold
-
What Are The Most Common Holding Patterns?
- Arrival Holding Pattern
- Holding In-Lieu Of Procedure Turn
- Missed Approach Holding Pattern
-
Other Uses of Holding Patterns
-
Conclusion
Most pilots don’t like holding patterns. New students are intimidated by the procedures, and experienced pilots are tired of circling endlessly. They’re the aviation equivalent of a traffic jam on the freeway.
Unfortunately, there’s no better way to manage large numbers of aircraft. The inability of an aircraft to pull over to the side of the road makes holding patterns a necessity.
A holding pattern is a maneuver in which an aircraft flies a racetrack-shaped pattern in a designated area. They are used to keep an aircraft in protected airspace while delaying its arrival at a later point along its route.
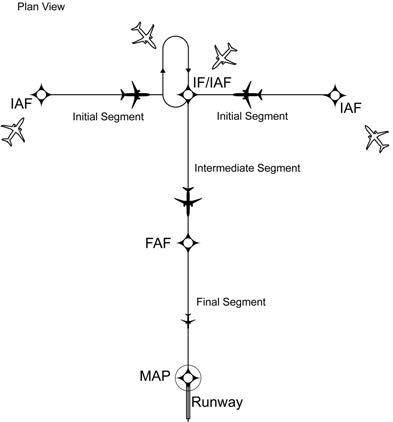
Parts Of A Holding Pattern
The diagram below shows the terms that you’ll need to be familiar with to understand the holding pattern.
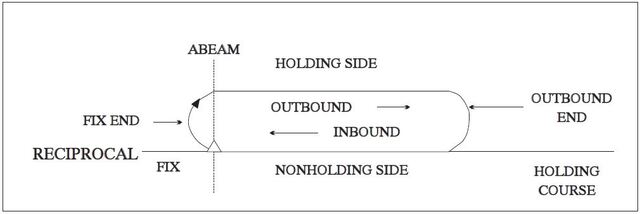
Holding Fix
Every holding pattern uses a fixed point as a reference. This point, appropriately enough, is called a ‘Fix’.
The fix can be any geographical point but it should be something easily identifiable to the pilot, Air Traffic Control, and other aircraft in the area. Fixes can even be visual landmarks like a lake or a hill. Since the holding pattern is more common in instrument flying, most holding fixes are RNAV waypoints or Navigational Aids such as VORs.
The fix forms the endpoint of the inbound leg. The point on the outbound leg that’s perpendicular to the fix is called the abeam point. The abeam position is where the outbound leg begins.
The holding fix can be based on a single VOR using radial and distance information provided by Distance Measuring Equipment (DME) or GPS. If the VOR does not offer distance information, you’ll need to have two VORs to establish a fix.
A single VOR only lets you know which radial you’re on, but it doesn’t tell you how far along the radial you are flying. A fix requires you to be able to locate yourself at a point, not a line. If you’ve got two VORs, each of their radials will intersect the other’s radial only at a single point, allowing you to locate your fix. The use of NAVAIDs to locate fixes is shown in the diagram above.
Protected Airspace
The airspace surrounding a holding pattern is clear of obstacles and is kept free of other air traffic by ATC.
The area between the inbound and outbound courses is called the primarily protected airspace. This is the region where the aircraft is supposed to fly while holding. Secondary protected airspace surrounds the primary area and is meant to act as a buffer region.
You’re not supposed to fly in the secondary protected area, but in case your aircraft drifts out of the primary area due to wind or pilot error, you won’t collide with any obstacles.
When you’re flying within the primary area, at least a thousand-foot obstacle clearance is ensured for your aircraft. Obstacle clearance in the secondary area starts off at 500 feet on the inner side and tapers off to zero at the outer boundary.
The size of the primary protected area depends on the holding location, the holding altitude, the type of NAVAID used as the holding fix, and the aircraft’s holding speed. The secondary area will always be 2 Nautical Miles wider than the primary protected area.
Inbound and Outbound Legs
These directions are provided in reference to the holding fix. If you’re flying towards the fix, you’re on an inbound course. Flying away from the fix means you’re flying on the outbound course.
Inbound Leg Length
The inbound leg can be based on either time or distance. Standard practice is to have an inbound leg lasting one minute if the aircraft is holding below 14,000 feet, and one and a half minutes for aircraft holding above 14,000 feet. Legs defined by distance are either flown as instructed by ATC or have the length shown on the chart.
Why Is The Holding Pattern Shaped Like A Racetrack?
Wouldn’t a circle be simpler and require less protected airspace?
The problem is that flying in a circle limits your situational awareness. You’re flying on instruments, so you’re not using visual references to orient yourself. VFR pilots do hold in circles since it’s easy to keep the aircraft aligned with a fixed visual landmark on the ground.
When the aircraft is in a sustained bank, the gyroscopic instruments will show an error in the readings due to the centrifugal force present in a turn. The Attitude Indicator will eventually show level flight while you’re still turning.
If you’re holding with reference to a VOR, you’ll only be able to orient yourself if you’re flying along a radial. That’s why the inbound and outbound legs are flown on a specified radial. You can’t track a VOR accurately when you’re crossing radials flying perpendicular to it.
Correcting the effects of wind is also much easier when flying in a straight line.
Of course, with the introduction of RNAV, it’s now easy to orient yourself and fly pretty much any pattern you can imagine. But since the rules of aviation were standardized before GPS came into common use, we have to use the racetrack pattern developed for holding at the time.
Which Way Do You Fly The Holding Pattern?
There are two types of holding patterns, standard and non-standard. Aircraft operating in a standard holding pattern fly the circuit clockwise. That means that the racetrack pattern has right turns only. Aircraft flying a non-standard holding pattern have to make left turns.
The standard holding pattern direction catches pilots out sometimes because most other patterns in aviation are left-handed, such as the standard traffic pattern around an airfield.
Procedures Before Entering The Hold
ATC will either clear the aircraft beyond the fix or give holding instructions at least 5 minutes before the aircraft reaches the fix. If you’re not given further clearance, the holding fix becomes your clearance limit.
The pilots have to report the time they reach the clearance limit and the altitude or flight level that the aircraft is flying. Pilots also need to report leaving the clearance limit.
If you’re within 3 minutes of arrival at the fix and ATC still hasn’t given you holding instructions for an unpublished hold, you should contact them again and restate your request. If they’re unable to reply, for example, due to a busy frequency, start decelerating to holding speed and plan a hold at the fix.
The aircraft must reach holding speed before overflying the fix. You should use a published route if it exists for the fix. If there’s no charted course, plan a standard pattern on the arrival course.
You need to hold at the last altitude assigned by ATC. Airspace at this altitude will be considered protected.
Keep attempting to contact ATC and ask for clearance as soon as possible.
What’s Included In A Holding Clearance?
If ATC assigns you an uncharted pattern, the full holding clearance includes:
- The name of the holding fix.
- The compass direction of the hold in relation to the fix.
- Either the holding course, the bearing, or the radial to the fix. This could also be an airway or a route.
- The length of the outbound leg if it’s a DME or RNAV hold, otherwise use the standard time duration.
- The direction of the turns. If they’re not mentioned, use right turns for a standard pattern.
- EFC time. EFC stands for Expect Further Clearance, the estimated time you’ll be cleared to depart from the hold. This helps you with your fuel planning and is also used in case of lost comms.
- An estimate of any additional en route or terminal delay on your route, if any.
If ATC directs you to “hold as published”, they’ll only give you the name of the fix, the holding direction, and the EFC time. In this case, you can get the remaining information by looking at the chart.
Even if you’ve been given a published hold, you can still request ATC to give you the entire holding instructions if you need them.
Holding instructions are lengthy and complicated so it’s good practice to keep a pencil handy when you’re ready to copy holding clearance. Since this is a clearance, you’ll have to read back the call so that ATC can verify that there’s been no miscommunication.
How Do You Use EFC Time?
The EFC time is used in case the aircraft is unable to contact ATC. If your aircraft develops a radio issue while holding, you would not be able to receive ATC’s call to leave the hold and continue on your route.
Although rarely used, FAR 91.185 allows the pilot to leave the hold after the EFC time is up and proceed to make an approach at the destination airport close to the flight’s estimated time of arrival.
You’ll only take advantage of this regulation as a last resort. Your first course of action would be to recheck your radio. Try using a secondary radio if the aircraft is equipped with one and see if you can raise anyone on another frequency. If you get nothing, set squawk 7600 on the transponder and follow the lost comms procedures.
How To Enter The Holding Pattern
The first step in entering any hold is for the aircraft to overfly the fix. As soon as it flies over the fix, the aircraft is bound to remain within the protected airspace from that point onwards until it leaves the hold.
Hold entries are simple if the aircraft is approaching the fix on a course that lines up with the holding pattern. But if you’re coming in at a steep angle to the pattern, it will be impossible to turn the aircraft sharply enough to join the hold without leaving the protected airspace. Even if the aircraft may be capable of turning sharply, remember that instrument procedures have bank angle limits to prevent the pilot from getting disoriented.
Entry procedures have been developed for each approach angle, allowing the aircraft to stay within protected airspace while also respecting bank angle limits. Obeying the speed limit is critical in hold entries to avoid overshooting protected airspace.
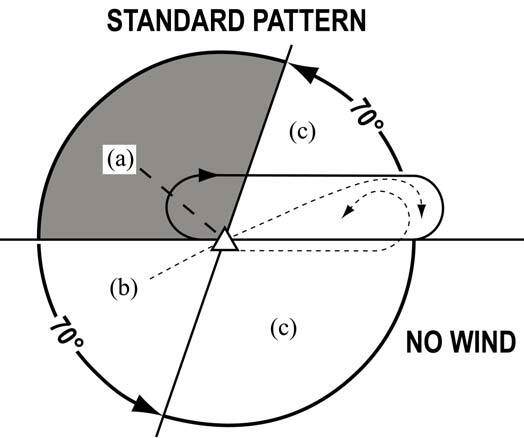
The airspace around the fix is divided into three parts. Each part is named after the type of maneuver you have to make if you’re approaching the fix from that angle.
The sections are made by constructing a line going through the fix at an angle of 70 degrees from the outbound course on the holding side. The line is extended past the fix, making a 110-degree angle to the inbound course on the non-holding side.
Section (a) starts from the outbound bearing to the dividing line on the holding side, making a region spanning 110 degrees.
Section (b) is the region between the outbound bearing to the dividing line, making it the smallest region spanning 70 degrees.
Section (c) has the remaining area with 70 degrees on the holding side and 110 degrees on the non-holding side adding up to a total angle of 180 degrees.
In the diagram above, section (a) is the Parallel Entry region, section (b) is the Teardrop Entry region, and the remaining area is section (c), the Direct Entry region.
Note that this diagram assumes the standard pattern direction, so all turns in the hold are right-hand turns.
Parallel Entry
The parallel entry procedure is carried out by overflying the fix and immediately turning left to a heading parallel to the outbound course. Fly along with this heading for one minute, then turn left again through more than 180 degrees and join the inbound course towards the fix. When you reach the fix again, turn right 180 degrees to join the outbound leg.
The parallel entry is unique in that it requires two turns in the ‘wrong’ direction to enter into the pattern. Non-standard patterns will have you turning right to join the parallel heading and right again to join the inbound, even though the rest of the holding pattern has left turns.
As you’re flying in from region (a), you might be tempted to join the outbound leg, since you can turn to that heading without needing a steep bank. This maneuver is not allowed. The problem is that you don’t know exactly where the outbound leg exists without first flying over the fix. The outbound leg is defined in relation to the fix, so you have to overfly the fix first to be able to join the outbound leg accurately later.
Teardrop Entry
When you’re approaching the fix from the region (b), overfly the fix and then turn to a heading 30 degrees offset from the outbound course heading on the holding side.
This means that you can get the teardrop heading by subtracting 30 degrees from the outbound course in a standard pattern and adding 30 degrees to the outbound course in a non-standard pattern.
Fly in this direction for one minute and then turn right to join the inbound course. Continue on the inbound course to intercept the fix again, and then turn right to join the outbound as usual.
Direct Entry
Direct Entry is the simplest entry procedure. All you have to do is intercept the fix, and then you can turn to the outbound leg as usual.
Direct Entry doesn’t need any elaborate maneuvering since your approach angle to the fix allows you to turn to the outbound leg without having to enter the aircraft into a steep bank.
Entering A Non-standard Pattern
The only change in entry procedure for a non-standard pattern is that the turns at the fixed end and the outbound end are made towards the left instead of the right.
Remember that you can’t use the diagram above for figuring out how to enter into a non-standard pattern. The 70-degree dividing line must be inclined towards the outbound end on the holding side, so non-standard patterns will have it inclined in the other direction than what’s shown in the diagram above. The sectors would then be drawn according to that line.
How Do You Figure Out Which Entry To Use?

Pilots figure out which entry to use by considering their angle of approach relative to the inbound course. You can use the bug on the heading indicator to point to the inbound course. Then, compare your approach heading with the bug to see which entry is valid for you.
You can also draw the circle every time you’re assigned a hold, filling in the headings to figure out the appropriate entry.
If you’re coming in right at the boundary between two sectors, you might be wondering which one to use. Fortunately, the FAA provides a 5-degree margin that allows the pilot to choose either entry that they’re comfortable with.
How To Use The Thumb Rule
Another technique is the thumb rule, which requires nothing but your hand. The right hand is used for figuring out entries for standard patterns and you use the left one in case you’re entering a non-standard pattern.
Place your hand palm downwards onto the chart. If you look at the back of your hand, the angle between the thumb and the index finger is similar to the 70-degree angle that the sector dividing line uses. You’ll need to extend your thumb a bit for it to resemble the angle better.
Position your hand over the chart till the holding fix is aligned with the base of your thumb, and your index finger points out towards the inbound course. The palm of your hand forms the holding side of the pattern.
Imagine a line extending along with your thumb through your wrist. That’s the dividing line extending out onto the holding side of the pattern.
Sector (a) is the region between your index finger and the extended imaginary line. You can remember this as the Parallel sector by noticing that your fingers are parallel to each other.
The angle between your thumb and index finger is the smallest, so that’s a sector (b). This is the Teardrop sector.
The remaining area between your thumb and the imaginary line is your sector (c). You can remember this as the Direct sector since it includes your wrist, which directly connects your hand to your arm.
The chart will be showing you your route. With your hand overlapping the chart, it’s easy to see which part of your hand is intercepted by your route.
How Much Time Does A Circuit Take?
Accurate and precise timekeeping is essential in flying a perfect holding pattern. Messing up your timing will lead your aircraft to drift away into unprotected airspace.
When you’re established in the holding pattern, the outbound leg timing starts when you’re exactly abeam the fix. This is also the case when flying a Direct entry. Teardrop and Parallel entries require a pass over the fix before joining the pattern, so in those entries, you’ll start timing the outbound leg when the aircraft is exactly overhead the fix.
When a VOR is used as the holding fix, you’ll know you’re exactly overhead when the TO/FROM indicator on the aircraft’s CDI reverses. The CDI needle rotates past 90 degrees when you’re abeam the fix.
If you aren’t able to figure out where the abeam position is, you can use the point where you roll out onto the outbound heading as your reference.
Leg Times
When holding at or below 14,000 feet MSL, the inbound leg should take exactly one minute.
When holding above 14,000 feet MSL, the inbound leg should take exactly one and a half minutes.
If the wind is calm, the outbound leg should take just as long as the inbound leg does since the racetrack pattern is symmetrical. But if you’re experiencing a headwind on your inbound leg, the aircraft won’t be able to finish the leg in the required amount of time.
Conversely, tailwinds can shorten the inbound leg time. Pilots are allowed to adjust their outbound leg to achieve the inbound leg time requirement, although they’re still bound to stay within the protected area.
Turn Times
You have to make all the turns during entry and while flying inside the hold at a fixed bank angle. You can make all of your turns at these bank angles:
- Standard Rate Bank angle.
- 25 Degrees of bank if you’re using a Flight Director.
- 30 Degrees of the bank.
Pilots are required to use whichever method requires the least bank angle.
Standard Rate turns are also known as Rate One turns. All IFR procedures are designed to be flown with the aircraft making Standard Rate turns. Standard Rate turns have the aircraft turning 3 degrees every second. This means that reversing your heading will take exactly one minute, and making a full circle requires two minutes. The number of degrees of bank required to maintain a Rate One turn depends on the aircraft’s speed. The faster you’re flying, the sharper you’ll have to bank.
A quick rule of thumb to figure out the bank angle for a Standard Rate turn is to divide your airspeed by 10, then add half of it to the result.
For example, if a light aircraft is holding at a speed of 100 knots, here’s how you get the bank angle:
100 / 10 = 10
10 / 2 = 5
10 + 5 = 15 degrees of bank.
It’s easy to figure out that as long as you’re flying at or below 200 Knots, you’ll be using the standard rate turn in the hold. Using 200 Knots in the formula above gives you 30 degrees of bank.
If your aircraft has a Flight Director, you can use 25 degrees of the bank as long as you’re flying at 170 Knots or more. If you don’t have a Flight Director, it will be difficult to maintain exactly 25 degrees of the bank throughout the turn. In that case, you’ll go back to using the Standard Rate turns below 200 Knots.
Total Time
It’s easy to calculate the total time your aircraft will take to fly one circuit. The inbound leg will take one minute if you’re below 14,000 feet, and 1.5 minutes above it. The outbound take will take an equal amount of time, assuming no wind.
Add one minute each for the two 180-degree Standard Rate turns between the legs.
This gives you 4 minutes for a circuit below 14,000 feet and 6 minutes if you’re holding at a higher altitude. These times are irrespective of your airspeed.
Predictable circuit times are good since they allow ATC to plan and sequence aircraft for their arrival.
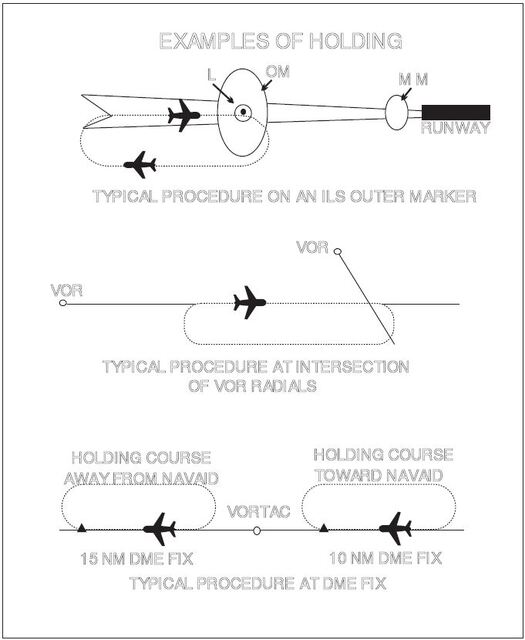
What Is Distance-Based Holding?
You can fly the holding pattern based on distance instead of time. This method uses DME or GPS to locate the start and endpoints of the legs and to show the aircraft’s relative position. The entry and holding procedures are carried out in the same way for timed and DME/GPS holds.
ATC will let you know the length of the outbound leg. The pilot uses the GPS Along-Track Distance (ATD) or DME readings to determine the distance flown from the abeam the fix and the distance remaining till the end of the leg.
Distance-based holding patterns use a point defined by a distance and course reading from a NAVAID for the holding fix. This point may be published as a GPS waypoint on a chart. Some published holds have the ATD specified on the chart itself.
DME/GPS holding patterns allow either the inbound course to face the NAVAID or have it face away from the NAVAID.
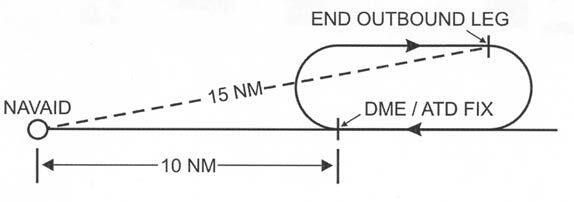
The former case is shown in the diagram above. As soon as the aircraft reaches a distance of 10 Nautical Miles from the NAVAID, the pilot initiates the turn to the outbound leg. The aircraft reaches the end of the outbound leg when the DME or ATD readings show a 15 Nautical Mile distance.
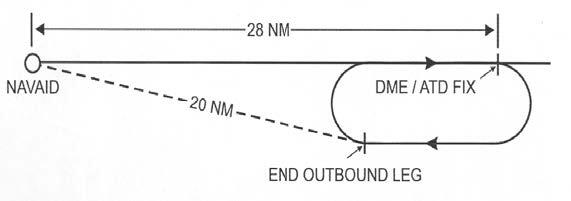
Similarly, a DME/GPS holding pattern with the inbound course facing away from the NAVAID is shown in the diagram below.
The Difference Between RNAV And DME Holding
The FAA allows the use of RNAV systems including GPS in place of DME, as described above. A notable difference between RNAV and DME is that DME shows the slant distance and not the true distance between the Fix and the NAVAID.
DME calculates the distance between the DME station on the ground and the aircraft’s receiver. Since the aircraft is at a high altitude, DME distance includes the vertical distance as well as the horizontal distance. The higher the aircraft is while flying close to the station, the greater the error in the distance reading.
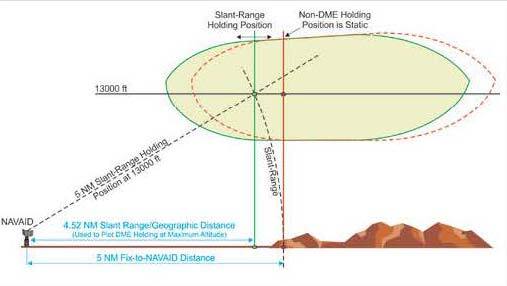
This is the reason that DME readings will show the holding fix appearing closer to the NAVAID than it actually is. RNAV methods will show the actual distance.
The difference between the two readings is small enough to be ignored for holding purposes, so there’s no corrective action needed by the pilot for slant angle error.
What To Look Out For When Using RNAV For Holding?
RNAV includes FMS guidance that uses navigational data from multiple sources including GPS. Standalone GPS units are also classified as a type of RNAV. These systems have their own internal database of waypoints and can also guide the aircraft into published holding patterns.
While they are programmed to follow the standard rules and conventions of flying in and entering holding patterns, each system has its own programming logic that the pilot must be aware of in order to ensure it guides the aircraft as the pilot expects it to.
The combined effect of multiple small differences can end up having a major impact on the aircraft’s flight path, and it could end up departing protected airspace if the pilot isn’t familiar with them.
Heading Versus Ground Track
Some RNAV systems select the entry procedure on the basis of aircraft heading instead of the ground track. The ground track refers to the aircraft’s path along the ground and is unaffected by wind. But high crosswinds require the aircraft’s nose to be pointed towards the oncoming wind in order to maintain the course.
The direction that the nose is pointing is called the aircraft’s heading and the difference between the heading and the ground track is the drift angle. A large drift angle could prompt the heading-based systems to lead the aircraft into an entry that the pilot may not be expecting.
Fly-By Approaches
Some RNAV systems try to prevent overshooting a waypoint in a turn by executing a fly-by. This means that they direct the aircraft to turn in before reaching the fix and joining the next course. If the aircraft is entering the pattern using a direct entry from the holding side, turning in before overflying the fix may cause the aircraft to leave the protected airspace.
Differences In Design Turn Points
Holding patterns with a published distance measure it from the holding fix to the end of the outbound leg. This is the point where the aircraft is supposed to begin turning from the outbound course back to the inbound course.
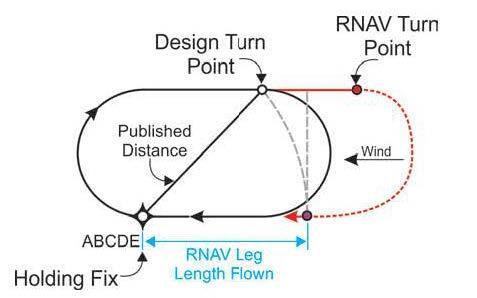
Some RNAV systems interpret the published distance as the length of the required inbound leg instead. This means that the aircraft begins the turn too late and ends up beyond protected airspace.
If there’s a tailwind coming in on the inbound course, the system will extend the outbound leg even further to correct for the wind. Aircraft flying at higher speeds and altitudes are more likely to venture into unprotected airspace.
RNAV systems try to steer the aircraft using the minimum amount of bank angle necessary. The pilot needs to make sure that the bank angle commanded by the system isn’t so shallow that the aircraft is unable to stay within the hold during turns.
Errors In Programming RNAV
If you’re descending in the hold, make sure the RNAV respects the change in leg times as the aircraft descends below 14,000 feet. Some systems also compute the hold based on the speed and altitude of the aircraft at the time the system is being programmed by the pilot. Pilots usually program the system before decelerating to holding speed, so the system may compute the hold for cruise speed instead.
RNAV Limitations
A fair question to ask at this point is why doesn’t the RNAV know to remain within the boundaries of the protected airspace?
The answer is that protected airspace boundaries are not included in the RNAV system database.
Multiple holding patterns may exist at a single navigational fix, each intended for a different purpose. The same fix could have an en-route hold, an arrival hold, or a hold-in-lieu of a procedure turn.
All of these holds have different altitude and speed limits and therefore won’t have a common protected area. Pilots need to make sure that they’ve selected the right type of hold when multiple holds exist at a single fix.
Uncharted routes are not going to be found in the navigational database, so the pilot needs to manually program the hold into the system. Similarly, holds with non-standard turns are also going to need to be manually programmed.
The Effect Of Wind On The Holding Pattern

After you’ve used one of the entry methods to establish the aircraft in the hold, your next task is to figure out the prevailing winds. Crosswinds will cause your aircraft to drift off course, headwinds will increase the leg time, and tailwinds will make you arrive at the end of the leg too early.
The second orbit that the aircraft makes is called the no-wind orbit. This circuit is flown as if there were no wind acting on the aircraft at all.
Deviations from the planned course let the pilot know the intensity and direction of the winds acting in the area. The pilot makes corrections in subsequent orbits to counter the effect of the wind by making adjustments to the aircraft’s heading and the length of the outbound leg.
Drift Correction
Make drift corrections on the straight legs, not on the turns. When you’re flying on the inbound leg, note the heading you’re having to maintain to stay on course. The difference between your heading and the course track is your drift correction angle.
You’ll need to apply this drift correction angle on all your inbound legs. For your outbound legs, the AIM advises you to multiply the drift correction angle by three.
For example, if you’re having to add 5 degrees of correction when flying inbound, subtract 15 degrees of correction on the outbound leg.
Recheck your drift correction angle on your inbound legs. If you’re holding for a long time, the wind intensity or direction might shift.
The presence of wind can warp your holding pattern into something resembling an egg shape. As long as you’re constantly correcting for drift, the protected airspace is wide enough to keep you safe.
The FAA’s Aeronautical Information Manual (AIM) recommends flying holding patterns in fixed-wing aircraft at speeds greater than 90 KIAS to reduce the influence of crosswinds. For the same reason, holding patterns for helicopters are also designed for a 90 KIAS minimum forward airspeed.
Correcting For Headwinds And Tailwinds
The headwind or tailwind component will mess up your inbound leg timing. You can compensate for it by adjusting the length of your outbound leg.
A tailwind on your inbound course will increase your ground speed and will make you arrive at the fix earlier than you’re expecting. The opposite happens with a headwind.
A rough guideline is to add or subtract one second to your outbound leg per knot of the wind component for the one-minute pattern.
If you’re flying the one and a half minute pattern, add or subtract one and a half seconds for every knot of the wind component.
What’s the Speed Limit On The Hold?
Aircraft holding at altitudes from the Minimum Holding Altitude up to 6,000 feet are limited to 200 Knots Indicated Airspeed (KIAS).
Aircraft holding at altitudes greater than 6,000 feet up to 14,000 feet is limited to 230 KIAS. Some airspaces have a speed limit of 210 KIAS at these altitudes. This restriction is marked on the chart wherever it applies.
Aircraft holding at altitudes above and not including 14,000 feet are limited to 265 KIAS while in the hold.
The aircraft is expected to follow the speed limits at all times while they’re in the hold. That includes the aircraft’s entry into the hold, so pilots begin decelerating from their normal cruise speed about two to three minutes before they’re expected to overfly the fix for the first time.
If a hold has a non-standard speed limit, it’ll be written on the chart inside parenthesis. A notable example is a holding pattern exclusively designed for use by Category A and B aircraft to avoid obstacles and terrain. This pattern has a speed limit of only 175 KIAS and can be found at altitudes from MHA up to 18,000 feet MSL.
What Should Be Your Speed?
Note that these are the maximum speed limits. There’s no point in flying at the maximum speed in a hold since it won’t help you get to your destination faster. Remember that the whole point of flying in a holding pattern is to pass the time.
The only reason you might want to increase your speed in the hold is if you’re experiencing turbulence. Turbulence can cause variances in your speed that can drop you down to your stall speed if you’re flying slowly. You can speed up to increase your safety margin but be sure to ask ATC for permission first.
The recommended speed for flying in a holding pattern is the aircraft’s endurance or economical cruise speed. The best thing you can do is fly at the speed at which you know your aircraft consumes the least fuel.
This is especially important in cases where you’ve been given an indefinite hold due to a runway closure since you could be stuck in the hold for a long time. Keeping more fuel in the tank leaves you with more options in case you need to divert. Each aircraft has a different endurance speed and manufacturers specify it in the aircraft’s Pilot Operating Handbook or Aircraft Flight Manual. Some flight manuals even explicitly mention a recommended holding speed for the aircraft.
What are the 5 Ts?
The 5 Ts are a mnemonic that’s good to remember in instrument flying and is used by the pilot to remember the actions needed whenever the aircraft passes a fix. You might not need to take action for each step at every fix, but you should still go through all of the Ts so that you don’t overlook anything. The 5 Ts are:
Turn – Turn immediately after overflying the fix.
Time – Note the time you fly over the fix and reset your timer for the next segment. If the actual inbound leg time was different than the planned leg time, you’ll know you have to adjust the outbound leg to compensate in the next circuit. The Time and Turn actions are carried out practically simultaneously.
Twist – Twist the OBS knob on the aircraft CDI to the next course to avoid reverse sensing. If you’re not holding over a VOR, turn the heading indicator bug instead to remind yourself which heading you have to hold through the leg.
Throttle – Check if you’re maintaining your holding speed. You’ll have to adjust the throttle if the prevailing winds change. Even if the winds are constant, a strong wind from one end of the circuit means that you’ll have to add power when flying on the leg that’s against the wind and reduce power on the other leg.
The Throttle ‘T’ can also include a Trim. Check that the aircraft is properly trimmed and is maintaining altitude. If you’re on hold for a long time, you’ll burn off enough fuel to significantly change the aircraft’s weight and the position of the Center of Gravity. This will require readjusting the trim and throttle from time to time.
Talk – See if you need to talk to ATC. If you’re at the EFC time and haven’t been contacted by ATC, give them a call. Another occasion where you have to talk is if ATC asks you to report turning inbound. This usually happens on one of the approaches holds, or if ATC’s trying to manage a particularly dense traffic sequence.
Leaving The Hold
ATC will give the aircraft permission to leave the hold and may also issue instructions to exit the hold at a particular time. The pilots should adjust their flight path while remaining within hold boundaries to leave the hold at the exact time specified by ATC.
If the aircraft can’t make it in time, the pilots should immediately inform ATC so that they can be accommodated at another slot in the sequence.
As soon as the aircraft leaves the hold, it should resume the normal speed appropriate for that stage of flight; accelerating to cruise speed or decelerating to approach speed.
What Are The Most Common Holding Patterns?
You could be asked to enter a hold practically anywhere, but the most common holds are the Arrival Hold, the Hold in Lieu of Procedure Turn, and the Missed Approach Hold.
It’s not a bad idea to brief each of these holds before your flight, especially if you’re expecting bad weather or heavy traffic. The more prepared you are before the flight, the less are your chances of making a mistake.
Arrival Holding Pattern
Terminal Arrival Areas (TAAs) are designated areas where aircraft coming in from different en-route waypoints converge to join an instrument approach fix. Traffic congestion can be common at this intersection, so a holding pattern is charted there for aircraft to wait their turn to land.
This arrival holding pattern is drawn on the chart using a thin solid line. Unlike a procedure turn, you can only fly this hold if instructed to by ATC.
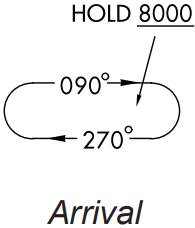
Arrival holds are also used where the aircraft’s turn angle to join the approach exceeds limits. Pilots can request ATC to allow them to join the hold. After turning to the inbound leg, the pilots can continue with their approach.
What Is Stacking?
When extremely busy airports experience bad weather, the approaching traffic ends up in the air equivalent of a traffic jam. Visual approaches won’t be possible and ATC won’t give out vectors to the final. Low visibility, hard precipitation, and heavy winds cause aircraft to frequently execute missed approaches.
All this leads to a lot of aircraft that need to wait to land. Since large airports are usually located in busy airspaces, only a limited number of navigational fixes may be available for holding. ATC clears multiple aircraft to hold at each fix, with every aircraft being assigned a different holding altitude. This is known as a stack.
The aircraft reaching the terminal area first is assigned the lowest holding altitude and is first in line to be given a shot to land. Aircraft arriving later are progressively given higher altitudes for their holds.
As soon as the first aircraft leaves the holding pattern, ATC clears the rest of the aircraft for a lower holding altitude. This maneuver is called shaking the box.
What Do You Need To Remember While In The Stack?
Two things are very important while holding in the stack. First, the pilots must ensure they’re flying at the altitude they’ve been assigned. They also need to make sure that the aircraft’s altimeter is adjusted to the latest pressure setting. The altimeter setting gets updated periodically, so the pilots need to regularly monitor the automated weather service known as ATIS.
The second critical factor for long holds in the stack is the aircraft’s fuel status. It can take a long time to get down to the bottom of the stack. If the pilots are forced to go for a missed approach, they’ll have to rejoin the stack back at the top.
The aircraft needs to carry enough fuel to make it to the alternate airport and land there with a legal quantity of fuel remaining in the tank. While ATC does try to prioritize aircraft based on how long they’ve been holding, they don’t know the aircraft’s fuel status and rely on the pilots to manage it.
The pilots need to divert to their alternate airport if they’re low on fuel. If for some reason the pilots don’t divert to the alternate airport in time, they can declare an emergency and will get immediate approach clearance. Declaring a fuel emergency will invite scrutiny from the FAA, but pilots should never hesitate to take that option if it becomes necessary.
On a January night in 1990, New York was experiencing very low visibility, fog, and rain. JFK airport was left with just one runway available for landing due to the wind. Avianca flight 52 was one of the dozens of aircraft attempting to land there that night. The high volume of traffic led to flight 52 being instructed to hold more than three times.
ATC was not aware of the flight’s worsening fuel situation and the pilots did not declare a fuel emergency at any point till the fuel ran out. The Boeing 707 crashed because the pilots did not divert and did not alert ATC about the gravity of their fuel situation.
Holding In-Lieu Of Procedure Turn
Instrument approaches have a point known as the FAF or Final Approach Fix. This point marks the start of the final segment of an instrument approach. If you’re approaching the FAF in the opposite direction to the runway, you’ll need to reverse your course after overflying it.
Since we’re talking about instrument flying, you have no visual references and need protected airspace that you can use to safely turn around.
The Holding In-Lieu of a Procedure Turn is one of the procedures used to reverse your course. The full name is a mouthful, so it’s abbreviated as HILPT.
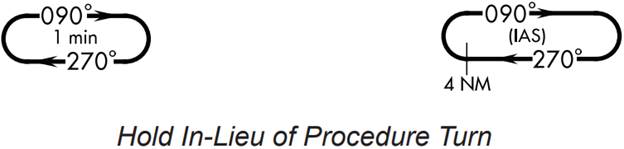
This procedure is shown on approach charts as a solid bold racetrack. A barbed arrow on the chart shows the outbound course’s maneuvering side. The chart will show the maximum leg distance or time.
You’re not allowed to descend from the minimum holding pattern altitude down to the FAF altitude until you’re established on the inbound course.
The entry procedures for a HILPT are the same as that of a regular hold, but you just fly the final approach course after overflying the fix on the inbound course. You can use it as a regular hold too if you’re coming in too high on your approach, but you’ll have to get permission from ATC first. ATC can also ask you to fly a full hold if they want some separation between your aircraft and preceding traffic.
When is a HILPT not allowed?
- When the approach chart has “NoPT” shown on the segment.
- When you’re being given radar vectors to the final approach by ATC.
- When you’re flying a timed approach.
These rules are laid out in 14 CFR Section 91.175.
You have to be careful when listening to the approach clearance given to you by ATC. If they clear you to fly a straight-in approach, you must not fly a Procedure Turn or a HILPT, even if it is shown on the chart.
If you’re not clear about their instructions, don’t hesitate to ask ATC for clarification. NASA’s Aviation Safety Reporting System has numerous reports of misunderstandings in this phase of the approach. You can read some of them here.
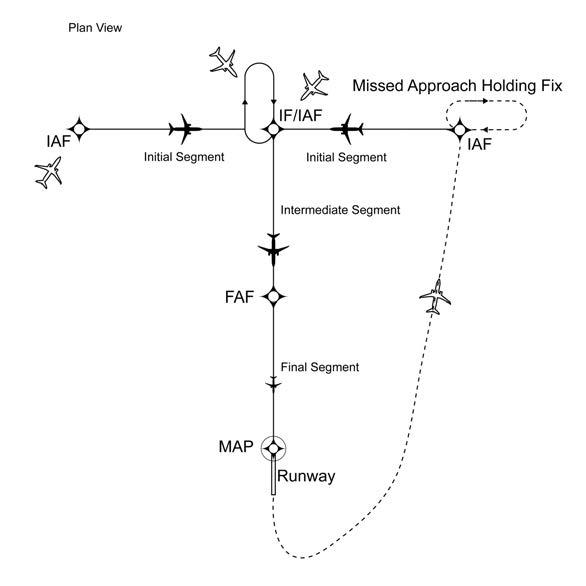
Missed Approach Holding Pattern
Missed approach procedures have a holding pattern placed at the missed approach fix. The purpose of placing a holding pattern there is for the aircraft to wait to receive instructions from ATC. It may also be used by the aircraft to wait until the problem that made them go around gets resolved.
In practice, this holding pattern is rarely used. ATC almost always redirects the aircraft back towards the approach end. The missed approach holding pattern mostly ends up being used for training, but it’ll still be there if you need to use it.
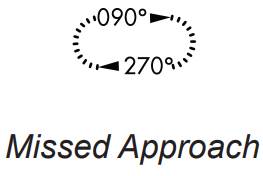
The missed approach holding pattern is shown on the chart as a dashed line. The holding fix is usually located along a straight course past the runway. Some missed approach procedures require the aircraft to make a climbing turn and fly to a holding fix located somewhere near the approach fixes as shown in the diagram below.
Some approaches have an alternate missed approach holding pattern shown on the chart too. These alternate patterns are used when the NAVAID that the original missed holding pattern uses is out of service.
No route or altitude information is shown on the chart for the alternate pattern to avoid confusing the pilot between the two holding patterns. The alternate pattern doesn’t exist in GPS databases either. You can find out how to get to the alternate pattern by looking at the active NOTAM instead.
Other Uses of Holding Patterns
Other reasons you might fly in a holding pattern include waiting for an emergency at the airport to clear out, waiting for ground staff to fix malfunctioning equipment at the airport, or waiting for weather conditions to get better for your approach.
There are even cases where the pilots may request ATC to put them on the hold. Pilots can use holding patterns to troubleshoot problems with their aircraft, figure out their course, or have some time to decide to continue with the approach or divert. Pilots on a survey, banner towing, or aerial photography mission also commonly operate in holding patterns.
Airports that have high terrain or obstacles in the vicinity often clear aircraft to climb in a hold soon after takeoff. Similarly, small airports can instruct pilots to descend in a hold on the downwind leg of the traffic pattern.
Military aircraft use holding patterns as well. Tankers fly in a hold to conduct mid-air refueling operations for smaller aircraft while reconnaissance aircraft and drones hold at high altitudes to monitor conflict situations.
Conclusion
Holding patterns, particularly entries into holding patterns, are one of the things that instrument students dread the most. A little practice planning hold entries goes a long way to preventing mistakes in the hold.
If the holding pattern rules seem a bit complicated, remember that it’s not easy to manage dozens of aircraft flying around at high speed, all trying to land at the same place. Just hold on, you’re going home.