-
Key Takeaways
-
Understanding Ground Reference Maneuvers
- The Purpose of Ground Reference Maneuvers
- The Importance of Wind Correction During Maneuvers
- Key Terms and Concepts
-
Mastering the Rectangular Course
- Selecting Your Practice Area
- Establishing Your Altitude and Airspeed
- Flying the Pattern
- Entry: Downwind Leg
- Base to Upwind Leg
- Upwind to Crosswind Leg
- Final Transition: Crosswind to Downwind
- Common Mistakes to Avoid
-
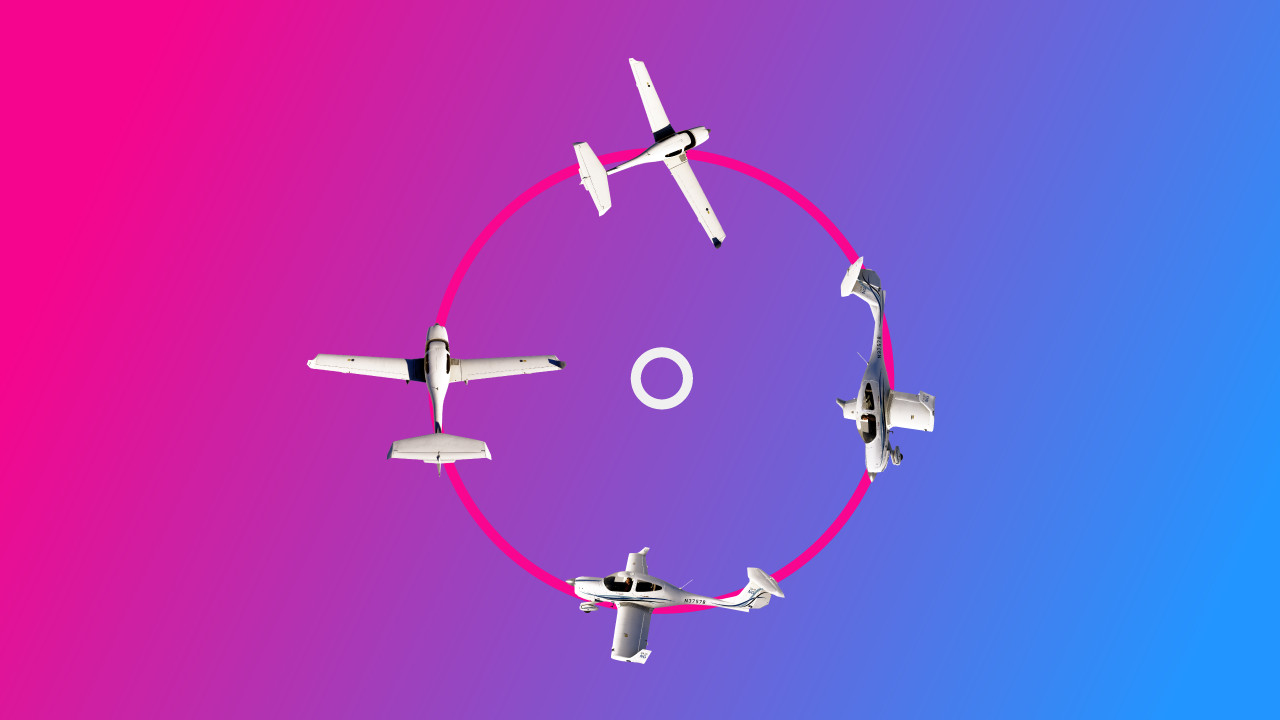
Mastering Turns Around a Point
- Understanding Turns Around a Point
- Choosing Your Ground Reference
- Preparing for Entry
- Initiating the Turn
- Changing Bank Angle
- Tips
-
Mastering S-Turns
- The S-Turn Procedure
- Common S-Turn Mistakes
-
Evaluating Your Performance
-
How to Determine Wind Direction and Speed
- Ground Reference Drift
- GPS
- Windsocks
- Smoke
- AWOS and ASOS
-
Conclusion
Ground reference maneuvers involve flying precise patterns relative to landmarks on the ground. These exercises aim to sharpen your skills and awareness in the cockpit.
Unfortunately, they’re infamously tricky.
This guide is your go-to resource for mastering these maneuvers, offering step-by-step instructions and expert tips to perfect your technique.
Whether you’re navigating S-Turns, Rectangular Course, or Turns Around a Point, we’ve got the insights to boost your confidence.
Key Takeaways
- Ground reference maneuvers train you to fly precise patterns using visual points on the ground.
- Wind correction is the core challenge—adjust bank angles and headings to stay on course.
- Practice Rectangular Course, S-Turns, and Turns Around a Point sharpen control and patterns.
- Tools like GPS, windsocks, and visual drift help you assess wind and refine your performance.
Understanding Ground Reference Maneuvers
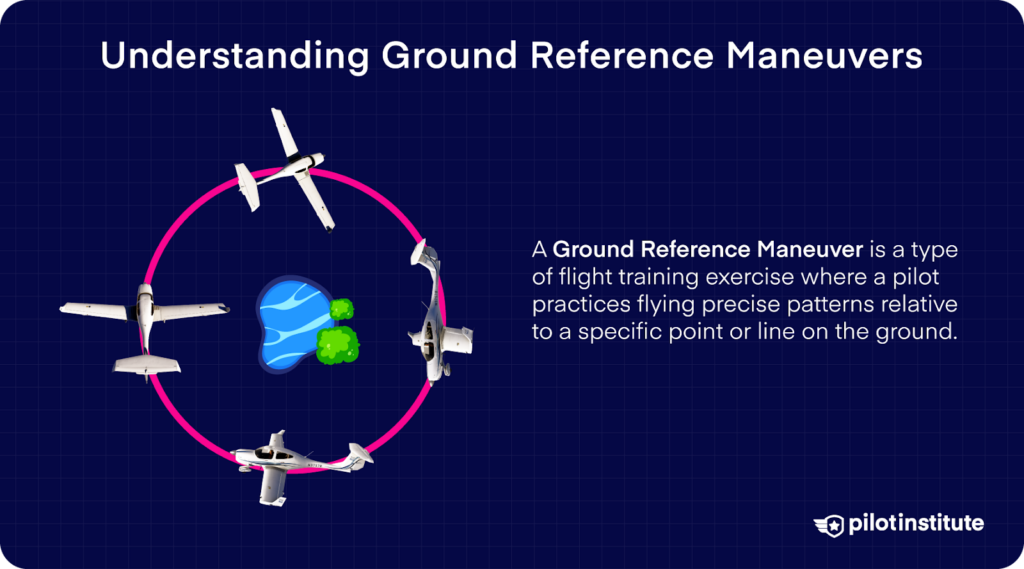
Ground reference maneuvers are a set of flight exercises where you maneuver your aircraft relative to a specific point or line on the ground.
Sounds simple, right?
While the idea is straightforward, executing these maneuvers with precision is where the challenge – and the learning—begins.
The Purpose of Ground Reference Maneuvers
First things first: Why are these maneuvers important?
Ground reference maneuvers aim to train you to accurately control your airplane under various wind conditions.
Think of them as the lessons where you learn to master wind correction, aircraft control, and situational awareness – all critical skills for a safe and proficient pilot.
The Importance of Wind Correction During Maneuvers
Let’s face it; the wind won’t always be your friend up there. It’s the invisible factor that can quickly turn a smooth flight into a challenging one.
You’ll learn how to detect and counteract the wind’s effects during ground reference maneuvers.
This means learning how to adjust your bank angle and flight path to maintain your intended course over the ground, – crucial for both safe maneuvering and accurate navigation.
This becomes particularly important when you start flying in the traffic pattern. In the traffic pattern, you’ll need to ensure that you maintain a course in relation to the runway.
Key Terms and Concepts
Before we get further into each maneuver, let’s get familiar with a few terms:
- Reference Point: A specific, easily identifiable point on the ground that you will use to guide your maneuver. In the traffic pattern, this is the runway.
- Bank Angle: The angle at which you tilt the wings of your aircraft relative to the horizon.
- Wind Correction Angle: The angle difference between your heading and your track over the ground, used to counteract wind drift.
In the sections ahead, we’ll break down the most common ground reference maneuvers (Rectangular Course, S-Turns, and Turns Around a Point) into detailed, step-by-step guides.
Your journey toward mastering ground reference maneuvers starts now.
Mastering the Rectangular Course
In this exercise, you’ll fly your aircraft in a rectangle, mimicking a typical traffic pattern at an airport.
This exercise is less common than S-Turns or Turns Around a Point, but it’s a great way to “simulate” a traffic pattern.
You need to keep the legs of the rectangle equal and parallel while adjusting for wind. Let’s dive into how to nail this maneuver.
Selecting Your Practice Area
First up, pick your rectangle on the ground. Look for easily identifiable landmarks, like roads or fields, that form a rectangle. Make sure the area is free of obstructions and other air traffic.
Establishing Your Altitude and Airspeed
Consistency is key. Choose an altitude and airspeed, and stick with it. You’ll want to perform any ground reference maneuver between 600 and 1000 feet Above Ground Level (AGL).
This ensures that you can see the ground clearly while maintaining a safe height above the ground.
Remember to be mindful of anyone on the ground. Be respectful, and remember that your airplane makes a lot of noise.
Flying the Pattern
Here’s the critical part: the wind will try to push you off course.
Your mission is to adjust your bank angle during turns and your heading during straight segments to counteract this drift. Essentially, you’re learning to dance with the wind.
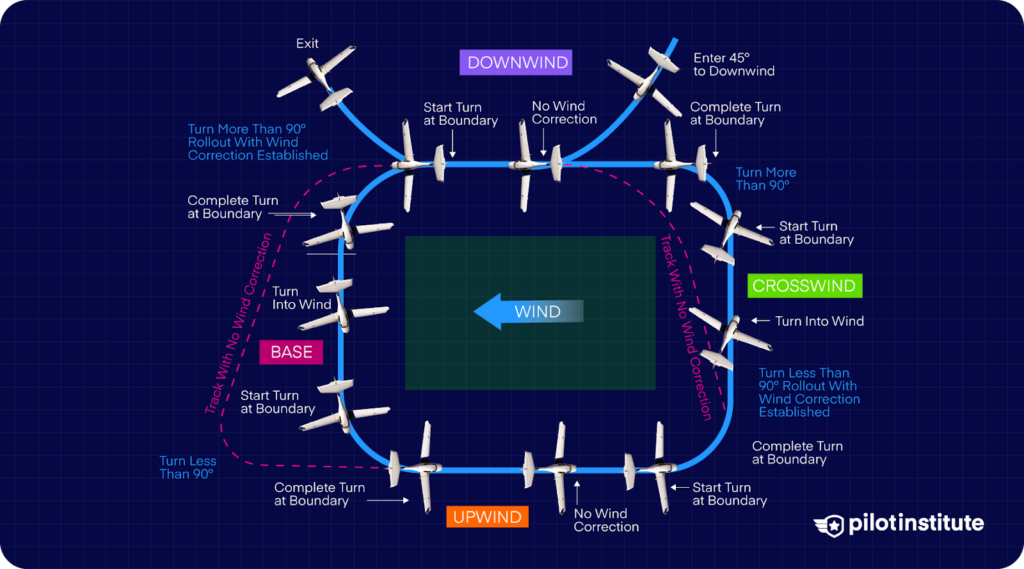
Entry: Downwind Leg
Initiate the maneuver with the wind pushing from behind – this is your downwind leg.
Enter at a 45-degree angle, as you would enter the traffic pattern.
When the wind is coming from directly behind the airplane, ideally, no wind correction angle is necessary.
Entering the base leg from downwind requires a steep bank angle. Use coordinated aileron and rudder pressures to swiftly, but not excessively, angle into this turn.
Base to Upwind Leg
As your aircraft moves from the downwind leg onto the base leg, the tailwind transforms into a crosswind.
Reduce your bank angle smoothly using coordinated controls. To account for lateral drift, make sure to angle your turn slightly inward, going beyond the typical 90°.
During the transition to the upwind leg, the wind should come from the front of the airplane. While the ideal scenario would be a direct headwind, you might still need to adjust for drift.
For this turn, use a moderate bank angle. Since you angled into the wind previously, this turn will be slightly less than 90°.
Upwind to Crosswind Leg
For this leg transition, gently roll into a slight bank.
As your airplane faces the crosswind, it will naturally drift inward. Adjust your controls smoothly and keep an angle that counters the drift.
This turn will be less than 90° because you’ll need to angle the aircraft into the wind.
Final Transition: Crosswind to Downwind
The final turn back to the downwind leg needs a moderate bank angle, necessitating a turn slightly more than 90°.
Expect an increase in groundspeed, and use smooth inputs on the controls to return to your original heading.
Common Mistakes to Avoid
- Not adequately scanning for hazards before and during the maneuver.
- Not maintaining a consistent altitude before and during the exercise.
- Inaccurate wind direction assessment.
- Incorrect wind correction angle application.
- Uncoordinated use of aileron and rudder, leading to slips or skids.
- Jerky or inconsistent flight control handling.
- Not effectively balancing between aircraft control and ground reference tracking.
- Mistimed turns during the maneuver.
Mastering Turns Around a Point
For a more detailed look at how to fly Turns Around a point, read our How to Fly Turns Around a Point Like a Pro article.
We’ll cover the basics here.
Turns around a point might initially seem like a simple circular exercise, but once introduced to real-world conditions, especially varying winds, the task quickly becomes intense.
Understanding Turns Around a Point
This maneuver requires the aircraft to maintain a consistent turning radius around a specific ground object. Its primary aim is to equip pilots with the ability to adjust for wind while using a single point on the ground as a reference.
In ideal conditions without wind, you’d maintain constant bank and airspeed, sketching a near-perfect circle on the ground.
However, throw in the wind, and the true challenge emerges.
Choosing Your Ground Reference
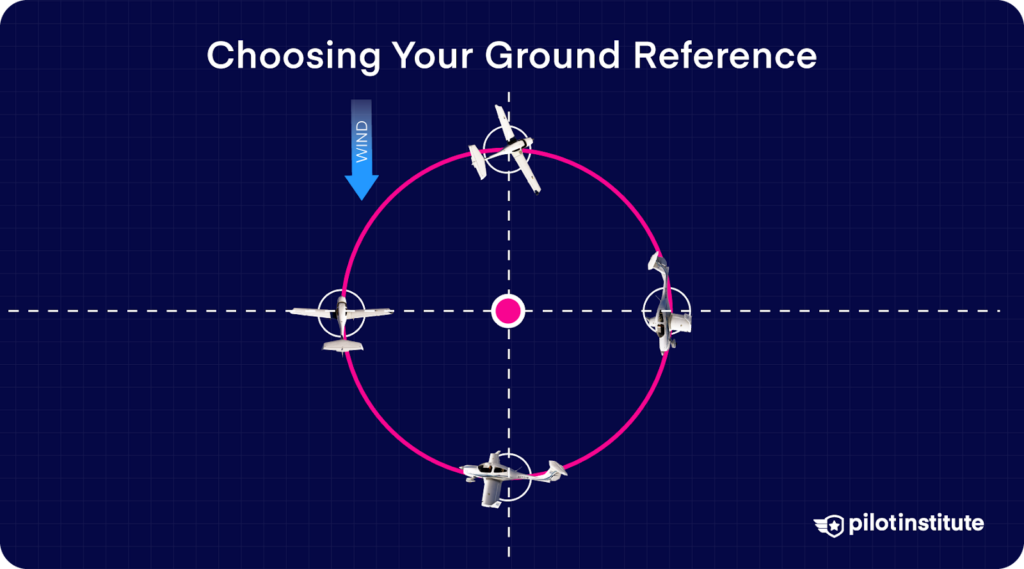
First and foremost, select a distinct ground reference. Intersecting roads at a right angle is excellent for this, allowing you to pinpoint a reference for each quadrant.
Preparing for Entry
Align the aircraft downwind (with the wind coming from behind) with your chosen ground reference.
The side you wish to turn towards is the same side that the ground reference should be (to your right for a right turn, and vice versa).
Your distance from this point will dictate your turn’s radius.
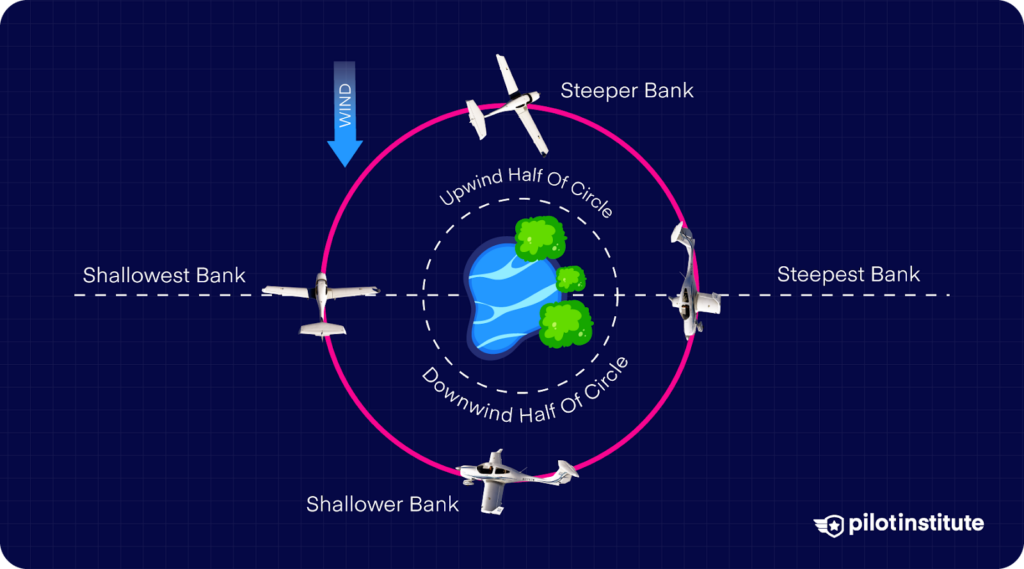
Initiating the Turn
Start your turn as you align parallel to your ground reference.
This position demands the steepest bank angle. Ensure a swift enough roll to achieve this bank angle as you pass your reference.
Changing Bank Angle
As the maneuver progresses, reduce your bank angle when turning into the wind. The shallowest bank is required as you face directly into the wind.
Gradually increase the bank angle as you rotate out of the wind, returning to the steepest bank upon completing the circle.
Tips
- Stability First: Ensure the aircraft’s stability and trim are set before entering the maneuver. An unstable entry will make altitude and bank adjustments challenging.
- Wind Assessment: Accurately determine wind direction and strength. Misjudging the wind can throw off your initial positioning.
- Maintaining Altitude and Speed: Adjust the throttle to maintain airspeed, especially with increasing bank angles. A constant altitude is paramount. Any altitude deviation can destabilize the aircraft.
- Initial Bank Caution: A frequent mistake is overbanking at the outset. Starting with a 30-degree angle and adjusting from there is advisable.
- Flexible Bank Angle Adjustments: Continuously modify your bank angle throughout the maneuver, especially under strong wind conditions. Embrace corrections as learning opportunities; initial attempts are bound to have rough edges.
Mastering S-Turns
The S-Turn offers pilots an invaluable lesson in managing wind corrections during turns.
When executed correctly, the aircraft’s path over the ground will depict two symmetrical half-circles on either side of a chosen straight-line ground reference.
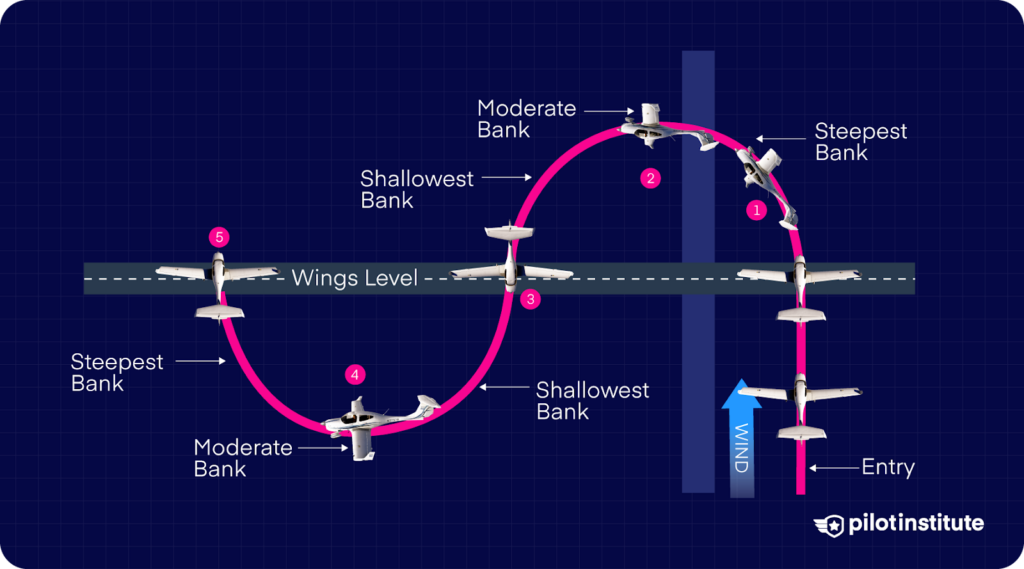
The S-Turn Procedure
Align the aircraft with a straight-line reference (like a road) at a right angle, again with the wind coming from behind.
After crossing, immediately initiate a 180° turn with a consistent radius.
Adjustments to the bank angle and roll rate are necessary to compensate for wind drift and ground speed fluctuations.
Similar to the turns around a point, your initial bank will be the steepest and gradually decrease as you come back to the straight-line reference.
On completing this turn, mirror it in the opposite direction.
You can keep turning back and forth for as long as your reference line allows (the longer the reference line, the more turns you can do).
Common S-Turn Mistakes
- Misreading the wind direction.
- Struggling with maintaining turn radius consistency.
- Rough or disjointed transitions between turns.
Evaluating Your Performance
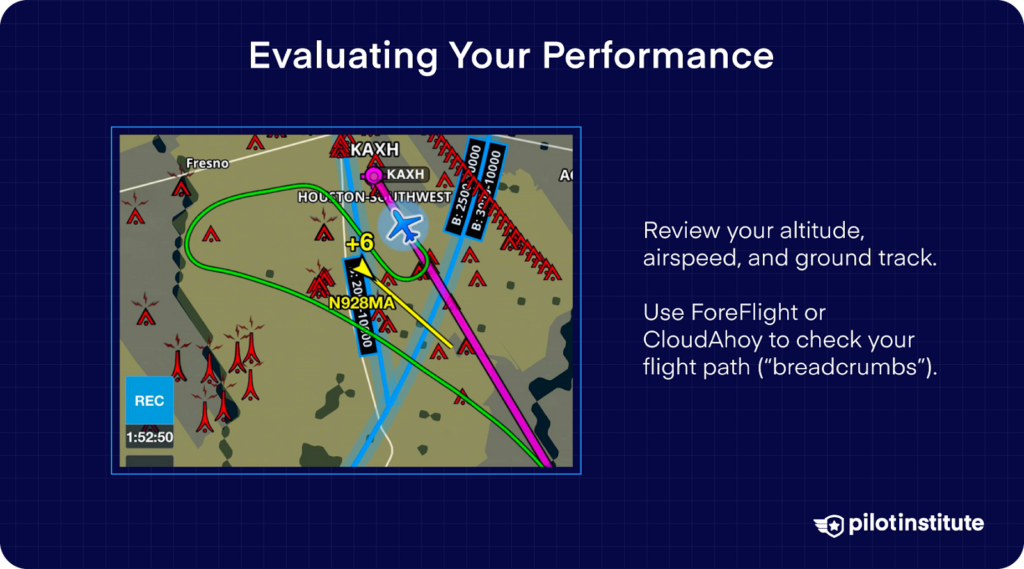
As you complete your ground reference maneuver, assess how well you maintained your altitude, airspeed, and track.
Use tools like ForeFlight or CloudAhoy to evaluate your track across the ground (known as “breadcrumbs” in ForeFlight).
How to Determine Wind Direction and Speed
Determining the wind speed and direction is the best way to set yourself up for success when it comes to ground reference maneuvers.
Without an accurate understanding of the wind, you’re practically flying blind.
Luckily, GPS can provide you with the wind information you need – but we’ll cover the old-school methods, too.
Ground Reference Drift
By comparing the aircraft’s heading with the actual ground track using landmarks, you can determine the wind direction.
Here’s an example: Pick a reference point and fly towards it. If there is wind present (and it isn’t a direct headwind or tailwind), you’ll need to point the aircraft’s nose to the left or right of the landmark.
The direction the nose points is where the wind is coming from.
GPS
Modern aircraft are equipped with advanced GPS systems that can calculate wind direction and speed based on GPS track data and the aircraft’s airspeed and heading.
This is the easiest way to determine the wind speed and direction and can be a lifesaver.
It’s worth taking the time to become familiar with your GPS to understand how to find and read wind speed and direction.
Windsocks
Windsocks are the most recognizable tools for determining wind direction at airfields.
If you’re operating in the vicinity of the windsock, it will be a great way to determine the wind speed and direction.
Smoke
The smoke offers a natural and intuitive indicator of wind direction and speed.
When released into the air, smoke will drift in the direction the wind is blowing.
To gauge wind speed, note the angle and speed at which the smoke rises and disperses. If the smoke rises vertically and lingers, the wind is calm. On the other hand, if it disperses rapidly and at a sharp angle, it indicates a stronger wind.
AWOS and ASOS
AWOS and ASOS systems provide continuous weather updates, including wind direction and speed.
This can provide the wind conditions in the vicinity of where you intend to perform the exercise.
Just like the windsocks, keep in mind that the wind won’t be exactly the same (unless you use the station as the ground reference).
Conclusion
These maneuvers look simple until you’re in the air dealing with wind and trying to hold your line. Flying a clean rectangle, nailing a perfect turn around a point, or keeping your S-Turns symmetrical takes real attention and control.
Each pass teaches you how to read the wind and respond with precision. Keep flying them. The better you get, the sharper you’ll fly in the pattern and beyond.