
-
Is your departure airport suitable for takeoff?
- Required Runway Length
- Balanced Field
- Density Altitude
-
How To Select Your Destination
- Aircraft Range
- Airplane News Update
- Picking the destination airport
-
How To Determine Your Route
- Straight Line Distance
- Great Circle Distance
- Checking The Weather
- Checking Aeronautical Charts
- Charting The Course
- Checking Airspaces
- NOTAMs and TFRs
- Selecting your Cruise Altitude
- Alternates En Route
- Assigning PIC
-
How To Plan Your Navigation
- Pilotage
- Dead Reckoning
- Making a Navigation Log
-
Filing a Flight Plan
-
Conclusion
One of the adages about piloting an aircraft is for the pilot to never let the plane go anywhere that the pilot’s brain hasn’t already been to five minutes earlier.
There’s usually not much time or spare attention available to the pilot once airborne. Airplanes are fast, and crucially, you can’t pull over to have some time to think. That’s why pilots try to offload as much of their decision-making and planning as times when they’re on the ground.
If you’re the Pilot in Command, you’re also bound by CFR § 91.103 to be familiar with all available information that’s relevant to the flight.
You should plan out the entirety of the flight, including the departure and arrival, the route, alternate airports, waypoints, fuel, weather, and other factors before you climb into the cockpit so that you’re prepared to deal with any situation that might arise during the flight.
Is your departure airport suitable for takeoff?
First things first. Is your aircraft even able to take off from where you landed it?
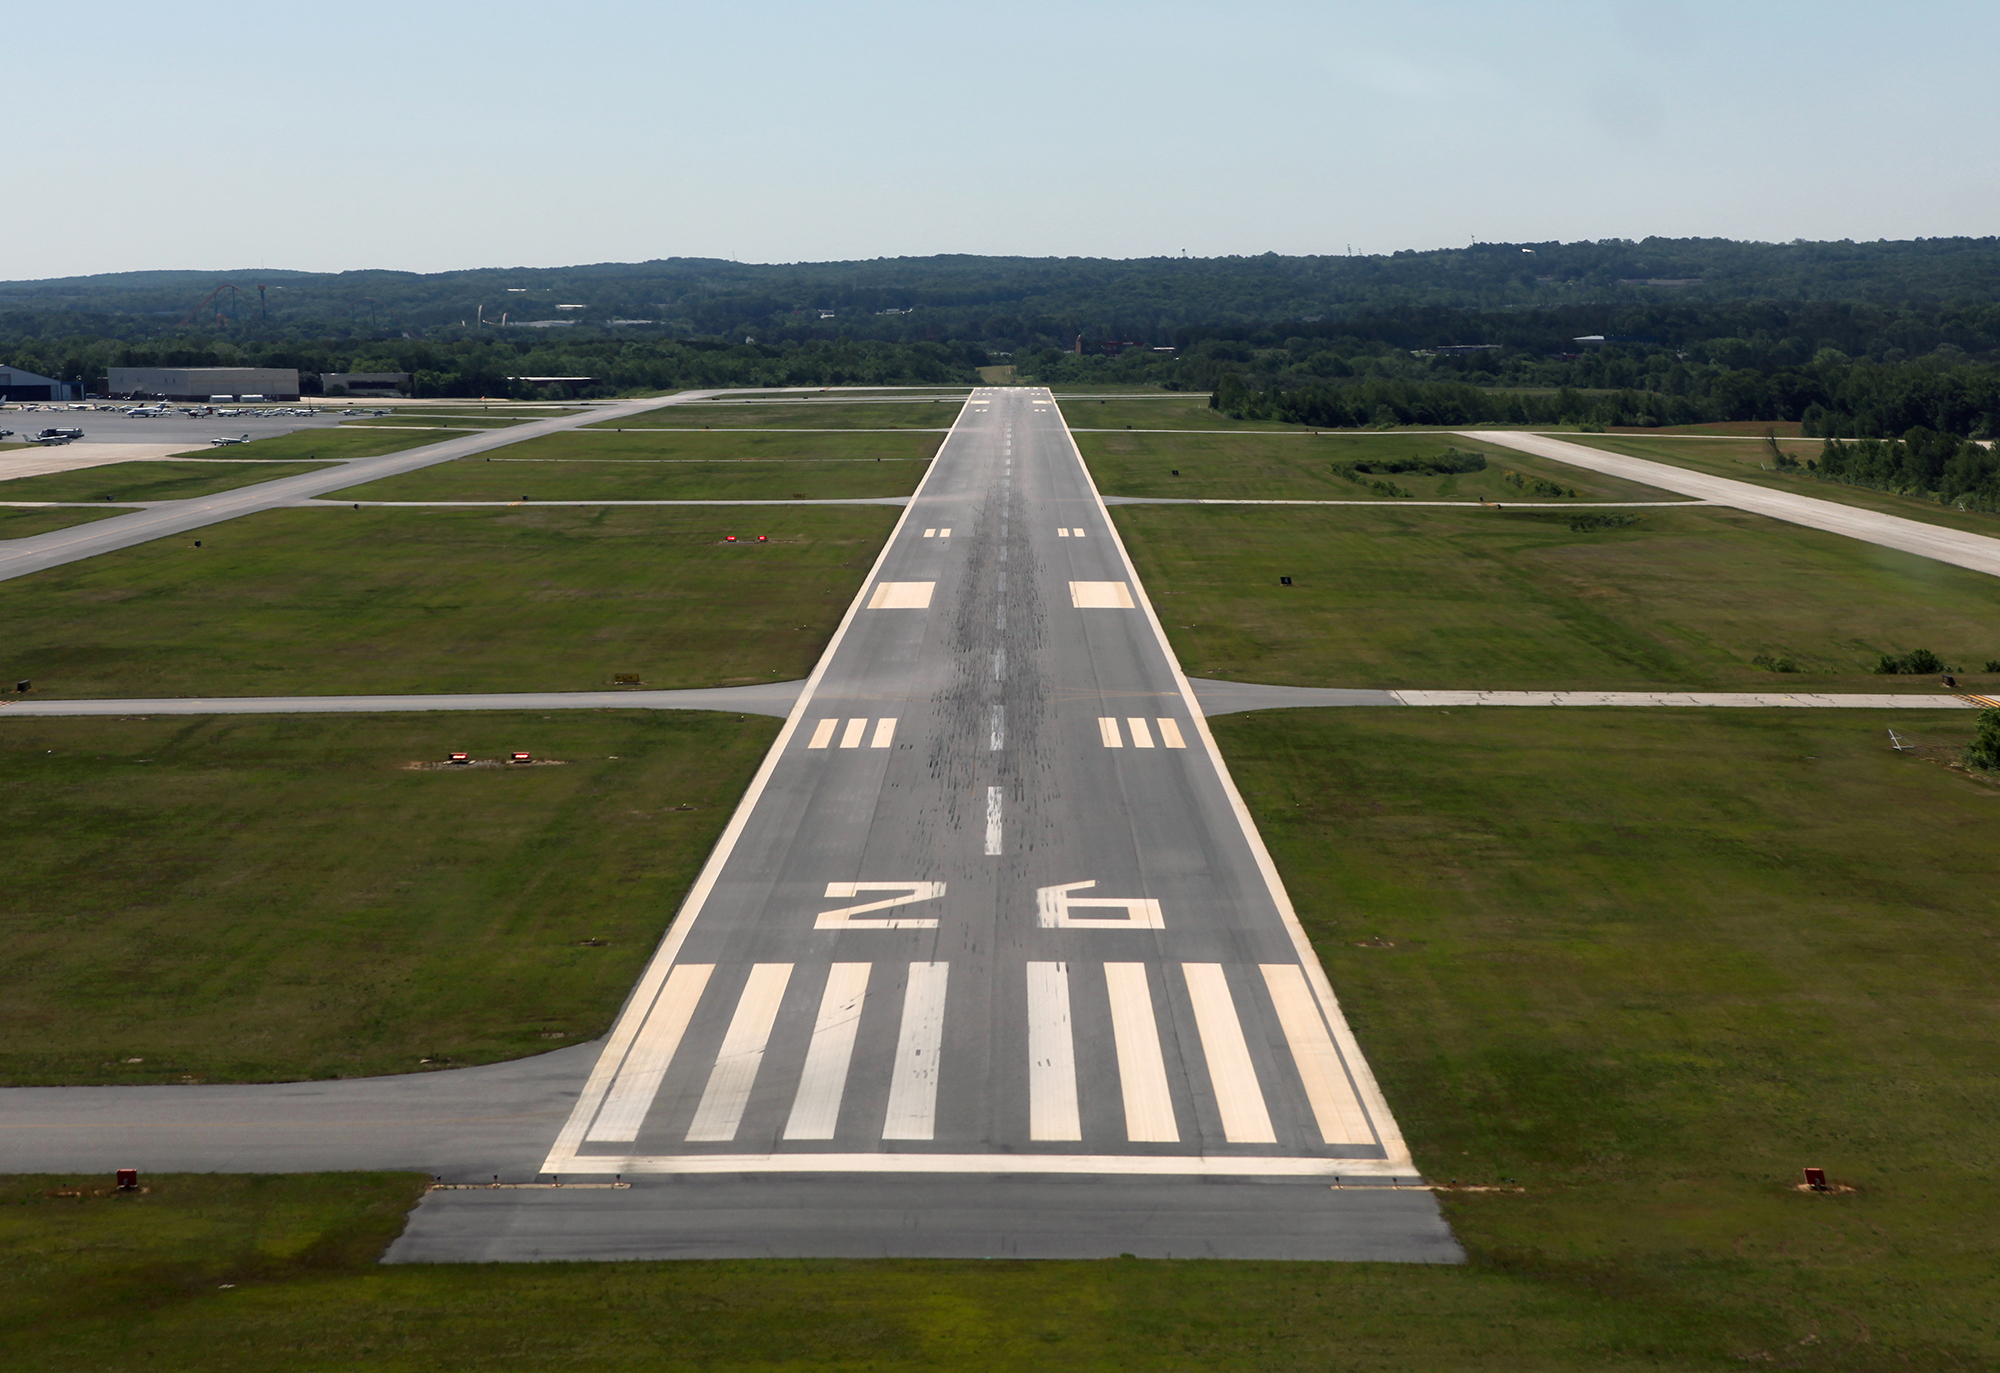
Required Runway Length
You don’t want to go through all the trouble of planning your entire flight and only then come to the realization that your aircraft can’t take off from the runway safely, so it’s wise to check this first.
The pilot should know the maximum weight that the aircraft can have to take off from the runway length that’s available.
The aircraft’s required runway length for takeoff is determined with the following assumptions:
- Aircraft is taking off at Maximum Take-Off Weight.
- Standard atmospheric conditions exist.
- The runway has no slope
If your flight is operating under different conditions, for example, you’re flying on a hot and humid day, or you’re not carrying much weight, the aircraft’s takeoff roll distance will change.
In most aircraft, you can reduce your required takeoff distance by using a notch of flaps.
Your aircraft Pilot Operating Handbook (POH) or Aircraft Flight Manual (AFM) will have the Takeoff Roll length specification for different flap configurations and aircraft weights.
Balanced Field
Next, you should find out if you’re taking off from a Balanced Airfield.
During your takeoff roll, if a serious issue develops in the aircraft, such as an engine failure or a fire, it’s the pilot’s job to decide to come to a stop or to continue with the takeoff.
If the pilot makes the decision to stop too late in the takeoff run, the aircraft might not be able to stop on the runway and might result in an overrun.
For this reason, the runway that you are taking off from should have enough length for the aircraft to accelerate to just under rotation speed, and still have enough distance remaining for the pilot to reject the takeoff and stop the aircraft safely.
If the pilot decides to proceed with the takeoff, the runway should be long enough for the aircraft to climb successfully with the remaining engine power available.
If the distance needed to accelerate and then come to a stop is equal to the take off distance needed by the aircraft after losing one engine, the field length is described as a Balanced Field.
This data is provided by the aircraft manufacturer and can be found by the pilot in the Aircraft Flight Manual (AFM) or Pilot’s Operating Handbook (POH).
The proper definition and calculation of a Balanced Field is actually quite a bit more complex. It’s intended for larger aircraft that need to operate with larger safety margins and are regulated differently.
Smaller general aviation aircraft are operated under Part 23 of the CFRs. The Balanced Field takeoff is not a legal requirement for them. But if you’re flying an aircraft that’s operating under Part 25, you’re required to meet balanced field requirements every time.
Even if it’s not a legal requirement for you, it’s still not a bad idea in the interests of safety to verify that you’re operating from a balanced field.
Density Altitude
Density Altitude is a major factor affecting aircraft performance. Most small general aviation aircraft tend to be a bit underpowered already, and the performance degradation caused by this effect can be severe enough to not allow the aircraft to even climb off of the runway.
Since the air density decreases with increasing altitude, if your departure airport is situated at a high elevation, your aircraft’s performance might not match the figures specified in the aircraft manuals. The required takeoff distance will increase, and the aircraft’s climb rate will decrease.
The density altitude also increases in hot and humid atmospheric conditions. High humidity can add up to 10 percent of your required runway length for takeoff.
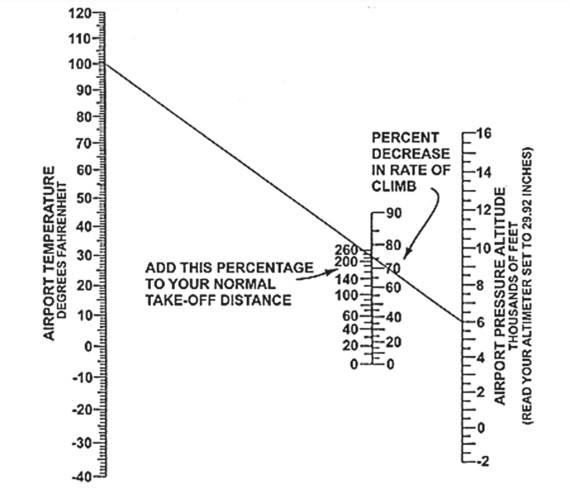
The level of performance degradation you can expect should be specified in the AFM or POH for your aircraft. If it’s not there, you can use the Koch Chart to get general rule of thumb approximations.
Consider changing your departure time to the early morning or evening on hot and humid days, or flying shorter legs to reduce the fuel load on each flight.
You need to keep the density altitude in mind for all airports that you’re departing from or arriving at. This factor alone might make some airfields unsuitable for your aircraft.
How To Select Your Destination
You have a general idea of where you intend to go. But you need to consider some factors to see if you can actually make it to your intended destination safely.
Aircraft Range

The first thing to consider is your aircraft’s range. Wait, don’t just read the aircraft’s brochure! Your aircraft’s range varies with and is limited by the amount of payload it is carrying.
It might surprise you to know that most small general aviation aircraft are not able to carry a full load of passengers, a full baggage load, and full tanks of fuel at the same time.
Weight and Balance
There are a few important weight specifications that the pilot must always keep in mind:
- Max Gross Takeoff Weight: The maximum weight with which the aircraft is allowed to take off.
- Basic Empty Weight: The weight of the aircraft without anyone on board, without cargo, or fuel.
- Useful Load: Subtract the Basic Empty Weight from the MGTW, and you have your Useful Load. This includes the weight of the fuel onboard, the weight of the pilots and passengers, and any cargo you’re carrying.
- Usable Fuel Load: The weight of the fuel that you can use for flight planning. It’s usually not equal to the total fuel capacity. The aircraft is not able to reliably use some fuel right at the bottom of the tank, so it’s not counted.
- Payload: The difference between the Useful Load weight and the Usable Fuel Load.
The amount of weight being carried by aircraft has a significant effect on its performance. If you’re flying heavy, you’ll find it harder to climb up to your cruise altitude. Your takeoff and landing requirements also increase, and the airframe will be subjected to greater stress.

It’s not just the amount of weight that matters, how it’s distributed throughout the aircraft is also very important. The position of the aircraft’s Center of Gravity (C.G) affects its stability. Each aircraft has a specified range of C.G that the aircraft is designed for.
Weight and balance limits can be found in the AFM or POH. Manufacturers provide data for a range of load scenarios and have graphs or tables that you can use to get estimates for weight and balance.
During your flight planning, you should compute the total weight as well as the C.G position for your aircraft to ensure that they don’t exceed limits.
As the flight progresses, the aircraft consumes the fuel it is carrying, which causes a change in the weight and balance of the aircraft. You should calculate weight and balance for the end of the flight as well. The C.G you calculated for the start of the flight is likely to have moved by the end of the flight.
Calculation of Weight and Balance is critical for each flight. The FAA offers a Weight and Balance Handbook that you can use to get a deeper understanding of this subject.
Fuel Load
Since both the fuel and the payload adding up to the MGTW, you need to calculate just how much fuel you’re able to take with you once you know your payload. If it’s not enough to get to your destination, you’ll have to plan your flight to have a fuel stop along the way.
Keep in mind while calculating your fuel load that you need reserve fuel as well.
If you are flying under Visual Flight Rules (VFR), make sure you have at least enough reserve fuel for 30 minutes of additional flying time. If you’re flying at night, you should have enough fuel for at least 45 minutes of additional flying time. These requirements are specified in § 91.151 of the CFRs.
If the flight is being conducted under Instrument Flight Rules (IFR), you need enough reserve fuel to fly to your planned alternate airport, and 45 additional minutes of cruise flight. If you’re flying IFR, your flight is governed by CFR § 91.167.
The fuel load you end up with determines the aircraft’s range. The range, in turn, determines if you can make it to your destination, and if not, then how many additional stops you might need to make.
Another major factor affecting the aircraft range is wind. Your aircraft will take more time to cover ground if it is facing heavy headwinds. It’s possible to lose so much time that you might not be able to make it to your destination without requiring a stop for refueling.
If your aircraft is unable to take off from your origin airfield, you can consider taking off with only a small amount of fuel and plan to take on a greater fuel load at an airport with a longer runway.
This strategy is even employed by large airliners sometimes. The most well-known example of this was British Airways flight BA001 from London to New York JFK. This flight used to depart from the severely cramped London City airport and was operated using Airbus A318s.
The A318 was not able to take off from City airport’s short runway with enough fuel to take it all the way across the Atlantic, so it used to fly to Shannon airport in Ireland carrying a low fuel load and only then took on enough fuel for the whole journey.
Remember to make allowances for fuel spent during taxi or in a hold. The fuel burn here could be significant enough to make major changes in your route. In 1990, an Avianca Boeing 707 crashed in New York, because it had been holding for so long that it ran out of fuel.
Be very careful about estimating your fuel burn. It’s better to make your estimates conservative when calculating your fuel load, to be on the safe side.
Picking the destination airport
Now that you know where your aircraft can go, it’s now time to select the specific airport. There are over 19,000 airports in the United States and most communities have more than one small airfield.
You’d want to land at the airfield that’s closest to the part of town you want to visit, but you need to make sure it’s able to handle your aircraft.
Runway Availability
Your first consideration should be the available runway length. The FAA provides a database that has detailed data for airports in the US. You can use this database to find out all available airports in the city you’re flying to, along with details about the available runways.

Aircraft manufacturers provide the required stopping distances for a given payload and aircraft configuration in the airplane’s Pilot Operating Handbook (POH).
If the weather is inclement, you need to consider the increased stopping distance needed on runways that are contaminated with water or ice. Density Altitude also affects the aircraft’s performance on approach and landing, so keep that under consideration as well.
In case of low visibility, pick the airport that has navigational aids such as an ILS, or published GPS approaches. Even if you might have to make a longer drive, picking the airport with the safer runway is usually not a bad idea, and it’s easier to drive in bad weather than it is to fly in it.
Check if your aircraft has the required equipment as well. If an approach needs a DME, or two navigational radios, you need to make sure that they’re available and functioning on your airplane before you set off.
The longest runway on the airport isn’t guaranteed to be the runway in use at the time you arrive. If the runway is closed temporarily, you’ll need to make sure the other available runways are long and wide enough for your aircraft.
Similarly, it’s possible that crosswinds may make a different runway more suitable for landing. Keep the weather and winds at your destination in your mind when selecting your destination airport.
Remember that the safety of the flight, the aircraft, and the passengers is on you as the pilot. If, in your judgment, safety is going to be compromised at your desired destination, there’s no shame in rescheduling for better weather or picking a different airfield to land.
Availability of Facilities
Your chosen airport might have a runway that suits you, but you also need to check if other important facilities are present too.
Checking the Chart Supplements
Airport information is provided in the Chart Supplements U.S that are published by the FAA and are available in printed form or here.
You can use the Chart Supplements to see the basic airport information, diagrams to familiarize yourself with the airport layout, and other information that might be useful for you if you’re unfamiliar with the area.
The Chart Supplements will let you know the airport’s hours of operation, the types of fuel that are available, and any special notices that apply there. You don’t want to line up on final approach and only then find out the field is closed, right?
Checking with FBOs
You should also contact the FBOs that are active at your planned destination. FBOs are Fixed Base Operators. They’re basically companies that are running facilities at the airport.
You’ll be dealing with them to get your aircraft refueled, arrange any hangar space that you require, do de-icing services, or other ground handling services that your aircraft might need.
They also provide services for pilots and passengers such as rest areas or lounges.
You should check for these facilities at each airport you plan to land, as well as your planned alternate airports.
How To Determine Your Route

The aircraft and the pilot need to be capable and licensed to fly the planned route.
If the flight is to be conducted in marginally bad weather, see if the conditions at any point along with the route drop below VFR minimums.
VFR minimums are detailed in § 91.155 and depend on the type of aircraft, the airspace it’s flying in, and whether it’s flying in day or night.
In case conditions deteriorate down to IFR, you must have an IFR-capable aircraft and be Instrument Rated yourself, or else you’ll have to turn back.
If you’re flying at night, you as the pilot in a command need to have night currency in order to legally carry passengers later than one hour after sunset or earlier than one hour before sunrise.
Night currency requires you to make three takeoffs and landings to a full stop at night within the previous 90 days.
The pilot’s and aircraft’s limitations may restrict some routes for you, so only plan your route after making sure you can fly it legally.
Straight Line Distance
When you’re planning your route, it makes sense to make a route that is as direct as possible. Any unnecessary diversion costs fuel and time.
With that said, it’s pretty uncommon for the final planned route to end up being just a straight line between the origin and the destination of the flight unless the flight is very short.
When you’re flying cross country, there are a lot of factors that affect your routing. It’s okay if the final route ends up looking a bit convoluted.
Great Circle Distance
What’s the shortest distance between two points on a map? A straight line, right?
Maps display the world in a flat, two-dimensional manner. In reality, the curvature of the Earth makes the shortest distance between two points look more like an arc than a straight line.
This is called the Great Circle Distance. Since we’ll be traveling along the surface of a sphere, flying in a straight line will end up looking like a curve on a two-dimensional map. The effect only becomes more significant when the distance between the two points is large. It’s also more pronounced near the poles.
If you’re planning a long-distance flight, you should select your waypoints in such a way that the overall route runs close to the Great Circle route. For shorter flights, you don’t need to bother since the difference won’t be significant.
Checking The Weather
It’s recommended to check the weather before going through the entire flight planning process. The weather can determine not just the route you’ll be taking, but also if your flight can even be conducted at all.
Airports provide current weather in the form of a METAR that is updated on a regular basis. Other pilots flying in the area offer weather information in PIREPS or pilot reports.
Forecasts are provided for the area around the airport in a report that is called a TAF. These forecasts are valid for 24 or 30 hours and are updated four times a day.
Regions in between airports are covered by Area Forecasts. Winds aloft data is provided by the NOAA.
The pilot can get a good idea of the weather outlook by combining information from the sources described above. It is still recommended to get a weather briefing from a specialist at a Flight Service Station (FSS) to get a more comprehensive advisory report for your flight. Contact details for FSS are available in the Chart Supplement U.S.
The weather briefing will inform the pilot of any adverse conditions that exist along the route. This includes any significant weather such as icing or thunderstorms and information such as airport closures. This can influence the pilot’s decision to delay or cancel the flight.
If the weather along the route falls below VFR minimums, the briefing will include this information and may recommend flying IFR.
All of this weather information is taken into consideration and only then does the pilot decide to go ahead with the flight or not. Remember that weather forecasts are not guaranteed to be 100 percent accurate.
If you decide that conditions are safe for the flight, you should adjust your route to avoid significant weather.
Checking Aeronautical Charts
At this point, we have our departure and destination airports, and a general idea of the route in between. Rarely, though, are there going to be flights that don’t involve further complications.
Pilots use aeronautical charts to plot their course and to pick out waypoints that they use to monitor their progress.
If you’re flying VFR, you can use the following types of aeronautical charts:
- Sectional Charts
- World Aeronautical Charts (WAC)
- VFR Terminal Area Charts
Sectional charts are the most commonly used chart for VFR flight planning. WAC charts have a smaller scale, so they won’t provide as much detail as the Sectionals do, but are otherwise very similar.
VFR Terminal Area charts provide additional detail for areas inside or close to Class B airspace.
Remember to use a plotter that’s calibrated to the same scale that your chart uses.
You can use the charts to plan your route around obstacles and airspaces. When you’re in the air, you can use it to orient yourself by matching the landmarks outside with your position on the charts.
Charting The Course

Here’s a step-by-step guide to using the charts to plot your route.
Firstly, locate your departure and arrival airport on the chart. Draw a straight line between both points. If you’ve determined that you’ll need to stop for fuel on the way, include these airports as well by segmenting your lines.
Look at where your lines are passing. Adjust your route to avoid high terrain or obstructions. See if you’re going through any controlled airspace or restricted area.
These restrictions are usually altitude limited, so you can cross them If your aircraft is able to maintain an altitude high enough. If not, you’ll have to adjust your route to avoid them.
Remember that weather briefing you took? Mark severe weather along your planned route and see if you have to detour to avoid it.
Then divide each line into divisions roughly 10 Nautical Miles apart. Look for any significant landmarks near your divisions. These will form the waypoints that you’ll use to monitor the flight progress and navigate.
You need to carefully select your waypoints. If you’re using landmarks, they should be unique enough to be positively identified and large enough to be easily visible from altitude.
Linear landmarks such as highways, railroads, rivers, or power lines are easy to find, but remember that they don’t give you an exact fix. You’ll know that you’re crossing them, but you won’t know where along their length you’re crossing them.
You can use populated areas as landmarks. They are marked in yellow on charts, but be sure to use large towns or towns that have something unique that you can use to positively identify them. Man-made landmarks can change over time, so make sure you’re using an updated chart.
Look for landmarks that are slightly abeam your route. You won’t be able to see them if they pass directly under you.
You can also use a bit of radio navigation to help you out. Look out for VOR stations close to your route and check their bearing to your waypoints. They can serve as a way to cross-check your position, or even serve as waypoints themselves.
Here’s an example of a route planned on a chart using the steps described in this section:
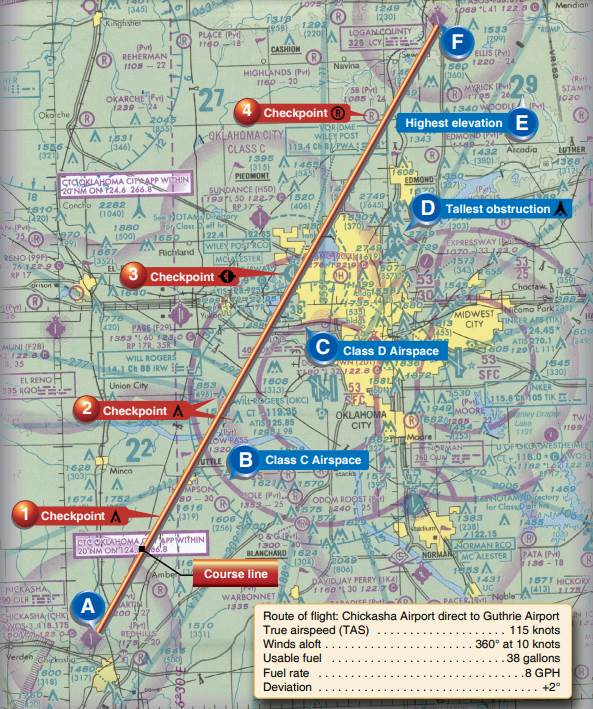
The route you mark on the chart is your True Course since the chart is aligned to True North.
Checking Airspaces
Handy with a chart? You’ll need to be if you want to stay out of trouble. The US airspace is divided into five types of controlled airspace. Each type of airspace has its own rules.
General aviation aircraft usually deal with Classes B, C, D, and E. You need to get clearance from ATC before entering Class B, C, and D airspaces.
Violating airspaces is something that the FAA really does not appreciate, so brush up on the rules about each of them before you plot your course.
If you’re not planning on being guided by ATC, you’ll have to fly in uncontrolled Class G airspace. You might have to plan your route to avoid controlled airspaces.
Also marked on charts are Special Use Airspaces. These include Prohibited and Restricted Areas, and even Military Operated and Controlled Firing Areas (CFAs).
Each of these areas has its own specific rules, so familiarize yourself with the restrictions in place in areas along your route.
NOTAMs and TFRs
NOTAMs are Notices to Airmen. NOTAMs have aeronautical information that is relevant to a particular area or time.
It can include information about airport closures, hazards, temporary unavailability of Navaids, or any other kind of short-term information of importance.
You should look up NOTAMs that would be active along the planned route at the planned flight time. The FAA maintains a database of NOTAMs that can be accessed here.
TFRs are Temporary Flight Restrictions. These are short-term airspace closures intended for safety or security purposes. TFRs are issued as a type of NOTAM.
They can be issued in case of VIP, Space Agency Operations, or emergency response to a disaster being carried out in the area. TFRs are usually issued 30 days in advance, so you can look them up here while planning your route.
Some TFRs may allow you to fly through the affected airspace but might impose certain conditions such as having an active flight plan or requesting flight following.
Contact local Flight Service Stations (FSS) just before your flight to get updated information about TFRs active on your route.
Selecting your Cruise Altitude
Now that we’ve checked the weather, noted obstacles and terrain heights on the chart, and looked up airspace restrictions, we’re now in a good position to decide our cruising altitude.
Sectional charts have a Maximum Elevation Figure for each grid section on the chart. This altitude provides at least 100 feet of clearance from all obstacles and high terrain in the section. You can find lower altitudes to fly at by looking at the section of the chart that your route goes through.
What about collisions with other aircraft?
VFR flying is all about seeing and avoiding, but CFR § 91.159 does help avoid collisions with other aircraft. This rule applies to aircraft flying VFR between 3,000 feet AGL and 18,000 feet MSL.

This rule says that aircraft that are flying on a magnetic course of 0 to 179 degrees have to maintain odd thousand-foot altitudes plus 500 feet. This means you can select 3,500, 5,500, 7,500, and so on while you’re flying in an easterly direction.
If you’re flying on a magnetic course between 180 degrees and 359 degrees, you can select even thousand-foot altitudes plus 500 feet.
Once you’ve determined you won’t be hitting anything, you can look ahead to the weather. Wind speeds and directions vary with altitude, so use the winds aloft data that you received in your weather briefing to determine where the winds are most favorable for your flight.
With that said, you’ll want to fly as high as conditions favor for three reasons.
The first reason is safety. If you’re flying higher, you have more time to react to emergencies. Your choice of forced landing sites also increases if you’re higher up at the time of engine failure.
The second reason is engine performance. Air density decreases with increasing altitude, so the aircraft experiences less drag. You’ll be able to lean the mixture and save more fuel by flying higher.
The third reason is that higher altitudes are less likely to have turbulence, so you might have a smoother ride up there.
Alternates En Route
Expect the unexpected. Or at least plan for it, anyway. When you’re planning a flight, always have a backup or alternate airfield in mind. If you’re flying cross country, it’s wise to keep track of airfields along your entire route that you could divert to in case of an emergency.
It’s not a bad idea to realign your route so that you fly closer to other airfields. In case of an engine failure or a medical emergency, the closer you are to a safe place to land, the better your odds will be.
Your aircraft POH or manual will have the glide ratio specified for your aircraft. Glide ratios determine how far the aircraft can travel horizontally for the vertical height it loses in case of a loss of engine thrust. Use the glide ratio as a guide for aligning your route according to the altitude you plan to fly at.
Assigning PIC
If you’re flying with another pilot, you should decide before the flight which of you will be acting as the Pilot in Command (PIC). The Pilot in Command is the person who’ll be responsible for the conduct and safety of the flight.
How To Plan Your Navigation
There are two basic techniques that are useful for navigation on a cross-country flight. These techniques are pilotage and dead reckoning. You’re not bound to just use one or the other, you can use a combination of both to cross-check your location. Both of these techniques do need some planning, so it’s best to prepare for them while you’re planning your flight.
Pilotage
Pilotage is the art of navigating using landmarks and waypoints as references. We’ve already established our waypoints earlier in this guide.
It’s helpful to keep looking at your map throughout your flight so that you are always aware of the aircraft’s general location. This prevents precious time spent in re-orienting yourself to look for an airfield in case of an emergency.
Always navigate from the chart to the landmarks instead of the other way around. Remember that it’s always possible for there to have been changed in the landscape after the time the map or chart was printed. Use the most recent maps available, and make sure your charts have not expired.
Dead Reckoning
Dead Reckoning is when you use your knowledge of the aircraft’s speed and direction of flight to figure out your present location relative to a known point.
Dead Reckoning is also useful for locating yourself between two-waypoints.
If you select an initial point such as an airfield and then record your Ground Speed and Track, you’ll know how far you’ve gone from the airfield in given time duration.
You can use this to estimate the time when you’ll be approaching your next waypoint or landmark and can be on the lookout for it as it approaches.
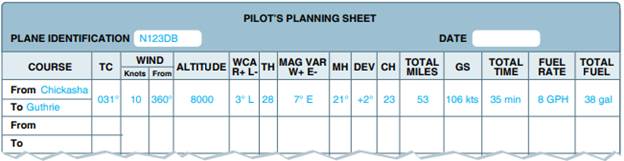
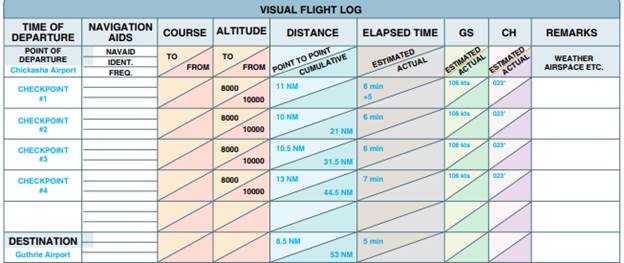
Making a Navigation Log
You know the route you’ll be taking and you’ve mapped out the VFR and IFR waypoints that you’ll be ticking off along the way. The purpose of the navigation log is to monitor your flight’s progress.
The nav log allows you to keep track of time, distance, and fuel consumption. When you’re using the nav log, you’re actually making use of pilotage and dead reckoning techniques simultaneously.
If you use a flight planning app, it probably has a function that prints out a navigation log based on the flight plan you create. If you’re flying old-school, you can make your own nav log manually.
Nav logs are usually presented in the form of a table, you can either print out a standard one or just roughly make yours on your own.
Navigation logs are prepared before the flight, with some sections pre-filled on the ground, others left empty where you’ll be recording data as the flight progresses.
The start of the nav log contains the particulars of the day’s flight. You can record the date, the name of the pilot, the co-pilot, and the aircraft type and registration.
Recording Flight Times
Next, we come to the flight time section. Here you’ll be leaving spaces to record some important times:
- Time of Chocks-off
- Time when Airborne
- Set Course time
- Landing time
- Time of Chocks-on
Why are these times useful? There’s more detail provided in this article, but here’s an overview. The time duration between Chocks-off and Chocks-on times will be the pilot flight time that you record in your logbook.
What’s the Set Course time?
The Set Course time is the time that you use as a reference to begin your timekeeping for your navigation log. It’s when you actually ‘set your course’ as planned in your nav log. You shouldn’t use the Chocks-off time for this, since you’ll be losing a bit of time during taxi.
For smaller airfields, you can use the time that you get airborne to set your course. Larger airports may require you to enter a hold while you climb, or might have you take off from a different runway than you initially planned.
For this reason, your actual flight times will be closer to your estimates if you note down the time you actually set course on your route.
You might pass through several time zones during your flight. Using local time would probably make your navigation log incomprehensible, so record all times in Universal Coordinated Time (UTC). In order to convert the local time into UTC, use the following conversions:
Eastern Standard Time – Add 5 hours
Central Standard Time – Add 6 hours
Mountain Standard Time – Add 7 hours
Pacific Standard Time – Add 8 hours
Remember to check if Daylight Savings Time is active or not as well.
What to write in the Nav Log
Remember the waypoints we established earlier? We can divide our flight into sections based on our waypoints. Each section is called a ‘leg’. If your flight has a lot of legs, you can further divide them into ‘sub-legs’, but the concept is the same.
Each leg or sub-leg is represented as a row in the nav log. They are defined using the waypoints where they start and end. In the nav log, this is written down in the FROM and TO rows.
Other columns are where you record all the other data for each leg. Relevant data for each leg includes recording your planned heading, altitude, and speed.
You should also include estimates for time duration and fuel consumption for each leg, then check them with actual data when you fly.
Figuring out your Headings
The second column is where you write down the True Course for each leg. You found the True Course out when you plotted your route on the map. You should note it down here for each leg so that you can reference it quickly while you’re flying.
As mentioned earlier, you need to know the winds aloft if you don’t want to drift away off course. The wind speed in knots and the direction from which it is blowing should be noted down. Of course, keep in mind that these are estimates, so the actual wind might vary when you get there.
We need to know the Wind Velocity in order to apply the right Wind Correction Angle (WCA) for maintaining our course. The Wind Correction Angle can be found out using the wind side of a flight computer.
If the wind is blowing at you from the right, you need to add the WCA to the True Course. If you’re getting wind from the left, subtract the WCA from the True Course. Applying the wind correction gives you the True Heading.
Remember, Course is the aircraft’s direction of travel, while Heading is where the aircraft’s nose is pointed.
If winds are calm, then the True Heading will be the same as the True Course, but this condition is pretty uncommon.
You can find the wind velocity from winds aloft data that’s provided by the National Weather Service.
Now that we have the true heading, we need to figure out the magnetic heading. General aviation aircraft have a heading indicator that is synced with a magnetic compass. This is why we need the magnetic heading instead of the true heading. The difference between them is called Magnetic Variance.
Magnetic Variance is defined as the angle between the True North and the Magnetic North. The extent of the variance differs depending on the geographic location.
The correction needed for a particular airfield is listed on its respective charts. Adding or subtracting the Magnetic Variance as required to the True Heading gives us the Magnetic Heading.
Note that we applied the wind correction to the True Course, not the Magnetic Course. This is done since winds aloft data is provided with reference to True North.
The Magnetic Heading can be read off of the aircraft’s magnetic compass, but there’s another factor to correct for here. Since each aircraft has its own unique localized effect on the internal magnetic compass, each aircraft has its own Magnetic Deviation adjustment that is made to readings from its magnetic compass.
The Magnetic Deviation for each aircraft can be found on its own compass deviation card. Applying the Magnetic Deviation to the Magnetic Heading leads us to the final Compass Heading that we can use to navigate accurately.
All of these headings need to be calculated for each leg in order to get the final Compass Heading that you’ll be using throughout the flight. Given a large amount of workload, you’ll probably appreciate doing it on the ground instead of on the fly!
Time Estimates
Now that you know where to point the nose, let’s see how long it takes for us to get there.
The only speed constant throughout your cruise will be your Indicated Air Speed (IAS).
You can use manufacturer recommended cruise speeds for an economical or high-speed cruises as per your requirement. These values of IAS are provided in the AFM or POH.
The IAS cannot be used to figure out your time estimates, it needs to be converted into True Air Speed (TAS) and then into Ground Speed (GS). Details for carrying out this procedure are provided here.
Since your Ground Speed is dependent on the Wind Velocity, you’ll have to calculate it for each leg separately. Similarly, your True Airspeed will vary with the altitude, the local pressure, and the temperature.
You know the distance that you’ll be covering from the plot you made on the map, so simply dividing the distance by the Ground Speed will give us the Estimated Time En-route (ETE) for each leg.
Make sure your units are consistent! Ground Speed is given in knots, which are nautical miles per hour. For legs that have a duration of less than an hour, convert the time from minutes to hours before you use it in a formula.
Adding the Estimated Time En-route to each successive leg will give us the Estimated Time of Arrival (ETA) at each waypoint. When you arrive at the waypoint during your flight, note your Actual Time of Arrival (ATA). You can compare your ATA with your ETA to figure out if you’re ahead of or behind schedule.
If there’s a significant difference between your ETA and your ATA, don’t worry. Just recalculate your estimates by adding the ETE to the Actual Time of Arrival to get the new ETAs.
You can use your time estimates to figure out if you’re arriving ahead of or behind schedule. You can also use them to respond quickly to ATC queries about your estimated arrival times at any waypoints if required.
Fuel Estimates

The rate at which your aircraft consumes fuel at the specified cruising speed is written down in the Aircraft Flight Manual (AFM) or Pilot Operating Handbook (POH).
This rate is given in terms of Gallons of fuel consumed per hour. It’s a simple matter to determine the fuel consumption for each leg. Multiply the ETE with the fuel consumption rate to get the fuel burn estimate for that leg.
In another column, initially write your total usable fuel on board, and then subtract the fuel consumed for each leg to get the estimated fuel onboard at the end of each leg.
Then, when you’re in flight, you can use the aircraft’s fuel consumption gauge to note down the actual fuel consumption, and the fuel gauge to check the actual fuel on board. Compare the actual values with the estimates to see if they match.
A mismatch in fuel consumption can be a symptom of your aircraft requiring some maintenance. Drastic differences in readings might indicate something more serious, such as a fuel leak.
Reference Data
It’s helpful to note down other relevant data for each leg on your nav log as well since you’ll be referencing your nav log throughout the flight. You should note down the planned altitude you’ll be flying at for each leg while leaving space to write down the actual altitude once the flight is in progress.
You might be directed to fly at a different altitude by air traffic control in case of traffic congestion, or you might find weather conditions unfavorable at your planned altitude.
You should note down the radio frequencies you expect to contact while en route. Air Traffic Controllers do provide the frequency when they hand you over to the next controller, but it’s helpful to have them written down beforehand. This helps in the case of garbled radio communications and reduces the chances of mishearing the correct frequency.
This applies to navigational radio too. If one of your waypoints is a VOR station, or it’s an airfield with a beacon, you should note down the station’s frequency beforehand so that you can tune it in without needing to look at the airport charts.
You can also add a remarks section, where you can put any reminders for yourself for anything that you might need at that point in the flight. This can include any NOTAM or Weather information or any other useful note.
Remember, the goal here is to offload as much of the work as possible to the time when you’re on the ground. It’s harder to do even seemingly trivial tasks while you’re flying the airplane in the limited space that the cockpit provides.
TOC and TOD
Your first nav log entry after departure usually takes you up to the Top of Climb (TOC). This is the point where you should have reached your cruise altitude. There are a few differences in this leg compared to your cruise legs.
The first difference is that the IAS will be set to your aircraft’s climb speed, which is less than the cruise speed, so you won’t be covering as much horizontal distance as you would in other legs. That’s okay since our goal here is to get to cruising altitude.
The second difference is that you calculate the ETA for this leg using the aircraft’s climb performance instead of using your Ground Speed. Climb performance data and the recommended IAS for maintaining specific climb rates are provided in the AFM or POH.
Remember, your engine will be operating at a high power setting when you’re climbing. This will result in an increased fuel flow rate. Keep this in mind when you’re making your fuel burn estimates.
Similarly, your last nav log entry will usually be from the Top Of Descent (TOD) to your destination. It’s not a requirement for your TOD to be your last waypoint, by the way. Depending on the approach, you may add further waypoints to help guide you through the descent as well.
Filing a Flight Plan
You’re not required to file a flight plan if you’re flying VFR, but it’s highly recommended that you do file one. A filed flight plan has information that search and rescue services can use to reach you in case of an emergency.
Here’s an example of a completed flight plan.
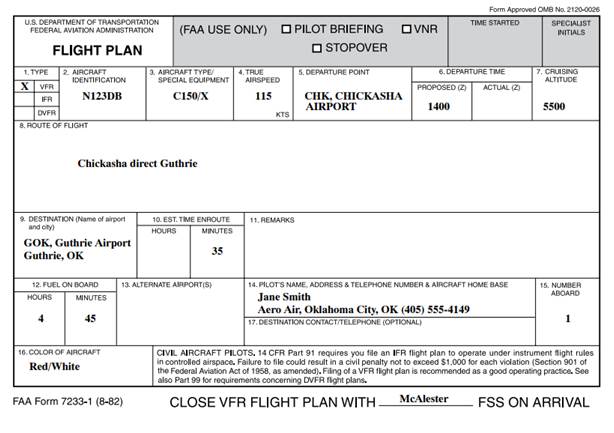
Since you’ve already prepared your navigation log, you can use it to fill in your flight plan.
Your flight plan is valid for up to one hour after your proposed departure time. Be sure to contact your FSS in case your departure gets delayed.
When you arrive at your destination, remember to close your flight plan! You don’t want a search and rescue mission going around in circles after you! It’s recommended to avoid radio congestion by closing the flight plan over the telephone.
Conclusion
There’s a lot that goes into flying an airplane. You should try to prepare as much as possible before the flight so that you have a plan in case something goes wrong.
Making crucial decisions on the fly, so to speak, greatly increases the chances of you making a mistake. It’s a lot easier to take your time and carefully consider your options when you’re safely on terra firma.