-
Key Takeaways
-
What Is a Contaminated Runway?
- Why Friction Plummets
-
Contaminated Runway Risks
- Directional Control Hazards
-
Building The Surface Picture
- Pilot Braking Action Reports
-
Landing-Performance Planning Before Takeoff
- Wet-Runway 115 Percent Additive
-
Time-Of-Arrival Landing Assessment
-
Flying The Approach
- Stabilized Criteria
- Firm Touchdown Technique
-
Deceleration and Directional Control
- Spoilers – Reverse – Brakes Sequence
- Anti-Skid & Emergency Brakes
- Hydroplaning
-
Special Contaminants & Seasonal Gotchas
- Slush / Standing Water
- Compact Snow
- Ice & Freezing Rain
-
Training, SOPs, Human Factors
- Approach Brief Template
- Misconceptions To Kill
-
Lessons From The Field
- Delta Air Lines Flight 1086
- Case Study: A330 St. Lucia
-
Conclusion
It’s a rainy day when you see a Gulfstream rolling past the runway with the brakes screeching and reverse wide open. The pavement keeps slipping by anyway.
Two thousand feet vanish, and it is still not stopping. Then, you hear a crash at the end of the runway.
You don’t want this to be you.
A passing rain shower and even frost you can’t see from the cockpit can erase more than half of your dry runway braking.
Let’s talk about how to read the runway condition report and use techniques that keep the airplane on the pavement in even the toughest situations.
Key Takeaways
- Contaminated runways degrade braking and directional control.
- Add margins to dry runway landing distances and recheck them near arrival.
- Stable approaches and firm touchdowns add force to the wheels and allow for effective braking.
- Early go-around decisions prevent excursions when conditions no longer match the plan.
What Is a Contaminated Runway?

First of all, what do we mean when we call a runway “contaminated?” For condition reporting and performance purposes, the FAA considers a runway contaminated when more than 25 percent of the runway surface area (within the reported length and width) is covered by frost, ice, snow, slush, or water.
Why Friction Plummets
Why should this concern you? Well, your wheels depend on friction to slow you down and stay pointed straight.
The friction between your aircraft’s tires and the runway surface governs how well the wheel brakes can decelerate your aircraft.
We can describe this using the wheel braking coefficient, μ. It compares the deceleration force created by the brakes to the total vertical load pressing the tires onto the runway.
The higher the wheel braking coefficient, the more effectively you can brake and decelerate.
Contaminated Runway Risks
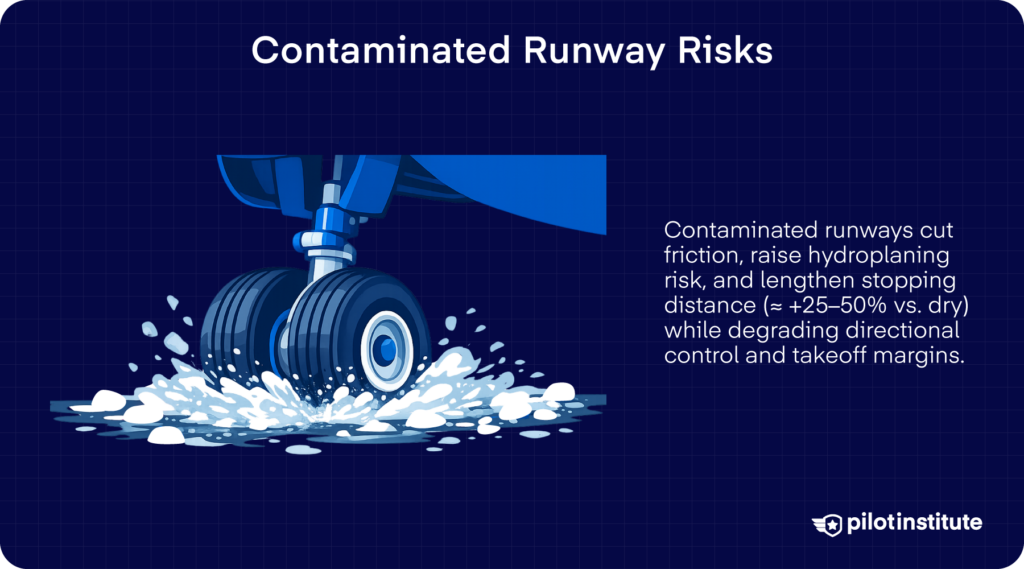
Runway contamination is a real and serious hazard that shows up again and again in the accident record.
In fact, the Flight Safety Foundation found that worldwide, contaminated runways were part of 96 percent of the runway-excursion accidents in which runway condition was known between 1995 and 2008.
Directional Control Hazards
But what exactly makes them so dangerous? Let’s look at how they can mess with your directional control.
Uneven Braking
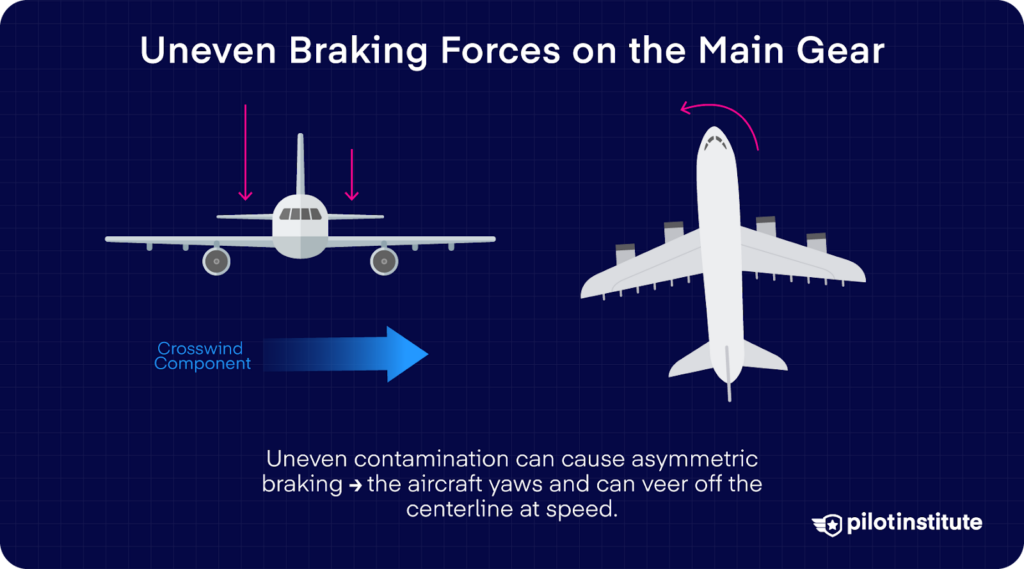
First, brake effectiveness can vary asymmetrically. On a contaminated runway, water or slush may be deeper on one side than the other.
If one main wheel has better traction than the other, the braking force isn’t balanced. The imbalance can yaw the aircraft one way. And at higher speeds, that yaw can quickly turn into a veer off the centerline.
T-Tail Rudder Blanking
Rudder blanking becomes a real concern, especially on aircraft with rear-mounted engines and a T-tail.
When you deploy the thrust reversers, the exhaust gets redirected forward instead of straight back. That redirected flow moves right into the space the rudder depends on for clean airflow.
What does that mean for you? It means the rudder can suddenly lose effectiveness just when you expect it to help.
Add a contaminated runway to that situation, and you’ve got the recipe for disaster.

Free Private Pilot Study Sheet
Grab a printable PDF that highlights must-know PPL topics for the written test and checkride.
- Airspace at-a-glance.
- Key regs & V-speeds.
- Weather quick cues.
- Pattern and radio calls.
Building The Surface Picture
Where can you find information on the runway conditions at an airport? The ATIS and NOTAMs are always a great source.
The FAA uses the Runway Condition Assessment Matrix (RCAM) to turn observed contaminants into a set of three numbers. These numbers are called Runway Condition Codes (RwyCC).
Each code is directly tied to the type and depth of contaminants, as well as to expected braking and directional control performance. It ranges from 6 (dry) down to 0 (nil braking).
Each third of the runway gets its own code: first for the touchdown segment, then the midpoint, and finally the rollout.

Here’s an example. Suppose the NOTAMs say:
RWY 14 FICON 5/5/3 60 PRCT 1/8IN DRY SN, 60 PRCT 1/8IN DRY SN, 60 PRCT COMPACTED SN.
What does that mean?
The acronym FICON means “field condition.”
“5/5/3” are the runway condition codes for the touchdown, midpoint, and rollout thirds of the runway.
The report that follows the codes describes the contaminants that generated them. In this case, the first two-thirds of the runway have a code of 5, while the last third has a code of 3 due to compacted snow.
Pilot Braking Action Reports
Pilot braking action reports (PIREPs) can be another part of the picture. These are subjective reports where pilots describe runway braking conditions. The standard terms are: “good,” “good to medium,” “medium,” “medium to poor,” “poor,” and “nil.”
Once received, controllers often broadcast those reports on the ATIS.
Landing-Performance Planning Before Takeoff
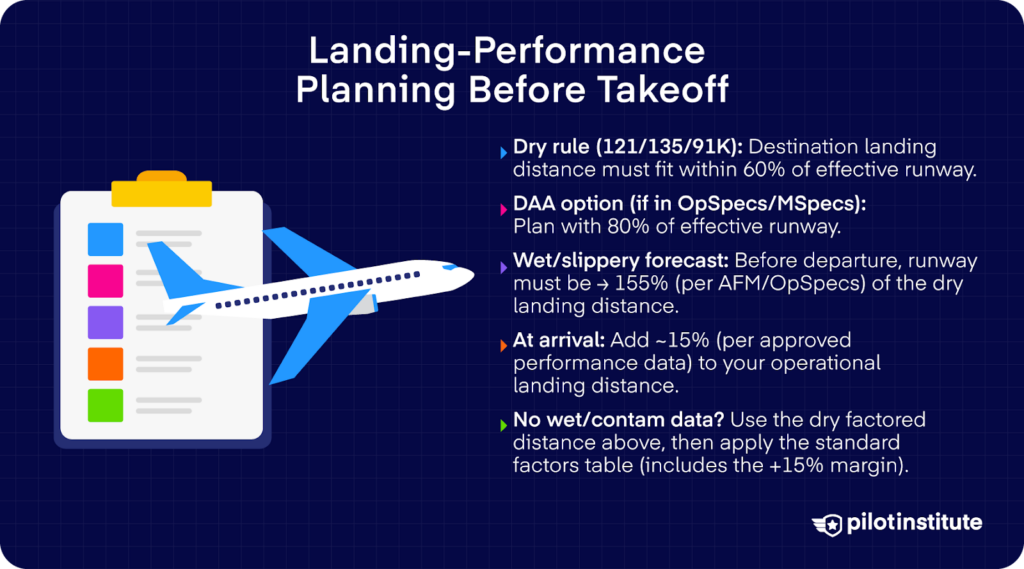
Here’s how you should think about landing performance before you even push back, especially when a runway might not be dry.
First of all, what do the regulations say?
Under 14 CFR Part 121 and Part 135, you cannot depart in a large turbine transport-category airplane unless your calculated landing distance at the destination fits within 60 percent of the effective runway length.
This rule also applies to certain Part 91 operations, such as those under Subpart K (fractional ownership).
For Part 91K and certain on-demand Part 135 operators, the FAA allows a Destination Airport Analysis program (DAA) documented in your operations specifications (OpSpecs) or management specifications (MSpecs).
If you have that authorization, you can plan a flight only if your preflight planning shows the aircraft can make a full-stop landing within 80 percent of the effective runway length at your destination.
But here’s the catch. When the forecast or expected conditions at your destination are not dry, like when a runway will be wet or contaminated, these factors aren’t likely to give you a safe landing margin.
Wet-Runway 115 Percent Additive
Take note that the standard runway performance charts in the aircraft flight manual are typically based on dry runways only.
Federal regulations state that if the destination runway is forecast to be wet or slippery, you’re not allowed to depart unless the effective runway length at the destination is at least 115 percent of the runway length required for a dry landing. This is a pre-departure planning requirement.
Separately, for a time-of-arrival assessment, the FAA recommends adding a safety margin of at least 15 percent to your calculated operational landing distance.
Unavailable Runway Data Factors
But what if you don’t have wet or contaminated runway landing data to work with? When that happens, you fall back on a standard workaround.
You take the dry, factored landing distance from your preflight planning, calculated under the applicable operating rule. Then, you apply the factors from the table below.
| Runway Condition | Reported Braking Action | Factor to apply to (factored) dry runway landing distance* |
| Wet Runway, Dry Snow | Good | 0.9 |
| Packed or Compacted Snow | Fair/Medium | 1.2 |
| Wet snow, slush, standing water, ice | Poor | 1.6 |
| Wet ice | Nil | Landing is prohibited |
That step only applies when no specific wet or contaminated data exist. Note also that these factors already account for the additional 15 percent margin.
Practical takeaway for small GA pilots (Part 91): use AFM data and plan a margin; FAA guidance recommends adding at least 15% to operational landing distance at arrival and notes wet runways often need more caution.
Time-Of-Arrival Landing Assessment
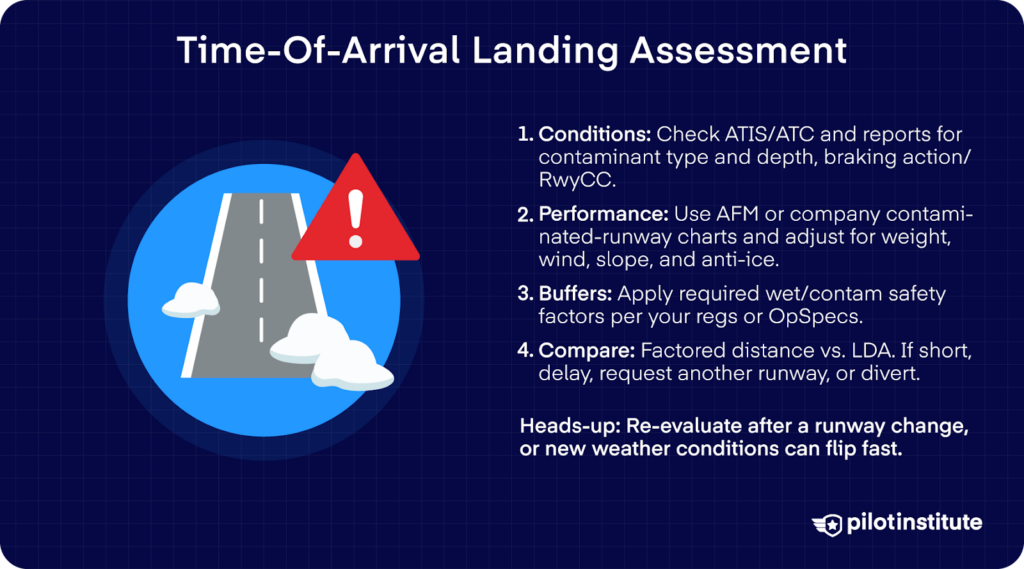
So, are you going to stick the landing? You can think through your decision in four steps:
- What do the ATIS, ATC, or any recent reports say? Find out what contaminants and depth are on the surface.
- Will your landing distance fit into the runway based on manufacturer advisory charts for contaminated runways? If so, adjust your landing distance based on conditions.
- If forecasts point to a wet or contaminated runway, add the appropriate safety buffer to the landing distance you derive from the charts and data.
- Compare the factored distance with the landing distance available (LDA) to make sure you still have enough runway to stop.
But even after doing all this, keep in mind that surface conditions can change quickly and invalidate your earlier assumption. You should repeat this assessment after a runway change or even a sudden shower.
Flying The Approach
Stabilized Criteria
But even if you’ve exercised the best of your judgment, it will all come down to how you handle the approach and touchdown.
How can you pull it off? It all starts with a stabilized approach. You want to be on a smooth, constant descent path that keeps you lined up with your aim point and at the right energy state.
Fly the recommended VREF with the proper wind additive and hold it until about 50 feet over the threshold.
Now’s not the time for carrying extra speed “just in case”. What happens when you’re above your target speed? You float, and you burn runway fast.
If you’re not fully configured by that point, you should go around instead of pushing it. It’s much safer to have a steady, predictable approach than to steal every last knot of speed right before touchdown.
Firm Touchdown Technique
When you are on final, plan for a firm but smooth touchdown.
Aim to touch down with a steady vertical speed. Pick a visual reference around 500 to 1,000 feet down the runway so you can see exactly where you expect to land.
A smooth and deliberate touchdown that gets the wheels rolling soon after crossing the threshold is better than trying to make the softest contact imaginable.
That’s because the sooner your tires spin up, the sooner you can start generating any friction that is available to slow the aircraft.
Deceleration and Directional Control
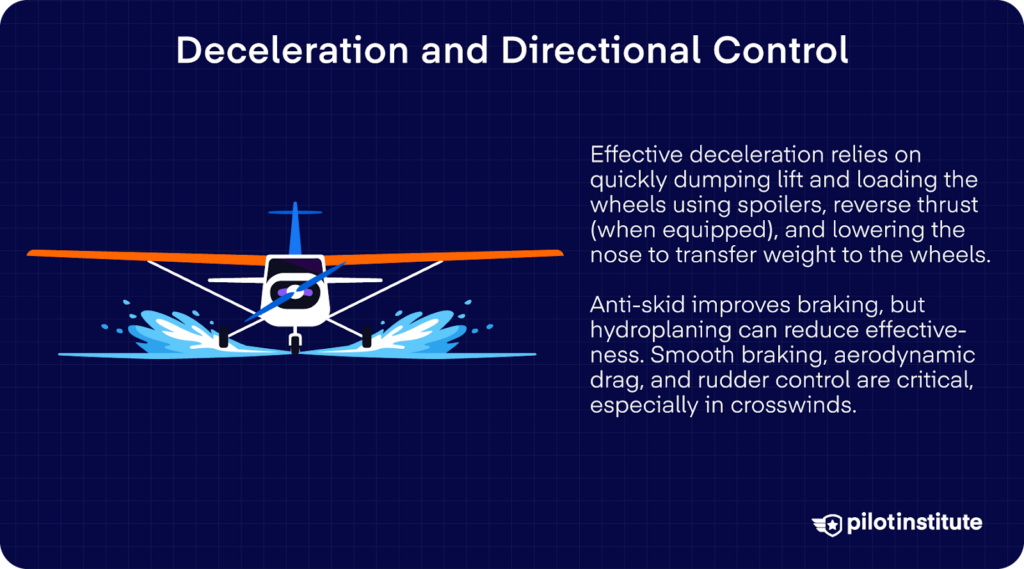
Spoilers – Reverse – Brakes Sequence
Once the main gear is on the runway, you want full lift spoiler deployment. Start de-rotation and deploy reverse thrust.
Spoilers dump lift and put weight onto the wheels. De-rotation adds more load as the nose comes down. Reverse thrust helps slow the airplane early, before braking really bites.
Why does all that matter? Because brakes only work when the tires firmly press into the runway.
More wheel loading means better tire rotation and more reliable brake effectiveness. Get those actions done promptly, and you give the braking system the best possible chance to do its job.
Anti-Skid & Emergency Brakes
Modern aircraft use an anti-skid system on the brakes to prevent the wheels from locking. That system senses wheel speed and modulates brake pressure.
How does it work? If a wheel starts to slow too fast relative to aircraft speed, anti-skid control valves reduce pressure briefly. Then, they reapply as needed to keep the wheel turning and maximize braking efficiency.
What if a normal brake or the anti-skid system fails? Some aircraft also have emergency brake modes or alternate systems.
In an emergency brake mode, you may still have brake pressure available, but anti-skid protection might be available only in one of the functioning sets of brakes.
That means you have to apply the brakes more carefully to avoid wheel lockup. That’s because the automatic protection that modulates pressure during skid onset might not be available.
Hydroplaning
You’ve probably seen this coming. Now, let’s talk about hydroplaning.
Hydroplaning happens when you land on standing water that is deeper than the tire tread. The tire cannot push the water out of the way, so it lifts and rides on top instead.
You think of stepping on the brakes, but that’ll only make things worse. The wheel can lock, and friction drops to almost nothing.
Mitigation Techniques
But you can still stack the odds in your favor before the wheels ever touch. A grooved runway is your first choice if one is available, because the grooves help water escape and restore tire contact.
You also want to arrive as slowly as safety allows. Speed is not your friend here.
After touchdown, lower the nosewheel and start braking smoothly. What if you don’t see any deceleration? You may be hydroplaning.
In that case, ease off the brakes. You should then raise the nose to use aerodynamic drag to decelerate to a speed where the brakes become effective. Once the tires reconnect with the runway, braking will return.
The rudder remains your primary tool for directional control, but add a crosswind, and things become more complex. The airplane can weathervane into the wind while sliding sideways at the same time.
Special Contaminants & Seasonal Gotchas
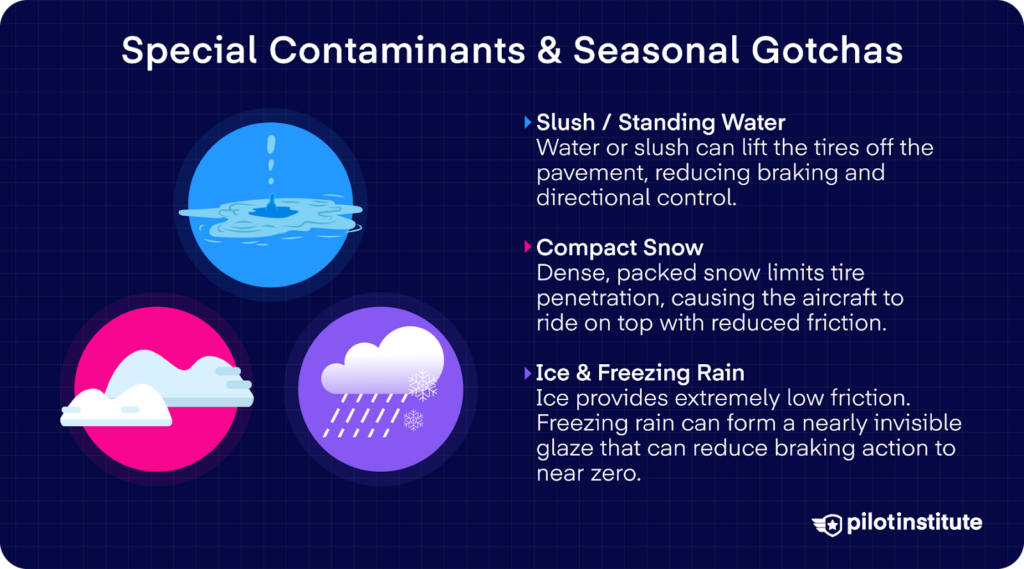
Slush / Standing Water
Slush and standing water are like liquid traps on the runway. When you touch down on a surface with water deeper than a few millimeters or slush, that fluid can act as a cushion between the tire and pavement.
Compact Snow
Compact snow is a different animal. It’s a kind of snow that has been pressed into a hard, dense layer. It resists further compression, which means the airplane will sit on top of it instead of pushing through.
Ice & Freezing Rain
Ice and freezing rain are often the worst for landing. Ice gives you very low friction. Freezing rain can coat the surface with a near-invisible layer of supercooled water that freezes on contact with pavement.
That layer of rime or glaze ice can leave braking action down to nil in places and create a surface that is almost like glass.
Training, SOPs, Human Factors
A big part of your training should be learning how to recognize limitations. Have an honest talk about common misconceptions so you don’t fall into unsafe thinking.
How can you practice in a simulator? Dry and contaminated stopping distances are allowed to be represented within a tolerance.
However, that often means the simulator’s braking performance doesn’t precisely match the real-world friction behavior under contamination.
That’s why your training should include line-oriented scenarios. You have to see the consequences of delayed decisions on slippery surfaces.
Then, review the session together so you can internalize the cues and outcomes.
Approach Brief Template
You want to note the runway conditions for the expected runway. Then, talk about your deceleration plan and confirm your exit plan before you begin the descent.
Include a go-around gate in altitude, or yes, even in the remaining runway after touchdown. That’s so everyone knows when you will pull power and climb away if the landing isn’t going as planned.
Misconceptions To Kill
Grooved ≠ Dry
A lot of pilots think that a grooved runway is basically dry no matter what. That’s a dangerous myth.
Grooving absolutely helps water drain and reduces the risk of hydroplaning.
Does that mean you get dry-runway friction back? No. Significant contamination still degrades braking, with or without grooves.
Reverse Thrust
Another myth is that reverse thrust will save the landing. Well, reverse does help, but it is not the hero of the story.
Its effectiveness varies with conditions. On dry runways, most of the stopping force comes from the wheel brakes.
But on a wet or slippery runway, reverse thrust may be the dominant deceleration force just after touchdown, and throughout the deceleration if the runway has poor or worse braking conditions.
As the aircraft slows, the wheel brakes become more effective and take over as the dominant force..
Butter Landing
Then there is the “greaser” mindset. A silky touchdown may win you street cred, but it does nothing for stopping on a slick surface.
You actually need enough sink rate to break through the layer of contaminants. Aim for a firm, controlled touchdown that loads the wheels and gets them spinning.
That is what gives the brakes something to work with, and that is what actually keeps you safe.
Lessons From The Field
Now, let’s step out of theory and look at real events. Here’s how small errors have led to runway overruns in the past.
Delta Air Lines Flight 1086
On March 5, 2015, Delta Air Lines Flight 1086 was landing on runway 13 at LaGuardia Airport.
Crews ahead had reported good braking, so you would expect to see at least some pavement after breaking out of the clouds. That, unfortunately, did not happen here.
What did the flight crew see? The runway was still snow-covered, despite recent clearing and the reports that suggested otherwise.
That surprise did nothing to reassure the flight crew. A short runway, water beyond the departure end, and worse conditions than expected all pushed stress higher.
The captain went quickly to reverse thrust after touchdown to stop early. Both pilots knew the target for a contaminated runway was about 1.3 EPR.
And yet, it rose to 2.07 on the left engine and 1.91 on the right engine.
Remember what can happen with excess reverse thrust? Rudder blanking. Directional control faded at the absolute worst time.
The captain stowed the reverse and added rudder, nosewheel steering, and braking, but control came back all too late.
The airplane left the runway before those inputs could take effect. It slid off the left side of the runway and came to rest near Flushing Bay.
What can we learn from this accident? Surprises will come your way, despite how much you prepare for them. And when they do, you have to know how to manage your stress. Stay on top of your aircraft, no matter the challenge.
Case Study: A330 St. Lucia
An Airbus A330 was scheduled to fly from Tobago to St. Lucia-Hewanorra International Airport, then continue to London.
From the start, conditions were unstable and unpredictable. Heavy rain and strong gusts delayed the flight and repeatedly closed the airport.
Once airborne, the crew received repeated weather updates while holding near the field. And each time the crew checked back, the answer was the same. No meaningful change.
Eventually, the tower advised that the field was open again, and the crew accepted clearance for the RNAV approach. At that point, the captain took over as the pilot flying.
During the approach, the crew talked through the weather and the go-around plan. They even noted that the wind was outside normal crosswind limits.
You’re already telling yourself this is not a normal landing. Still, the approach continued, fully configured and stable on paper.
Touchdown did not feel normal. The crew felt a strong judder and more deceleration than expected.
The airplane veered left before the pilots regained control. The ECAM showed a left wing air leak. But on the surface, nothing appeared wrong.
The real surprise came later. The underside of the aircraft was badly damaged.
The investigation found that extreme rainfall caused a nearby river to overflow. You couldn’t see it from the cockpit, but the runway was effectively flooded where the wheels first touched the surface.
The lesson? Bad weather does not always announce the most dangerous hazard. Sometimes, the real threat lies in how bad weather changes the runway environment.
Conclusion
Contaminated runway landings take preparation and timely decisions. Understand how friction works and plan conservatively.
You protect yourself by using data and conservative calculations. And when the conditions call for it, be ready to go around without hesitation.
Does that sound demanding? It is, and that is why it works.
Treat every wet or contaminated runway as a performance exercise. Brief it clearly and fly it deliberately.