Are you wondering what MDA and DA mean for your instrument flying? Curious about when you’d use one over the other?
If you’re on a non-precision or precision approach, understanding MDA (Minimum Descent Altitude) and DA (Decision Altitude) is incredibly important.
We’ll cover what each term means, how they’re different, and when to use them.
Ready to clear up the confusion around MDA vs DA? Keep reading.
Key Takeaways
- MDA: Level off at a set altitude on non-precision approaches.
- DA: Decide to land or go around during continuous descent on precision approaches.
- Circling: Always uses MDA.
- Main Difference: MDA = level off; DA = act immediately.
Understanding MDA and DA in IFR Approaches
How do you land an aircraft if you can’t see well because of clouds or fog?
Pilots use special paths called IFR approaches to help them line up with the runway. These paths guide the airplane safely during its descent.
But flying down when you can’t see can be risky. There might be hills, buildings, or tall trees below.
So, how do you make sure you won’t hit anything?
IFR approaches use something called approach minimums.
Minimums are the lowest height you can go without seeing the runway. If you can’t see it by that height, you must stop descending and try again.
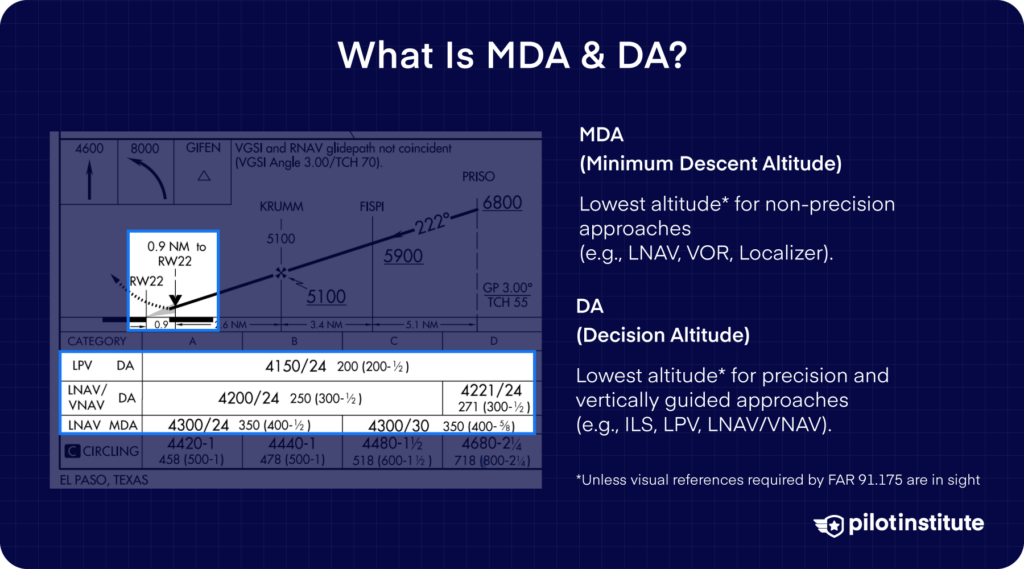
MDA and DA are two types of minimums.
Key Differences Between MDA, DA, and DH (Decision Height)
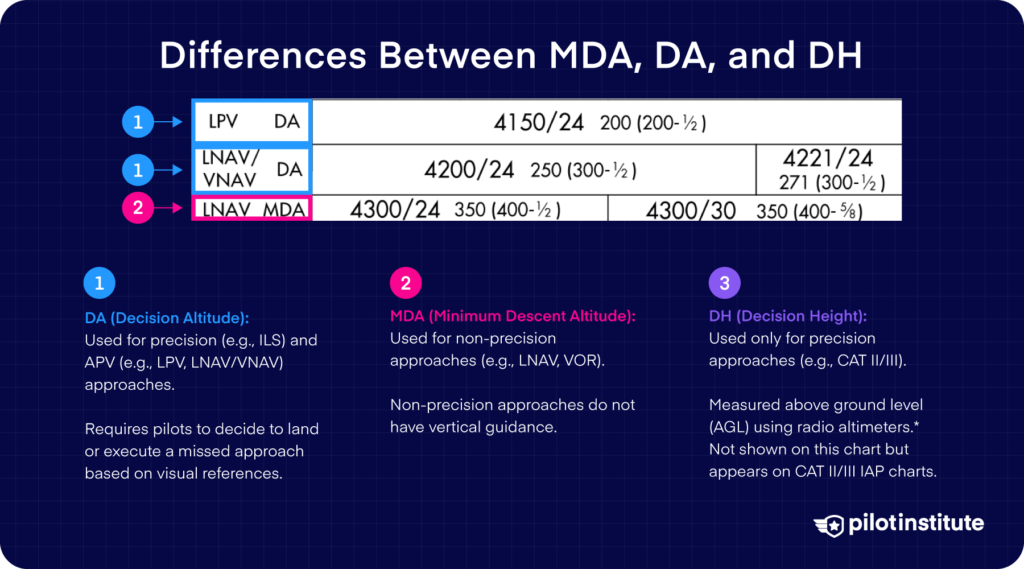
There are two kinds of minimum altitudes for two kinds of approaches:
- MDA (Minimum Descent Altitude): Used in non-precision approaches like VOR or some GPS approaches. These don’t give vertical guidance.
- DA (Decision Altitude): Used in precision approaches (ILS) and RNAV approaches with vertical guidance (LPV, LNAV/VNAV). These provide vertical guidance, helping pilots know if they’re too high or too low.
Both MDA and DA are measured from sea level, just like the altimeter in the airplane.
Sometimes, you might see DH (Decision Height). This is like DA but measured from the runway’s height above sea level.
For example:
If the DA is 5,000 feet and the runway is at 4,000 feet, then:
DH = 5,000 – 4,000 = 1,000 feet
DH is used when pilots use a special instrument called a radio altimeter. Radio altimeters display height above ground, not altitude. That’s why it makes sense for these approaches to use DH.
It’s easier for pilots since they don’t have to calculate the DH every time.
Let’s talk about each type in more detail.
MDA in Non-Precision Approaches
You’ll see MDA used when the approach doesn’t give vertical guidance.
What does that mean?
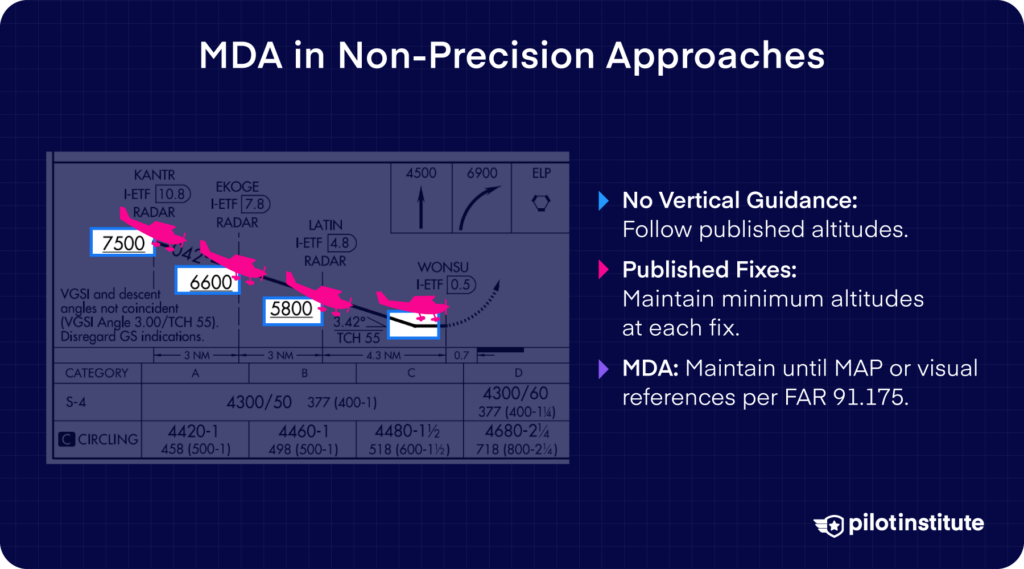
It just means the aircraft’s instruments won’t automatically show you if you’re too high or too low. You have to follow the chart manually.
For example, a chart might ask you to:
- Fly at 7,500 feet at one point.
- Cross the next point after dropping down to 6,600 feet.
These are altitudes which must be observed by pilots outside the Final Approach Fix (FAF) unless otherwise authorized, regardless of the approach type
The lowest altitude the pilot can fly without seeing the runway is the MDA.
Here’s how to fly an approach with an MDA:
- Prepare yourself by briefing the chart before you actually fly it. Note the MDA listed in the minima table.
- Start the approach by flying to the point where the instrument procedure begins.
- Follow the path shown on the chart. Your instruments will show you if you need to turn left or right, but they won’t tell you whether you need to climb or descend. Make sure you cross each point at the altitude marked on the chart.
- Once you reach the MDA, determine if the required visual references specified in FAR 91.175(c)(1) are in sight.
- If they are in sight and the runway is clear, continue your descent to land.
- If they are not in sight, maintain level flight at the MDA and continue to the missed approach point (MAP).
- If required visual references are not in sight at the MAP, execute the published missed approach procedure.
DA in Precision Approaches
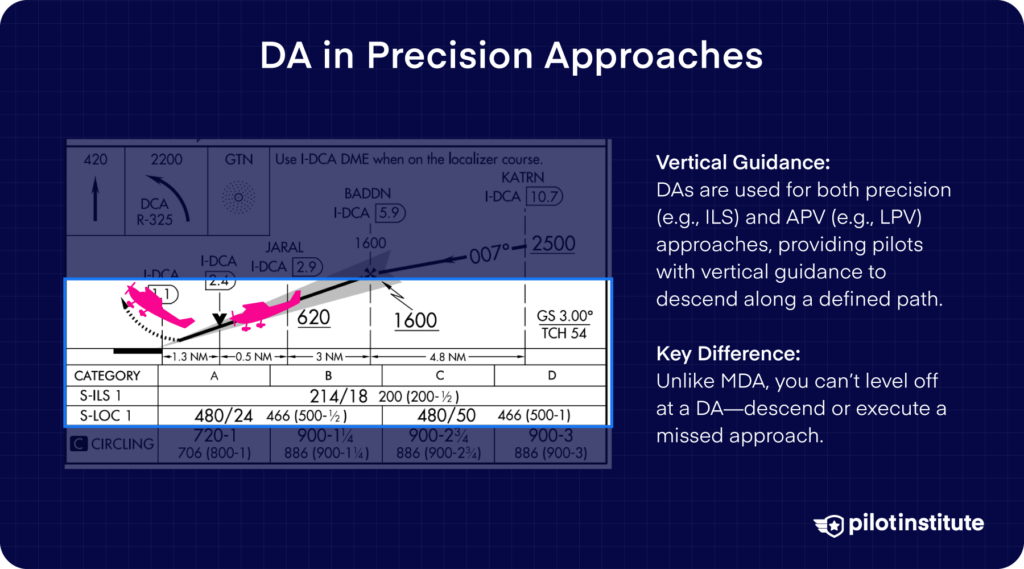
Approaches that use DA have some crucial differences.
All precision and APV (Approach with Vertical Guidance) approaches use DAs. These approaches provide vertical guidance using radio beacons or GPS* signals, helping pilots maintain a proper descent profile.
*Note: GPS is used for APV approaches, not precision approaches.
What difference does it make compared to an approach with an MDA?
It means that the pilot can descend smoothly through the final approach. The descent looks like a playground slide.
Here’s how you fly an approach with a DA:
- Prepare the approach by looking at the chart and performing a briefing. Notice the path doesn’t turn flat at the end. Note the DA listed in the minima table.
- Fly to the initial point to start the instrument procedure.
- Follow the path shown on the chart, adhering to altitude limits until capturing the ILS glide slope or APV glide path.
- Once your instruments capture the ILS glide slope* or APV glide path, they’ll indicate whether you need to adjust your descent rate.
- As you get close to the DA, check if you can see the runway.
- If the required visual references per FAR 91.175 are in sight, continue your descent to land.
- If you don’t see it, you have to go missed immediately.
The crucial difference between the DA and the MDA is that you can’t fly level at the DA.
*Note: A glide slope (ILS) provides vertical guidance for precision approaches, while a glide path (APV) provides vertical guidance for approaches with vertical navigation.
DH in Precision Approaches
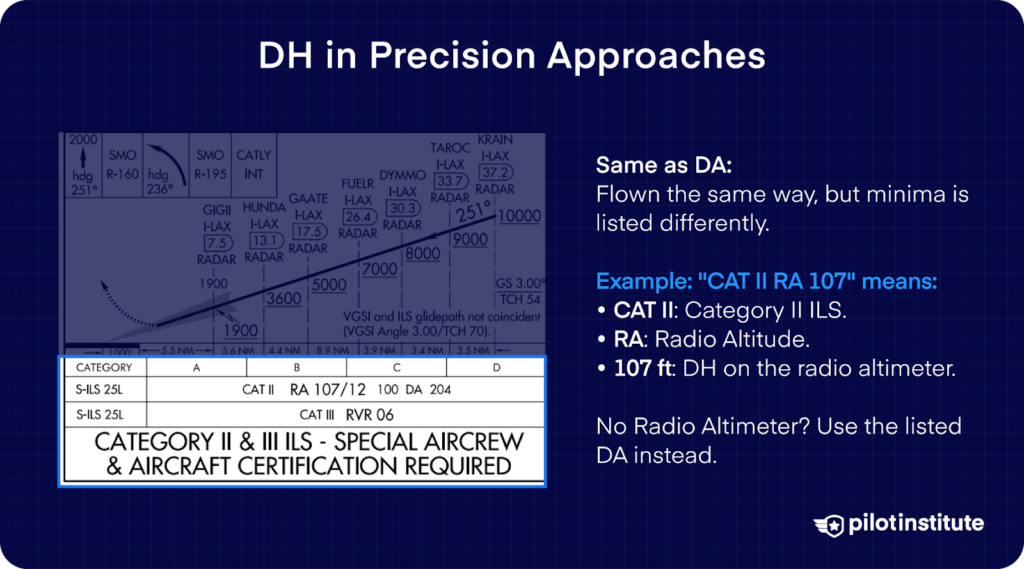
Wondering how approaches with DH work?
DH (Decision Height) is typically used in CAT II and CAT III ILS approaches, designed for jets and specially certified aircrew.
These approaches require specific equipment and training, so student pilots won’t encounter them in their general aviation trainers.
An approach with a DH is flown exactly the same as one with DA. The only notable difference is how it’s written in the minima table.
As an example, the minima table for an approach like this may say something like: CAT II RA 107.
CAT II means Category II ILS. The RA means Radio Altitude. Remember we mentioned that’s why these approaches use DH?
So, for this approach, you’ll be at the DH when your radio altimeter reads 107 feet.
The approach plate helpfully lists the DA as well. Don’t have a functioning radio altimeter? Use the DA instead.
Exceptional Cases
It’s generally true that DA/DH is meant for precision approaches, and non-precision approaches use MDA. But there are some special cases you should know about.
Approaches with Vertical Guidance (APV)
Some RNAV approaches, such as LPV or LNAV/VNAV, are labeled as Approaches with Vertical Guidance. They use DH since they have vertical guidance.
Legally, however, ICAO doesn’t classify them as precision approaches. That’s how they’re an exception to the general rule.
Circling Approaches
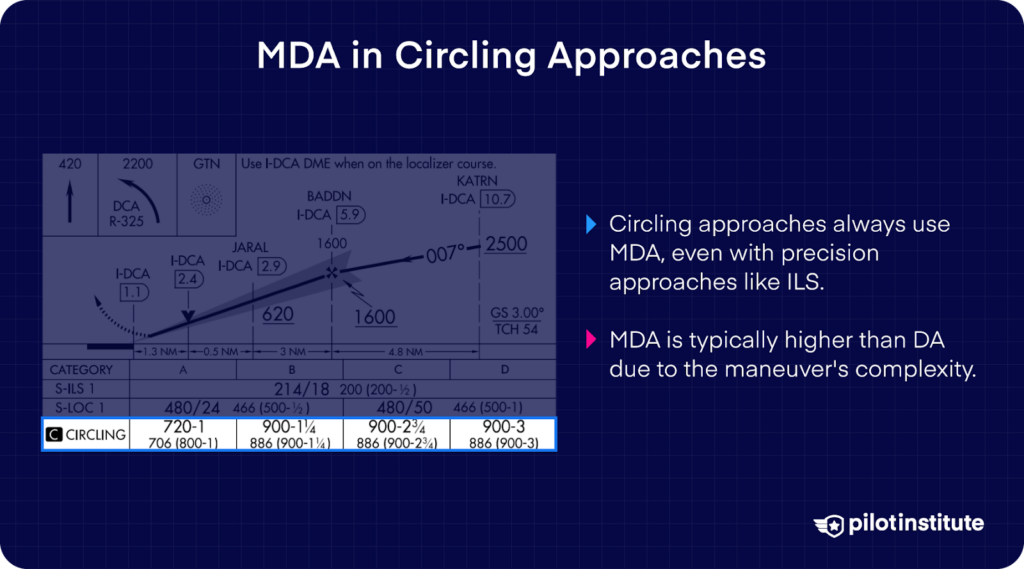
These are complex approaches. You’ll see them in places where a straight-in approach isn’t feasible.
What happens in a circling approach?
- Follow an instrument approach to find your way to the airport.
- Descend all the way down to the circling MDA(if applicable). Make visual contact with the airport.
- Level off at the MDA and circle around to another runway. Keep the airport in sight at all times.
- Align the aircraft with the runway and land visually.
Circling approaches use MDA. Vertical guidance can be used down to the circling MDA, but the remainder of the approach is visual.
The MDA is almost always higher than the DA for the precision approach since this is a complex maneuver.
Conclusion
Now that you know the basics of MDA and DA, making sense of IFR minimums should feel a lot simpler!
MDA is your go-to altitude for non-precision approaches, where you wait to see the runway before going any lower. DA is used in precision approaches.
So, next time you’re flying an IFR approach, you’ll be ready to handle those minimums!
If you want to learn more about flying with instruments, we suggest checking out Instrument Rating Made Easy courses for help.
