-
Key Takeaways
-
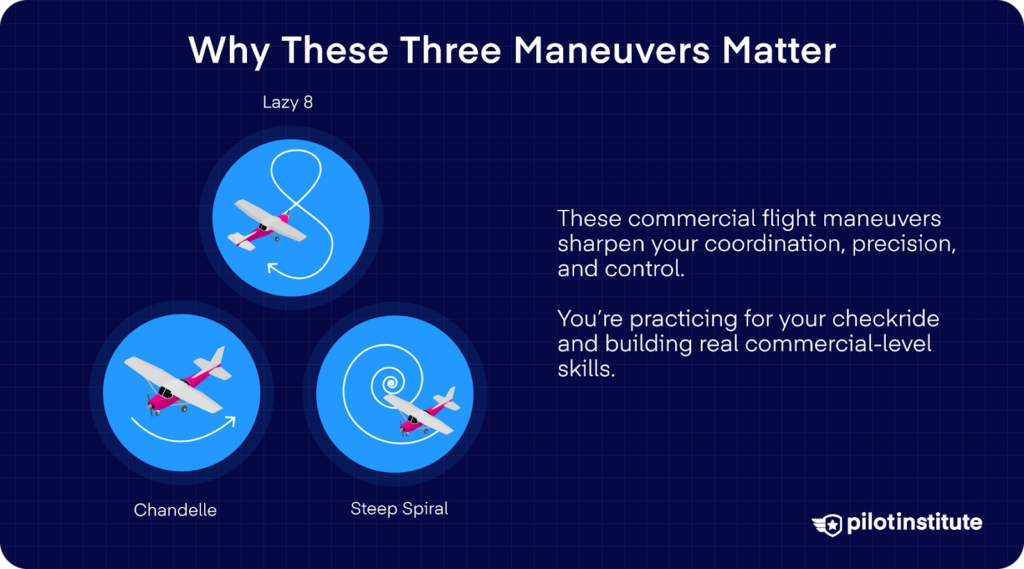
Why These Three Maneuvers Matter
- Skill-Building Goals
- Checkride Reality
-
Aerodynamics Primer
- Load Factor & Accelerated Stall
- Overbanking & Adverse Yaw
-
Chandelle: Maximum-Performance Climbing Turn
- Entry Setup
- First 90°: Constant Bank, Increasing Pitch
- Second 90°: Constant Pitch, Decreasing Bank
- Recovery & Criteria
-
Lazy 8: The Art of Smooth Energy Flow
- Why It’s Harder Than It Looks
- Segment Walk-Through (Repeat Opposite Direction)
-
Steep Spiral
- Setup & Wind Strategy
- The Three-Turn Minimum
-
Putting It All Together
- Progression Plan for Learners
-
Checkride Day Tips
- Cockpit Organization & Radio Calls
- Mindset Advice
-
Conclusion
During World War I, a single chandelle could turn a Sopwith Camel pilot from hunted to hunter. That same urgency lives on, albeit in a different form, on your commercial checkride.
Commercial standards raise the stakes to precise and smooth energy management. Chandelles, lazy eights, and steep spirals are the tasks flown for stick-and-rudder skill. No radios, no GPS. Just you, the airplane, and your judgment.
Now, let’s look at both the how and the why of each maneuver. Read closely, and you might pick up insider tips to debrief like a pro and ace your checkride.
Key Takeaways
- Commercial maneuvers develop precise energy management and aircraft control.
- A chandelle is a maximum-performance climbing turn with constant bank and increasing pitch.
- A lazy eight is a continuous, flowing figure-eight maneuver with coordinated pitch and roll control.
- A steep spiral is a constant-radius descending turn around a reference point with controlled airspeed.

Free Private Pilot Study Sheet
Grab a printable PDF that highlights must-know PPL topics for the written test and checkride.
- Airspace at-a-glance.
- Key regs & V-speeds.
- Weather quick cues.
- Pattern and radio calls.
Why These Three Maneuvers Matter
Skill-Building Goals
You run the same maneuvers so often that at some point, you just accept it as a fact of flight training. And when you moved into commercial training, the list of maneuvers only got longer.
It’s easy to assume the constant repetition exists purely to prepare you for the checkride, or that it’s just “standard procedure.” But have you ever wondered about the real reason why you keep practicing them?
You may not realize it at the time, but while you’ve been doing these airplane maneuvers repeatedly, you were building a set of advanced, high-precision skills that made you a more capable pilot.
Chandelle
Take the chandelle, for example. You’re staying coordinated through the turn, managing the airplane’s natural urge to overbank, and keeping maneuvering speed in mind, especially when weight changes start to affect how the aircraft responds.
You’re also setting the right configuration for a maximum performance climb, then guiding the pitch with a steady hand as the airspeed slowly bleeds off.
Lazy Eight
The same thing goes for the lazy eight. You’re guiding the aircraft through each phase, from the gentle entry to the smooth recovery. The whole time, you’re keeping the motion unhurried and balanced.
You manage the aerodynamics that shape the maneuver. You’re staying coordinated as the bank and pitch change together. You also keep an eye on performance limits and airspeed so the aircraft never gets ahead of you.
Steep Spiral
A steep spiral starts to click when you see how closely it ties to real emergency work. You’re essentially rehearsing the setup for a deadstick landing, only now you’re using a steady, controlled descent to keep a constant radius around your chosen point.
As you circle, you watch how the wind pushes and stretches your ground track, then adjust the bank and pitch so the spiral stays tight and predictable.
Checkride Reality
How can you know if these maneuvers are working in sharpening your skills?
You’ll be able to track your progress when you set measurable benchmarks, give or take a slim allowance. And when you get to your commercial pilot checkride, those tolerances become written in black and white in the Airman Certification Standards (ACS).
Chandelle Tolerances
What marks should you hit for the chandelle? Well, start with the proper configuration. Roll into a 30° bank and apply power and pitch together so the climb develops smoothly. You have to maintain the bank angle until the 90-degree point while the airspeed continues to decrease.
At the exact 180-degree mark, your heading must be within 10 degrees of target, and your airspeed should be just above stall.
Hold that near-stall condition briefly without letting the airplane break, then return to straight-and-level flight with minimal altitude loss.
Lazy Eight Tolerances
For lazy eights, the tolerances are straightforward but demanding. You should reach roughly a 30° bank angle at each peak of the maneuver.
After that, there are three checkpoints at the 180-degree mark. Your altitude must be within 100 feet of where you started, your airspeed must be within 10 knots of your entry speed, and your heading needs to fall within 10 degrees at the 180-degree point.
Steep Spiral Tolerances
For steep spirals, you should maintain a bank angle of no more than 60° at the steepest part of the turn.
The wind will try to distort your ground track, so you’re expected to apply drift correction throughout. You should divide your attention between controlling the aircraft, watching for traffic, and keeping the reference point stable on the ground.
As the spiral continues, your airspeed must stay within 10 knots of the specified value. And when you roll out, your heading must be within 10 degrees of the heading or reference you selected.
| Maneuver | Tolerances | ||
| Airspeed | Heading | Altitude | |
| Chandelle | Just above stall | ±10 degrees | N/A |
| Lazy Eight | At the 180° point, ±10 knots from entry airspeed | At the 180° point, ±10 degrees | At 180° point, ±100 feet from entry altitude |
| Steep Spiral | ±10 knots | Roll out toward an object or specified heading ±10° | Complete maneuver no lower than 1,500 ft AGL |
Aerodynamics Primer
Load Factor & Accelerated Stall
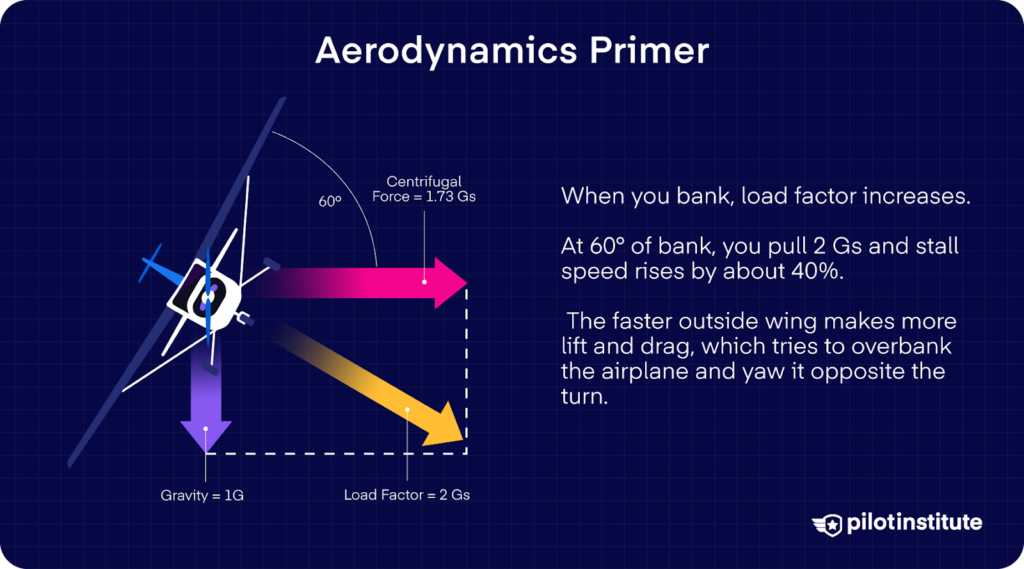
Two things happen when you bank an airplane. Yes, you’re changing direction, but you’re also increasing the load factor.
What does that mean? The wings have to generate more lift than in straight-and-level flight. And when you bank 60°, the load factor doubles, meaning you’re pulling 2 Gs.
Now, because stall speed increases in proportion to the square root of the load factor, a 2-G turn drives your stall speed up by about 41 percent.
Overbanking & Adverse Yaw
Another interesting thing happens when you bank an airplane, and you’ll notice it when you do your commercial maneuvers.
The outside wing moves through the air a little faster because its path is longer, even though both wings complete their circuit in the same amount of time. What do you think happens because of this?
Well, since lift increases with speed, that faster outside wing produces more lift than the inside wing. That tends to make the airplane roll more into the turn, which is a phenomenon known as overbanking tendency.
At the same time, that outside wing also generates more drag. The increased drag comes from the higher lift and associated induced drag on the lifted wing. This drag causes a yawing moment opposite the direction of the roll, called adverse yaw.
Chandelle: Maximum-Performance Climbing Turn
How do these aerodynamic effects play out in real life? One of the best ways to see how is by performing a chandelle. Let’s look at the rundown.
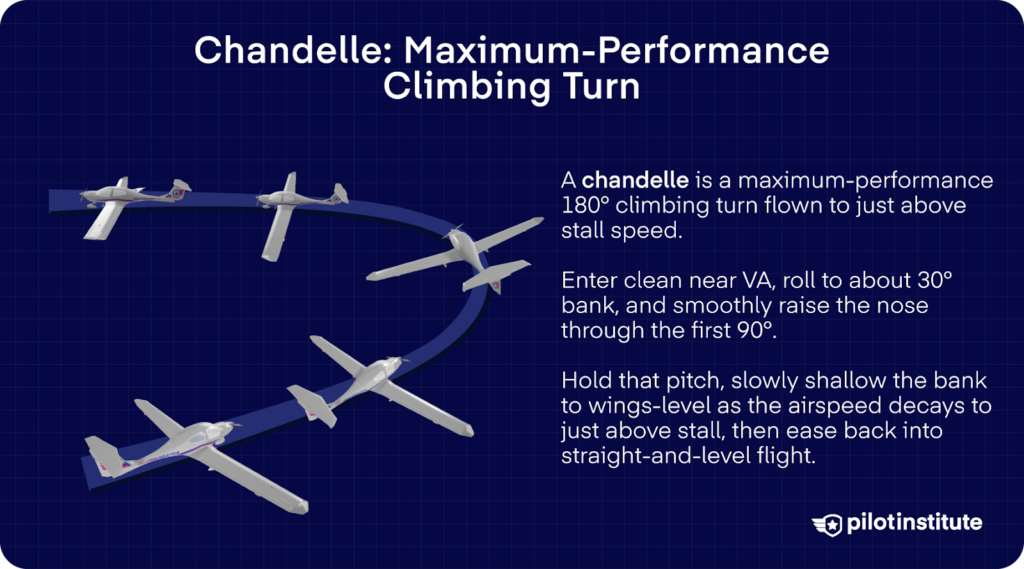
Entry Setup
Before you enter a chandelle, set the aircraft up clean: flaps up, gear up, and everything trimmed for a smooth start.
Clear the area and stabilize in straight-and-level flight. Look out for your visual references during this portion, too. Then, accelerate to the manufacturer’s recommended entry speed, which often sits near VA or VO.
First 90°: Constant Bank, Increasing Pitch
Got the speed down? You’re ready to ease the aircraft into a coordinated climbing turn. Bank the aircraft to 30° and start the climbing portion at the same time. Add steady elevator back pressure and advance the power to the recommended setting.
Now, what do you think happens when you supply your aircraft with energy using the throttle, then pull the yoke? Normally, your altitude will increase, and so could even your airspeed. But pull the yoke back any farther, and you’ll actually slow down as you continue to climb, just like you’ll see here.
As the airspeed begins to fade, the aircraft’s left-turning tendencies grow stronger. Add more right rudder to stay coordinated.
At the 90-degree point, you hold the pitch attitude you worked up to and begin a smooth rollout from the bank.
And even though the bank stays fixed during the first half of the turn, the decreasing airspeed creates more overbanking tendency. Don’t forget to manage that with steady aileron and rudder input until the rollout begins.
Second 90°: Constant Pitch, Decreasing Bank
The wings are coming back toward level. What’s going to happen to your aircraft? The vertical lift component increases, but the falling airspeed still calls for a touch more elevator to hold the pitch you already established.
When you’re near the top of the chandelle, when the airspeed is at its slowest, the rudder work peaks. But did you know that left chandelles and right chandelles aren’t the same?
Rolling out of a left chandelle takes a stronger right rudder input to counter both adverse yaw and P-factor. Rolling out of a right chandelle is easier, since the yaw favors the direction of the turn and reduces how much correction you need.
Recovery & Criteria
When the aircraft completes the full 180 degrees, the wings should be level, the airspeed just above the power-on stall speed, and the nose held high for a brief moment.
Once the aircraft settles back under full control, you simply relax the pitch, bring it back to straight-and-level flight, and let the chandelle fade smoothly into normal cruise.
Lazy 8: The Art of Smooth Energy Flow
Why It’s Harder Than It Looks
A lot of pilots have fallen for that first word in lazy eight. In reality, it’s anything but lazy. So, what makes it so tough?
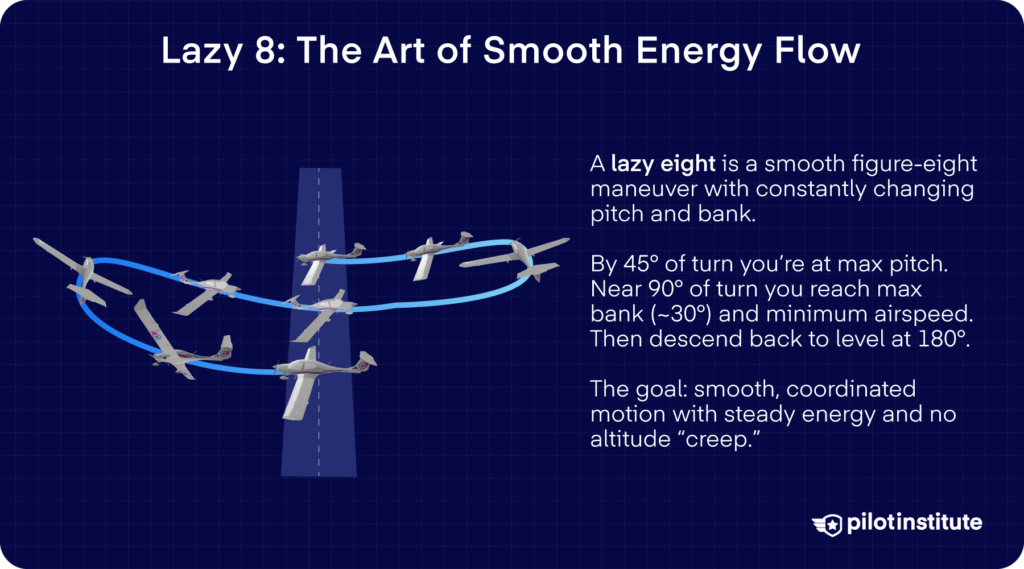
The lazy eight forces you to do two 180° turns with no steady-state. You’re never flying in a stable attitude. Instead, your pitch and bank are constantly changing, and there is no “cruise segment” mid-maneuver.
Segment Walk-Through (Repeat Opposite Direction)
Setup and First Steps
Now, from level flight, ease the aircraft into a gentle climbing turn toward the 45-degree point. The pitch comes up slowly, the bank builds to about 15°, and the airspeed starts to fall, which tightens the turn.
Do it right, and the roll begins gradually. Too much too soon, and you’ll hit the reference point before you reach your planned pitch peak.
45 Degrees
As you pass the 45-degree mark, the nose begins to settle toward the horizon until you reach the 90-degree point, where the pitch passes through level and the bank reaches its maximum of roughly 30°.
Because the aircraft is climbing and slowing through these first stages, coordination becomes a big part of the work. The decreasing airspeed increases left-turning tendencies, so you add right rudder as needed to keep the maneuver balanced.
Rolling right at low speed demands the most right rudder, because adverse yaw stacks on top of P-factor. Rolling left, the two mostly cancel each other, so you need less correction.
90 Degrees
At the 90-degree point, the airspeed is at its minimum, only a few knots above stall, and the bank is at its steepest. You may even need a touch of opposite aileron to keep the wings from overbanking while you hold the rudder steady. Instead of pausing, let the aircraft flow straight into the descending half of the figure.
The nose comes down, the bank unwinds slowly, and by the time you reach the 135-degree point, the pitch is at its lowest. The airspeed is rising again, so you ease off the right rudder as the aircraft accelerates.
180 Degrees
Approaching 180 degrees, you gradually relax both aileron and rudder while raising the nose and leveling the wings so everything comes together right as you hit the heading.
At that point, you roll smoothly into the second half of the maneuver and repeat the same flow in the opposite direction. Energy management ties all of this together.
Enter at or below the recommended speed, usually no faster than VA or VO, to stay within limits.
Too much power will make you gain altitude through the figure, and too little will make you lose it. Just the right amount keeps the lazy eight balanced from start to finish.
Steep Spiral
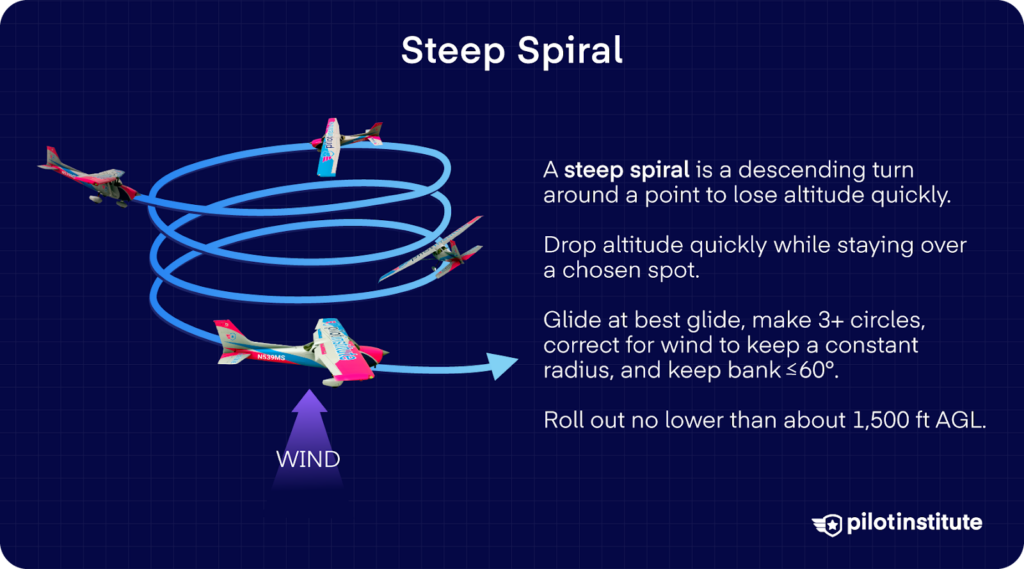
A steep spiral gives you a way to drop a lot of altitude quickly without drifting away from a chosen spot. It’s essentially a descending version of turns around a point, only now you’re gliding and letting the airplane spiral down while holding a constant radius around your reference.
The maneuver involves at least three full circles, and you start high enough to finish no lower than about 1,500 feet AGL, so you still have room to recover or transition into an approach.
Setup & Wind Strategy
Like every maneuver, you start a steep spiral with a full clearing turn while also picking your reference point. Consider the distance from the reference point, since that establishes the turning radius.
Are you sure the airspace is safe? Have you selected a good reference? If so, then bring the throttle smoothly back to idle. Apply carb heat if your aircraft has it, then set the best glide speed (that’s 65 knots for a Cessna 172).
The Three-Turn Minimum
Once the speed settles, lower the pitch, then roll into the bank as your chosen reference point crosses the nose.
From there, you work to keep a constant radius around the reference by adjusting for wind. Tighten the bank on the downwind side and ease it up on the upwind side, but never allow the bank to exceed 60°.
Holding a steady airspeed might be the trickiest part because it likes to wander as the bank angle changes. You eventually get used to them with practice.
You usually fly at least three full turns in training, then roll out on a chosen heading. You can practice rolling out into the wind instead of at a visual target to keep things interesting, since that’s more realistic for an actual emergency.
Also, since the engine is sitting at idle for a while, you need to step in to prevent cold shock, plug fouling, or carb ice. What can you do? You can bring up the power for about three seconds for every full circle.
You should also raise the pitch slightly each time you add power so the glide speed stays where you want it. Do this while pointed into the wind to make things smoother.
Putting It All Together

Going from private to commercial pilot training isn’t easy, we get it. Suddenly, the list of things you have to learn just got longer. So, how can you make the transition go as smoothly and successfully as possible?
Here’s a flight training roadmap, and we’ll take it one week at a time.
Progression Plan for Learners
Finding Your Footing
Week 1 is about going back to the basics. Focus on slow flight and a full stall series, including power-on, power-off, and accelerated stalls. The goal is to build your energy awareness and familiarity in the cockpit.
The following week, begin working on half chandelles. Practice rolling in, climbing to 90°, and then “freezing.” Hold that attitude for a moment so you can internalize the sight picture and control feel at the top.
Full Maneuvers
Move to full chandelles in Week 3, flying them in both directions. By now, your control coordination should be more refined. How can you prove it?
Focus on keeping that 30° bank, smoothly increasing pitch, and managing roll-out from 90 to 180 degrees while maintaining just-above-stall speed.
Introduce lazy eights the following week. Start with a shallow peak bank of about 20° so you can get comfortable with the continuous changes in pitch and roll. Once that feels more natural, increase to a 30° peak bank.
Now, by Week 5, you’re ready for steep spirals. Begin with the emergency descent mindset. Idle power and trim for your glide speed.
Then, practice descending via three 360-degree turns around a reference point. All the while, you should hone your wind drift correction.
Checkride Day Tips
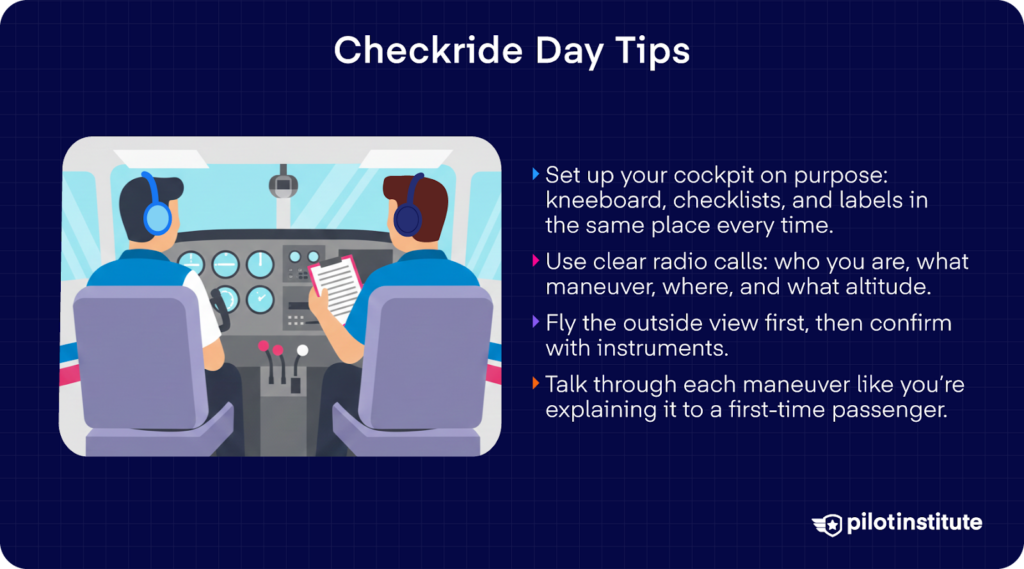
You’ve put in the hours of training in the cockpit. You’ve mastered the maneuvers and understood what they’re for. All of your hard work has prepared you for the day you earn your commercial pilot license. But still, there are a few steps you can take to improve your shot at success.
Cockpit Organization & Radio Calls
Before you take off, make sure your cockpit feels intentional. Use your kneeboard or checklist cards and clip them in the same order you expect to fly: chandelle, lazy eight, spiral.
Crisp professionalism doesn’t go unnoticed on your radio transmissions. For example, you can use this as a template:
“Jackson traffic, Archer one-two-three-four, chandelle maneuver west practice area, four thousand five hundred feet.”
That tells other traffic exactly what you’re doing, where, and how high.
In the cockpit itself, consistency matters for your setup. Label your cowl flaps, carb heat, or any other configuration switches with removable tape.
Keep them in the same positions for each maneuver so you don’t forget mid-sequence. And when things start to get busy, muscle memory and visual cues like those simple labels will keep you grounded.
Mindset Advice
By the time you’ve finished your commercial training, you’ll likely have cured your tendency to fixate on the instruments. But just in case, a gentle reminder won’t hurt.
Fly for the outside, not the panel. Focus primarily on your outside reference and only glance at instruments for confirmation. What does the horizon look like, and how do your reference points line up?
Also, treat your examiner like a first-time passenger. Verbally explain what you’re doing, what you expect to happen, and how you’ll recover. Call out your control inputs like, “Now I’ll lower the nose and roll into the turn to hit my 45-degree reference.”
Examiners notice when you’re situationally aware, and speaking out loud proves that you know what you’re doing and why.
Conclusion
Remember that you’ve already done the hard work. You understand the maneuvers and what they’re really for. Lean into that preparation on checkride day.
Now, the real honest truth is that you were never training just for the checkride. After earning your certificate, you’ll carry the skills and wisdom with you wherever you fly next.
And there’s still so much more left to learn after that. Flying is a journey of lifelong growth. Now take what you’ve learned and face your next challenge.