-
1. Follow the rule of thirds
- Drone News Update
-
2. Look for leading lines
-
3. Try taking shots from low altitude
-
4. Use interesting patterns
- Best Drone Strobe Lights
-
5. Create depth with contrast
-
6. Use ND filters
-
7. Experiment with HDR and AEB
-
8. Incorporate people into your shots
-
9. Use natural light
-
10. Break the rules
-
Final thoughts
A good carpenter never blames his tools, and a good camera isn’t all it takes to get good photos. Even if you splurge on a camera drone that costs close to $2000, there is still no substitute for having an eye for good photos. Whether you do drone photography to earn or just for fun, it’s still worth the time and effort to learn the rules of good composition.
In this article, we list down the best tips to make your aerial photos stand out from all the rest. What does it take to take your drone photos from mediocre to incredible? Let’s take a look at the tips to get you started.
1. Follow the rule of thirds
The most valuable pieces of advice are also the most basic ones. In photography, the rule of thirds is a sort of “golden rule” of composition. It’s one of the first things that professional and amateur photographers learn and is a go-to technique for adding some dynamics to your photos.
How does the rule of thirds work? Basically, the rule is to place the subject of your photo somewhere off to the center of the photo. By introducing some asymmetry, you can compel the eyes of a viewer to move around the photo and take in more of its elements. The subject of a photo may be its focus, but the background and supporting subjects are the accents that make photos pop.
Just like most digital cameras, cameras mounted in drones offer the option of displaying a 3 x 3 grid to help you in following the rule of thirds. Don’t forget that the rule applies to both the vertical and horizontal directions. If you want to shoot a really interesting photo, you can even use the rule of thirds diagonally.
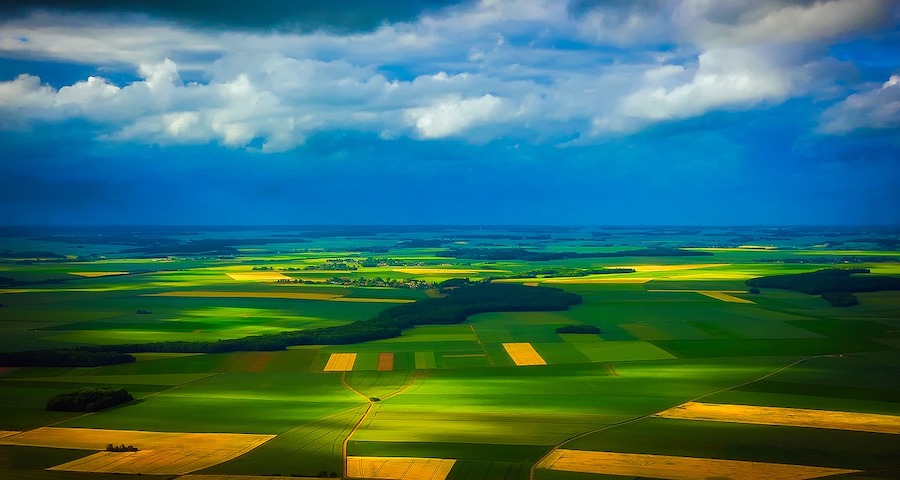
Some of the most common subjects of drone photography are wide landscapes and sceneries. Even if these shots may not have a single subject, the rule of thirds can still be used. By having the skies take up about two-thirds of the photo and restricting the land mass to a smaller space, you can add dynamism to the photo and create some depth and contrast.
2. Look for leading lines
Next to the rule of thirds, creating leading lines is also considered to be one of the most fundamental photo composition rules. Leading lines are simply lines that run across the picture which serve as guides for the eyes of the viewers. Again, this creates a more dynamic photo that takes your viewers on a visual journey.
The great thing about taking photos using a drone is that it becomes very easy to look for leading lines. Infinitely long lines are very common in nature, such as in shorelines or in lines of trees. It’s even better if you can find lines that are meandering, such as rivers and highways since they are even more dynamic than straight lines.
When taking photos from the ground, photographers are usually quite subtle in how they use their leading lines. However, leading lines of sceneries shot from the air much more pronounced because of how naturally they occur. This means that it’s perfectly fine to throw all subtlety out the window when your shooting photos with a drone. Be big and bold about using leading lines – you can even make them the subjects of your shots.
3. Try taking shots from low altitude
When you first take your camera drone for a spin, it can be very tempting to fly as high as possible to take photos. While this is still a viable technique, you can only be so many photos taken from the bird’s eye view before your portfolio starts to look stale and one-dimensional.
An interesting technique that drone photographers do is to hold back the reins of their drones and fly at much lower altitudes. Even flying at 10 to 15 feet high is enough to give you an interesting perspective that people don’t usually experience. An advantage of flying low is that you end up capturing longer shadows and leading lines and that you can still take advantage of having the sky as your backdrop. This isn’t an absolute rule, though, so you’ll have to judge when and where it’s appropriate.
When flying at low altitudes, be cognizant of the fact that you’ll likely be flying closer to obstacles than usual. If you lose altitude or your drone drifts, there’s a higher probability of getting into a crash. You might want to do some practice flights near the ground before you start making shots. If you feel that you’re going to be too pre-occupied with composing your photos, then it would be a good idea to have a visual observer by your side to keep your drone from crashing.
4. Use interesting patterns
Patterns occur naturally, and it’s up to a good photographer to find them. The great thing about flying a drone is that you have such an expansive view of your surroundings, so finding good patterns should be much easier. Whether it’s a neat row of trees or a regular interval of waves crashing on the shore, these patterns remind is that there’s a universal order behind all the chaos of our daily lives.
Just as interesting as aerial shots taken of natural patterns is if you can find a single feature that will “break” that pattern. You might see a single golden tree amongst a row of green ones, or a lone animal trudging along an expanse of desert. These breaks in patterns provide instant subjects for your shots. The contrast they provide makes for some really amazing shots. The best thing about finding these breaks is that they come so rarely that you’re bound to capture a photo that is truly unique and will stand out. Yes, patterns are good, but breaking the patterns is even better.
5. Create depth with contrast
Creating depth is something that all photographers aspire for in their photos. You want photos that are made with several layers, which provides a more compelling experience for viewers. This is even more important for aerial photos because they are rarely intimate and are instead grandiose and expansive. If you’re taking photos of a huge space, you need to make sure that none of that space goes to waste.
Unfortunately, a lot of aerial photos still seem to end up looking flat despite the scale of their subjects. This is because the scale of the photos needs to be translated into a medium that can be appreciated just by looking at it, and the best way to do that is to create contrast.
There are several ways to create contrast, although the easiest factors to exploit are color and brightness. You can deliberately have the subject look darker so that it looks closer to the viewer, while a brighter background creates the illusion of distance. You can even alter the impression of size through the use of colors – brighter colors make an object look larger, while darker colors make them less pronounced.
6. Use ND filters
If you like to take scenic shots and you don’t have a set of ND filters yet, then it’s time to invest in one. They aren’t terribly expensive but can be really useful in controlling the exposure of your shots. If almost all professional photographers consider ND filters as part of their standard kit, then why shouldn’t you?
ND filters allow you to reduce the amount of light entering your camera’s sensor, thus avoiding overexposed shots. They can be incredibly useful if you’re shooting in sunny weather or in exceptionally bright locations, such as out on the beach. Some ND filters sets also come with a Polarizing filter, which eliminates glare.
Aside from taking standard still photos of very bright areas, ND filters also allow you to play around with your camera’s shutter speed without ending up with overexposed photos. You can slow down the shutter speed to capture the cascade of water down a waterfall, or the movement of cars along a brightly lit highway. These techniques may have been done countless times before with DSLR cameras, but redoing the same shots through the lenses of a drone-mounted camera still gives them a sense of freshness.
7. Experiment with HDR and AEB
Exposure can be quite tricky to master when taking drone shots. Because of the scope of environments that you can capture in a single photo, relying on a single exposure setting may result in loss of some detail. If you set your exposure too high, then bright areas may seem too bright. However, setting the exposure too low may also mean that darker areas come out too dark.
Professional cameras and even camera phones have been able to skirt around this problem by introducing the HDR mode. HDR stands for High Dynamic Range, a camera feature that captures several simultaneous shots with each one set at a different exposure level. These shots are then combined in a manner that preserves as much detail as possible. If your drone’s camera comes with an HDR feature, then we highly recommend testing it out just to see the difference between a photo shot in HDR mode and one shot normally.
An alternative to HDR is AEB, which stands for Auto Exposure Bracketing. It functions very similarly to HDR in that it captures several shots simultaneously at different exposure settings. The difference is that all of the shots are retained in their raw composition, and it is up to the photographer to combine them in post-processing. More experienced and professional photographers prefer working with AEB as it gives them more control over the process and the appearance of the output.
8. Incorporate people into your shots
We’ve already talked about having elements that break patterns in your shots. One of the best ways to disrupt a pattern is to have people in your photos. A crowd of people might look boring, though, so it’s best to stick to about two or three.
Aside from people being disruptive elements in your photos, having people in them is one of the most effective ways to convey a sense of scale. Rarely can viewers appreciate how majestic or grandiose a scene is through a picture if there’s no way for them to imagine actually being there. Consciously or not, having a person in the scene draws viewers to imagine themselves as those people, which gives them an instantly immersive experience.
Something worth noting if you’re taking shots of people is that the Part 107 rules prohibit drone flight over people who are not directly participating in the drone operations. This includes people who may have provided their consent to have photos taken of them. The same provision also prohibits drone flight over moving vehicles for safety considerations. If you’re planning to take photos of people and moving vehicles, then it’s best to take them from a safe distance away.
9. Use natural light
It hardly needs to be said, but natural light is the best light for you to use in photography. Considering the scale of aerial photos, you pretty much don’t have a choice – the sun is the only light source powerful enough to light up your scenes.
Just as with regular photographers, catching the hues of the “golden hour” is just as valuable for drone photographers. Not only are the reddish-gold hues of the golden hours absolutely gorgeous in photos, but the long shadows that get cast during these times make for more dramatic shots.
Fortunately for all types of photographers, catching the golden hour no longer needs to be a matter of guessing and estimation. Mobile apps, such as Sun Surveyor, can give you daily forecasts of when the window for the golden hour starts. The app even lets you use your phone’s camera to view how shadows will look like depending on the time of day.
10. Break the rules
In closing this article, we’d like to give you our last piece of advice – and that is to not get too caught up in the rules. Yes, this whole article was all about rules, so this might be a strange note to close with. As with any artistic craft, being able to determine what looks good and what doesn’t often come down to a matter of taste and an instinctive sense of how you’re going to approach a subject.
A famous landscape photographer said that “there are no rules for good photographers.” This holds true for just about everything we’ve said in this article. Even the fundamental rules of thirds and leading lines can be ignored if you think that you can make photos look good without them. Some professional photographers have even become famous by creating a signature look of overexposed and underexposed photos.
Ultimately, the point is that a good photo will look good, regardless of if you followed the rules or not. You can think of these rules as mere guidelines that have been passed across the generations of photographers who have gained some success in using them. However, blazing your own trail to success is going to be even more lauded than sticking to some arbitrary set of rules.
Final thoughts
While there are photographers who are so supremely skilled that they can take amazing photos by instinct alone, the rest of us have to rely on standard photography guidelines. Most of the rules we’ve mentioned here are quite and fundamental and have been practiced by photographers for decades. However, drone photographers may have to be reminded that the basic photography rules still apply, even if their cameras can fly.
More than following any of these rules, the best way to improve your photography skills is to practice. pack up that drone, bring a few extra batteries, and spend a whole afternoon taking aerial photos. You’ll be much better before you know it.