-
Key Takeaways
-
What Is the “Impossible Turn?”
-
The Dangers of Turning Back
- Delayed Reaction
- Stalling
- Spinning
- Insufficient Altitude
-
Aerodynamic Factors
- Bank Angle
- Stall Speed Versus Bank Angle
- Turn Radius
- Effect of Wind
- Failure Altitude
- Nowhere to Land
-
Train for Failure, Train for Success
-
Perform a Takeoff Briefing
- How to Brief a Departure
-
Conclusion
As your aircraft smoothly climbs away from the runway, nothing seems amiss.
Suddenly, your engine seizes, and you haven’t even reached traffic pattern altitude yet.
What do you do?
Your first instinct is to turn around and land on the lovely, long runway from which you just departed.
But this maneuver, known as the “impossible turn,” is as dangerous as it is appealing.
In this article, we’ll help you resist the lure of the “impossible” and craft safer emergency plans.
Key Takeaways
- Preparing for engine failure and practicing what to do helps keep you safe in an emergency.
- Knowing your aircraft’s engine-out performance is essential when deciding a course of action.
- Always brief your departure, including failures at different altitudes and nearby landing spots.
What Is the “Impossible Turn?”
The impossible turn is a risky maneuver to attempt should your engine fail on climbout. It involves a steep bank at low airspeed and a turn of more than 180 degrees to reach the runway. If the emergency happens at a low altitude, you likely won’t have the energy to pull it off.
But is the impossible turn always impossible?
It is true that pilots have performed the maneuver and safely landed on the departure runway. These famous tales of success are why pilots continue to try their luck at it. Yet, many more have suffered injuries and accidents and lost their lives in the attempt.
During a low-altitude engine failure, you have little time to act. The aircraft is at a high pitch angle and already close to stall speed. As the seconds tick by, your options decrease, and obstacles loom ahead. It’s all too tempting to try to make it back to the paved surface behind you.
So why should we not attempt the impossible turn? Statistically, there is a higher risk of failure than success. The pilots who walked away from this maneuver had tons of experience, the right conditions, and heaps of luck.
According to the AOPA Safety Foundation’s Nall Report, most maneuver-related low-altitude crashes are fatal. In comparison, only 10% of all forced landings have fatalities.
Let’s look at the factors that make this seductive maneuver so hazardous.
The Dangers of Turning Back
The main issue with the impossible turn is that there’s little room for error, even if you have enough altitude. Energy management is crucial during an engine failure and is easy to miscalculate.
Let’s use a scenario to give us some context. Here’s the scene:
- You’re flying a Cessna 172.
- You completed the climb check at 300 ft AGL.
- The engine quits at 500 ft AGL.
- You’ve already passed the departure end of the runway.
Delayed Reaction
Case studies by the Federal Aviation Administration (FAA) show the average reaction time in an emergency is four seconds. Less experienced pilots will take longer to recognize an emergency situation.
A C172 will typically climb at VY or VX, which are 74 KIAS and 62 KIAS, respectively. With the flaps up, the stall speed is 48 KIAS. A pilot has a 14 to 26 KIAS buffer before the aircraft stalls.
At climb attitude, you’ll lose quite a bit of airspeed during that four-second delay. Once you realize the failure, you must immediately pitch down to reach best glide speed. If you haven’t prepared for this reaction, you might reach stall speed first.
Pitching down means exchanging altitude for airspeed. Now, you have even less than 500 feet of altitude to attempt the impossible turn.
Stalling
Stalling at a low altitude is the worst possible outcome. A C172 can lose more than 200 ft during a power-off stall recovery. With no altitude to spare, you need to prevent a stall no matter what.
The pressure of an emergency negatively impacts pilot performance. The stress can cause pilots to recover from a stall aggressively, leading to a secondary stall.
Spinning
There is a higher-than-usual chance of a spin during an engine failure on takeoff. You’re at a high pitch attitude and are counteracting the left-turning tendencies with rudder.
The shock of losing an engine and turning while uncoordinated can result in a spin. A C172 can lose more than 2,000 ft during the first spin and subsequent recovery. A spin at such low altitudes guarantees a crash. This is all too often the end result of the impossible turn.
Insufficient Altitude
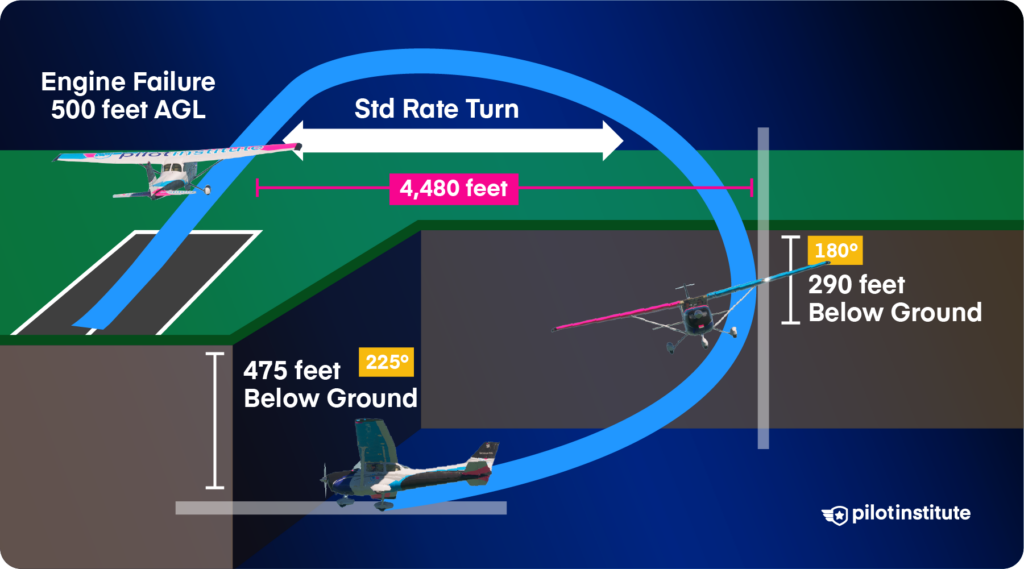
Let’s say you’ve already decided to turn around and know the dangers of a spin and stall. To avoid increasing the stall speed, you’ll conduct a standard-rate turn. Turning 180 degrees at 3 degrees per second will take 60 seconds.
A C172 descends at roughly 740 fpm at best glide speed and higher in a bank. You’ll be on the ground before completing your standard rate turn.
Aerodynamic Factors
Flying is dynamic, and aircraft performance changes with the flying conditions. Let’s look at some aerodynamic factors that can affect the impossible turn.
Bank Angle
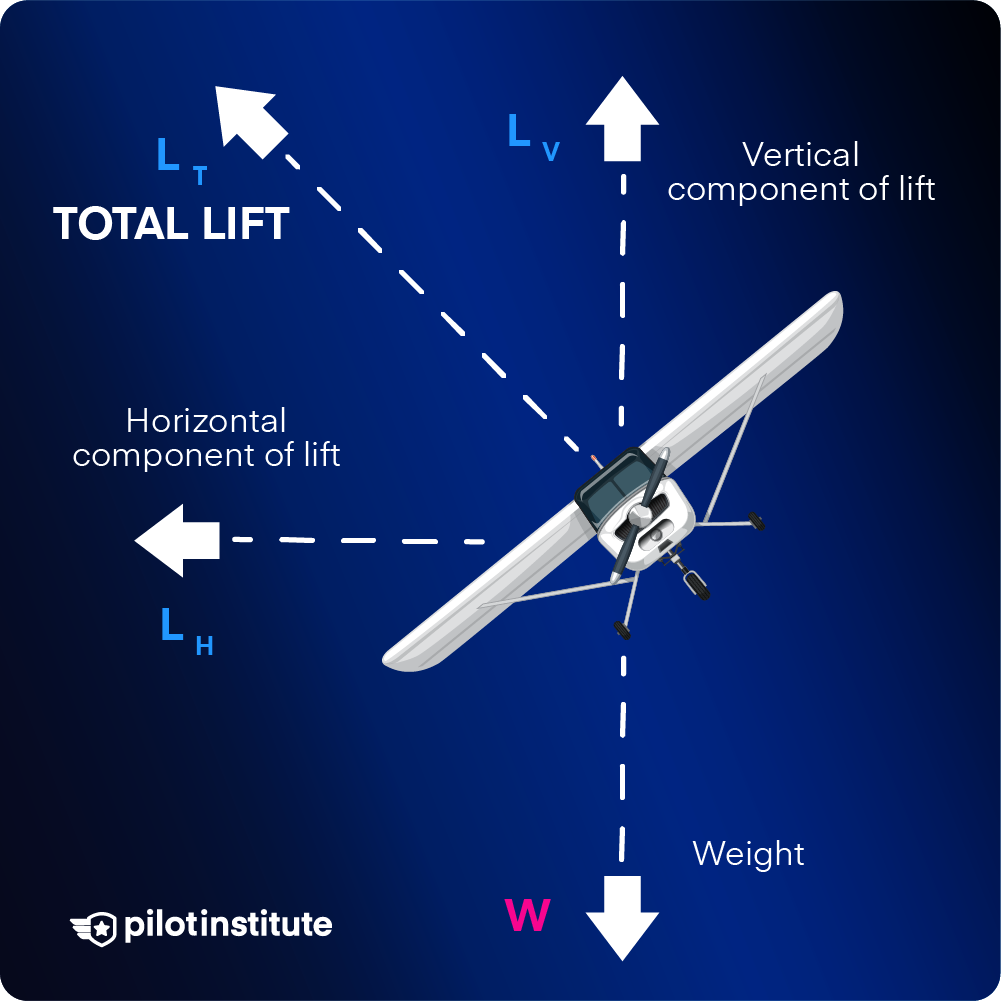
Let’s say your standard rate turn is at 20 degrees of bank. When you bank, with all other factors constant, the total lift doesn’t change. However, the direction in which the lift acts does.
The lift splits into a horizontal and vertical component. The former allows you to make the turn. But now you have less vertical lift to counteract the aircraft’s weight, so you descend faster.
To arrest this descent, you need to generate more lift. To do this without engine power, you can either increase the angle of attack or increase airspeed. Increasing the angle of attack will cause the airplane to slow below best glide speed. Pitching down for airspeed magnifies the already steep descent rate.
Stall Speed Versus Bank Angle
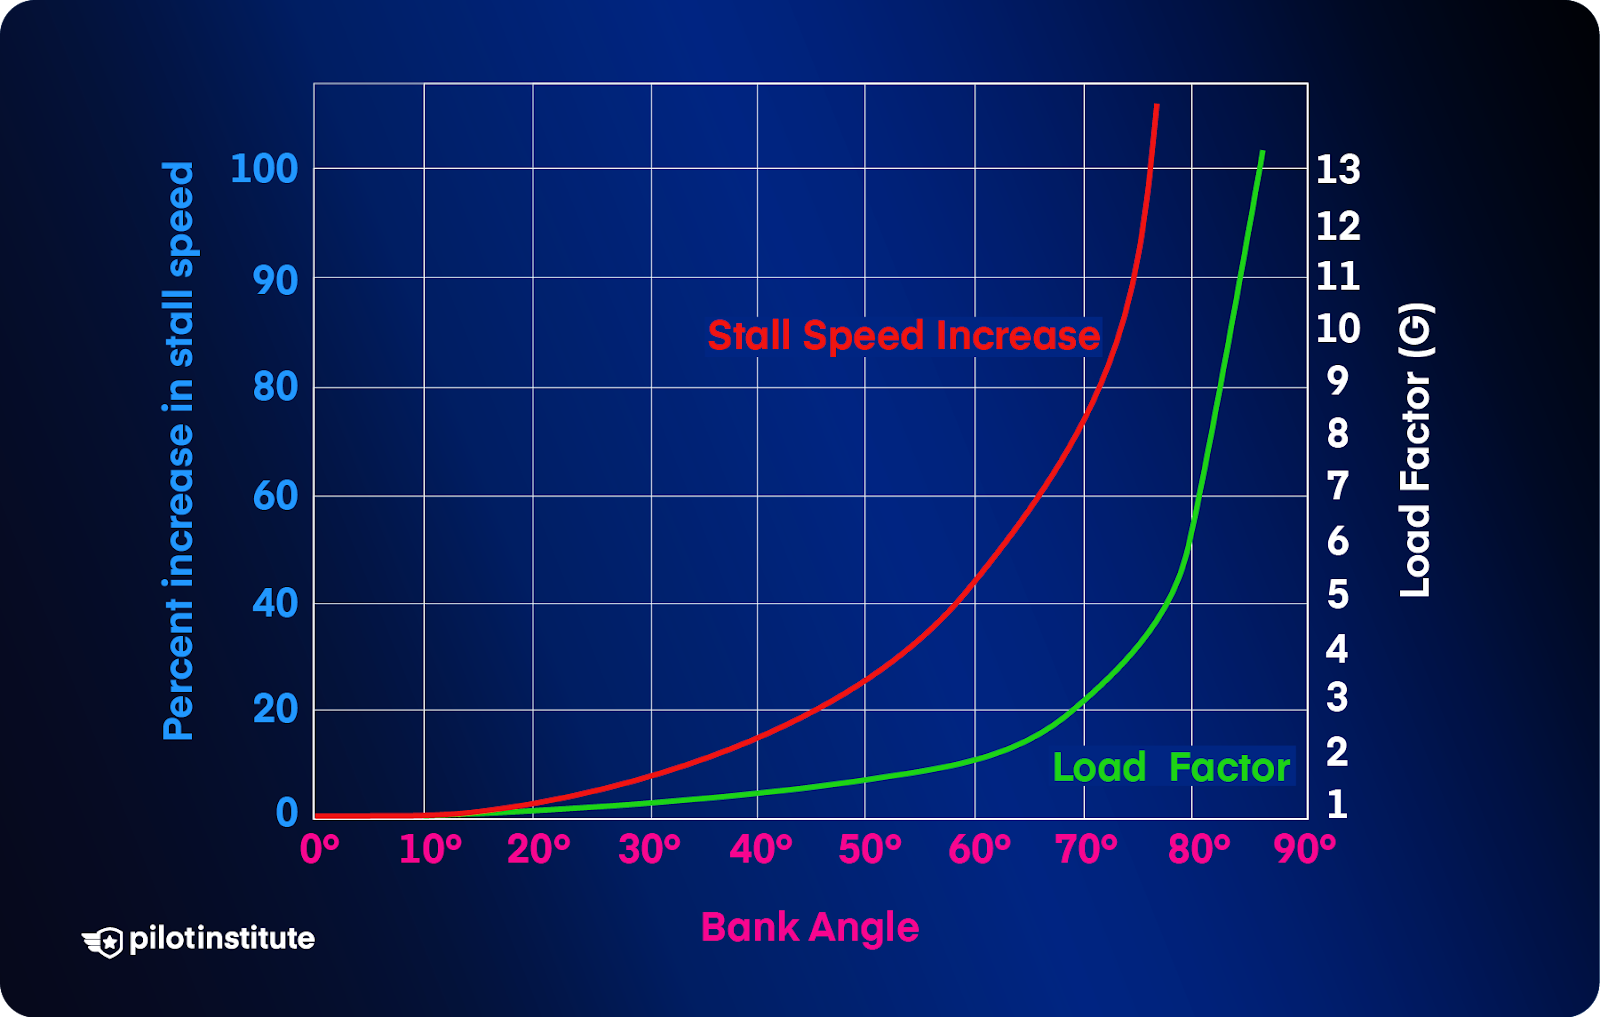
Another factor to consider is that the chance of stalling increases with the bank angle. The reason for this is twofold.
When banking, you must increase the angle of attack to keep the descent rate in check. The critical angle of attack where the wing stalls remains the same. The airplane will be closer to the critical AOA in the turn.
Also, the increased load factor in a turn causes the stall speed to climb. Load factor is the acceleration force you experience when rapidly changing direction. You’ve likely felt this sensation of being pushed into your seat during steep turns.
We measure load factor in Gs. The stall speed increases in proportion to the square root of the load factor. So, in a typical 2G turn, the stall speed increases by a factor of 1.41, or 41%. But why?
Stall speed increases with weight. The load factor increases the aircraft’s effective weight.
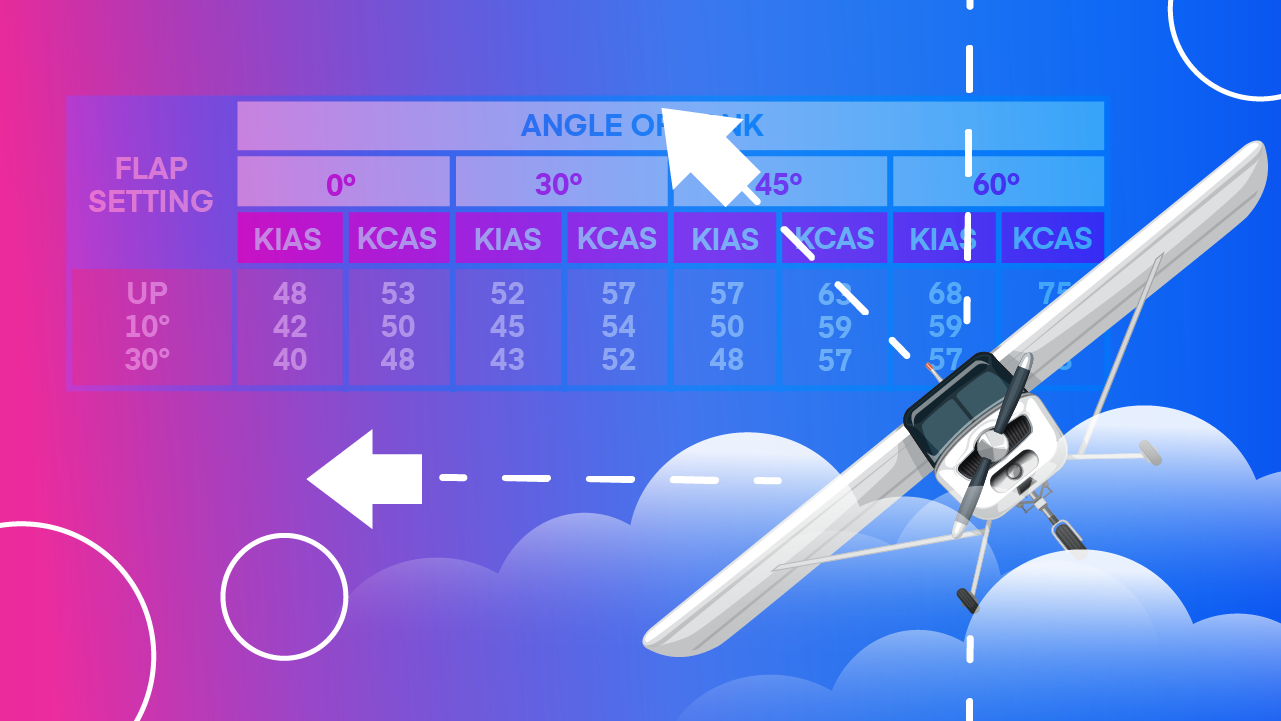
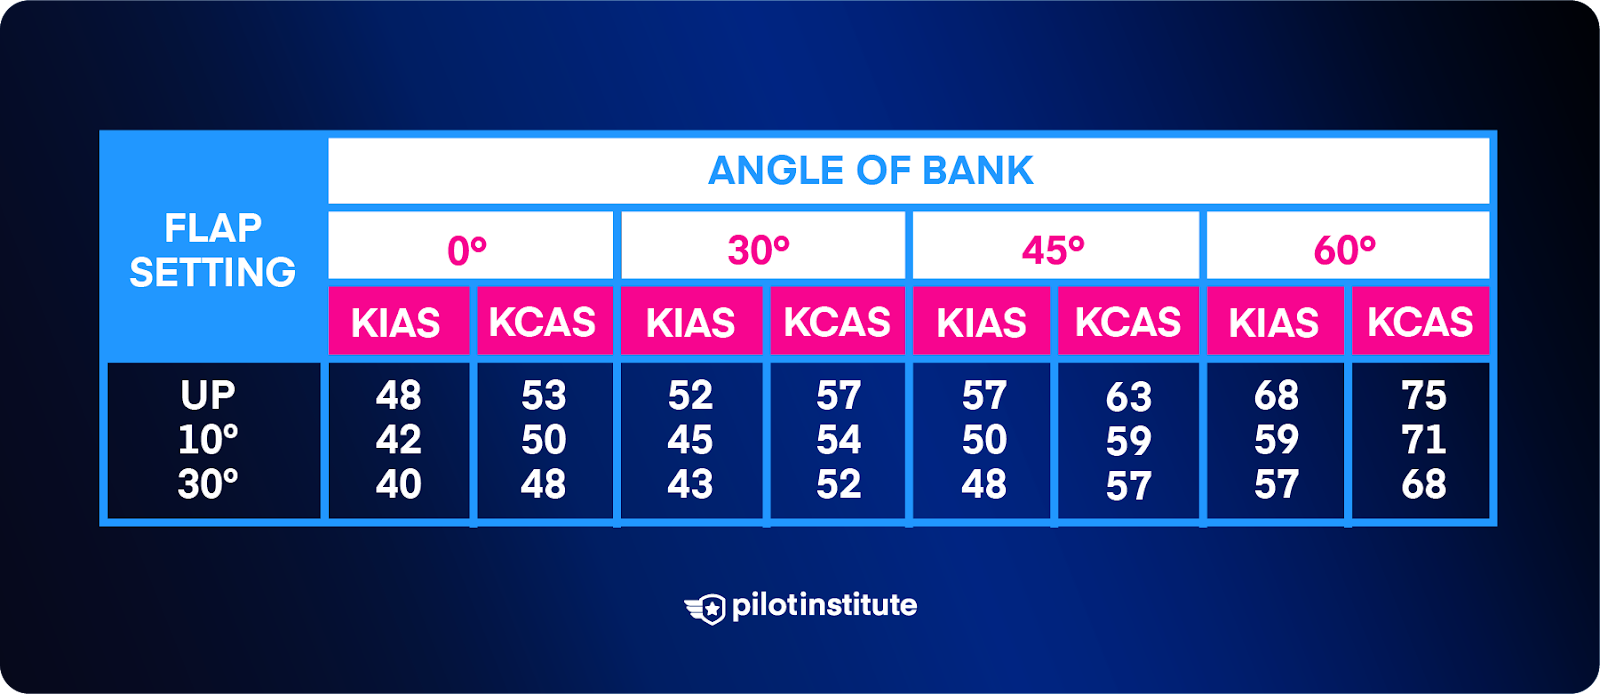
The table below shows the relationship between bank angle and stall speed in a C172. A 60-degree bank increases stall speed by 20 knots, three knots above the best glide speed.
Turn Radius
The impossible turn isn’t as simple as just turning around. The goal is to head back and land on the runway. To do this, you’ll always have to turn more than 180 degrees and fly further to reach the runway. Why? Because of the turn radius.
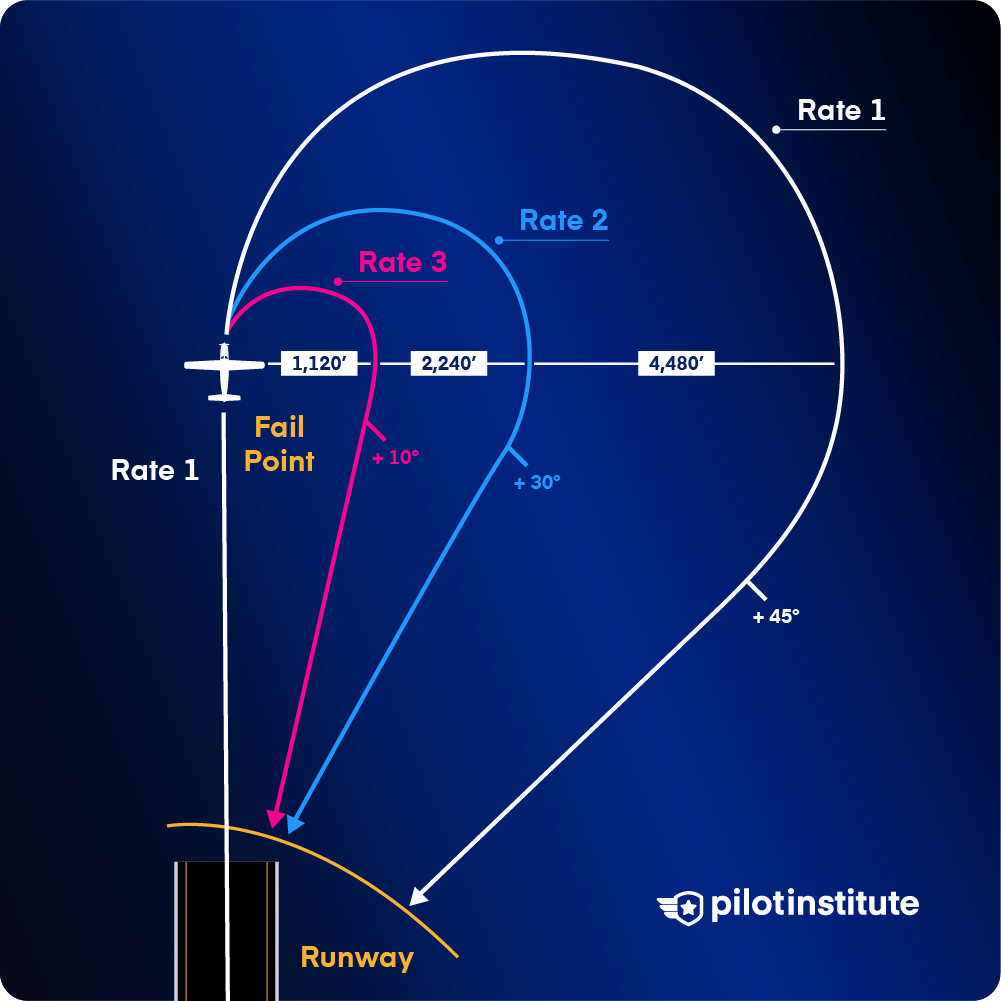
It takes 60 seconds to turn 180 degrees at a standard rate. As a rule of thumb, the diameter of a turn is 1% of the ground speed. At a typical ground speed of 70 knots, your turn diameter will be approximately 0.7 NM. So, you’re now about 4,480 feet to the side of where your turn began.
You might have turned around, but you’re still far from the runway. You must turn an extra 45 degrees toward the runway and have the altitude to glide to it.
What if we make a tighter turn at the same airspeed? A rate two turn (6 deg/sec) will halve the radius, but we must still turn an extra 30 degrees to head toward the runway.
The table below shows the relationship between turn rate, radius, and heading at 70 KIAS. Total time includes the four-second response delay. Altitude lost reflects a descent rate range between 740 ft/min and 1,000 ft/min.
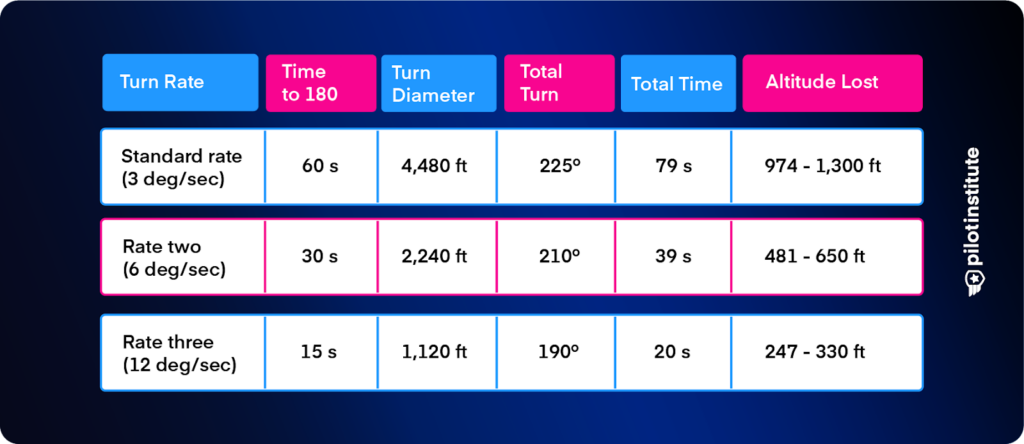
When bank angle increases significantly, airspeed must also increase to avoid a stall. A faster speed will further increase the turn radius.
Effect of Wind
Wind affects the aircraft’s turn radius and performance.
If you have a headwind when taking off, you will have a tailwind while landing. Increased ground speed gives you little time to prepare for a safe approach and landing. A strong tailwind could push you too far down the runway if you manage to make it back.
If you have a left crosswind and are banking left, you’ll have a tighter turn, which is beneficial. But, if you turn in the opposite direction, your turn radius will increase even further.
Failure Altitude
How you react to an engine failure on takeoff depends heavily on the altitude at which the engine fails.
1,000 ft AGL
At 1,000 ft AGL, you’re at traffic pattern altitude. You might make it back to the airport in a C172. However, preparation and immediate action will be necessary to pull it off.
You will have difficulty making the departure runway in heavier, less forgiving aircraft. For example, in a Bonanza, you might need 1,200 to 1,500 feet to make it back.
600 ft AGL
At 600 feet, you might feel you have enough altitude to turn around and make it to the runway. But gut feelings can be misleading.
At its best glide speed, a C172 descends at around 740 fpm. However, you might see 1,000 fpm at steep bank angles. So, you have around 45 seconds in the air wings-level and even less if you bank.
Six hundred feet is not a lot of altitude for an attempt to return to the runway. In the right conditions, in some aircraft, a skilled pilot might make it. Are you willing to take a chance?
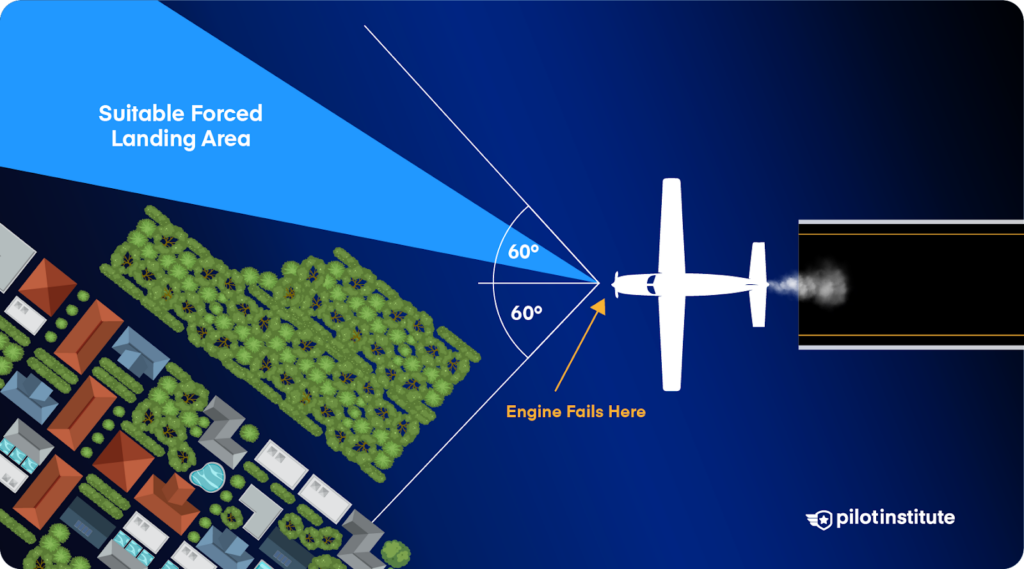
If you can’t land straight ahead, the next best choice is to land within 60 degrees to either side. Scan for the best landing spot and maneuver the aircraft with positive control toward it.
300 ft AGL
At 300 ft AGL, there’s no time to make substantial turns. Your options are extremely limited at this altitude.
It’s possible that you still have runway left underneath you. If so, pitch down and perform a forward slip as soon as possible. This will get you down quickly and keep you on the airport property.
If there’s no runway left, scan the area straight ahead and 30 to 60 degrees to either side. Pick the best spot, prepare the aircraft for an emergency landing, and put it down under control.
Nowhere to Land
What if there’s no place to land? Although infrequent, obstacles can surround airports, making the impossible turn the only option.
If you frequent such airports, consider whether flying out of them is worth the risk. Leaving yourself with no “out” is not good aeronautical decision-making.
Train for Failure, Train for Success
No pilot should perform an untested maneuver for the first time during an emergency. You don’t know how the aircraft will react and how you’ll respond. Practice emergency scenarios frequently and only with an instructor onboard.
At altitude, get a feel for how your aircraft performs during a simulated engine failure. Notice how much you pitch down to keep the aircraft flying and how much the descent rate increases at a given bank. Set an imaginary “ground” point and notice how much altitude you lose in the turn.
Once you know how the airplane reacts, fly to an unbusy airport with your instructor. Practice power-off 180 landings from downwind. This will give you a feel for how much your aircraft sinks without power. It will surprise you, and it might get you in the habit of tighter downwind legs.
Perform a Takeoff Briefing

Having a plan of action before an emergency happens is essential. Briefing yourself and your passengers before taking off helps affirm your plan.
Keep the information front and center in your brain. Preparation stops you from deviating from it in the heat of the moment.
How to Brief a Departure
When briefing a departure, the more information you have, the better.
Before you head out to the aircraft, make sure to utilize all your resources. The first thing to do is know where to land should your engine fail. Use your EFB or Google Maps to survey the area around the airport and find a suitable landing spot. Be aware that the satellite picture on Google Maps can be outdated.
The wind can make or break your landing. Know the wind direction and speed and consider gusts. Also, pay attention to how direction and speed change with altitude. How will the wind direction affect any turns you might need to make in an emergency?
Since you’ve calculated your performance, you know where your aircraft will lift off. Use this information to identify an abort point. If the aircraft is not performing as it should, cancel your takeoff run upon reaching it. Choosing a good abort point will let you know how much runway remains should something go wrong.
Divide the engine failure after takeoff briefing into two scenarios: failure below and above traffic pattern altitude.
Below traffic pattern altitude, you’re less than 1,000 ft AGL and have little time to react. You’re limited to the area around the aircraft. Focus on preventing a stall and landing in your predetermined area. If you need to turn to get there, bank no more than 45 degrees.
Above traffic pattern altitude, you have more time to turn. Pitch for the best glide airspeed, and begin maneuvering to your landing spot. If you have time, troubleshoot and call for help.
Your takeoff briefing should include these elements:
- The departure runway and available distance.
- Takeoff distance.
- Rotation speed.
- Rejecting the takeoff at the abort point.
- Failure on the takeoff roll after the abort point.
- Failure just after takeoff.
- Engine failure below pattern altitude.
- Engine failure above pattern altitude.
- The plan if things go well.
Briefing engine failure procedures gives you the best chance at success should the unexpected happen.
Conclusion
Even a single faulty component can turn a routine takeoff into an emergency. However, preparation helps us make the best possible decisions from the available options.
The “impossible turn” isn’t truly impossible. Yet, it shouldn’t be our first move after an engine failure at low altitude. Consider it a last resort. If fields surround your airport, you should brush up on your soft field landing skills. They could help in an emergency. Read more about the soft field technique in this article.