
-
Key Takeaways
-
What Are Runway Markings?
-
What Are Airport Diagrams?
-
The Importance of Airport Markings
-
Airport Marking Colors
-
Runway Types
- Visual Runways
- Non-Precision Runways
- Precision Runways
-
Runway Designators
-
Runway Centerlines
-
Runway Aiming Point
-
Runway Touchdown Zone
-
Runway Side Stripe Markings
-
Runway Shoulder Markings
-
Runway Threshold Markings
- Displaced Threshold
-
Blast-Pad, Stop-Way, Overrun Area
-
Runway Safety Area
-
Taxiway Centerline Markings
-
Taxiway Edge Markings
-
Taxiway Shoulder Markings
-
Surface-Painted Taxiway Direction Signs
-
Surface-Painted Location Signs
-
Geographic Position Markings
-
Runway Holding Position Markings
- Holding Position Markings in Runway Approach Areas
- Holding Position Markings for Instrument Landing Systems (ILS)
- Holding Position Markings for Intersecting Taxiways
- Surface Painted Holding Position Signs
-
Vehicle Roadway Markings
-
VOR Receiver Checkpoint Markings
-
Non-Movement Area Boundary Markings
-
Temporarily Closed Runway and Taxiway Markings
-
Permanently Closed Runway and Taxiway Markings
-
Short Takeoff and Landing Runways
-
Conclusion
As a pilot, understanding every airport marking that you may encounter is vital to the safe operation of your aircraft. One slight misunderstanding of an airport marking could lead to embarrassment at best and an accident at worst.
This guide will prevent that from happening.
In this guide to airport markings, we’ll take an in-depth look at the different types of airport markings, including their design, purpose, and significance, so that you can navigate an airport with confidence.
After reading this guide, be sure to complete your knowledge with our Essential Guide to Airport Signs.
Key Takeaways
- Runway markings are white and guide takeoff, landing, and alignment.
- Centerlines, aiming points, and touchdown zones help pilots land accurately.
- Yellow taxiway and holding markings prevent runway incursions.
- Check NOTAMs for temporary closures marked with yellow Xs.

Free Private Pilot Study Sheet
Grab a printable PDF that highlights must-know PPL topics for the written test and checkride.
- Airspace at-a-glance.
- Key regs & V-speeds.
- Weather quick cues.
- Pattern and radio calls.
What Are Runway Markings?
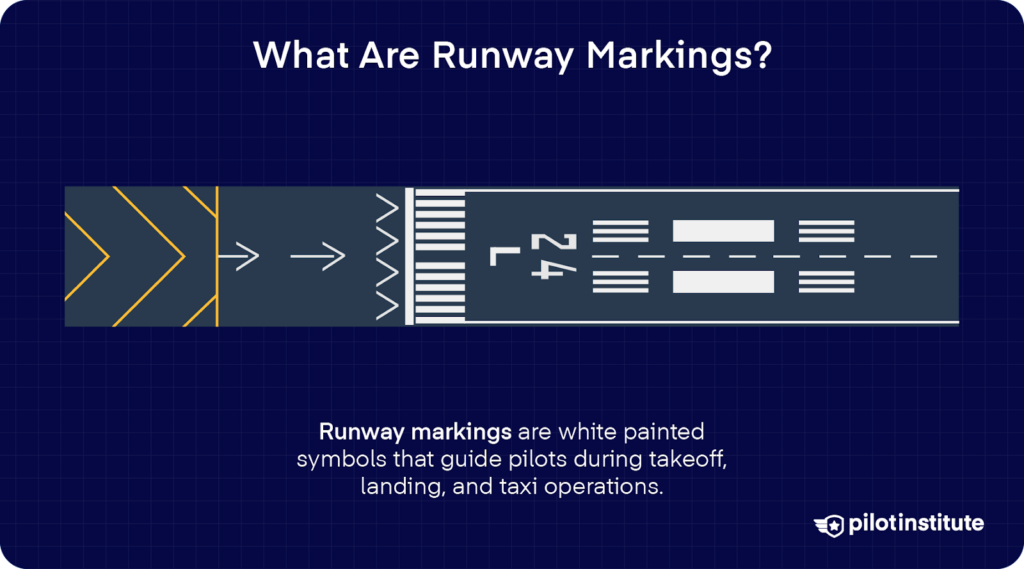
Airport markings are a system of symbols, lines, and colors found on runways, taxiways, aprons, and other areas of an airport.
They serve as visual aids to guide pilots, ground crew, and Air Traffic Control, indicating the boundaries and areas of different spaces of the airfield, such as runways, taxiways, holding positions, and parking areas.
These markings are needed for safe and efficient airport operations, helping to prevent accidents and ensure the orderly movement of aircraft and vehicles on the ground.
What Are Airport Diagrams?
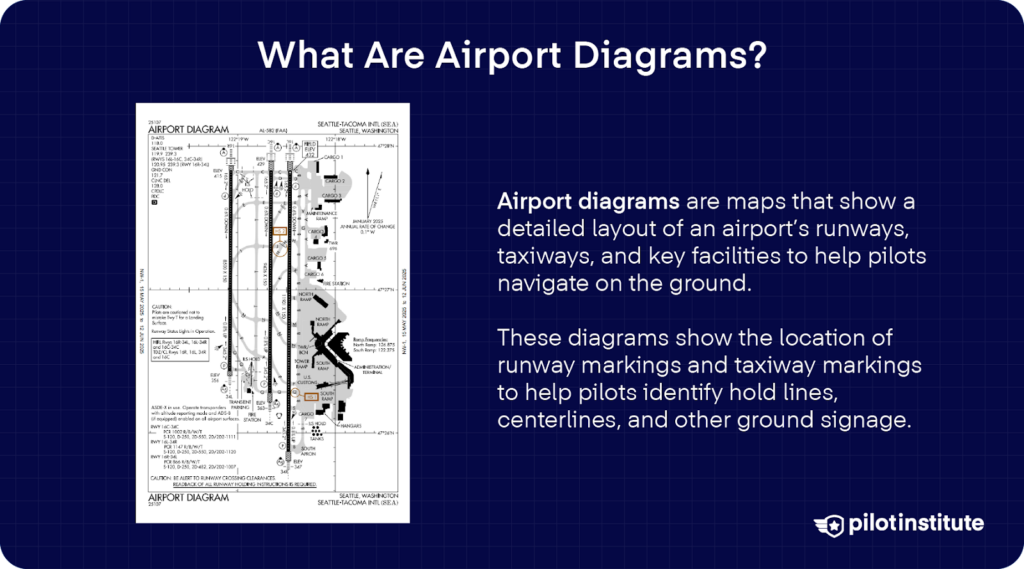
Airport diagrams are maps that show the layout of an airport. They include runways, taxiways, ramps, terminals, and other key features so pilots can safely navigate on the ground.
Think of them as your GPS for the airport; this can be useful at busy or unfamiliar locations.
The Importance of Airport Markings
Airport markings are vital to airport operations. The most notable example of the importance of airport markings is Air Traffic Control’s ability to issue instructions to aircraft and vehicles on the ground.
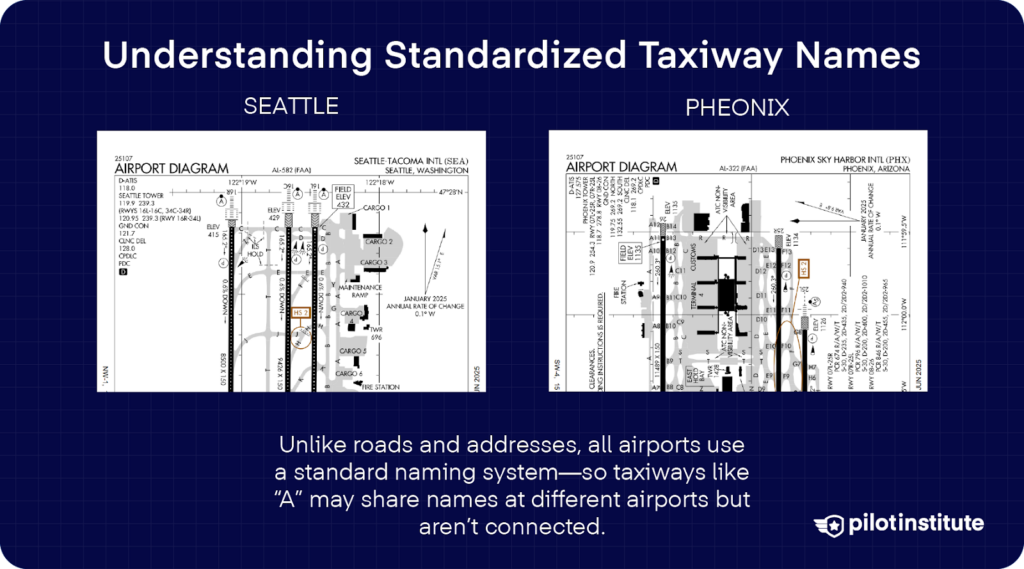
Much like roads, airport taxiways and runways have dedicated letters assigned to them. Kind of like addresses, parking areas also have unique identifiers.
The biggest difference between roads and addresses and their airport equivalents is that all airports use a standard naming system.
This means that two different airports may use the same name for a taxiway.
For example, taxiway “A” (referred to as “taxiway alpha”) at Seattle-Tacoma is not related to taxiway alpha at Phoenix Sky Harbor, despite sharing the same name.
This applies to most airport markings, like runway designators and parking areas.
Airport Marking Colors
Airport markings use defined colors to prevent confusion and misidentification (imagine if the taxiway and runway colors were the same – yikes!).
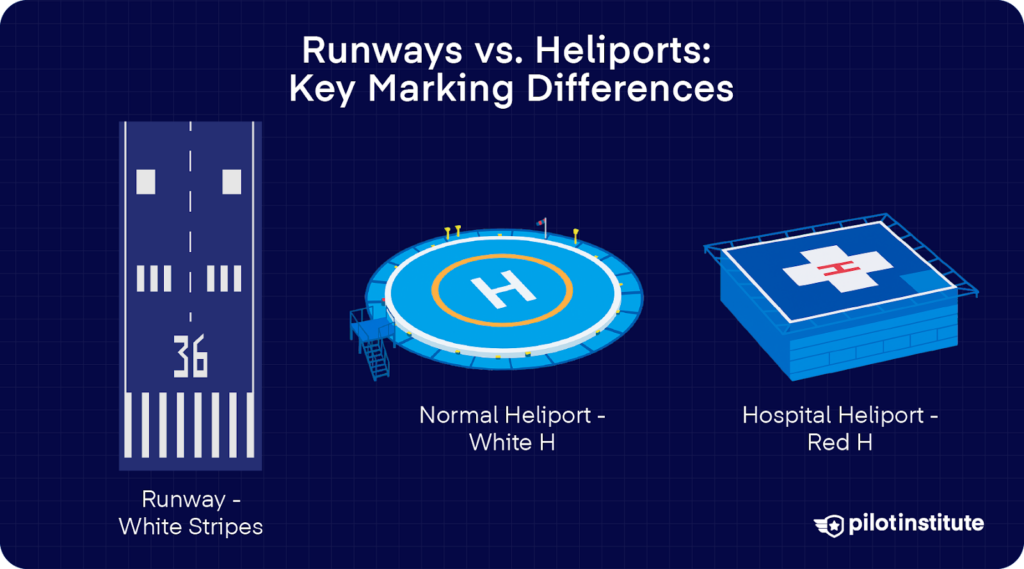
The markings on runways are white. The same is true for heliports, except for hospital heliports, which have a red “H” (usually on a white cross).
The markings for taxiways and other areas that aircraft aren’t supposed to use (like closed or dangerous spots) are all yellow.
Holding positions have yellow markings, even if they’re on the runway itself.
Runway Types
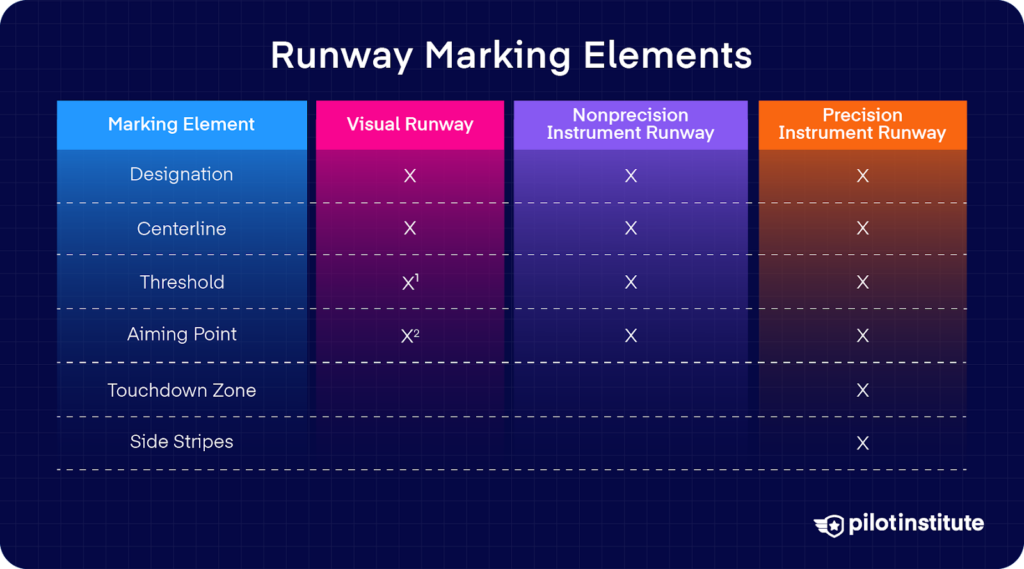
The runway is a critical component of every flight. Runway markings play an essential role in guiding pilots to and from the runway. These markings are more than just painted lines on the ground; they convey critical information to pilots about the runway’s dimensions, orientation, and hazards.
There are three types of runways, each with distinct markings.
Visual Runways
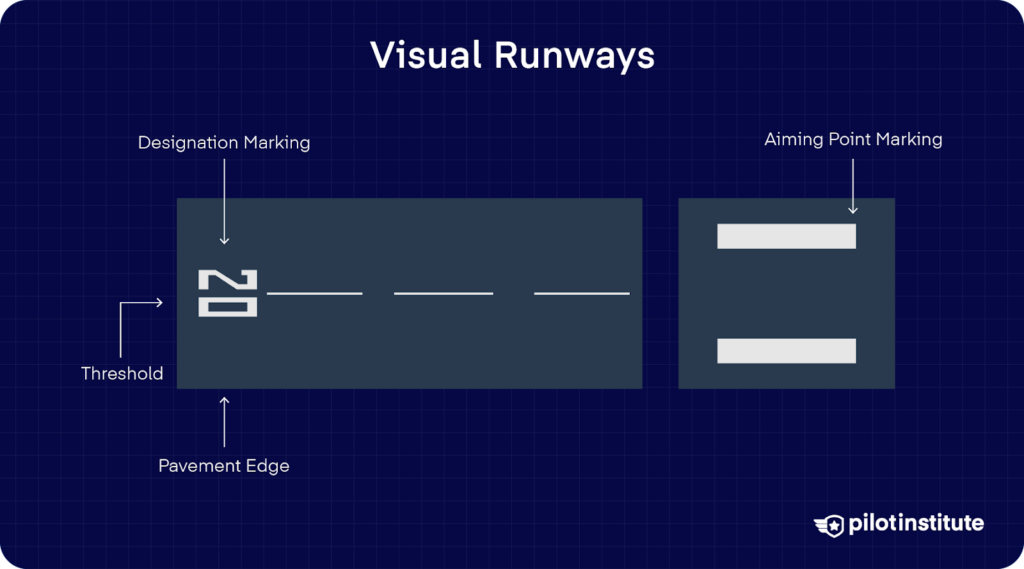
Visual runways have no instrument approach procedure available. Visual runways are marked with a dashed centerline and runway identification number.
On runways used by international commercial flights, a threshold must be present (we’ll look into that later in this article).
Visual runways feature aiming point markings (described later on in this article) if the runway is 4,000ft or longer or used by jet aircraft.
Non-Precision Runways
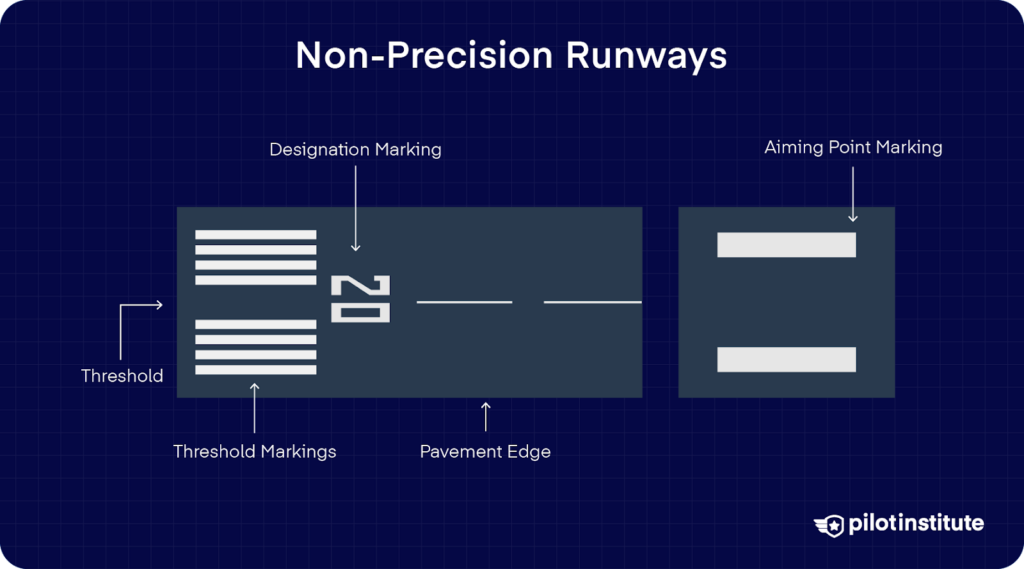
Non-precision runways have at least one non-precision approach available.
Non-precision runways often look similar to visual runways but feature threshold and aiming point markings.
Precision Runways
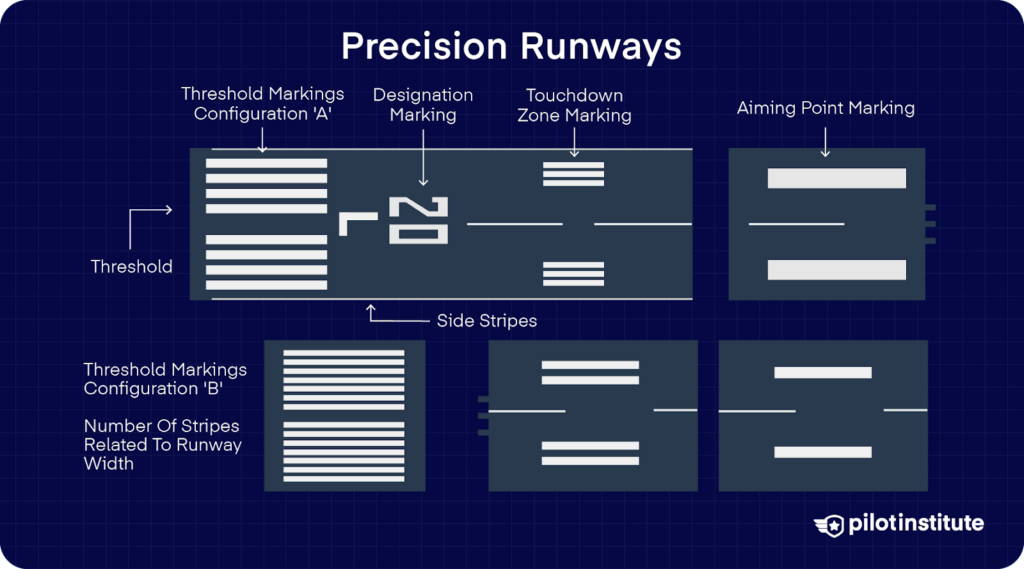
Precision runways feature at least one precision approach aid at either end of the runway, such as an Instrument Landing System (ILS).
Precision runways feature additional markings to assist pilots in determining runway distance and landing areas.
With the three types of runways defined, let’s look at the markings you may find on a runway.
Runway Designators
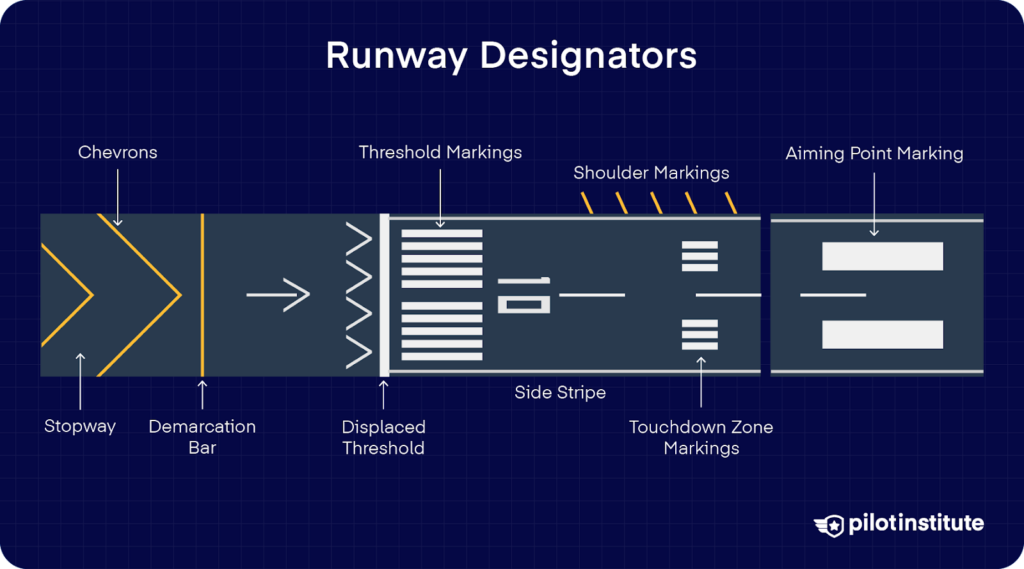
Runways feature perhaps the most important airport markings – runway designators.
You may be surprised to learn how simple the naming system is.
Runways are designated using the magnetic direction that they point towards, rounded to the nearest 10 degrees. For example, a runway pointing in a 063 magnetic heading will be designated as “Runway 6” (“Runway 06” outside of the US). A runway pointing in a 068 magnetic heading will be designated as “Runway 7” (heading 068 rounded to the nearest 10 is 070).
The opposite end of the runway is designated with the reciprocal (opposite) heading. For example, the opposite end of Runway 6 would be Runway 24. In other words, the heading for Runway 6 was 063, so we add 180 degrees to 063, which equals 243. The opposite end is therefore Runway 24.
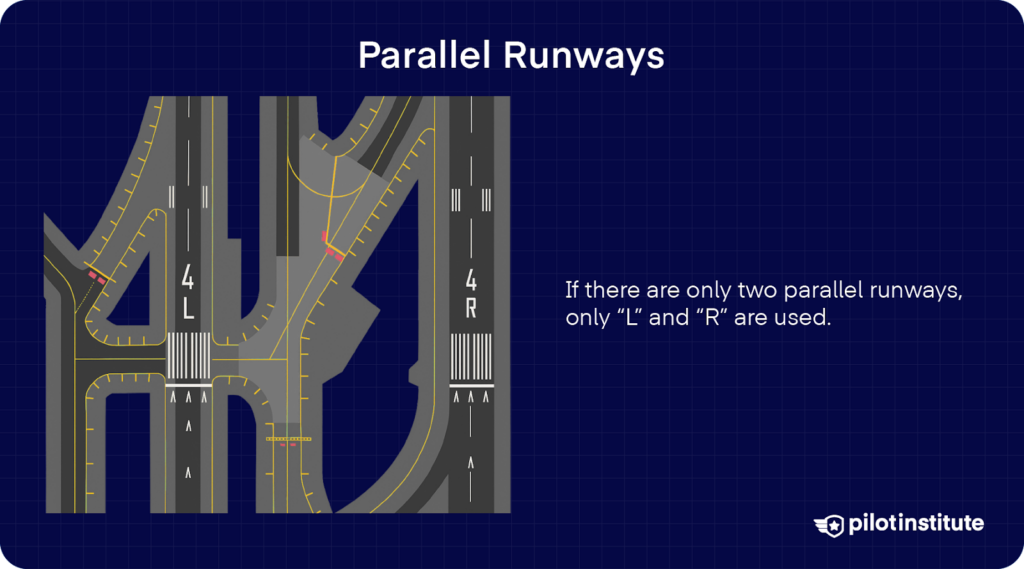
Parallel runways feature an additional letter describing their position; “L,” “C,” or “R” for “Left,” “Center,” and “Right.”
If there are only two parallel runways, only “L” and “R” are used.
Runway Centerlines
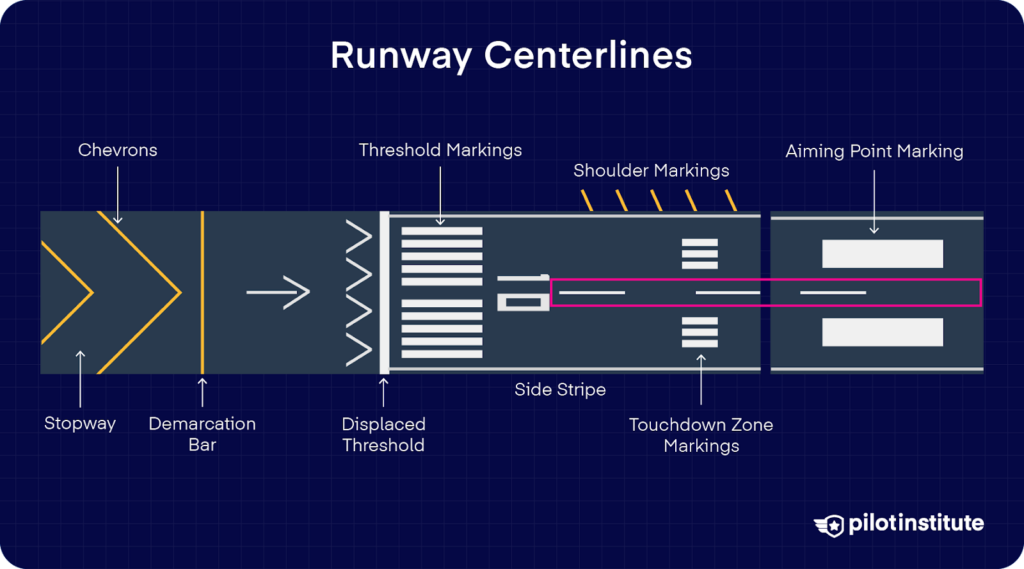
So now you know how to find the correct runway using its designator (very useful). Wouldn’t it be great to have a way of knowing when you’re in the middle of the runway?
That’s where runway centerlines come in handy.
Runway centerline markings are similar to the centerline on a road; only your aim with a runway centerline is to stay in the middle of it, not to the side.
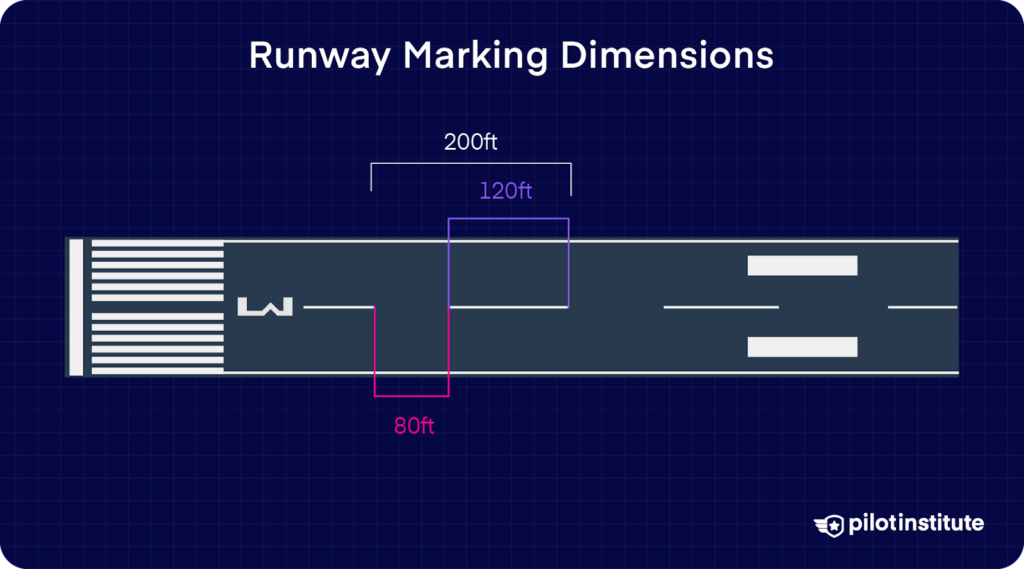
Runway centerlines are not only useful for guidance, however. A centerline marking (i.e., one stripe) is 120 ft in length, and the gap between markings (stripes) is 80 ft (so 200ft between the start of one stripe and the start of the next). This means that you can use the runway centerlines as a measuring stick.
But what would you measure, and how would you measure it?
Say, for example, that you’re going to depart for an Instrument Flight Rules (IFR) flight in fog. To legally take off, you need a minimum amount of forward visibility on the runway.
The easiest way to measure your forward visibility during takeoff?
Count how many centerline markings (stripes) you can see, and multiply that by 200 ft.
Of course, there is a caveat…
Adjustments to the runway markings (we’ll explain that later) are made in the middle of the runway. Because of these adjustments, you may find non-standard centerline spacing toward the middle of the runway.
The initial runway centerline markings will be standard, however.
Runway Aiming Point
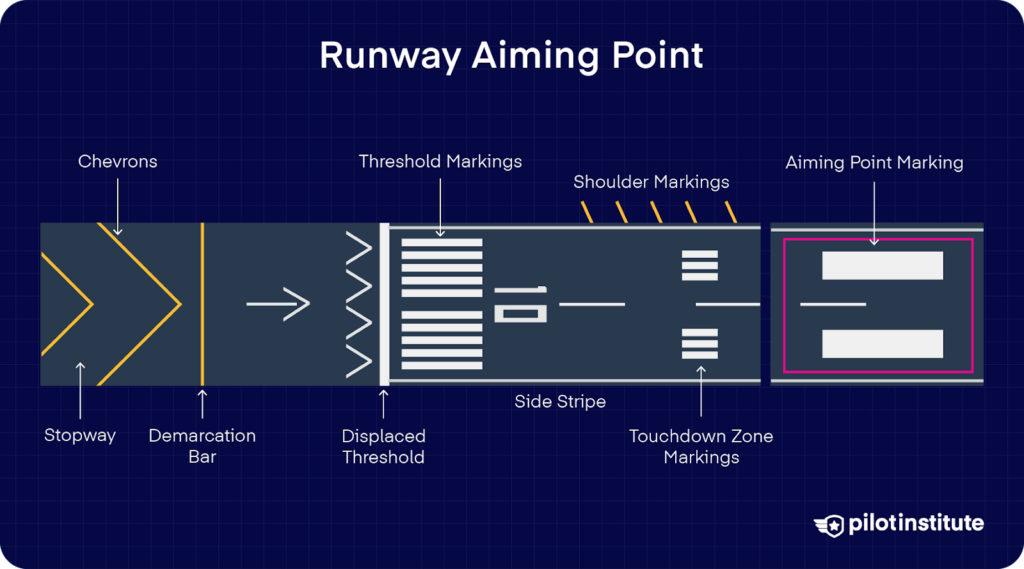
Runway aiming point markers consist of two thick white stripes on each side of the centerline, usually 1,000 ft from the runway threshold.
Aiming point markers are used as a target on the runway to fly towards. In other words, if you kept flying on the glideslope and did not flare, you would hit the aiming point markers.
These markers are often mistaken for touchdown zone markings.
Runway Touchdown Zone
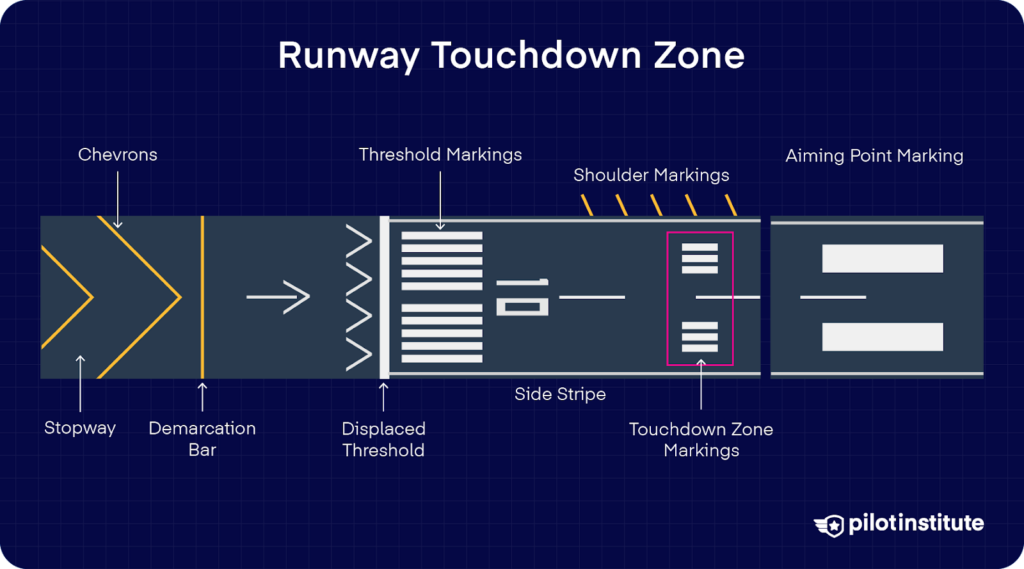
Runway touchdown zone markers are thin white stripes (aiming point stripes are thick) that identify the touchdown zone of the runway.
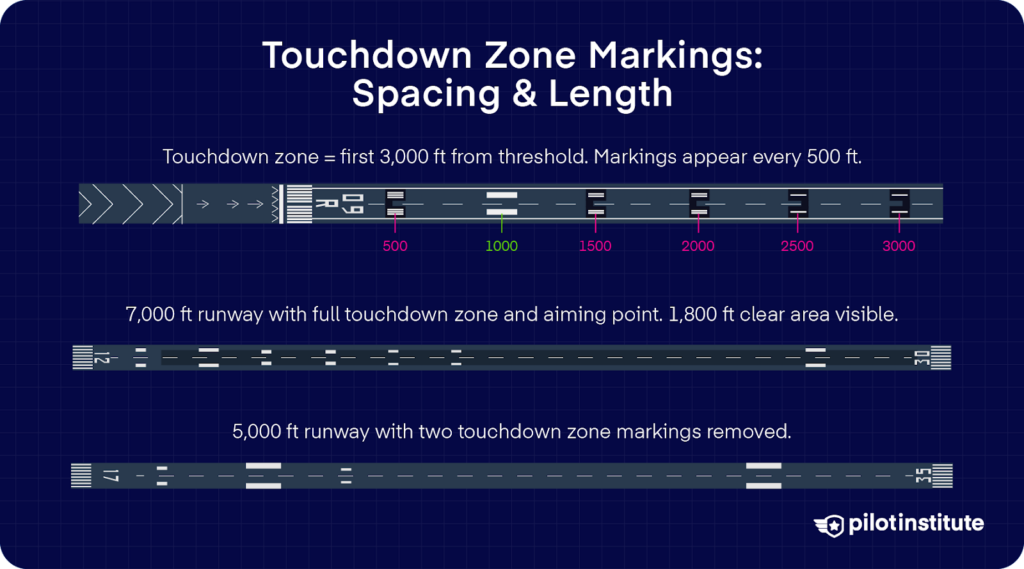
The Aeronautical Information Manual (AIM) defines the touchdown zone as the first 3,000 feet of the runway beginning at the threshold, and the touchdown zone markers are spaced 500 ft apart.
To avoid overlapping touchdown zone markings, runways have a minimum of 1800 ft in the center that are clear of any touchdown zone or aiming point markings.
For runways that are less than 6,000 ft long, touchdown zone markings that are in the 1800 ft area in the center are removed.
For example, this runway is 7,000ft long, accommodating the full touchdown zone and aiming point markings. Notice the 1,800 ft clear area with no markings.
Now consider this 5,000 ft long runway with two of the touchdown zone markings removed.
It is important to note that the 1800ft rule applies to markings on the runway, not the runway itself. In other words, there should be 1800ft between markings on either side of the runway.
This means that if one end of the runway is a precision runway (with touchdown zone markings) and the other end is a visual or non-precision runway (without touchdown zone markings), the 1800ft area would not be in the middle of the physical runway, but between the non-precision aiming point marking and the final precision runway touchdown zone marking.
This is also the reason why centerline stripe spacing is non-standard in this 1,800ft clear area.
Runway Side Stripe Markings
Runway side stripe markings are solid white lines that mark the edge of a runway. They are the least complicated markings on a runway, but are very important for identifying the width (and middle) of the runway.
Runway Shoulder Markings
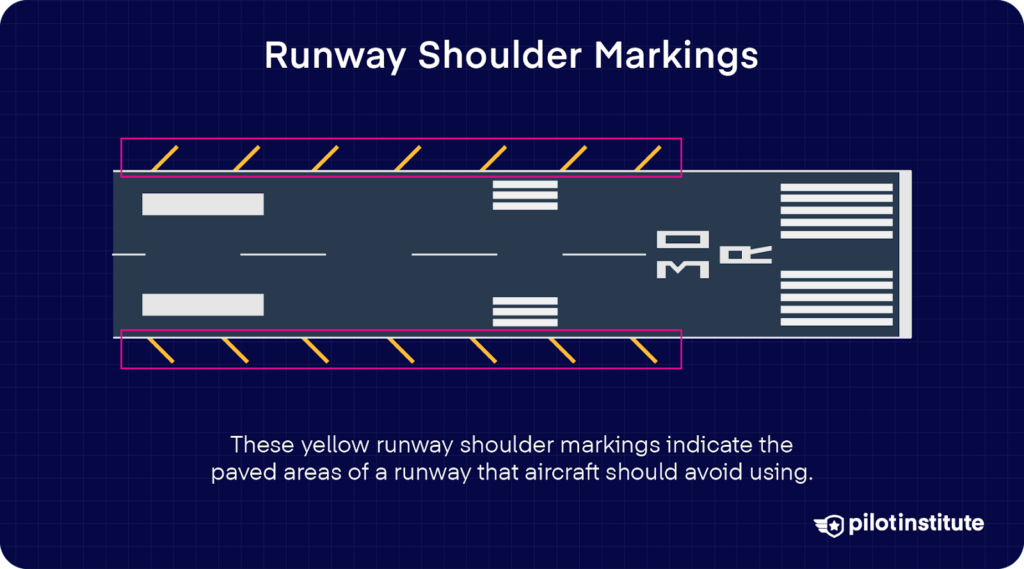
Runway shoulder markings are the least common runway markings. These yellow markings mark the paved area of a runway that should not be used by aircraft.
Taxiway shoulder markings (discussed later) are far more widely used.
Runway Threshold Markings
Runway threshold markings are some of the most misunderstood but vitally important runway markings used.
A runway threshold identifies the beginning of a runway.
There are two different runway threshold types (known as “configurations”):
- Eight identical stripes on either side of the runway centerline (four on either side), or;
- Identical stripes, the number of which is determined by the width of the runway.
When the second configuration is used to denote the width of the runway, the following numbers are used:
- 4 stripes = 60 ft wide
- 6 stripes = 75 ft wide
- 8 stripes = 100 ft wide
- 12 stripes = 150 ft wide
- 16 stripes = 200 ft wide
But the threshold can become even more unique if it is relocated or displaced.
Displaced Threshold
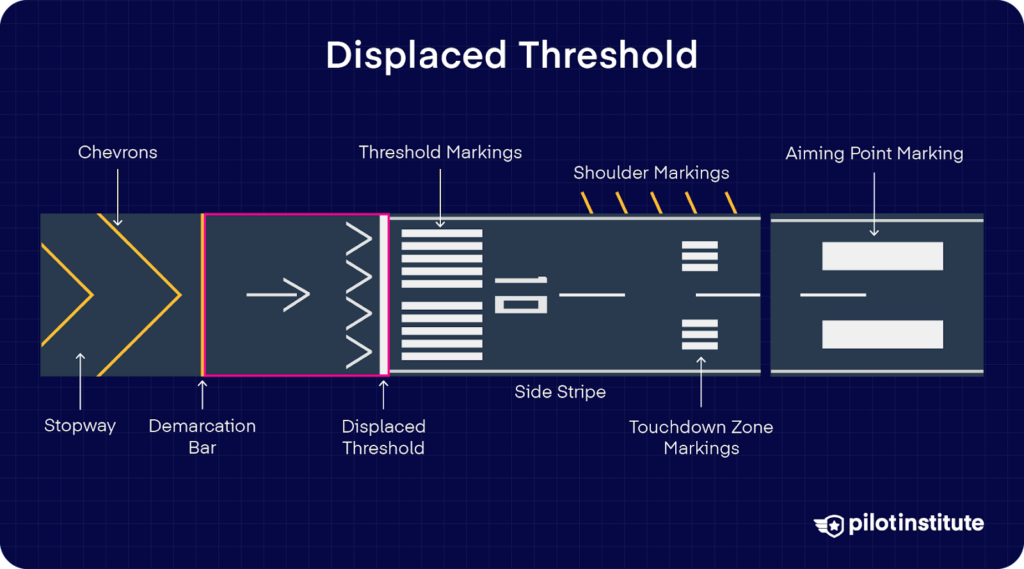
A displaced threshold is any threshold that is not located at the beginning of the runway. A displaced threshold is generally used due to obstructions at the beginning of the runway, such as buildings or trees.
It is important to note that the area behind the displaced threshold can be used for takeoffs but not landings. During landing, it can only be used as a landing rollout (i.e., for stopping at the end of the runway after a landing).
The displaced threshold consists of white arrows along the centerline of the runway.
These should not be confused with a blast pad or stop-way (also known as an overrun area).
Blast-Pad, Stop-Way, Overrun Area
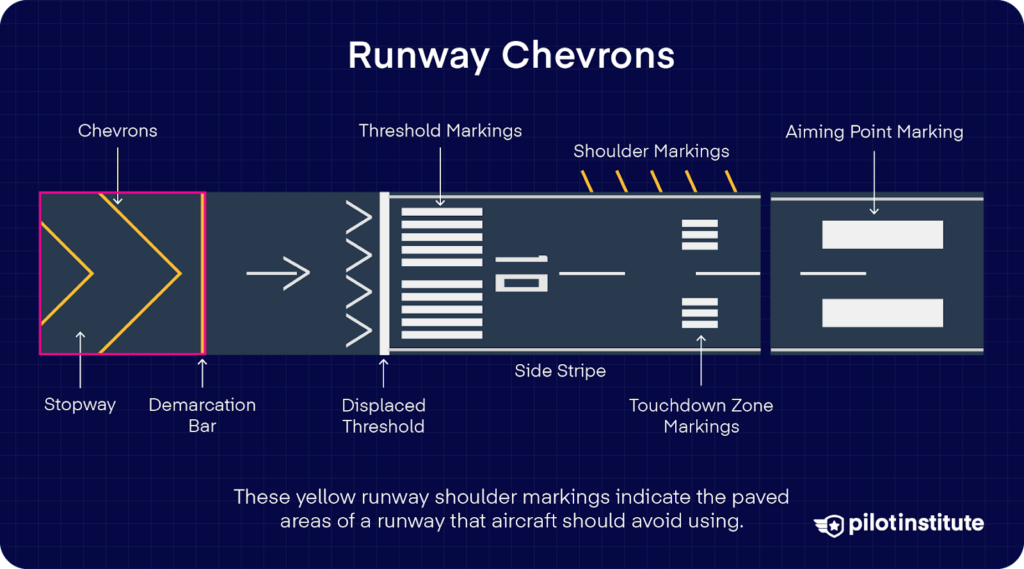
This area of the runway is marked with yellow arrows (known as chevrons), and it is not used for normal operations.
The stop-way (as it is most commonly referred to) serves two main purposes:
- To prevent a runway excursion during landing by providing additional tarmac for emergencies.
- To provide a clear area for jet and propeller blasts to dissipate.
The stopway forms part of the runway safety area.
Runway Safety Area
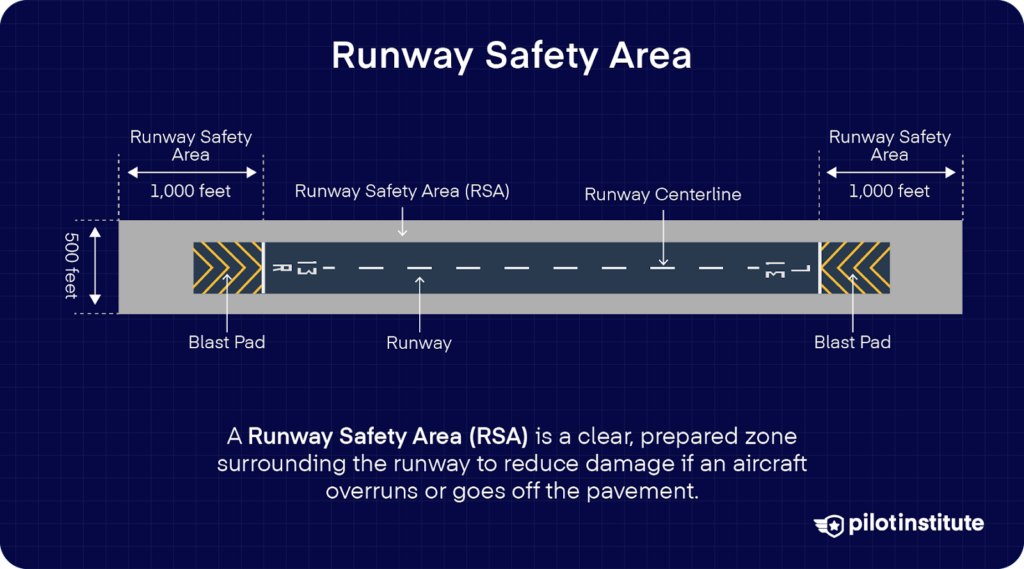
A Runway Safety Area (RSA) is an area around the runway that has saved several lives since its implementation.
The RSA is a buffer zone for aircraft when they come up short, go off-center, or go off the end of the runway. The RSA is usually kept clear and obstacle-free so aircraft can slow down or stop without any issues during emergencies.
Additionally, RSAs provide valuable maneuvering areas for firefighting and rescue equipment.
Taxiway Centerline Markings
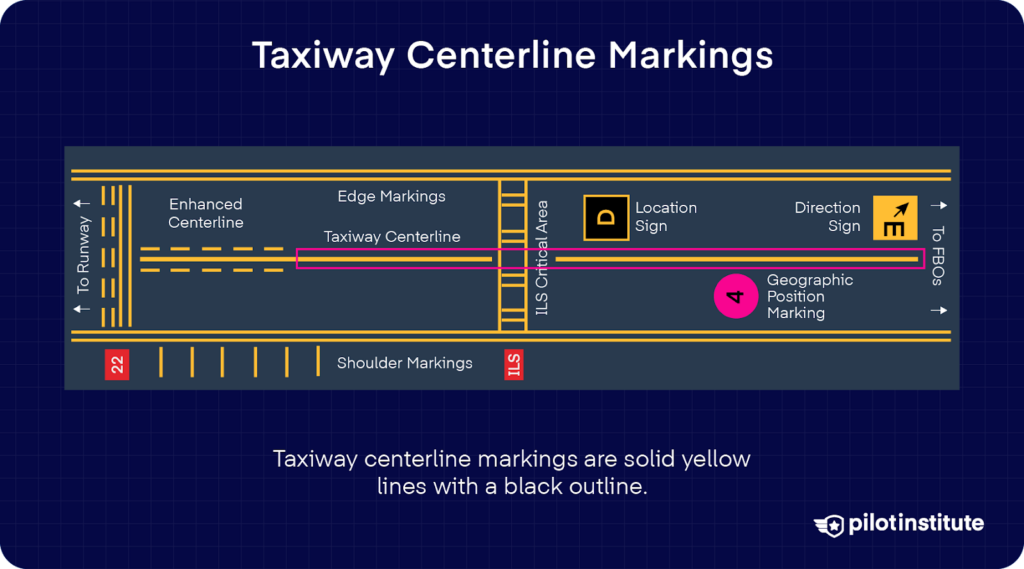
Unlike the runway centerline markings, which are dashed and white, taxiway centerline markings are solid yellow lines with a black outline.
There are two types of taxiway centerlines:
- Normal Taxiway Centerline:
- A single continuous yellow line with a black outline.
- Enhanced Taxiway Centerline
- Parallel yellow dashes on either side of the continuous yellow line. Also featuring a black outline.
Enhanced taxiway centerlines are used to warn pilots that they are approaching a runway. The yellow dash markings of an enhanced taxiway line extend for a maximum of 150 ft from a runway entry point (known as a “holding point”).
Taxiway Edge Markings
Taxiway edge markings identify the edges of a taxiway. They are not required and are generally only used when the paved area used for the taxiway does not correspond to the designated taxiway.
There are two types of taxiway edge markings:
- Continuous Markings:
- Continuous taxiway markings consist of two yellow lines, each 6 inches wide and separated by 6 inches.
- Dashed Markings:
- Dashed taxiway markings look similar to continuous taxiway markings, but they feature double yellow lines that are 15 ft long with 25ft gaps between them.
Taxiway Shoulder Markings
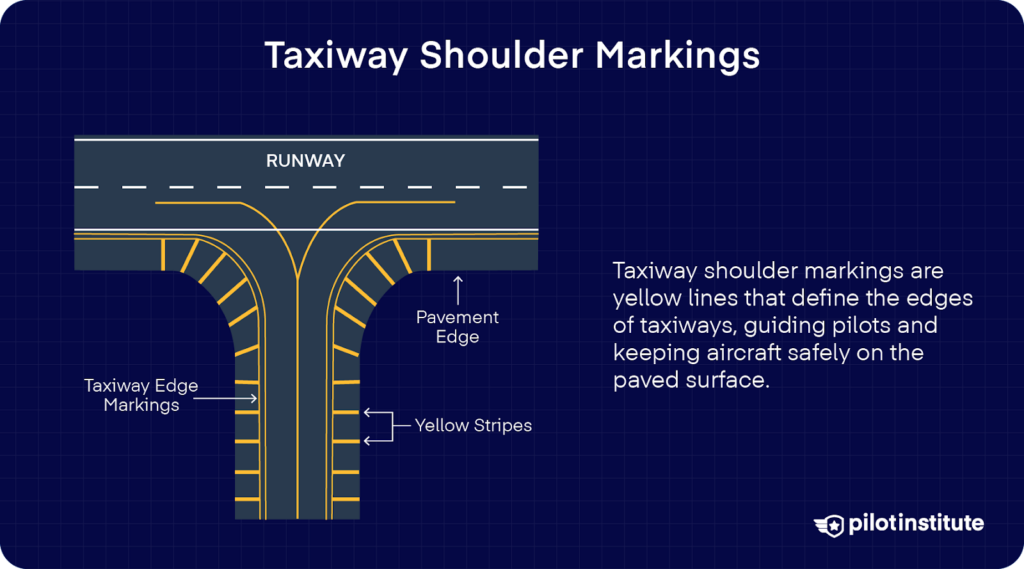
Taxiway shoulder markings serve the same purpose as runway shoulder markings but are far more common.
These markings indicate the paved area of a taxiway that is not intended for aircraft use. This is typically the area outside of the taxiway edge markings.
Taxiway shoulders are used for several reasons, such as:
- To prevent vegetation from interfering with the taxiway.
- To prevent jet or propeller blasts from scattering debris or water onto the taxiway.
- To allow fire and rescue vehicles greater accessibility.
- To prevent taxiway overruns.
Surface-Painted Taxiway Direction Signs
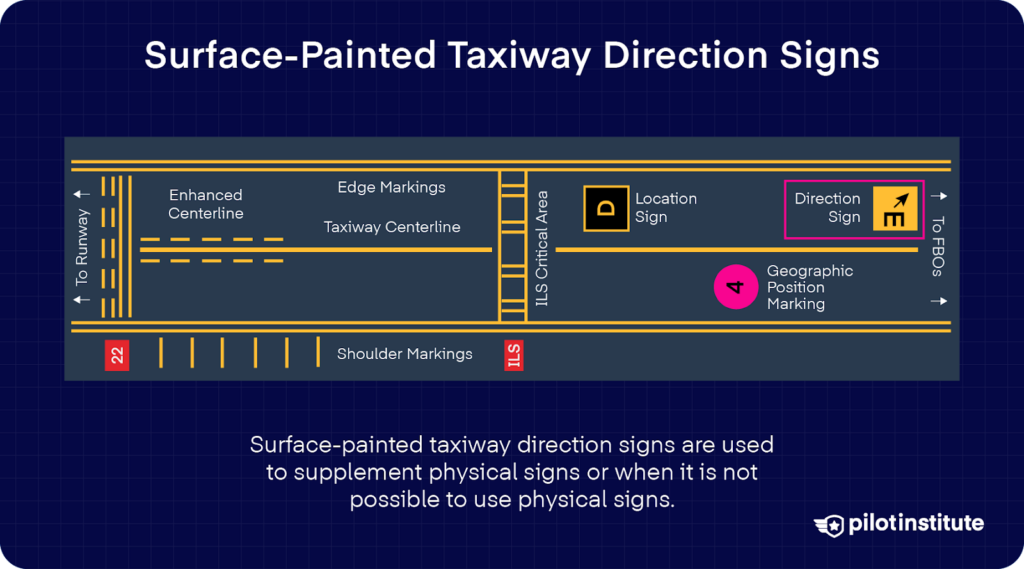
Surface-painted taxiway direction signs are used to supplement physical signs or when it is not possible to use physical signs.
Surface-painted signs look the same as their physical counterparts. Taxiway direction signs and markings use a yellow background with black inscriptions.
These taxiway direction signs are painted on the side of the centerline in the direction of the turn. In other words, if the taxiway direction sign points to the left, it will be on the left side of the taxiway centerline.
Surface-Painted Location Signs

Surface-painted location signs are also the painted version of their physical counterparts.
These location signs feature a black background with yellow inscriptions. They are painted to the right of the taxiway (so if you see one on the left of the taxiway, you’re reading it upside down).
Geographic Position Markings
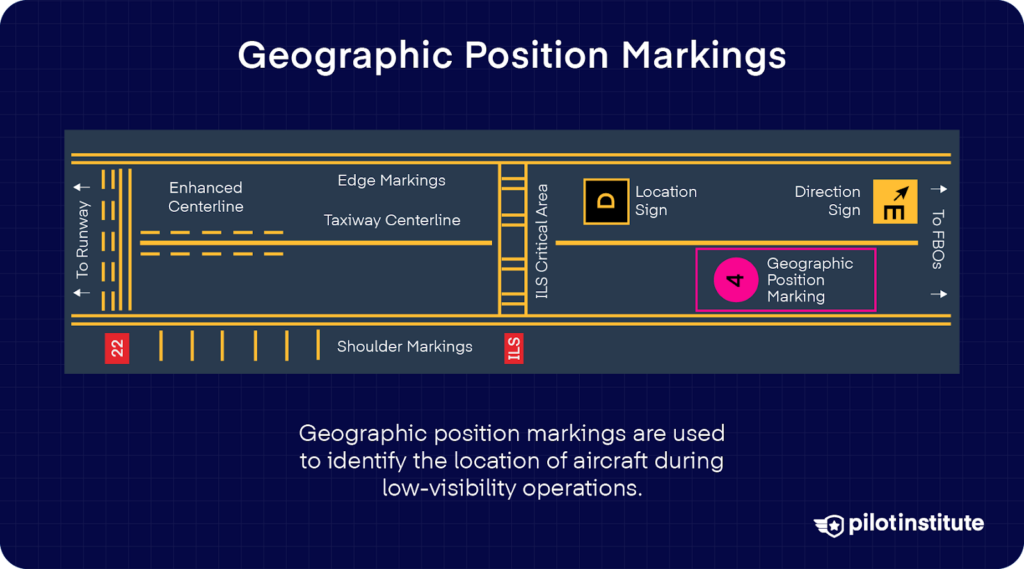
Geographic position markings are used to identify aircraft locations during low-visibility operations. They are identified by a number and letter or only by a number.
These markings feature a pink circle with a black and white border with black text.
Geographic position markings are only used during low-visibility operations (Runway Visual Range below 360m), so they won’t be needed during normal operations.
Runway Holding Position Markings
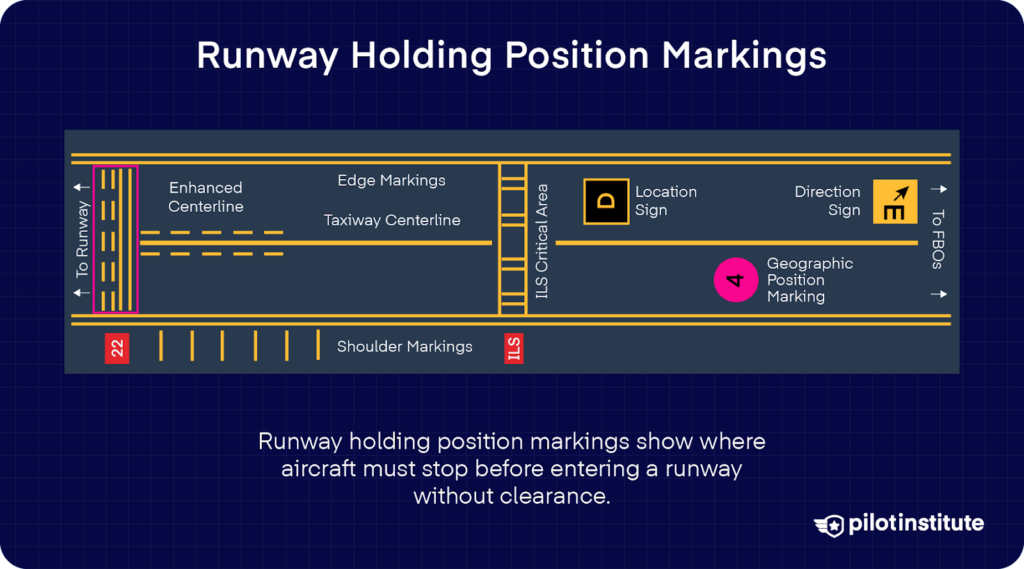
Runway holding position markings are the most arguably the most important airport markings used.
They mark the intersection between the taxiway and the runway where aircraft are required to stop if they have not been cleared to enter the runway. It is effectively where the runway begins and the taxiway ends.
These markings are usually placed 125 – 250 feet from the runway centerline.
The general convention used for these holding position markings is that the solid lined side should only be crossed with permission, while the dashed line side may be crossed without permission.
Runway holding position markings are also used on intersecting runways if Land and Hold Short Operations (LAHSO) are used.
An aircraft that is exiting a runway must have all parts of the aircraft over the holding position marking for it to be considered clear of the runway.
If you miss a runway holding position marking, you’re likely going to be in trouble, so pay attention!
Holding Position Markings in Runway Approach Areas

At certain airports, you’ll come across runway approach areas holding position markings.
These markings are crucial because they indicate where you should stop your aircraft on a taxiway that’s situated near the approach or departure area of a runway. By doing this, you’ll prevent any interference with operations taking place on the runway.

These markings are found alongside the runway approach area holding the position sign.
Holding Position Markings for Instrument Landing Systems (ILS)
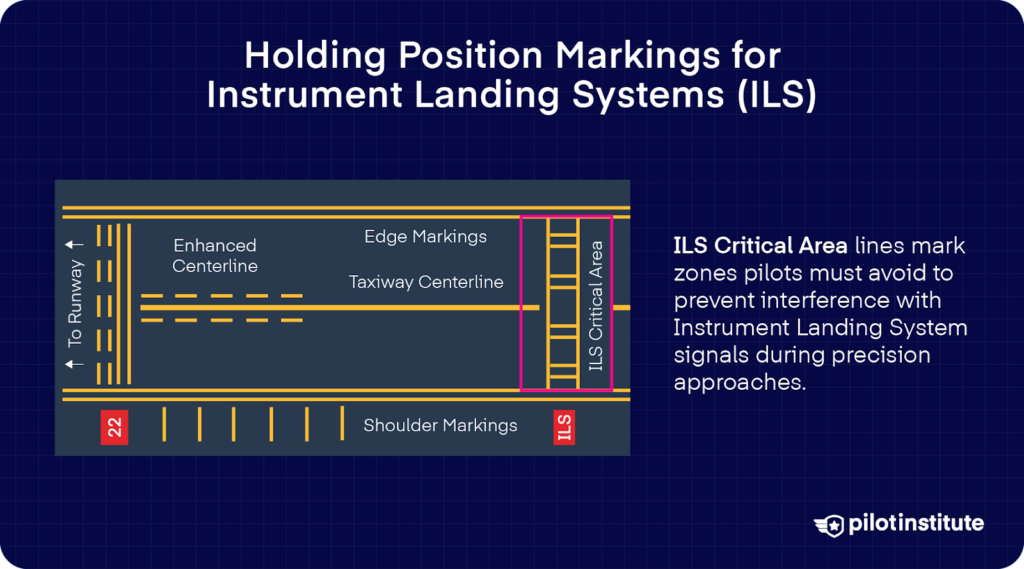
At airports with an Instrument Landing System (ILS), you may notice that the holding position line is moved back or that a specific ILS holding position line is created for certain operations.
You might hear these ILS holding position markings referred to by the specific ILS category they’re protecting, like “CAT I” or “CAT II” (for example, “Runway 15 CAT I holding point”). The usual holding point closer to the runway is sometimes called the “visual holding point.”
Holding Position Markings for Intersecting Taxiways

When it comes to taxiway intersections, you’ll find holding position markings that consist of a single dashed line extending across the entire width of the taxiway. These markings are placed on taxiways where Air Traffic Control (ATC) needs to hold aircraft short of the intersection.
If you don’t see a marking at an intersecting taxiway and you’re instructed to hold short, make sure you stop your aircraft at a spot that offers enough clearance from any aircraft on the intersecting taxiway.
Surface Painted Holding Position Signs
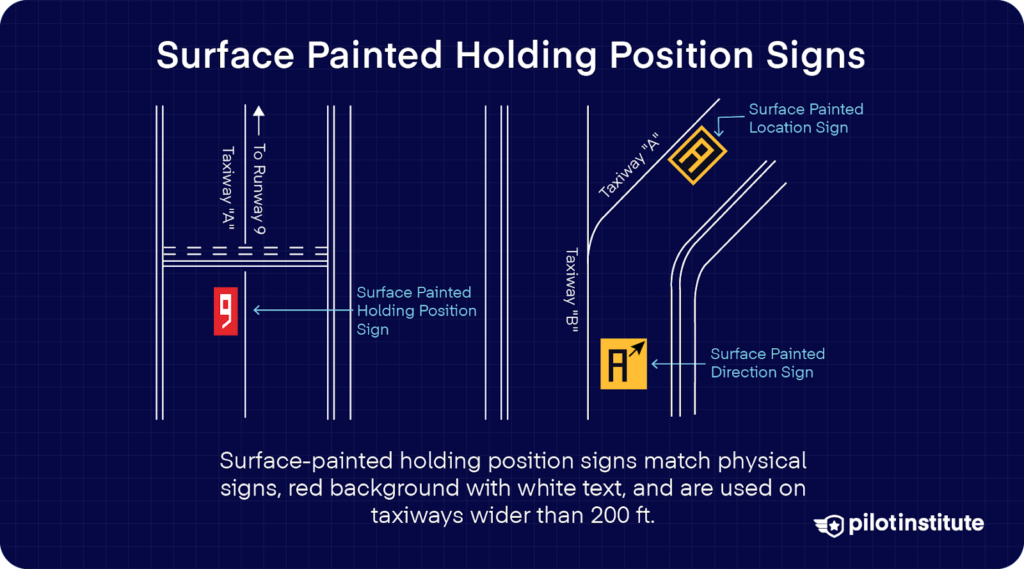
Surface-painted holding position signs look the same as their physical counterparts – red background with a white inscription.
They are generally used when the width of the holding position (i.e., the taxiway) is greater than 200 ft.
Vehicle Roadway Markings
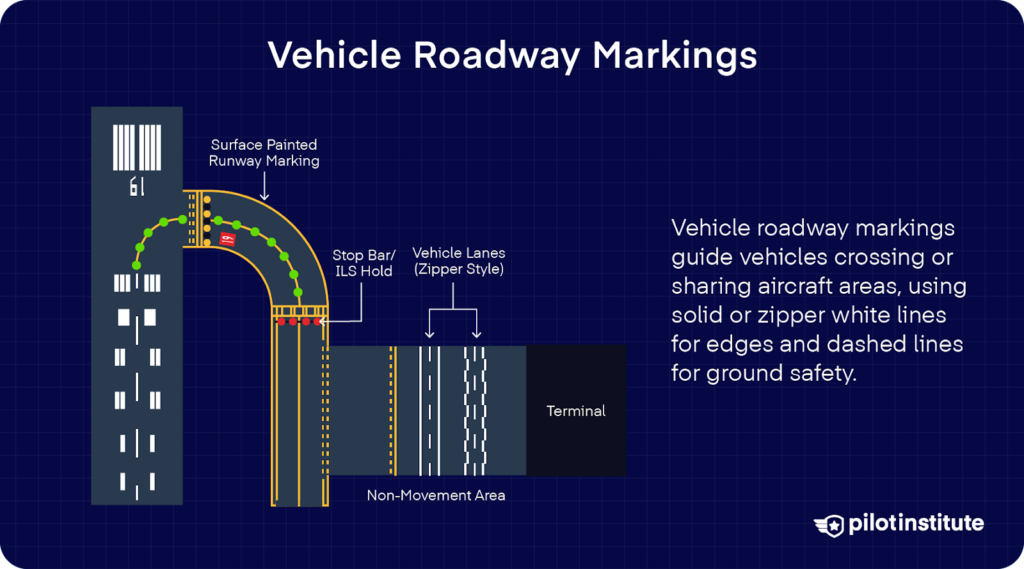
Sometimes, vehicle roadway markings are necessary to outline a path for vehicles operating on or crossing areas that are also meant for aircraft. These markings help maintain order and safety on the ground.
These markings typically include solid white lines that outline each edge of the roadway and dashed lines to separate the lanes within the edges. Alternatively, you might see “zipper markings” used instead of solid lines to define the edges of the vehicle roadway.
VOR Receiver Checkpoint Markings

The VOR receiver checkpoint marking is a useful tool that helps you verify your aircraft instruments with navigation aid signals. This marking consists of a painted circle with an arrow in the center, pointing in the direction of the checkpoint azimuth.
You’ll find this marking, along with a related sign, on the airport apron or taxiway. It’s positioned for easy access by aircraft but won’t obstruct other airport traffic too much.
The associated sign displays the VOR station identification letter, the selected (published) course for the check, the phrase “VOR check course,” and Distance Measuring Equipment (DME) data, if applicable. The text and numbers are black on a yellow background.
To find these checkpoint locations on the airfield and learn more about them, you can refer to Chart Supplements.
Non-Movement Area Boundary Markings
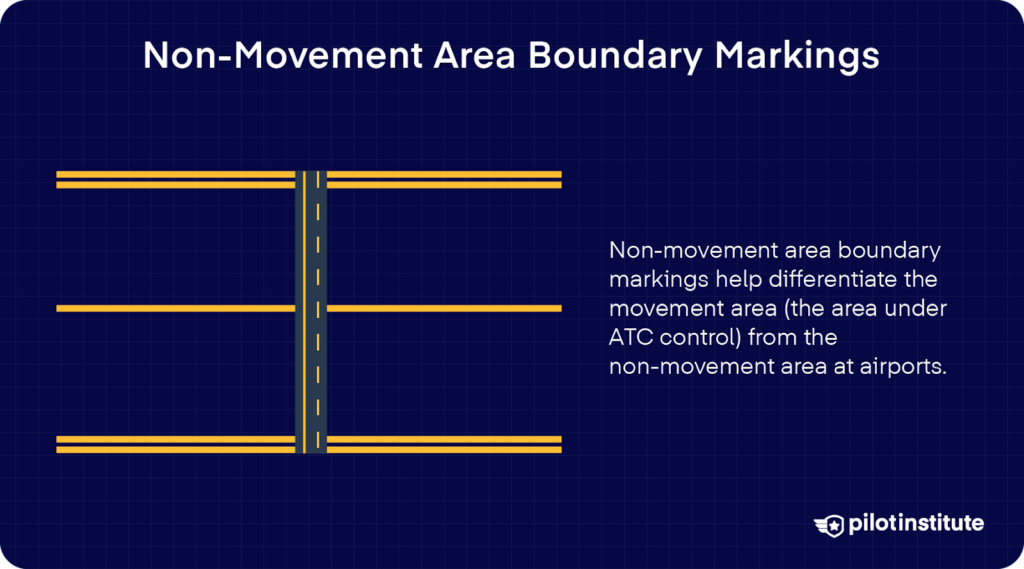
Non-movement area boundary markings help differentiate the movement area (the area under ATC control) from the non-movement area at airports. These yellow markings are positioned right on the boundary between these two areas.
The non-movement area boundary markings consist of two yellow lines, each 6 inches wide – with one being solid and the other dashed.
The solid line is situated on the non-movement area side, while the dashed yellow line is on the movement area side.
They look like the runway holding position markings with one solid and one dashed line instead of two solid and two dashed lines.
Temporarily Closed Runway and Taxiway Markings
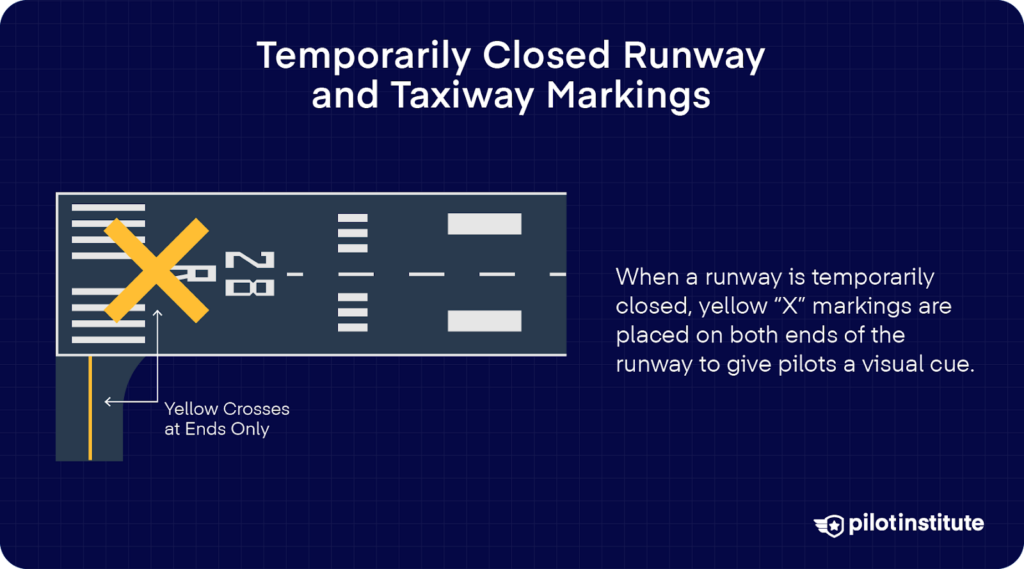
When a runway is temporarily closed, yellow “X” markings are placed on both ends of the runway to give pilots a visual cue. Instead of permanent markings, a raised lighted yellow cross may also be used to indicate the closure.
Keep in mind that a visual indication might not always be present, depending on factors like the reason and duration of the closure, airfield configuration, and the presence and operating hours of an airport traffic control tower.
To stay informed about local runway and taxiway closures, always check NOTAMs and the Automated Terminal Information System (ATIS).
Temporarily closed taxiways are often considered hazardous, and aircraft shouldn’t enter these areas. They’re typically blocked with barricades, but sometimes a yellow cross is installed at each taxiway entrance instead.
Just like with runways, visual indications for taxiway closures might not always be present, so be sure to consult NOTAMs and ATIS for updates.
Permanently Closed Runway and Taxiway Markings
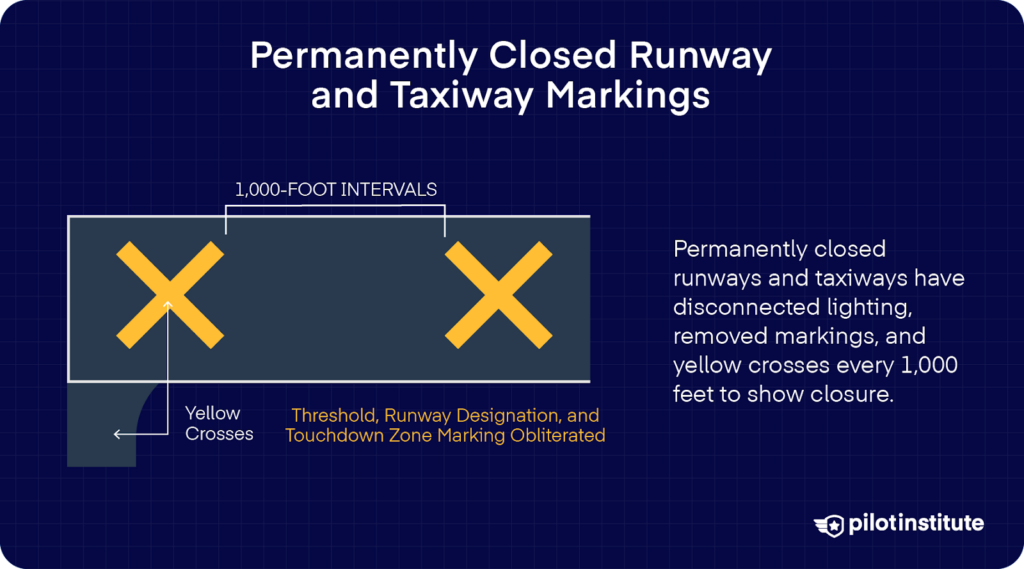
When runways and taxiways are permanently closed, their lighting circuits will be disconnected.
Additionally, the runway threshold, runway designation, and touchdown markings will be removed.
Instead, yellow crosses are placed at each end of the runway and at 1,000-foot intervals to indicate the closure.
Short Takeoff and Landing Runways
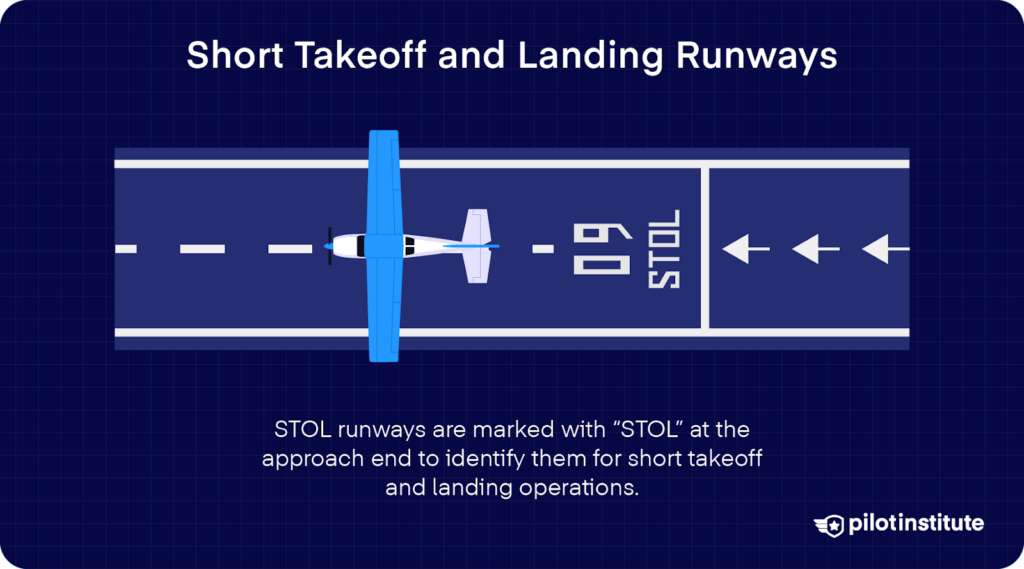
For runways designed for short takeoff and landing (STOL) operations, you’ll see “STOL” painted at the approach end. This helps identify the appropriate (and rare) runways for aircraft capable of STOL operations.
Conclusion
Understanding airport markings is a crucial skill every pilot should have, whether you’re flying a Cessna 172 or an Airbus A380.
Familiarizing yourself with these markings will not only help you navigate the airport environment safely and efficiently but also boost your confidence during taxi, takeoff, and landing.
To further enhance your understanding, don’t forget to check out The Essential Guide to Airport Signs, which complements this guide and will provide you with a comprehensive understanding of airport signage.
Happy flying!