-
Key Takeaways
-
Night Defined: The FAA’s Three Clocks
- 1. Sunset → Sunrise (Lights)
- 2. End of Evening Civil Twilight → Beginning of Morning Civil Twilight (Logging)
- 3. 1 hr After Sunset → 1 hr Before Sunrise (Currency)
-
Pilot Requirements and Currency
- Initial Training (Part 61 mins)
- Drone Operators Snapshot
-
Aircraft & Equipment Rules (Night VFR)
- Required by FAR 91.205(c) (“FLAPS”)
- Lighting Checks & Troubleshooting
-
Human Factors: Seeing and Thinking in the Dark
- Physiology of Night Vision
-
Flight Planning for Night VFR
- Weather Considerations
- Route & Altitude Selection
- Chart & Nav Prep
-
Ground Operations (Nights)
-
Night Takeoff and Departure
-
En-Route Risk Management (Night)
- Weather Deterioration Signs
-
Arrival and Landing (Night)
- Approach Path Control
- Flare & Touchdown Cues
-
Emergencies Unique to Night
- VFR into IMC
- Engine Failure
-
Building Night Proficiency
-
Common Night Mistakes (and Fixes)
-
Conclusion
Runway lights shimmer in the windshield, and the horizon fades into black. Suddenly, the cockpit starts to feel smaller. You pause for a moment and think. Are you legal and ready to fly into the dark?
Night flying opens you to a new kind of freedom that daylight can’t offer. It lets you beat weather, traffic, and tight schedules.
Excited to get on that night flight? Hold on just one second. As we walk towards the cockpit, let’s recall the rules, the physiology, the planning, and the real-world habits that make night flying both legal and actually fun!
Key Takeaways
- Night is the time between the end of evening civil twilight and the beginning of morning civil twilight.
- To carry passengers at night, you must have made three takeoffs and landings in the past 90 days.
- Night illusions happen because limited visual cues can mislead your judgment.
- Stay proficient with regular night flights and scenario-based practice with an instructor.
Night Defined: The FAA’s Three Clocks
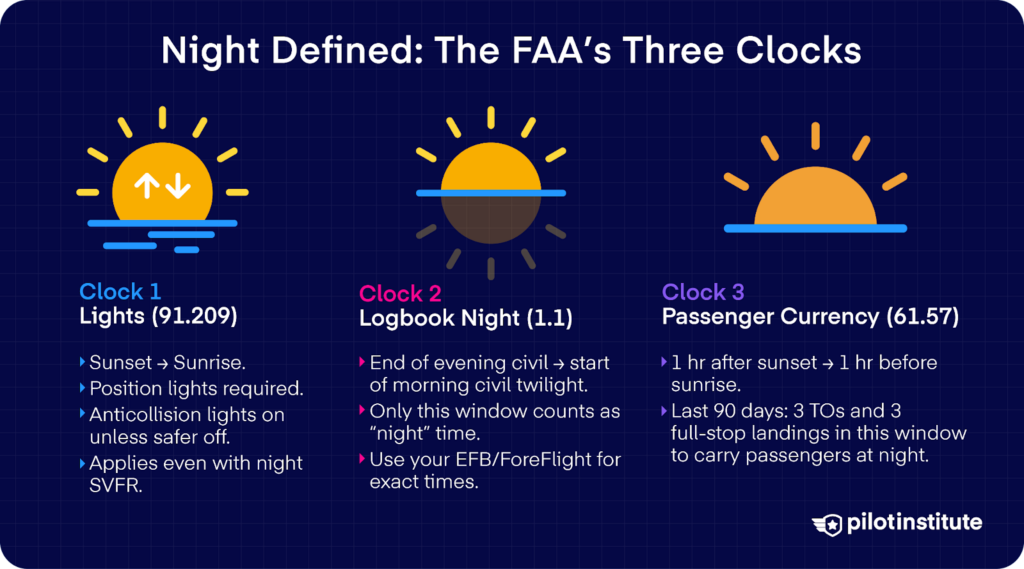
1. Sunset → Sunrise (Lights)
First up, let’s talk about the lights you need to switch on. The moment the sun sets and until it rises again, the rule under 14 CFR 91.209 takes effect.
It says that unless your aircraft has its position lights on, you can’t operate during that period. You should also turn on your anticollision lights unless you think keeping them off would be safer.
What if you’re flying with a special VFR clearance at night? Then those same rules also apply to you.
2. End of Evening Civil Twilight → Beginning of Morning Civil Twilight (Logging)
Can your flight be logged under night flying? How can you be sure? Let’s take a look at 14 CFR 1.1. It says:
Night means the time between the end of evening civil twilight and the beginning of morning civil twilight, as published in the Air Almanac, converted to local time.
That means “civil twilight” depends on the sun’s position. Evening civil twilight ends (and morning civil twilight begins) when the geometric center of the sun is 6° below the horizon.
To make keeping track easier, many electronic flight bags (EFBs) and apps like the ForeFlight app will give you the civil twilight cutoff.
3. 1 hr After Sunset → 1 hr Before Sunrise (Currency)
Has it been a while since you last flew at night? Then you should check the experience requirements before you take on any passengers.
You need to maintain currency under 14 CFR 61.57 to act as pilot in command (PIC) at night with passengers onboard.
Specifically, within the preceding 90 days, you must have made at least three takeoffs and three full-stop landings beginning 1 hour after sunset and ending 1 hour before sunrise. Only then can you carry passengers as PIC during that time of the day.
| FAA “Clock” | Time Window | Triggers |
| Sunset–Sunrise | Local sunset to local sunrise | 14 CFR 91.209 lights; SVFR equipment rule |
| End Civil Twi.–Beg. Civil Twi. | End of evening civil twilight to beginning of morning civil twilight | Log night time; 14 CFR 91.205 “FLAPS” gear |
| 1 hr after sunset to 1 hr before sunrise | 1 hour after local sunset to 1 hour before local sunrise | Currency to carry passengers as PIC |

Free Private Pilot Study Sheet
Grab a printable PDF that highlights must-know PPL topics for the written test and checkride.
- Airspace at-a-glance.
- Key regs & V-speeds.
- Weather quick cues.
- Pattern and radio calls.
Pilot Requirements and Currency
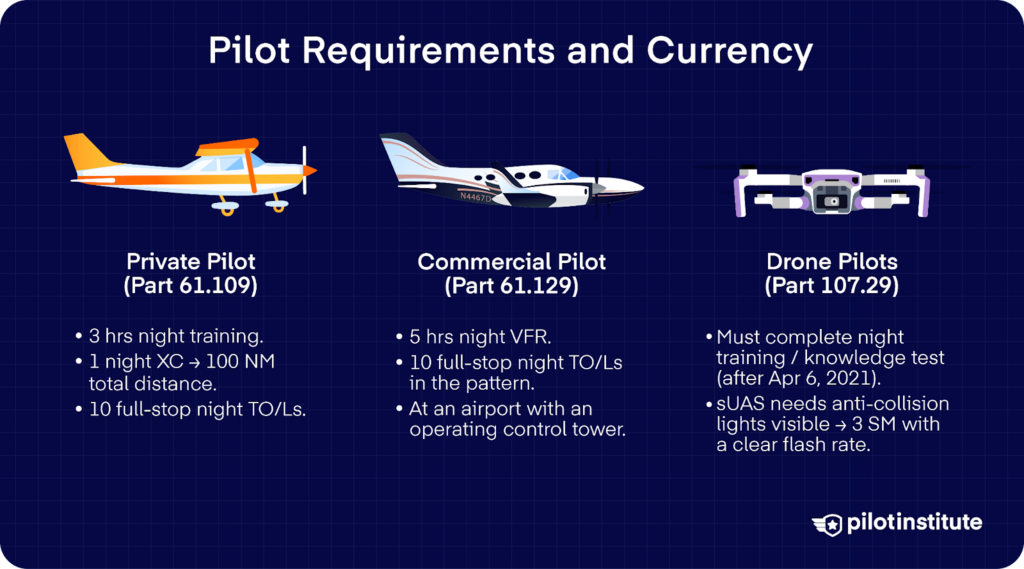
Initial Training (Part 61 mins)
There’ll also be specific experience requirements when you start training to fly at night under Part 61.
For a private pilot license (PPL), 14 CFR 61.109 says that you need at least 3 hours of night flight training. That includes a cross-country of over 100 nautical miles and 10 takeoffs and 10 landings to a full stop.
For a commercial pilot license (CPL), you also log night time under 14 CFR 61.129. The list of requirements gets a bit longer and more specific.
One of these night flying requirements is 5 hours in night VFR conditions, which includes 10 takeoffs and 10 landings in the traffic pattern at an airport with an operating control tower.
Drone Operators Snapshot
Night-operation rules also apply if you’re flying drones commercially under Part 107. 14 CFR 107.29 says that to fly at night, you must complete an initial or recurrent knowledge test or training after April 6, 2021.
The small unmanned aircraft must have anti-collision lights visible for at least 3 statute miles and has a flash rate sufficient to avoid a collision.
Aircraft & Equipment Rules (Night VFR)
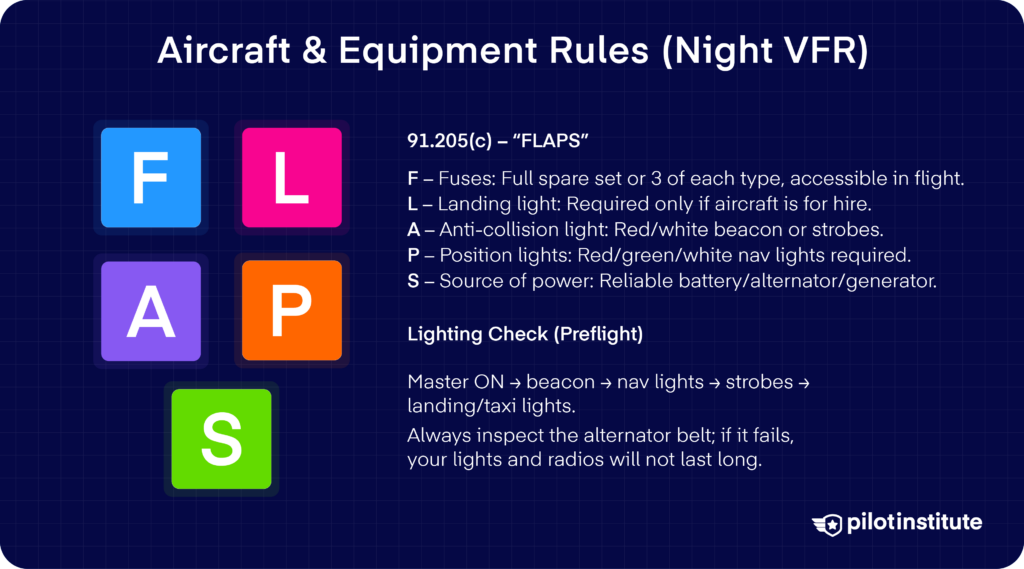
Required by FAR 91.205(c) (“FLAPS”)
Now, let’s talk about equipment. When you fly at night under VFR, the FAA has specific requirements laid out in 14 CFR 91.205(c). To make it easy to remember, just think of the acronym FLAPS:
- Fuses: You must carry either a full spare set or three of each kind of fuse accessible in flight.
- Landing light: But only if the aircraft is “for hire.”
- Anti-collision light system: You need a certified red or white anticollision system (beacon, strobes, or both).
- Position lights: Also known as navigation lights (red, green, white), required for all night VFR.
- Source of electrical power: The aircraft must have an adequate power source (battery, alternator, or generator) for all installed electrical/radio equipment.
Lighting Checks & Troubleshooting
Here’s a good sequence for your preflight lighting check. Turn the master switch on, then check the beacon (make sure it comes on before you prop). Then, verify the navigation lights and strobes, as well as the landing/taxi lights.
One mechanical item that often gets overlooked is the alternator belt. If that belt fails, you’ll soon lose electrical power. And with it, all your lights. That’s why you should always make sure the alternator belt is in good shape.
Human Factors: Seeing and Thinking in the Dark

Physiology of Night Vision
Night flight introduces several illusions that can trick your senses if you don’t expect them. One of the most serious is the black-hole approach, where you fly toward a runway surrounded by little to no ground lighting.
Without depth cues or terrain features, the runway can appear higher or farther away than it actually is, and it tempts you into flying dangerously low.
Autokinesis is another illusion you might notice on a dark night. If you stare at a single light for too long, it can appear to drift or move even though it’s perfectly stationary.
Fog and haze can also confuse your perception. When you fly into a thin layer, the sudden whiteness can feel like the aircraft is pitching up, which may cause an unnecessary and abrupt correction.
Ground lighting is its own source of confusion. Straight rows of lights, such as roads or moving trains, can be mistaken for runway lights.
Also, a very bright runway environment can make you feel closer than you actually are. On the other hand, a sparsely lit area can make you feel too high and cause a low approach.
The best safeguard is the same in all these situations. Acknowledge the potential for misjudgment and let your instruments be your guide until your vision regains clarity.
Flight Planning for Night VFR
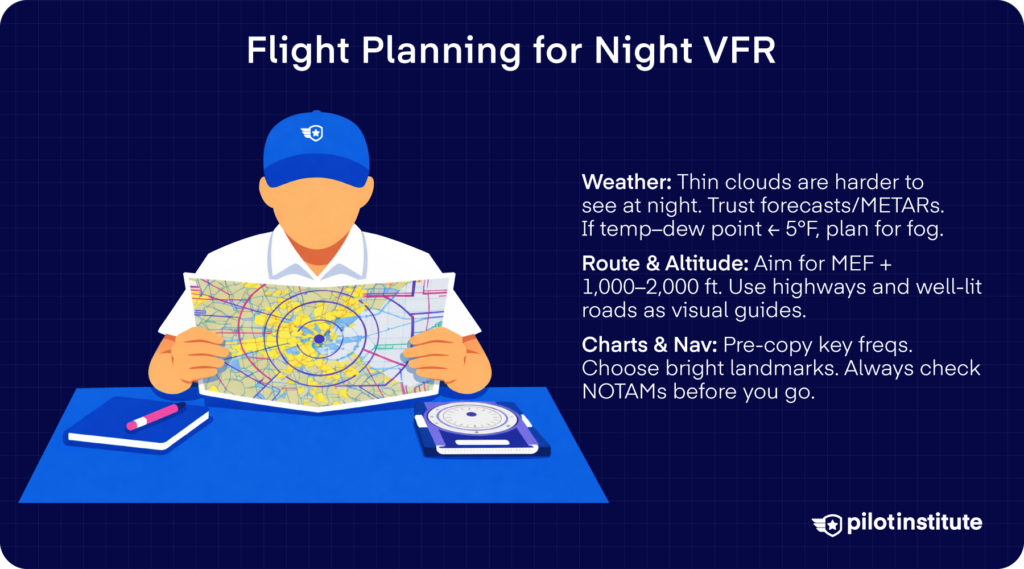
Weather Considerations
Weather and fronts takes on a new level of importance when you fly at night. Thin clouds that are easy to ignore in daylight can become nearly invisible in darkness.
Instead of relying solely on what you see, lean heavily on forecast ceilings and weather reports. Pay extra attention to the temperature-dew point spread. When it narrows to around 5 °F or less, that’s a strong warning sign that fog could form.
Route & Altitude Selection
Picking your route and altitude for night VFR is about maximizing safety while making navigation intuitive. One smart approach is to use the chart’s maximum elevation figure (MEF) plus a buffer of 1,000 to 2,000 feet.
On top of that, flying over major highways or well-lit roads is very helpful. These roads act like visible “corridors” you can follow and help reduce disorientation.
Chart & Nav Prep
Before you go, write down or “pre-copy” ATIS/CTAF frequencies and relevant information into your flight plan or kneeboard so you don’t need to fumble with the EFB in the air.
Identify ground checkpoints that will be visible at night. Will you fly over bright cities, racetracks, bridges, or major interchanges? They often light up and make reliable visual references.
When it comes to NOTAMs, you don’t know what you don’t know. Every prudent pilot obtains a full briefing on all the information necessary for a safe flight, and an essential part of that briefing will be NOTAMs.
Ground Operations (Nights)
There are different types of runway edge lights, such as MIRL (Medium Intensity Runway Lights) and HIRL (High Intensity Runway Lights), which help outline the runway.
You’ll also see REILs (Runway End Identifier Lights). These are flashing lights at the runway thresholds that provide a visual cue when you’re on final approach.
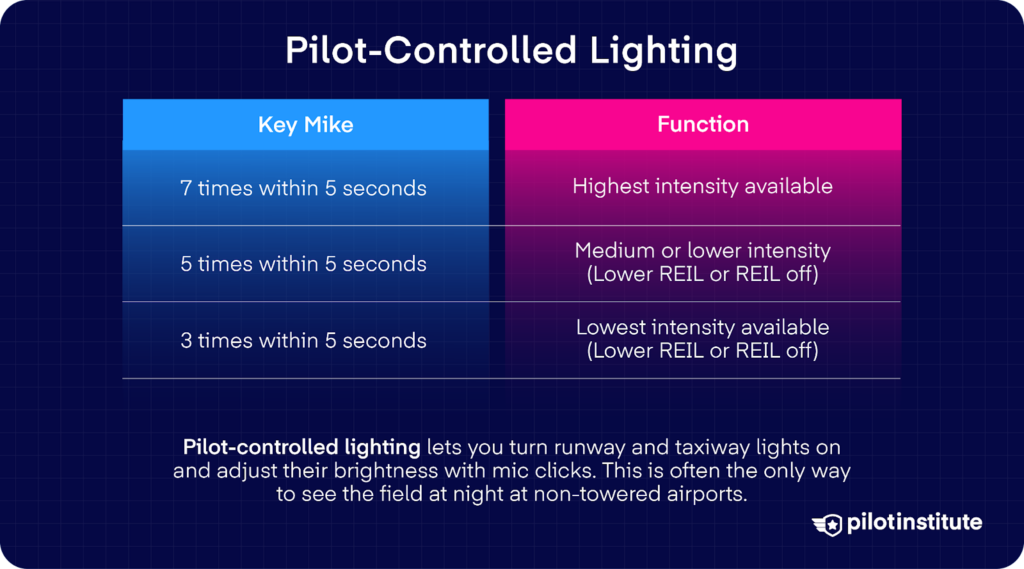
In some airports, the lighting is pilot-controlled. That means you can turn on or adjust the runway and approach lights using your radio.
By keying your mic a certain number of times (typically 3, 5, or 7 clicks), you can select different intensity levels. Once activated, the lights usually stay on for about 15 minutes.
If you’re flying into a towered airport, be aware that some towers may dim or turn off lights after midnight to conserve energy or reduce glare. Don’t hesitate to ask ATC if you need brighter lights.
Night Takeoff and Departure
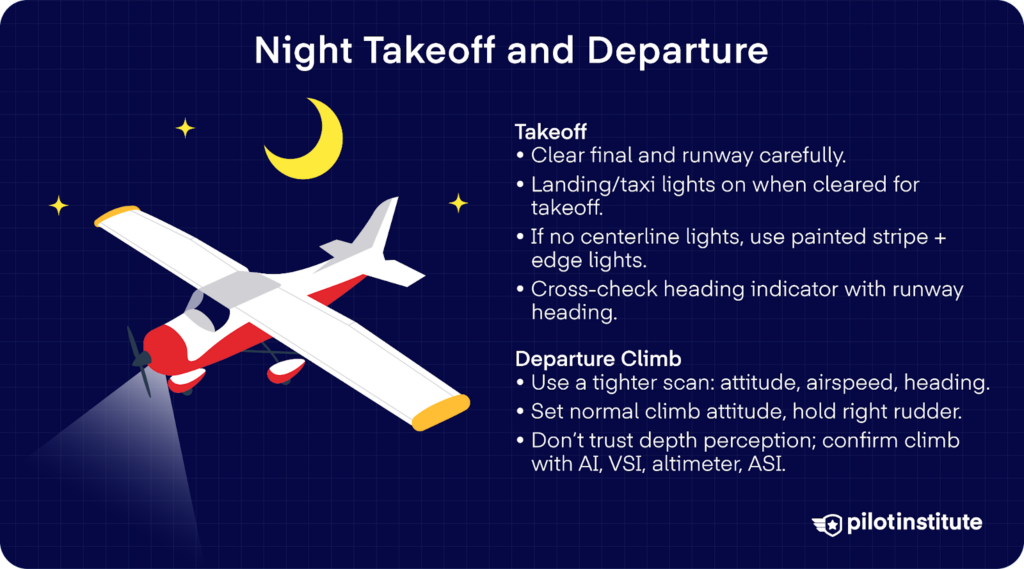
Takeoff
Pay extra attention when clearing the approach and runway. And once you receive your takeoff clearance, switch on the landing and taxi lights and line up on the runway.
Not all runways will have centerline lights. If that’s the case, use the painted stripe and the spacing between the edge lights to stay centered. And remember to cross-check the heading indicator against the runway heading.
Departure Climb
The basic procedure is the same as in the daytime, but many of the cues you rely on in daylight are gone, so your scan becomes all the more crucial. You’ll have to check airspeed, attitude, and heading more frequently.
At liftoff, set a normal climb attitude using both the limited outside light picture and your instruments. Maintain a controlled pressure on the right rudder to avoid drifting left.
Once airborne, depth perception becomes unreliable. How can you confirm the climb? With the attitude indicator, VSI, altimeter, and ASI.
En-Route Risk Management (Night)
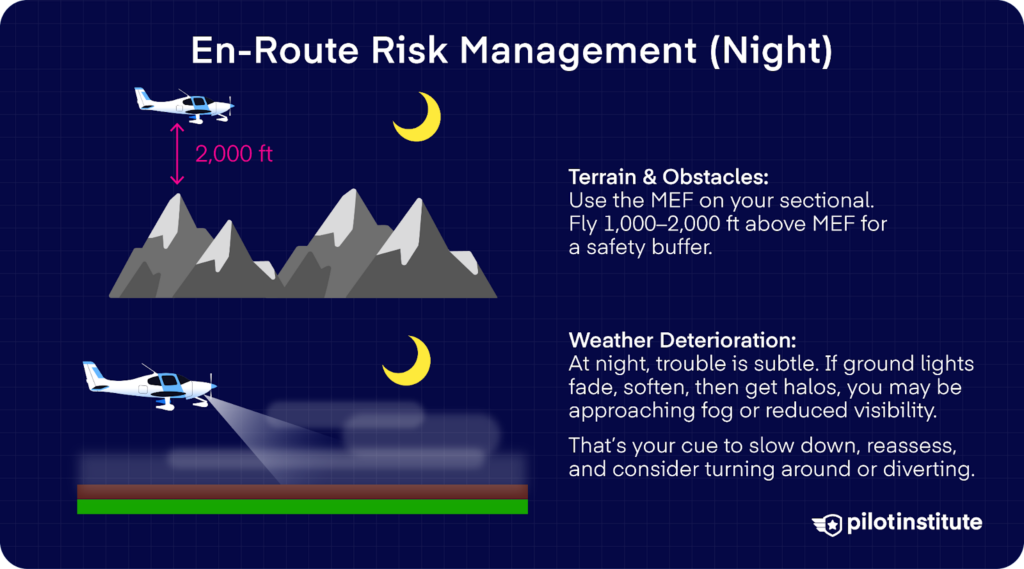
Your eyes won’t be as effective in identifying terrain at night, but you can plan for it. One of the safest ways to stay clear of obstacles is to use the maximum elevation figure (MEF) shown on your sectional chart.
As the name suggests, the MEF shows the highest known terrain or obstacle in each chart quadrant, including natural terrain and artificial obstructions. Add a buffer of around 1,000 to 2,000 feet, and you increase your margin for safety.
Weather Deterioration Signs
Clouds and visibility restrictions can sneak up on you at night, especially on dark, overcast evenings when the sky hides its boundaries. You may not notice trouble right away. Often, your first warning is subtle.
The lights on the ground begin to fade, then soften, and then the lights might start to glow with a faint halo. What do you think that means? You’re likely looking at ground fog ahead.
That glow is your signal to pause and reassess before pressing on. If you descend through smoke or clouds, you quickly realize that looking horizontally through restriction is far more limiting than looking straight down through it from above.
Arrival and Landing (Night)
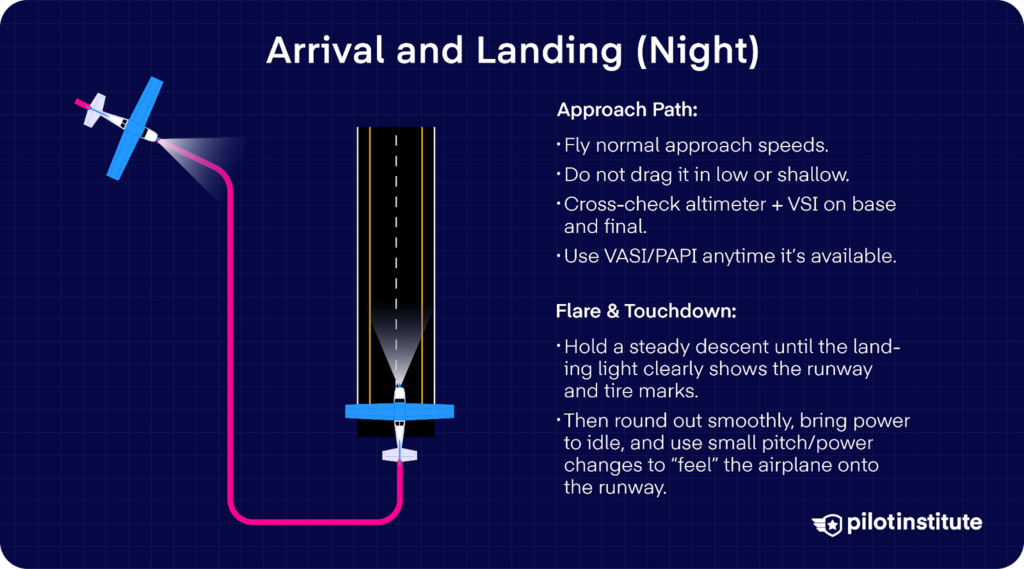
Approach Path Control
The fundamentals of the approach and landing are mostly the same, but your margin for visual error narrows.
Fly the recommended airspeeds just as you would in daylight, resisting the temptation to drag in low on a shallow approach, which is especially hazardous after dark. With fewer outside depth cues to rely on, your scan stays busy.
Cross-check the altimeter and the vertical speed indicator against where you know you should be on base and final.
When a VASI or PAPI is available, it becomes one of your most valuable allies. It gives you an immediate and reliable picture of whether you are high, low, or right on target.
Flare & Touchdown Cues
Your sense of height, speed, and sink rate is easily fooled because the landing area offers far fewer visual cues than it does in daylight. Without those familiar references, it is easy to misjudge the flare, and you could round out too high on instinct.
How can you cure this? One reliable technique is to hold a constant descent all the way down final. Keep it steady until the landing light brings the runway surface to life and the tire marks come into sharp view.
That’s also your cue for the next stage. Round out smoothly, then ease the throttle toward idle as the airplane settles into the touchdown.
In those moments, you’re not so much seeing the runway as you are feeling for it. Use small power and pitch changes to guide the aircraft gently onto the surface.
Emergencies Unique to Night
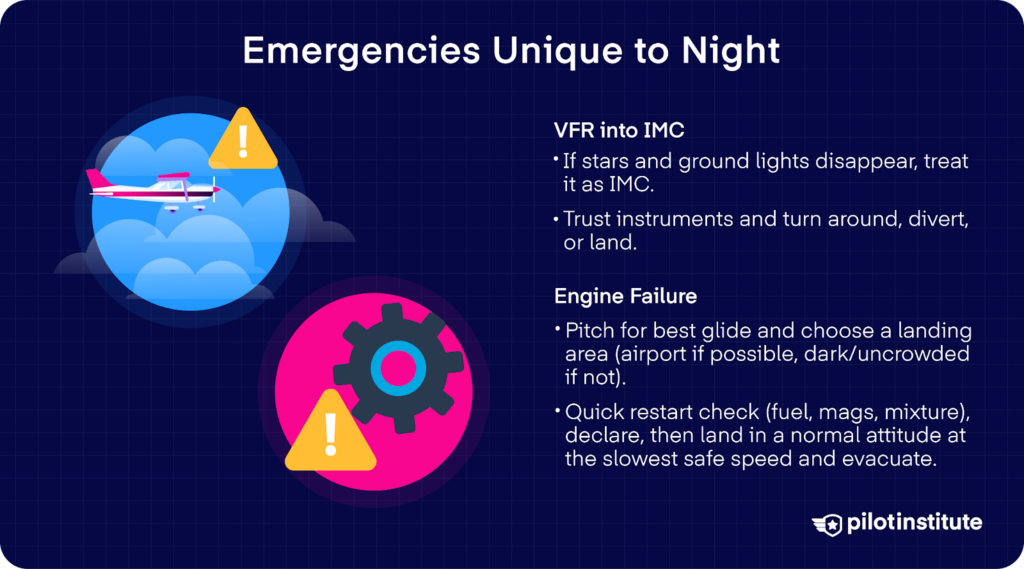
VFR into IMC
One of the most dangerous situations at night is inadvertently flying into IMC under VFR. Without reliable outside visual references, spatial disorientation becomes a real threat and possibility.
Even a few stars or distant ground lights can vanish as clouds or fog close in. Once that happens, you may lose all outside reference.
You should treat that as a serious warning. For a VFR-only pilot, diverting or landing may be the safest choice rather than trying to stick to your flight plan.
Engine Failure
The thought that unsettles most pilots about flying at night is the what-if of a total engine failure. That concern is valid, even though poor weather decisions and faulty judgment cause far more accidents than engines themselves.
Still, if the engine does quit after dark, what you do next matters immediately.
What should be your first priority? Stay in command of the aircraft. You establish the best glide speed and configuration right away, then turn toward an airport if one is within reach or away from congested areas if it is not.
Make a quick, deliberate check for possible causes like fuel selector position, magneto switch, or primer. If there is a fix to be found, apply it without delay and attempt a restart.
At the same time, let someone know what is happening. Announce the emergency to ATC or UNICOM and stay on your current frequency unless instructed otherwise.
Do you recognize the terrain below? Does it look usable? Then steer toward a dark, unlit portion of the area and commit to a forced landing there, as this is the least likely place to find hazardous obstacles.
If you can identify a suitable dark area that is also near public access, that may improve your chances of a quick rescue, but the priority is selecting a survivable landing site.
All the while, stay aware of the wind to avoid a downwind touchdown. As the ground comes up, complete your before-landing checks. Test the landing light at altitude and switch it on in time to reveal terrain and obstacles.
Fly the aircraft onto the surface in a normal landing attitude at the slowest safe airspeed. If the light fails and outside references vanish, maintain a level-landing attitude and let the aircraft settle on its own.
And once stopped, shut everything down and evacuate immediately.
Building Night Proficiency
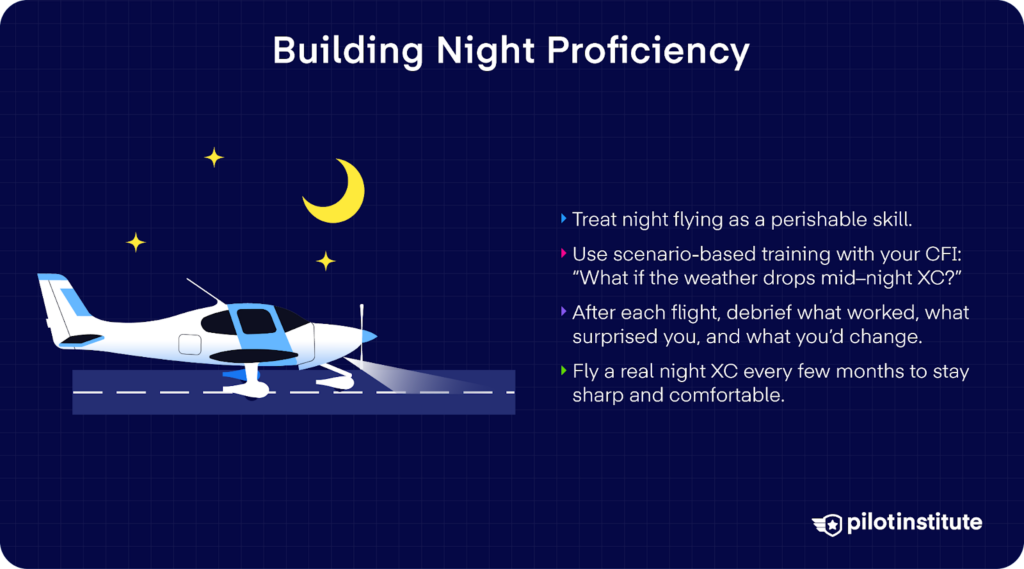
How can you keep your edge in night flying? One powerful way is through scenario-based training.
Run through a realistic “what-if” scenario in your mind or with your instructor. For example: “It’s a night cross-country, forecast shows clear weather, but halfway en route, unexpected snow begins. What are your options?”
Discuss whether you should abandon the plan or divert under IFR (if rated). After the flight, debrief on what worked, what caught you by surprise, and what you’d do differently.
Beyond those structured sessions, you should think of proficiency as a habit. Incorporate a few real-world night cross-country trips every several months. That’ll give you regular exposure to actual night conditions.
Common Night Mistakes (and Fixes)
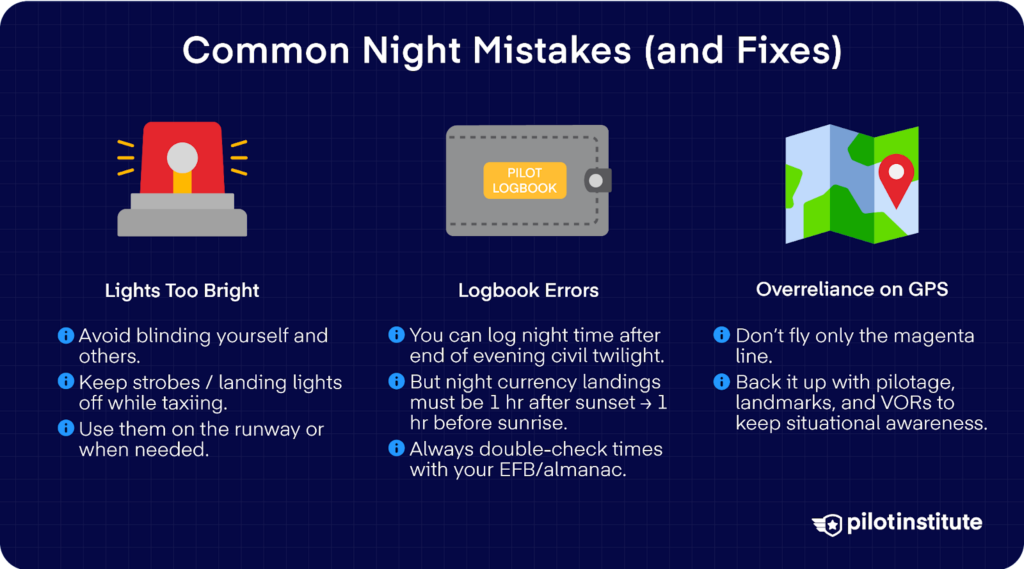
Lights Too Bright
Even simple mistakes can turn into serious hazards. One frequent error is accidentally blinding yourself or other pilots with taxi lights, strobes, or landing lights while on the ground.
Strobes or landing lights during taxi can dazzle other pilots and wreck your own night vision. Keep the lights off until you’re clear. Only use strobes or landing lights when you’re on the runway or when needed.
Logbook Errors
Another mistake is incorrectly logging landings for night currency. While you can log night flight time starting at the end of evening civil twilight, the three takeoffs and full-stop landings required for passenger-carrying currency must be done during the period from 1 hour after sunset to 1 hour before sunrise.
If you log currency landings based on civil twilight times instead of the ‘1 hour after sunset’ rule, you may not be legally current to carry passengers.
If you rely on memory or sunset time instead of verifying actual civil twilight times, you may end up with improperly logged “night” time. Always double-check with your EFB or almanac to confirm.
Overreliance on GPS
Relying too heavily on the GPS “magenta line” for navigation is another trap. The GPS is a great aid at night, but it can also lead to a loss of situational awareness.
It’s safer to back up GPS with traditional pilotage or with navigation aids such as VOR radials when available.
Conclusion
Night flying takes discipline and respect for what you cannot see. Keep yourself and your aircraft properly equipped, and plan every leg with care. When you’re ready for it, the darkness becomes predictable instead of threatening.
You already have the skills to fly safely after sunset. Now, it’s time to apply them with sharper awareness and better habits.
Review the regulations and practice with purpose. The more you prepare on the ground, the calmer you will be in the air. When you do it right, night flying can be one of the most rewarding experiences in aviation.