-
Key Takeaways
-
What Are Steep Turns?
-
Why Do We Practice Steep Turns?
-
The Aerodynamics of Steep Turns
- Load Factor
- Overbanking Tendency
- Left-Turning Tendencies
- Adverse Yaw
- Induced Drag
- Maneuvering Speed
-
Preparing for Steep Turns
-
Performing Steep Turns (Step-By-Step)
- Clearing Turns
- Entry
- During the Turn
- Rollout
- Return to Cruise
-
Common Mistakes
- Not Clearing the Area
- Incorrect Entry
- Not Maintaining Altitude
- Not Maintaining Airspeed
- Fixating on Instruments
- Underbanking or Overbanking
- Incorrect Recovery
- Not Recovering at First Sign of Stall
-
Private Pilot and Commercial ACS Standards
-
Conclusion
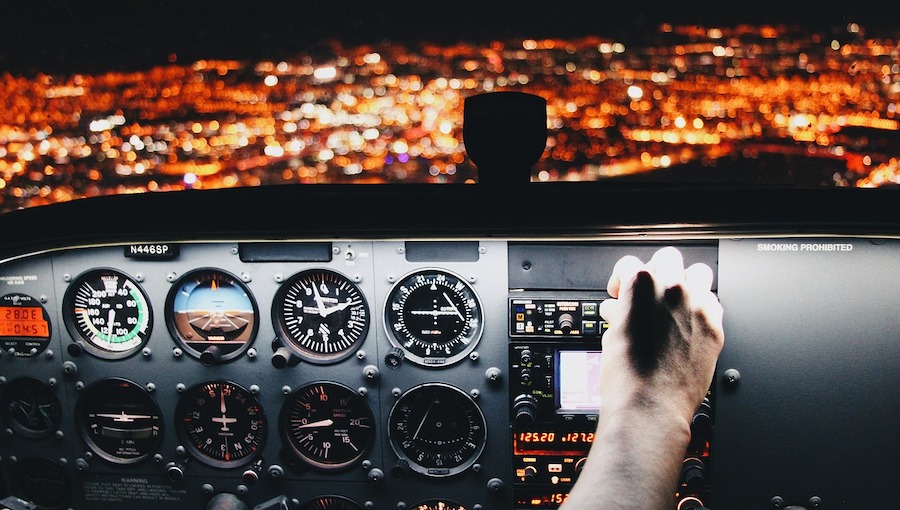
Steep turns should be one of the most fun maneuvers pilots learn. It’s as close to “evasive action” as you can get while flying a general aviation aircraft.
But for many pilots, flying coordinated turns while keeping altitude and speed steady is hard enough. Pulling Gs in tight circles only adds to the feeling of overwhelm.
If steep turns fill you with anxiety instead of excitement, fear not. This article covers everything you need to know to master steep turns – and avoid common mistakes.
Key Takeaways
- The steep turn is a performance maneuver to maximize rate of turn.
- In maintaining a properly coordinated steep turn, the pilot must use the opposite aileron to maintain bank.
- Pitch should be controlled by adjusting the elevator back pressure and bank angle.
- A smaller bank angle will result in more lift, while an increased bank angle will reduce the lift.
- Maintaining coordination is very important and should be watched carefully throughout the maneuver.
What Are Steep Turns?

The steep turn maneuver consists of a constant altitude turn in either direction, using a bank angle between 45° and 50°.
Compared to standard turns, steep turns are a maximum turning performance maneuver. Relatively high load factors are imposed, and countering the overbanking tendency is necessary.
Steep turns are difficult to perfect because attention has to be split between the inside and outside of the aircraft. This requires a lot of practice to master.
Why Do We Practice Steep Turns?
Besides being a required maneuver during practical tests and flight reviews, steep turns have practical use. As a maximum turning performance maneuver, it is used to help prepare pilots for emergencies, such as collision avoidance.
Steep turns enhance hand-eye coordination, situational awareness, and aircraft coordination.
Performing a successful steep turn to test standards requires knowledge of aerodynamics. Understanding how bank angle affects aerodynamic factors such as load factor.
And finally, steep turns are just plain fun to feel some G-forces.
To learn all the maneuvers you’ll need to perform on your practical test, check out Airplane Maneuvers Mastery for more.
The Aerodynamics of Steep Turns
Load Factor
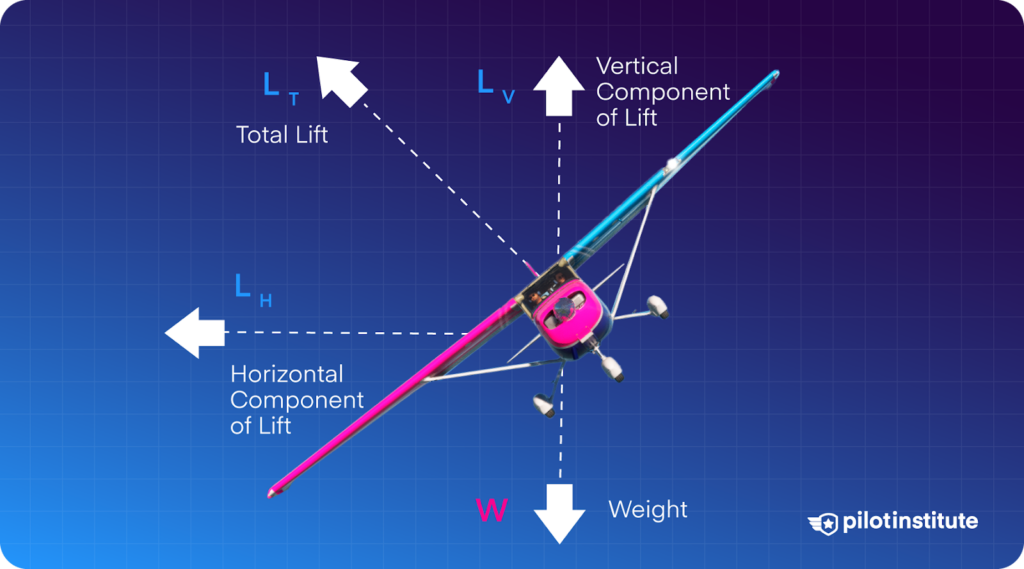
How does an aircraft turn? As an aircraft banks, lift is divided into horizontal and vertical components. The horizontal component of lift causes the aircraft to turn. The vertical component increases to maintain altitude.
Combining both components of lift, the total lift required increases. As total lift increases, the opposite force, total load, increases.
The total load is also expressed as load factor, or “G.” This is the felt gravitational force. For example, 2 Gs would make something that weighs 10 lbs act like 20 lbs.
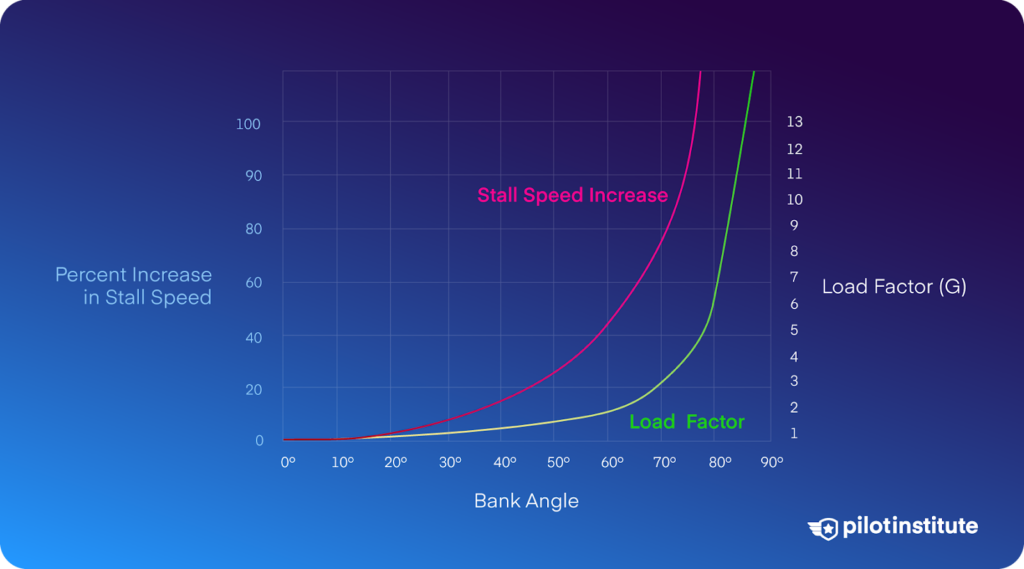
A steep turn requires a bank angle of 45° to 50°. To maintain altitude, the load factor and stall speed increase as the bank angle increases.
As the bank angle increases, the loads on the aircraft increase almost exponentially. To visualize this, at a 60° bank, a load factor of 2 Gs is imposed on the aircraft structure. At a 70° bank, the load factors increase to 3 Gs. This is regardless of the airspeed, power setting, or type of aircraft involved.
Increased load factors cause an increase in stall speed. The stall speed increases proportionately to the square root of the load factor. For example, an aircraft with
Understanding the relationship between bank angle and stall speed in a steep turn is crucial.
Overbanking Tendency
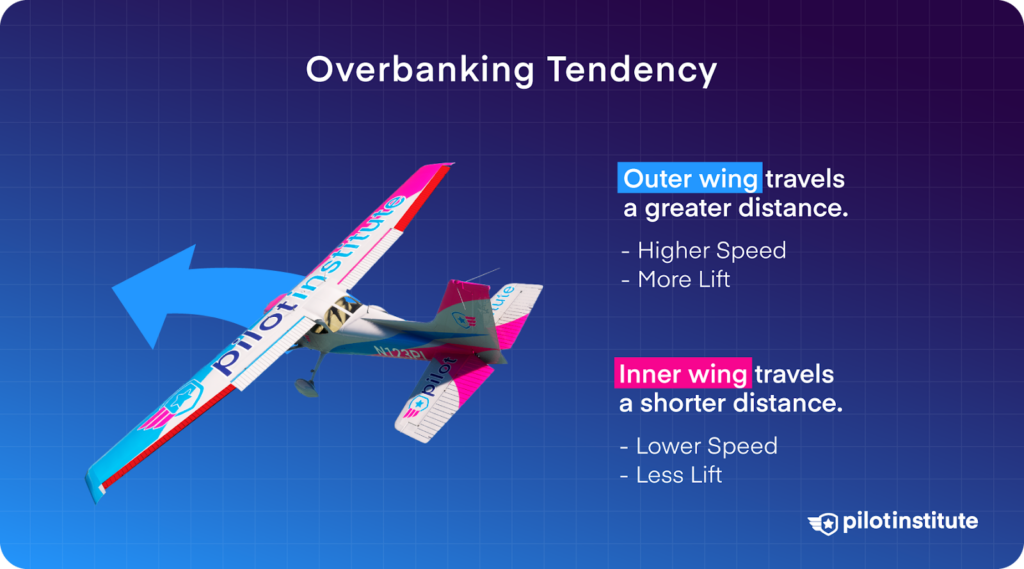
Overbanking tendency is a phenomenon that occurs especially in smaller radius turns.
Separating the wings into an inner and outer wing, we can see that the outer wing travels a longer path relative to the inner wing.
Because both wings complete the circle in the same amount of time, the outer wing moves faster than the inner wing.
A faster outer wing develops more lift relative to the inner wing. This causes the aircraft to want to roll further into the turn. You may need to apply the opposite aileron to counter the overbanking tendency.
Left-Turning Tendencies
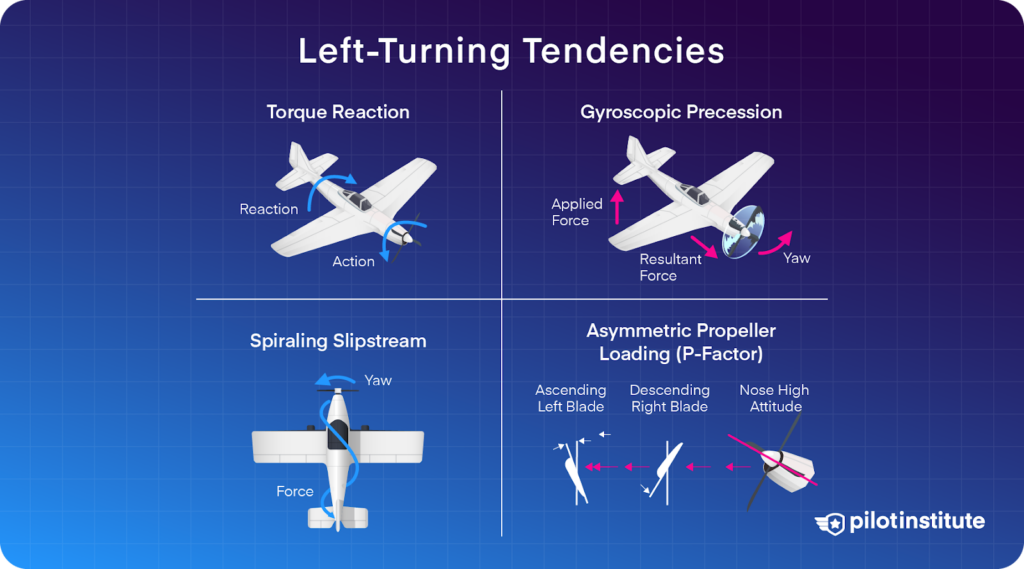
An aircraft’s left-turning tendencies must be accounted for in this maneuver to stay in a coordinated turn.
In the left turn, the left-turning tendencies can result in a skid.
In the right turn, the left-turning tendencies discourage a right turn and can result in a slip.
Adverse Yaw
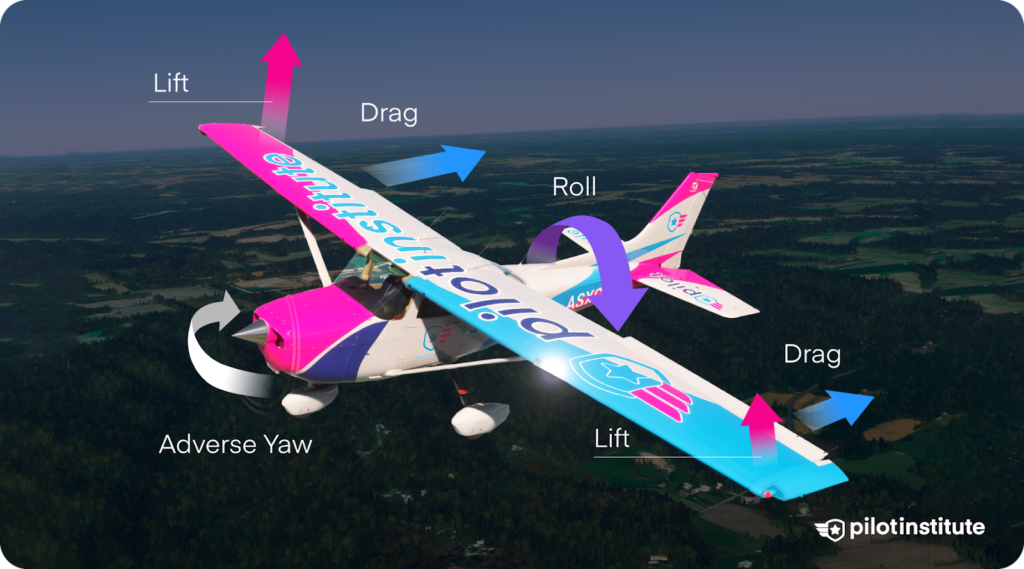
Adverse yaw is when an aircraft tends to yaw towards a raised wing due to the aerodynamic forces of an aileron deflected down.
As you bank the aircraft, one aileron is deflected up while the other is deflected down. This results in a lowered wing and a raised wing, respectively.
The downward deflected aileron produces more lift, and more lift produces more induced drag. This added drag will cause the aircraft to yaw towards the direction of the raised wing.
Adverse yaw is most apparent during the entry and exit of steep turns. Aileron movement is required to bank the aircraft into and out of the turn. Proper rudder use is required to counter adverse yaw to maintain coordinated flight.
Induced Drag
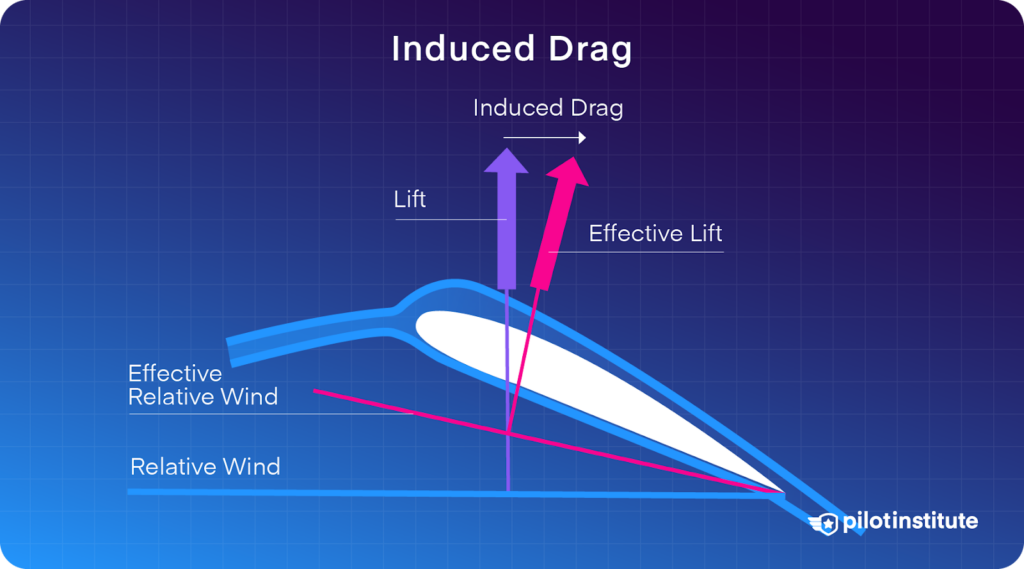
Induced drag is a byproduct of lift. Downwash at the wing’s trailing edge deflects the relative wind downward. This tilts the lift vector backward since lift is perpendicular to the relative wind. The rearward component of lift is called induced drag.
In a steep turn, we need to increase total lift to maintain altitude. We do this by increasing the Angle of Attack (AoA). However, this generates more induced drag. To compensate, we need to add power to maintain airspeed and altitude in the turn.
Maneuvering Speed
Maneuvering speed, VA, is the maximum speed at which a single full control input will not cause structural damage to the aircraft. Any airspeed above VA can cause the aircraft to be damaged when performing maneuvers.
The Pilot’s Operating Handbook (POH) for your airplane will list VA, typically for maximum gross weight. Maneuvering speed decreases as your airplane gets lighter.
Preparing for Steep Turns
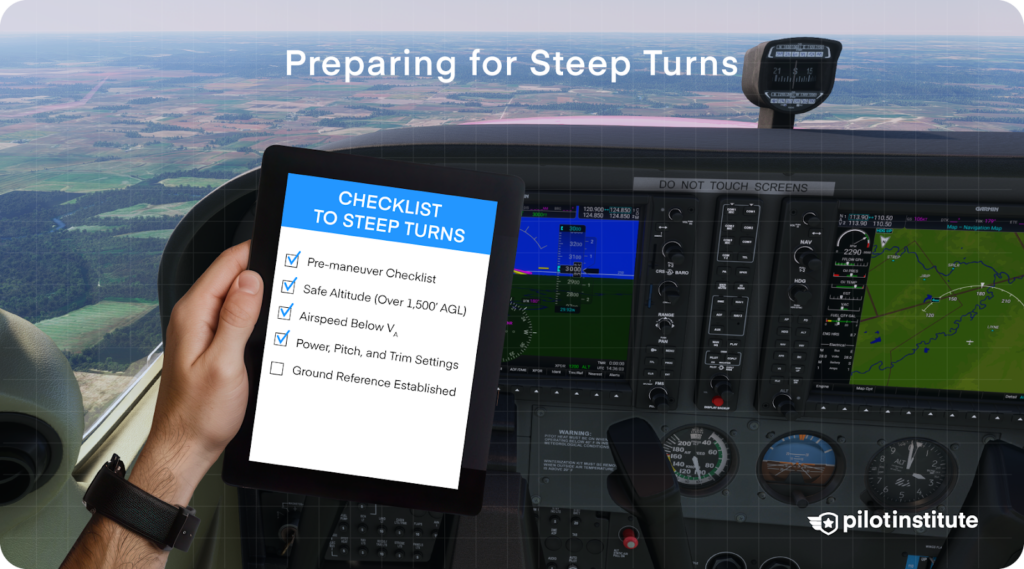
To set up for the steep turn, several factors need to be established before commencing the maneuver.
The pre-maneuver checklist should be completed.
The practical test has no officially established minimum altitude for steep turns. However, it is best practice to start a steep turn no lower than 1,500 feet above ground level (AGL).
A ground reference point can be established as the heading where you begin your steep turns. This will also be where you begin your turn in the opposite direction, complete the second turn, and exit the maneuver.
Your airspeed should also be below maneuvering speed to avoid structural damage to the aircraft.
It also helps to know the approximate power, pitch, and trim settings to conduct the maneuver up to standards.
Performing Steep Turns (Step-By-Step)
Clearing Turns

A steep turn has a rapid rate of turn and can pose a higher risk for in-flight collisions. Clearing turns should be made before starting the maneuver.
A clearing turn allows you to look for traffic in all directions, including above and below. This is usually done in one of two ways. The common method is to make two 90-degree turns in opposite directions, starting with the left. The second method is a complete 180-degree turn towards the opposite direction. While performing the clearing turn, the pilot scans for traffic in the surrounding area.
If in an established practice area, you can also make a radio call on the practice area radio frequency of your intentions. This allows nearby aircraft to be aware you are performing a maneuver and should be avoided.
Entry
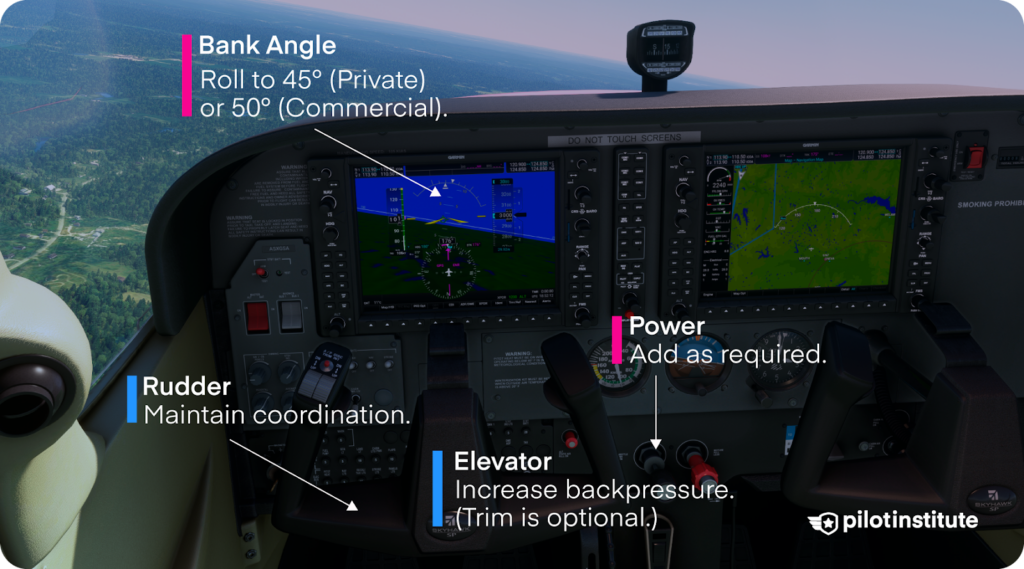
Smoothly roll into the bank angle required by the practical test standards of 45° for private or 50° for commercial. Apply the necessary rudder to maintain coordinated flight.
Some instructors prefer trim to relieve the back pressure needed on the yoke to maintain altitude. This involves three full rolls of nose-up trim on the Cessna 172 to relieve the use of any elevator. Other instructors might prefer not to use trim, relying entirely on elevator back pressure on the yoke to maintain altitude.
While banking towards the required bank angle, some power must be added to maintain the entry altitude and airspeed.
During the Turn
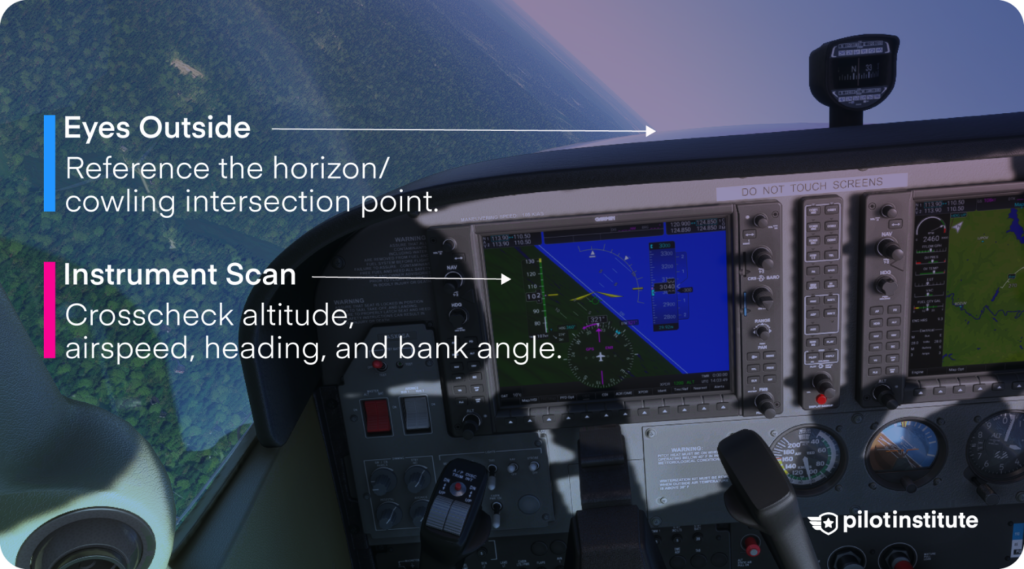
During the turn, the pilot should reference several instruments and outside references.
To maintain altitude, the pilot should have a reference point where the horizon meets the nose of the aircraft.
Some instruments that are part of the scan for the maneuver include:
- Attitude Indicator
- Altimeter
- Heading Indicator
- Turn/Slip Indicator
If the aircraft starts to climb, less back pressure or a slightly steeper bank angle will help bring the aircraft back to the starting altitude.
If the aircraft starts to descend, more back pressure or shallowing the turn will help bring the aircraft back to the starting altitude.
Continual scanning of the flight instruments and outside references is needed to ensure a proper steep turn.
Rollout
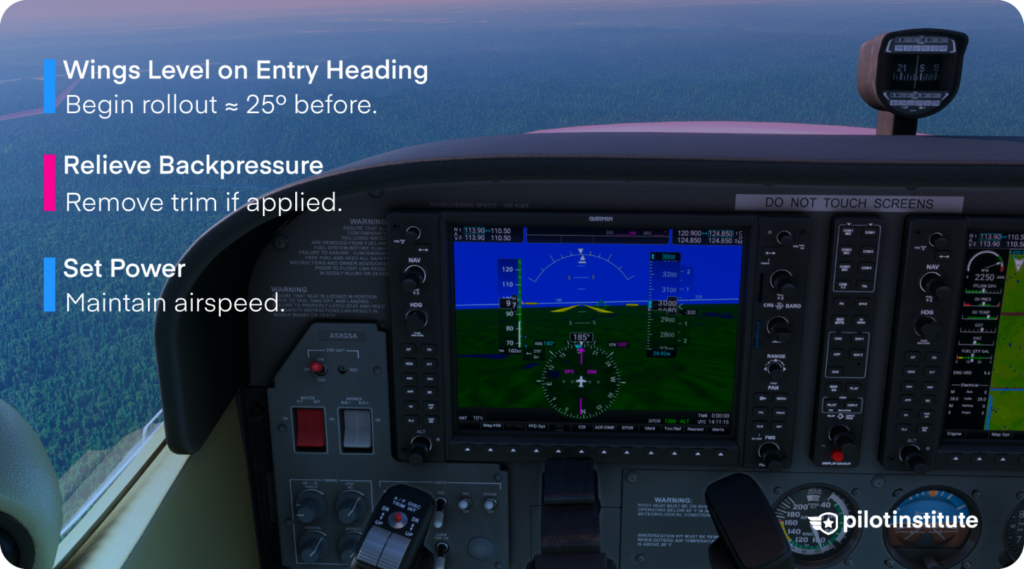
The rollout should be timed such that the wings are level when the airplane is exactly on the heading at the start of the maneuver.
The general rule is to begin the rollout at approximately ½ the bank angle. This is about 22.5° – 25° before reaching the original heading.
When rolling out of the turn, relieve the elevator back pressure and power as necessary to maintain altitude and airspeed. If using the elevator trim method, the trim has to be removed to prevent the aircraft from increasing in altitude once wings level.
Return to Cruise
Upon completion of the rollout, the maneuver is not yet complete!
Ensure the aircraft is properly configured to return to cruise flight. Set the power to a cruise setting, and ensure the aircraft is properly trimmed for straight and level flight.
Common Mistakes
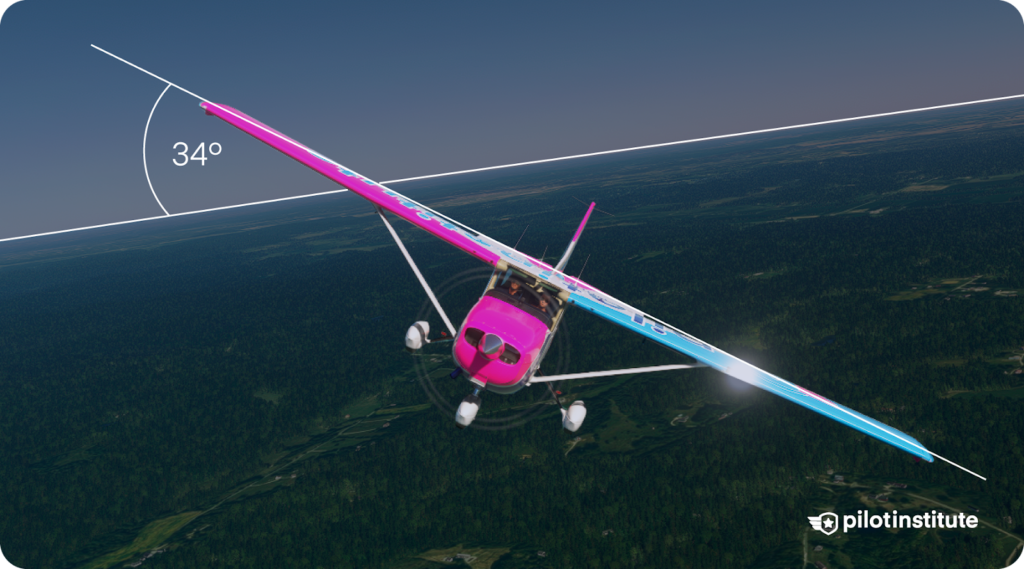
Here are some common mistakes you should avoid so that you will not be found unsatisfactory on the steep turn maneuver.
Not Clearing the Area
Clearing the area is the first standard that must be maintained in the maneuver on the certification standards.
Ensure that you complete a clearing turn before beginning the maneuver. Many applicants have failed the checkride due to not clearing the area.
Incorrect Entry
Entry into the maneuver requires a large amount of coordination. The maneuver may start poorly if any control inputs are inadequate or excessive.
Proper use of all flight control surfaces and throttle application is required.
If entered poorly, the pilot would perform larger corrections to remain in standards.
Not Maintaining Altitude
The lift cannot match the load factor for level flight if the pilot does not apply enough back pressure during the turn. This will cause the aircraft to start sinking in altitude.
If the pilot adds too much back pressure, the total lift would be more than required. The aircraft will begin to climb in altitude.
Instructors who do not recommend the trim method suggest that the pilot may not have the right feel on the yoke or may have incorrect trim amounts.
Not Maintaining Airspeed
If the pilot forgets to add power during the steep turn, the aircraft will begin to slow down and not maintain the airspeed.
Adding too much power can also cause the maneuver to be considered unsatisfactory. For a Cessna 172, an additional 100 rpm is sufficient.
Fixating on Instruments
The steep turn is primarily an outside reference maneuver. It only requires quick scans of the instruments to ensure airspeed, altitude, heading, and coordination.
Fixation on one instrument reading can compromise the other components of the maneuver. The outside reference where the horizon meets the nose is adequate for the maneuver.
Underbanking or Overbanking
The pilot has to ensure that the bank angle is maintained. Poor visual reference to the horizon or missing the attitude indicator scan can cause the maneuver to be unsatisfactory.
With the tendency to overbank, the pilot might not notice that the aircraft is slowly banking further into the turn. This increases the bank angle beyond what the Airman’s Certification Standards (ACS) allow.
Incorrect Recovery
If the gradual rollout is not started before reaching the heading at which the maneuver started, it will not match.
Besides the ground reference, using an actual heading and a heading bug can help make anticipating the rollout easier.
Power should also be smoothly removed during recovery, as the aircraft does not create as much drag as during the maneuver. If the power setting is left unchanged, the aircraft will increase in airspeed.
Some instructors do not like the trim method for maintaining lift for the maneuver because it can lead to gaining altitude on rollout. If trim is not relieved, or adequate forward pressure on the yoke is not applied, the aircraft will start to climb.
Not Recovering at First Sign of Stall
The ACS says that the aircraft should be recovered if it begins exhibiting signs of a stall.
Do not attempt to continue the maneuver, as the risk of an accelerated stall is higher during this maneuver.
Private Pilot and Commercial ACS Standards
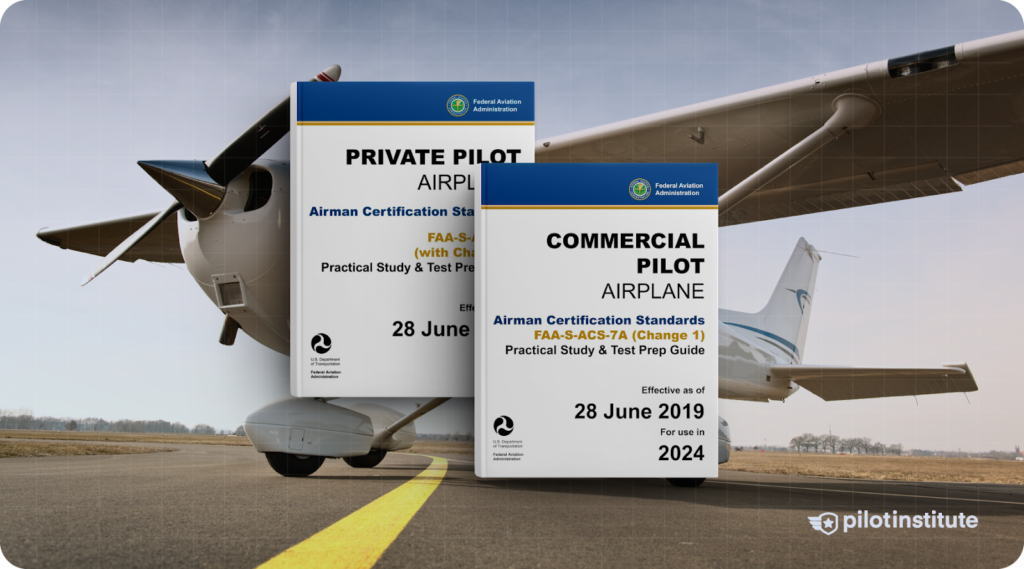
Here are the standards to be found satisfactory on the private and commercial practical tests.
Private Pilot ACS Skills Standards
1. Clear the area.
2. Establish the manufacturer’s recommended airspeed or, if one is not available, a safe airspeed not to exceed VA.
3. Roll into a coordinated 360° steep turn with approximately a 45° bank.
4. Perform the Task in the opposite direction, as specified by evaluator.
5. Maintain the entry altitude ±100 feet, airspeed ±10 knots, bank ±5°, and roll out on the entry heading ±10°.
Commercial Pilot ACS Skills Standards
1. Clear the area.
2. Establish the manufacturer’s recommended airspeed or, if not stated, a safe airspeed not to exceed VA.
3. Roll into a coordinated 360° steep turn with approximately a 50° bank.
4. Perform the Task in the opposite direction.
5. Maintain the entry altitude ±100 feet, airspeed ±10 knots, bank ±5°; and roll out on the entry heading, ±10°.
Conclusion
Steep turns build essential skills for handling your airplane in dynamic situations.
While they test your control at higher speeds, slow flight presents a different challenge—maintaining control at the edge of a stall.
To learn more, check out our article on mastering slow flight.

