Helicopter flight controls are somewhat different from fixed-wing controls, although not all that different. But before you can learn to fly a helicopter, you need to know what the controls are and how they work. So we will go over each of the controls in turn, before looking at how you use them for basic flying maneuvers.
Main Helicopter Controls
There are three main helicopter controls:
- The Cyclic
- The Collective (and Throttle)
- The Yaw Pedals
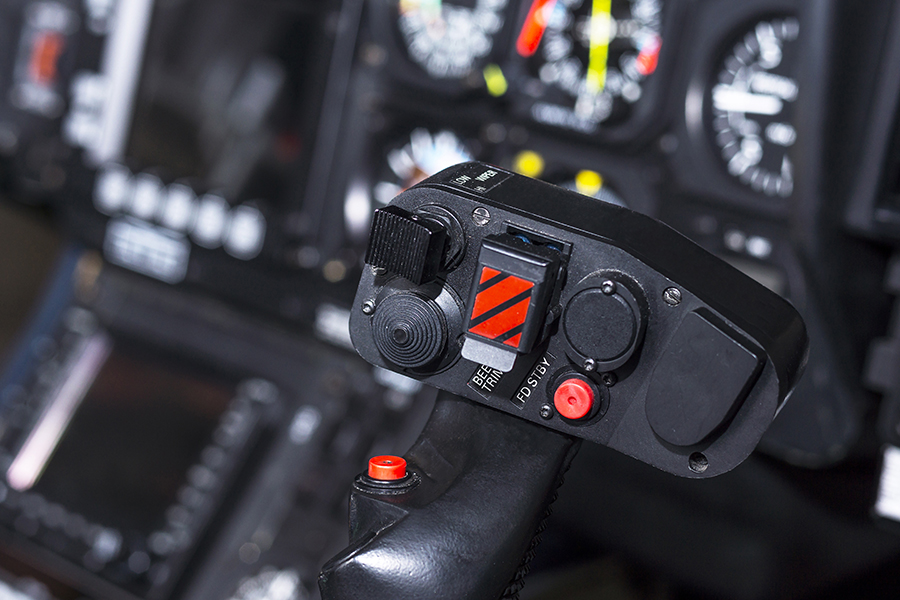
The Cyclic
The cyclic – sometimes called the stick – controls the altitude and airspeed of the helicopter. The movement of the cyclic alters the tilt of the rotor disc, which is the hypothetical disc the rotors make when they are turning. The rotor disc is attached to the helicopter fuselage, so where the disc goes, obviously the aircraft will have to follow. Therefore, if you move the cyclic forward, the helicopter will pitch nose down It will also descend and increase in speed – more about that later. Pulling back on the cyclic will cause the aircraft to pitch nose up, climb, and slow down. Moving the cyclic laterally will make the helicopter turn. To put it rather simplistically, you move the cyclic the way you want the helicopter to go.
This sounds quite easy, but there’s a little more to it than this, and there are a few other important points to mention. One is that stick movements need to be very small. It is very easy to move the cyclic too much, then realize what’s happened and move it too far in the opposite direction. You quickly end up with what is known as ‘pilot induced oscillations; that is, the helicopter starts swinging gently forward and back or from side to side, until your instructor takes over and sorts things out. You are over-correcting. But don’t be alarmed; practice makes perfect, and you will soon learn the amount of movement that is required.
The next thing we need to look at is the design of the cyclic you are using. In most helicopters, the cyclic is placed vertically in front of each pilot. However, in the commonly used Robinson R22 and R44, there is one cyclic control between the two pilots’ seats, with a T-bar on the top, so that it can be used from either side. I’ve heard different reasons given for the Robinson design, but it’s not something we need to consider here. The important point is that the two designs work in the same way, and it makes very little difference which one you have. You will possibly hear people say that one is better than the other, or that they don’t like the Robinson design, or something similar. But believe me, both cyclic types are identical in all but looks, and it isn’t something worth worrying about.
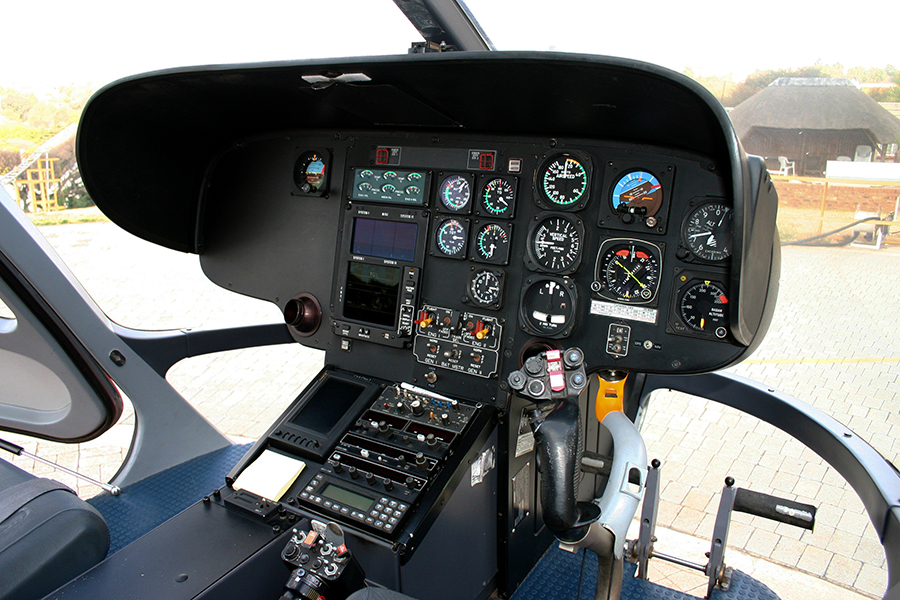
The Collective (and The Throttle)
The collective, or lever, is on each pilot’s left side, looking something like the handbrake in a car. It controls the height of the helicopter by altering the pitch of all the rotor blades collectively, hence the name. If you raise it, the helicopter climbs; if you lower it, the machine descends. Since more power is needed to climb, there is a twist-grip throttle on the end of the collective, so that it can be opened to climb and closed to descend. It works like a motorbike throttle, but if you’re a biker, be careful, as it works in the opposite direction from what you’ll be used to!
However, in most modern helicopters there is also an electronic governor which senses the position of the collective and automatically opens the throttle to the amount required, so you don’t need to worry about throttle control at all. This is the case for the Robinson R22 and R44, on which most people learn. But if you happen to be learning on the Schweizer 300 helicopters or the Enstrom 280, you will need to learn manual throttle control, as these aircraft are un-governed. It is not a big deal, as both these types have a manual correlator, which adjusts the power required to a certain extent so that the pilot just needs to keep an eye on it and tweak it a little now and then. And both these helicopter types are probably a little easier to fly than the R22, so it’s horses for courses and all that.
The Yaw Pedals
The last main control is the yaw pedals, often simply called the pedals. The left pedal causes the helicopter’s nose to turn left, while the right pedal has the opposite effect. Although they work a bit like fixed-wing rudder pedals, they are different, since they operate by altering the pitch of the tail rotor. In forwarding flight the pedals are primarily used to keep the aircraft in balance; that is, flying straight rather than crabwise. You can tell whether or not you are flying in balance by looking at two strips of wool that are fitted to the front of every helicopter, and most helicopters also have a balance ball – a bit like a spirit level – among the cockpit instruments.
Secondary Effects Of Controls
Let’s now look at what the controls do in practice. When you start learning to fly helicopters, you will first learn to handle each control individually. There is a good reason for this. It might seem from the descriptions above, that helicopter flying should be quite simple. You simply move the cyclic the way you want to go and use it to adjust your speed. You use the collective if you want to climb or descend, with the governor setting the power as required. You use the pedals to keep the helicopter in balance. End of story, isn’t it?
Well, it’s not quite as simple as that. The problem is that all these controls have secondary effects, and so several other things start to happen as soon as you move any one of them. As already noted, when the cyclic is moved forward the helicopter pitches nose down and speeds up. However, it also starts to descend, since there is not enough power to keep it at the same height at this faster airspeed. Similarly, as you move the cyclic back, the helicopter pitches the nose up and slows down, but it also starts to climb. Therefore, if you want to go faster you need to move the cyclic forward, but if you want to stop the descent you also need to raise the collective just a little. If you forget – and it’s easy to do so – you will gradually fly lower and lower, and eventually, start to wonder why everything on the ground is looking incredibly close.
So let us suppose that what has been described above has happened, and you’ve suddenly found yourself rather too close to the ground. So now you want to climb, and you raise the collective. So far, so good. However, raising the collective means that the helicopter will start to yaw to the right. So you’ll need to apply the left pedal. Also, the noise of the helicopter will start to pitch up, due to air pushing down on the tail as the helicopter climbs. And as the aircraft pitches nose up, it will start to slow down, so you need to push the cyclic forward to prevent this from happening. Thus to start to climb, you need to coordinate the use of all three controls rather than just one. And this kind of thing applies similarly to almost any maneuver you care to make.
This means that students learn to use each control separately, then use two together, gradually moving up to using all three. Only at this point do they start to learn to do basic maneuvers – level flight, climbing, descending, and turning. We’ll take a look now at performing those maneuvers.
Performing Basic Helicopter Maneuvers
Let’s first remember what each control is primarily used for…
- The cyclic controls altitude and airspeed
- The collective controls height and power (the latter through the throttle)
- The yaw pedals keep the helicopter in balance
Some students can get very confused about this, because it isn’t that obvious, due to the secondary effects of all the controls. For instance, pushing the cyclic forward will cause the helicopter to descend as well as speed up. Similarly, if you lower the collective, the helicopter might well speed up as well as descend, especially if you allow the nose to drop. And you can turn, though rather inefficiently, using the pedals. This is all true and very obvious to anyone who has done a little flying. But all the same, it is important to remember the main purpose of each control, particularly in the beginning, otherwise, things can become very confused later on in your helicopter training. Bearing all that in mind, let’s now look at how to perform the basic helicopter maneuvers.
Straight and Level Flight
Initially, you will learn to fly straight and level at a given airspeed, usually 70 knots. For this speed, you will find that a certain power setting is required. If the helicopter starts climbing or descending, you will need to adjust either the attitude or the power. Since the cyclic is so sensitive, in practice it is usually the attitude that needs to be adjusted, but if that doesn’t work, then you will need to alter the power setting using the collective.
Next will come speed increases and decreases. To increase speed, you will need to push the cyclic forward. However, you don’t want the helicopter to descend, so you must also raise the collective a little; then use whichever pedal is required in order to keep the helicopter flying in balance. For every airspeed, there is a power setting that will keep you flying level.
Reducing speed is done in the same way – bring the cyclic back, adjust the power, and use the pedals for balance. For both of these maneuvers, it is important to keep looking outside as much as possible, and not ‘chase’ the airspeed on the instruments. That is, don’t try to be too precise. There is a lag in all of the controls, so your input will not register on the dials until a second or two after you’ve made an adjustment, so if you chase the controls then you’ll be doing it forever. Therefore simply select the right picture on the windscreen, in the way your instructor will demonstrate to you, then hold that attitude, and adjust it later if necessary. There is a fine balance between sloppy flying and not being accurate enough, and trying too hard in the wrong way – and chasing the airspeed is a good example of the latter.
You will probably practice flying straight and level at a variety of airspeeds between 40 and 80 knots or thereabouts. You can fly slower than that, but the controls can be difficult to handle at very low airspeeds, and you could also encounter other problems. And you don’t want to go too fast in the early stages, as many training helicopters have a maximum permitted speed (VNE) of only around 90 knots.
Climbing and Descending
To climb, you select the attitude for the airspeed you want, probably 60 knots for this exercise. You then raise the collective and adjust the pedals…in this case, you will need the left pedal, as you will be making a large collective adjustment. Of course, you look out carefully and monitor your instruments to make sure all is well before you do this. To level off from the climb you move the cyclic forward to select the attitude for straight and level flight, then lower the collective, then adjust using the right pedal. You will probably learn an acronym for the order in which to do both of these maneuvers – APT, or attitude, power, trim. Of course, after a great deal of practice, the whole thing will become a smoothly coordinated application of all the controls simultaneously, but this is the sequence that should be used when you are learning.
To descend, you look out first, then lower the collective, select the attitude, and adjust the pedals…and similarly for leveling out from the descent. In this case, the acronym is PAT – power, attitude, trim. There is a good reason for this; if you selected a 60-knot attitude for the descent first, the helicopter would start to climb. If you are flying a helicopter with a carburetted engine, you will need to apply full ‘carb’ heat before you lower the collective for the descent. This is something you should always remember, as carburetor icing is much more likely at low power settings. Of course, those flying fuel helicopters with fuel-injected engines have one less thing to think about here.
Why do you slow down to descend, you might ask? This is largely a safety issue. Naturally, you could descend by maintaining the speed, lowering the collective, and pushing the cyclic forward, and in fact, this is the way commercial pilots often do it. But from a safety point of view, it is a good idea to descend at a steady, not-too-fast pace, particularly when you are learning.
Turns

Turning is usually done from a straight and level attitude, at 70 knots. The first thing you need to do is look out in all directions, particularly to the left if you are turning right, and vice versa. Why? Because you will be turning away from that direction, and there could be a faster aircraft there, which will then be behind you and might not have seen you. Helicopters have good visibility, but there are a few blind spots, so be careful to move your head as you look out, as it’s very easy to miss other aircraft.
The main problem when learning to turn is to try and stay at a flying level. Due to the side-by-side seating in helicopters, and the fact that you are probably using a reference point in the center of the windscreen in order to stay level, it is easy to think you are level in a turn when in fact you are climbing or descending. This happens far more in steep turns, but it even occurs at a rate of turn of around 20 degrees. The way to adjust for this is to pick a reference point on the windscreen which is directly in front of you, and your instructor will show you how to do this.
In the turn, the cyclic controls the attitude and angle of the bank, the collective controls the height, and the pedals keep you in balance. You will need a little in-turn pedal to turn properly, so don’t consider the pedals simply as footrests for this exercise, as so many students do, in my experience!
Climbing and Descending Turns
Finally, you will put together the maneuvers you have learned in order to practice climbing and descending turns. Basically, you establish the climb or descent first, then roll on the angle of the bank. In a climb, the rate of descent will decrease, while in descent, it will increase, as you turn. If you have learned the climb, descent, and turn properly, putting them together will not be too challenging, but as with everything else in helicopter flying, don’t expect it to be a piece of cake initially.
Conclusion
Reading this for the first time, it might all sound very confusing. This will particularly be the case if you have not done any helicopter flying yet. However, it is worth concentrating on the details of the theory and basic maneuvers at the start of helicopter flying, as it will make later, more advanced exercises much easier to understand. So I hope I have convinced you that time spent studying and reading about helicopters is definitely worthwhile. You can learn at least as much from this as you can in the air, and it’s significantly cheaper and not weather dependent. So before you have any flying lessons, make sure you’re familiar with the relevant theory, as it’ll pay dividends in both the short and longer-term. And then…good luck!