-
Key Takeaways
-
What Is the Aiming Point?
-
What Is the Touchdown Point?
-
Runway Markings and Visual Cues
- Aiming Point Markings
- Touchdown Zone Markings
- Runway Threshold Markings
- Utilizing Peripheral Vision and Sight Picture
-
The Differences Between Aiming Point and Touchdown Point
- Impact of Aircraft Dynamics
-
Importance of Understanding the Difference
- Safety Implications
- Landing Performance and Efficiency
- Regulatory and Training Considerations
-
Common Misconceptions and Errors
- Mistaking the Aiming Point for the Touchdown Point
- Overemphasizing the Runway Threshold
- Inadequate Flare Technique
-
Practical Tips for Pilots
- Training and Practice
- Adapting to Different Aircraft
- Briefing and Preparation
-
Conclusion
You aced the pattern, and you were perfect on the approach. You arrived at the runway threshold exactly where you should. But it all seemed to unravel in the last few seconds.
Either the aircraft floats and eats up half the runway, or you plant it hard, trying to force it down.
This happens when pilots confuse the aiming point with the touchdown point.
But aren’t you going to touch down at the point you were aiming at?
Actually, no.
Once you understand that the aiming and touchdown points aren’t the same, good landings stop feeling unpredictable and become repeatable.
Key Takeaways
- The aiming point is a visual reference that keeps the aircraft on a stable glide path.
- The touchdown point is the actual spot where the wheels meet the runway.
- If you touch down inside the touchdown zone, you’re likely to have enough runway left for a safe rollout.
- Consistent practice builds repeatability in sight picture and flare control.
What Is the Aiming Point?
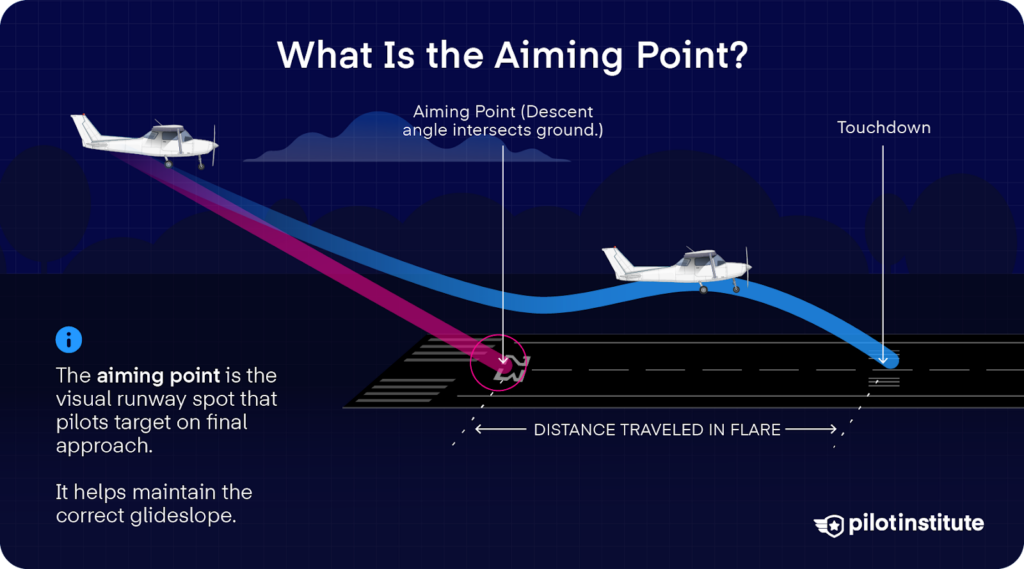
If your instructor ever told you to “fly the aircraft to a spot on the runway,” that’s the aiming point. It’s not just any spot you choose; it’s a fixed reference built into the runway itself.
On precision instrument runways, and on some nonprecision and visual runways, you’ll see two large white rectangular markings. These are the aiming point markings, and they are located on each side of the runway centerline, approximately 1,000 feet from the landing threshold.
The important thing to remember is that the aiming point is not where the wheels will touch. It’s simply the visual anchor that guides you to a safe and stable approach.
On a standard three-degree glide path, keeping this point fixed in your windshield brings you across the threshold at about fifty feet above ground. That height gives you reasonable obstacle clearance and time to flare.
Remember: the aiming point is a reference only. If you did not flare, your flight path would intersect the runway at that spot. A normal flare always carries you beyond it.
What Is the Touchdown Point?
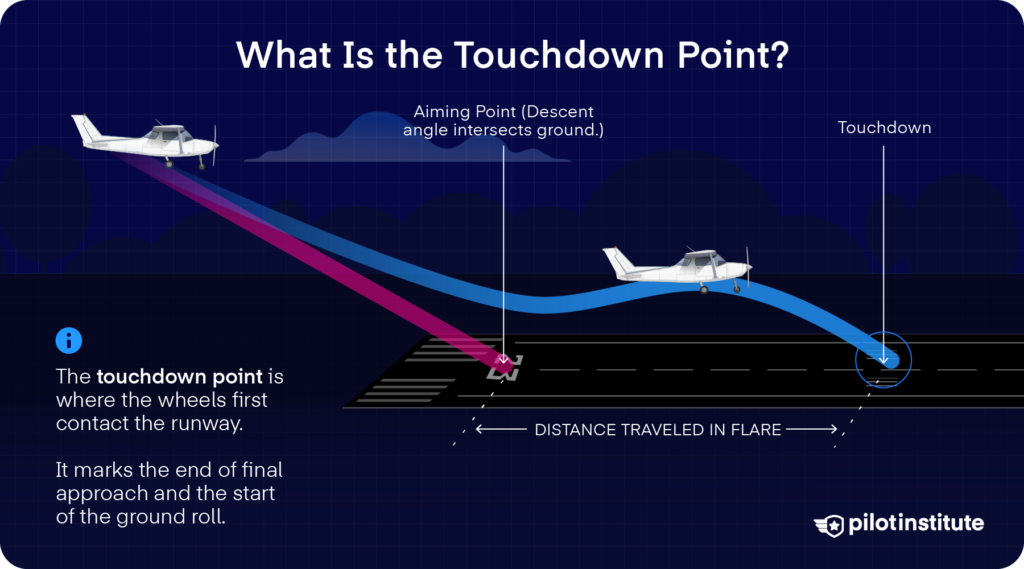
The touchdown point is where the aircraft actually meets the runway. It’s the spot where the wheels first make contact after you’ve rounded out and flared.
This is where many students trip up. They expect the aircraft to land precisely on the aiming point. But the flare changes everything. The aircraft keeps moving forward as you ease back on the yoke to arrest the descent. That extra distance means the touchdown happens beyond the aiming point.
Many factors affect the exact point the wheels make contact with the ground. It could be windy one day, or your aircraft might be heavier on a particular flight. This variability is why landings are targeted for a touchdown zone rather than a single, precise point.
There is, however, a touchdown zone where it’s acceptable for the wheels to touch down. Your goal is to plant that touchdown inside the designated zone, not force it onto the aiming point.
Runway Markings and Visual Cues
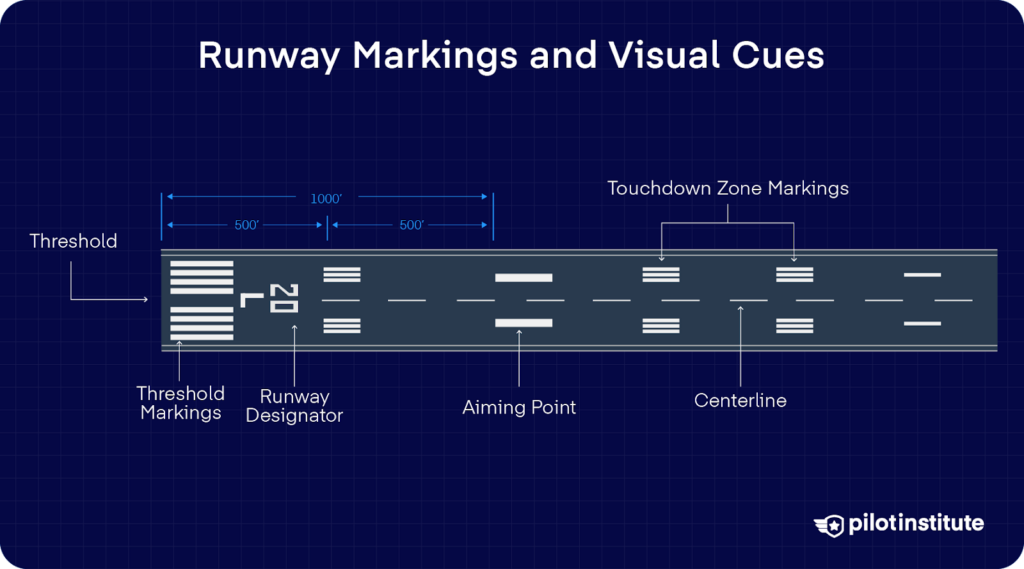
The key to mastering your landings is developing a good sense of the sight picture you want.
What’s the sight picture?
The sight picture is the overall visual image you see through the windshield on approach. It combines the aiming point in your central vision with the runway’s perspective in your peripheral vision.
Aiming Point Markings
The two large white rectangles straddling the centerline are designed to be seen from miles away. These help you anchor your sight picture.
Keep them steady in the windshield and you’ll find yourself on a stable glide path to the runway.
Touchdown Zone Markings
Pairs of white bars begin 500 feet beyond the threshold and repeat every 500 feet, typically out to 3,000 feet. The touchdown zone is the first 3,000 feet or the first third of the runway, whichever is less.
These bars give you quick distance cues in the flare and a clear boundary for what counts as an acceptable touchdown window.
Runway Threshold Markings
The piano-key stripes show where the runway begins for landing. If you were to use these markings as your aiming point, you would risk striking obstacles before the runway.
That’s why the aiming point is located approximately 1,000 feet past the threshold. This placement is so that if a pilot maintains a standard three-degree glide path to the aiming point, the aircraft will cross the runway threshold at a safe altitude. This provides clearance from any obstacles on the approach.
Utilizing Peripheral Vision and Sight Picture
To make the most of these cues, keep your head in a natural, straight-ahead position and avoid staring at one fixed point.
Shift your focus smoothly between just over the nose of the aircraft and the intended touchdown zone, while staying aware of runway edges with your peripheral vision.
This habit not only builds better depth perception but also helps you judge height and movement accurately in the final moments of landing.
The Differences Between Aiming Point and Touchdown Point
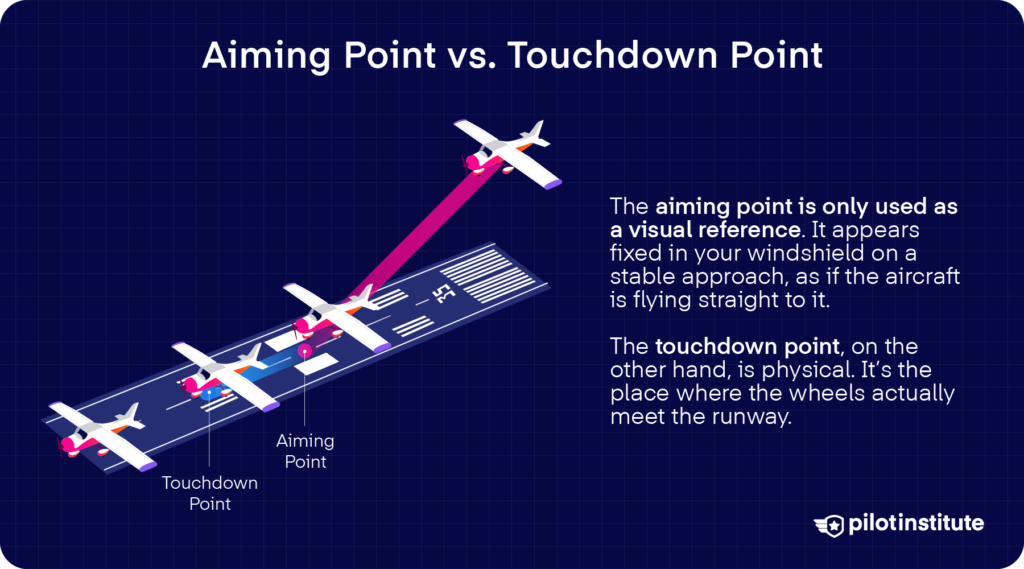
The aiming and touchdown points often get blurred together in a student’s mind, but they serve two very different roles.
The aiming point is only used as a visual reference. It appears fixed in your windshield on a stable approach, as if the aircraft is flying straight to it.
The touchdown point, on the other hand, is physical. It’s the place where the wheels actually meet the runway.
Impact of Aircraft Dynamics
Larger aircraft usually carry more momentum and need more space to settle. A heavy aircraft feels different in the flare compared to a lighter one.
Speed is another major factor. Even a few knots too fast can stretch the float and move the touchdown point hundreds of feet downfield.
Wind adds its own effect: a headwind shortens the float. If there’s a tailwind, you’ll have to fly at a higher groundspeed to maintain the correct airspeed at landing. That means you’ll cover more ground before touching down, and your touchdown point will likely move farther down the runway.
Similarly, if the runway slopes up slightly, it meets the wheels sooner as the aircraft descends. A downslope makes the aircraft chase the runway, pushing the touchdown point farther away.
Importance of Understanding the Difference
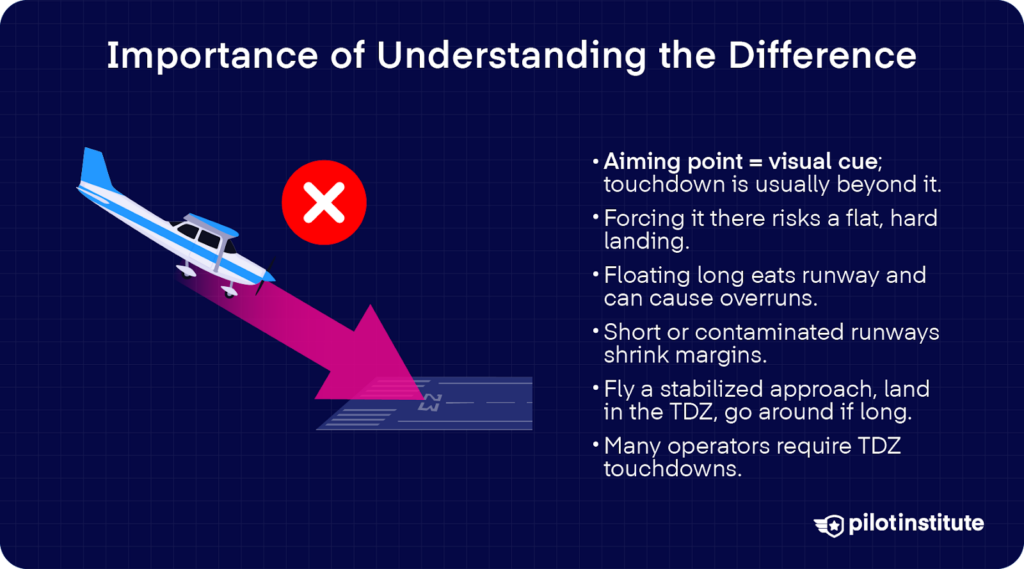
Safety Implications
Confusing the aiming point with the touchdown point can create serious risks.
If you force the aircraft down on the aiming point itself, you could touch down too early, possibly before the runway surface even begins. Even if you do land on the runway, it’s likely to be a hard landing since you’re coming in with little to no flare to hit the aiming point.
Alternatively, if you float well past your intended touchdown point, you eat into the runway that remains for rollout. Many runway overruns start this way. The pilot makes a late touchdown that leaves too little room to stop.
Landing Performance and Efficiency
Landing performance becomes especially critical on short runways, where every foot of pavement matters.
Another tricky situation is when the runway is contaminated. Ice, snow, or standing water will reduce braking action.
In these situations, even being a few hundred feet late can mean the difference between stopping safely and running out of room.
Regulatory and Training Considerations
The good news is that pilot testing standards require pilots to demonstrate accurate, stabilized landings. That means establishing a glide path to a defined aiming point and then touching down inside the touchdown zone.
Instructors are trained to emphasize the importance of selecting appropriate aiming and touchdown points depending on the aircraft type, the kind of landing being performed, and the conditions at the time.
Airlines and many training organizations often have strict policies that require touchdowns inside the zone, with a go-around mandated if the aircraft floats beyond it.
Common Misconceptions and Errors
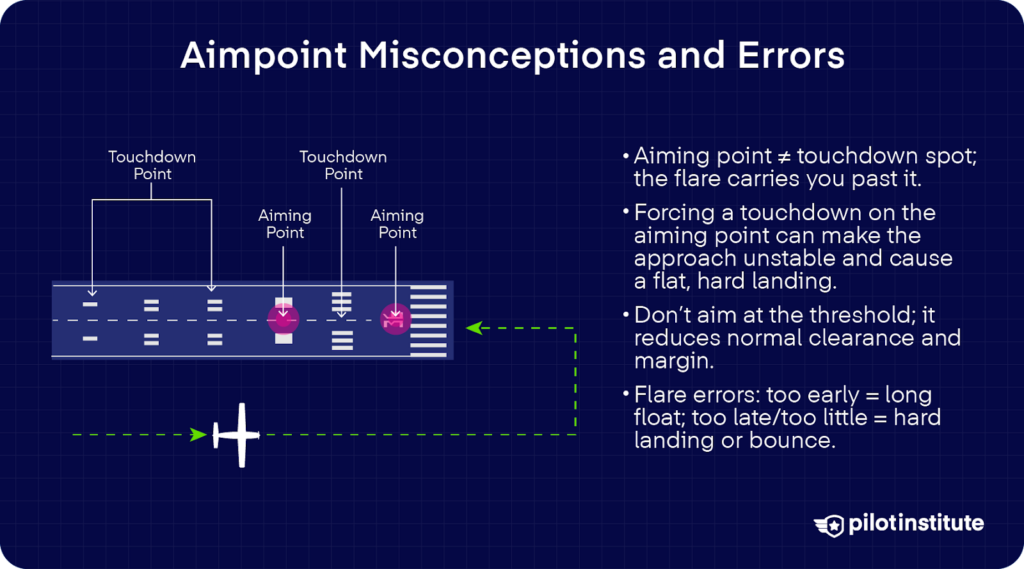
Mistaking the Aiming Point for the Touchdown Point
One of the most common mistakes students make is assuming the aiming point is where the wheels must touch.
Trying to force the aircraft onto that spot leads to problems.
The approach often becomes unstable as you chase a touchdown on the aiming point. And by cutting the flare short, you risk a flat, hard landing.
Overemphasizing the Runway Threshold
Another frequent error is using the runway threshold as the aiming point.
It looks tempting. The numbers are right in front of you, and putting the wheels down on them feels precise.
But the threshold isn’t meant to be a target. Approaches flown this way leave very little margin for error and set you up for rushed or firm touchdowns.
Inadequate Flare Technique
Mistakes in the flare create their own set of problems.
Starting the flare too early often leads to excessive float, which pushes the touchdown point far beyond where you planned.
Starting too late or not pulling back enough can result in a hard landing, a bounce, or even damage to the aircraft.
Practical Tips for Pilots
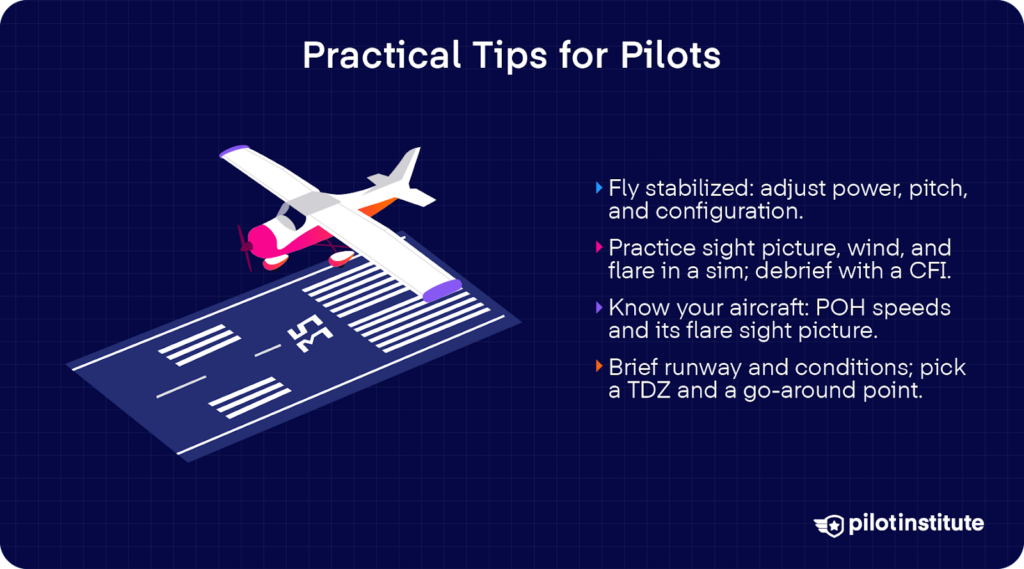
Training and Practice
A good landing isn’t about going through a memorized checklist of steps. It’s about reading what the aircraft does on each approach and adjusting power, attitude, and configuration in real time.
That’s why instructors encourage learners to think about why an approach is stable or unstable, not just “what to do next.”
Flight simulators are useful here. They let you practice sight pictures, wind effects, and flare timing in a low-pressure environment.
But the real benefit comes in the aircraft with an instructor who can give immediate feedback and help you recognize the small corrections that keep an approach stable.
Adapting to Different Aircraft
Every aircraft has its own flare and sight picture. The geometry of the cockpit windows, the position of the pilot’s eyes relative to the landing gear, and the overall handling in the flare all change from one type to another. That means you can’t simply carry over the same visual cues from one aircraft to the next.
Larger or higher-performance aircraft may also require adjustments in when you begin the flare and how much forward travel to expect before touchdown.
The aircraft’s operating manual is the best source for these details, as it provides recommended speeds and techniques tailored to each model.
Briefing and Preparation
Good landings start before the aircraft is on final. A thorough briefing helps you know what to expect. Knowing the runway length, slope, and available markings reduces the chance of an unwelcome surprise at short final.
Environmental conditions also play a role. Wind, weather, and NOTAMs can all change how the approach feels or how much runway you’ll need. Being aware of those factors ahead of time helps you adjust expectations instead of being surprised at the flare.
Conclusion
Every landing is an opportunity to practice.
Use each to refine your sight picture, confirm your aim, and notice where the aircraft really touches down.