
-
Key Takeaways
-
What Are RNAV Approaches?
- How Does RNAV Work?
- Why Do Airports Need RNAV Approaches?
-
Types of RNAV (GPS) Approaches
- Type of Guidance
- Approach Minimums
- LPV Approach
- LNAV Approach
- LP Approach
- LNAV/VNAV Approach
- RNP Approach
-
How to Perform an RNAV Approach
- Briefing the Approach
- Programming Your GPS
- Flying the Approach
- Completing the Landing
-
RNAV Approaches vs. Traditional Approaches
- RNAV’s Benefits for Airports
- RNAV’s Benefits for Pilots
- Benefits of Traditional Approaches
-
Conclusion
Interested in getting your instrument rating? Well, one important thing you’ll need to know is RNAV approaches.
These approaches use GPS to help you land and offer more flexibility than traditional systems like ILS. They don’t need ground-based navigation aids, making them especially useful at smaller or remote locations.
In this guide, you’ll learn how RNAV approaches work, the different types available, and tips to make them feel natural and straightforward.
Ready to simplify RNAV? Let’s get to it!
Key Takeaways
- RNAV uses GPS waypoints for direct routes, no beacons needed.
- Types include LPV, LNAV, LP, LP+V, LNAV/VNAV, and RNP.
- Precision systems allow lower minima for safer landings.
- RNAV improves access and efficiency, with beacons as backups.
What Are RNAV Approaches?
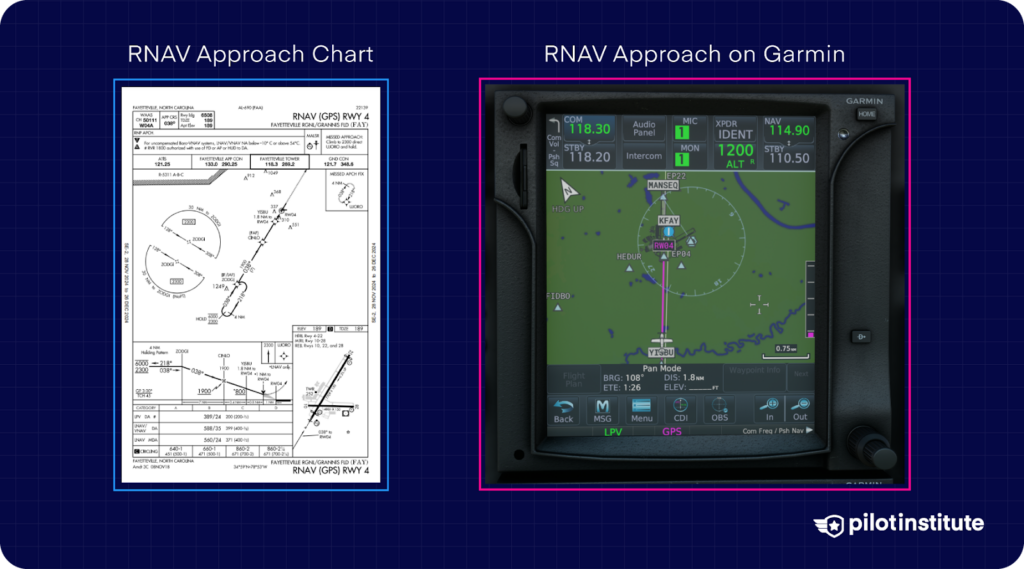
Area Navigation (RNAV) is a way for pilots to know where they’re going without needing help from the ground. They use modern satellite navigation, like the GPS in your phone or car, instead of old-fashioned radios.
Before RNAV, pilots had to rely on radios (NAVAIDs) and antennas on the ground such as VORs (Very High-Frequency Omnidirectional Range) and NDBs (Non-Directional Beacons).
These would guide them when they couldn’t see anything outside their airplane. But these systems had some problems, like not being able to work over water, or if there was something in the way of the transmitter and the aircraft’s receiver.
That’s because radio waves only travel in a straight line, so anything blocking them would make it hard for pilots to know where they were going.
Terrain, buildings, or the Earth’s curvature can block or weaken them. It’s kind of like trying to talk to someone, but there is a wall between you and the other person.
So, RNAV is a better way for pilots to get around safely!
How Does RNAV Work?
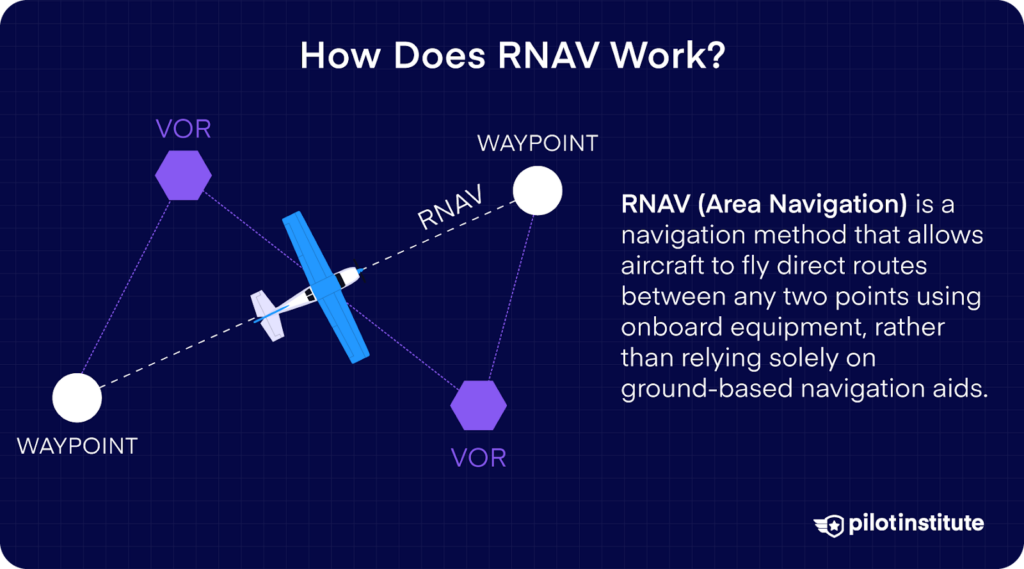
RNAV uses GPS to guide you with waypoints instead of physical beacons.
What are waypoints?
Well, waypoints are simply named coordinates based on latitude and longitude. They don’t exist physically, so they aren’t limited by issues with radio beacon locations.
Thanks to global satellite coverage, waypoints can be set anywhere – even over the ocean!
RNAV lets you use waypoints to fly a more direct route to your destination. You don’t need to zigzag your way between beacons anymore.
Why Do Airports Need RNAV Approaches?
RNAV approaches are now available at thousands of airports worldwide. They’re especially useful for airports that don’t have the budget or suitable terrain to install an Instrument Landing System (ILS).
This makes more airports accessible under Instrument Flight Rules (IFR). Otherwise, the airport would have to suspend flight operations in poor visibility.
Types of RNAV (GPS) Approaches
Now that you know what RNAV is, let’s look at the available RNAV approaches.
Each type of approach offers varying levels of guidance and precision. They’re designed to suit different aircraft capabilities and pilot requirements.
How do the approaches differ from each other?
Type of Guidance
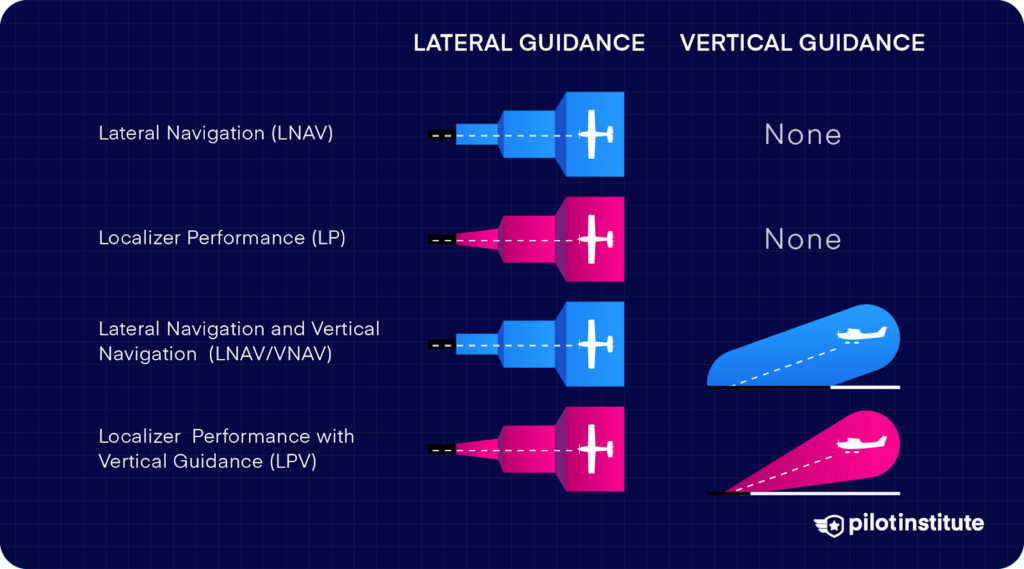
Instrument approaches offer two types of navigational guidance.
- Lateral guidance tells you to go left or right to align yourself with the runway.
- Vertical guidance lets you know you’re too high or too low on your approach path.
All instrument approaches provide lateral guidance. Some types add vertical guidance in addition to lateral guidance.
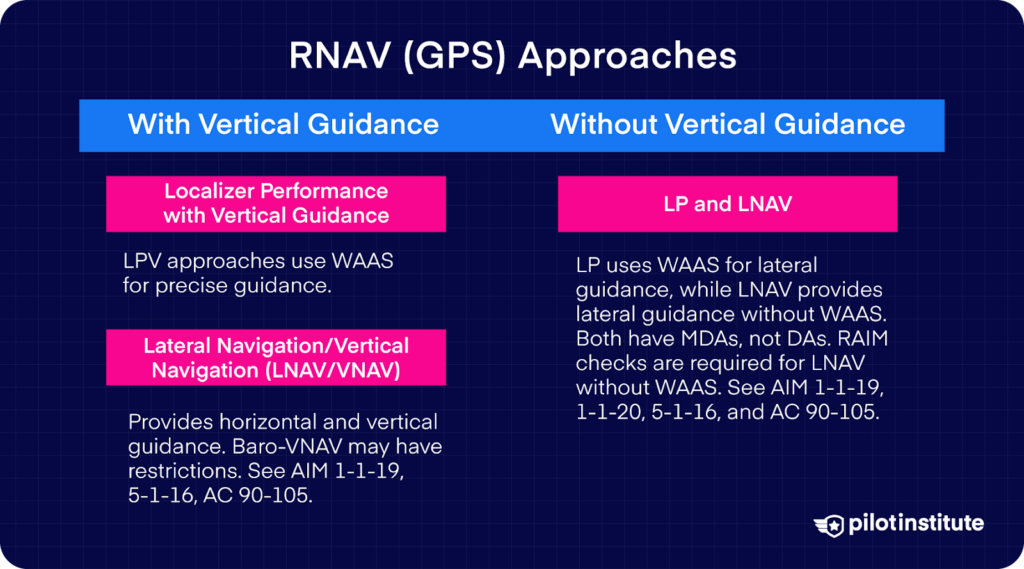
With Vertical Guidance
- Localizer Performance with Vertical Guidance (LPV)
LPV approaches use WAAS for precise guidance, mimicking ILS to aid pilot transitions. - Lateral Navigation/Vertical Navigation (LNAV/VNAV)
Provides horizontal and vertical guidance with DA minimums. Baro-VNAV may have restrictions. See AIM 1-1-19, 5-1-16, AC 90-105.
Without Vertical Guidance
- LP and LNAV
LP uses WAAS for lateral guidance, while LNAV provides lateral guidance without WAAS.
Both have MDAs, not DAs, and may share charts if LP offers lower minima. RAIM checks are required for LNAV without WAAS. See AIM 1-1-19, 1-1-20, 5-1-16, and AC 90-105.
Approach Minimums
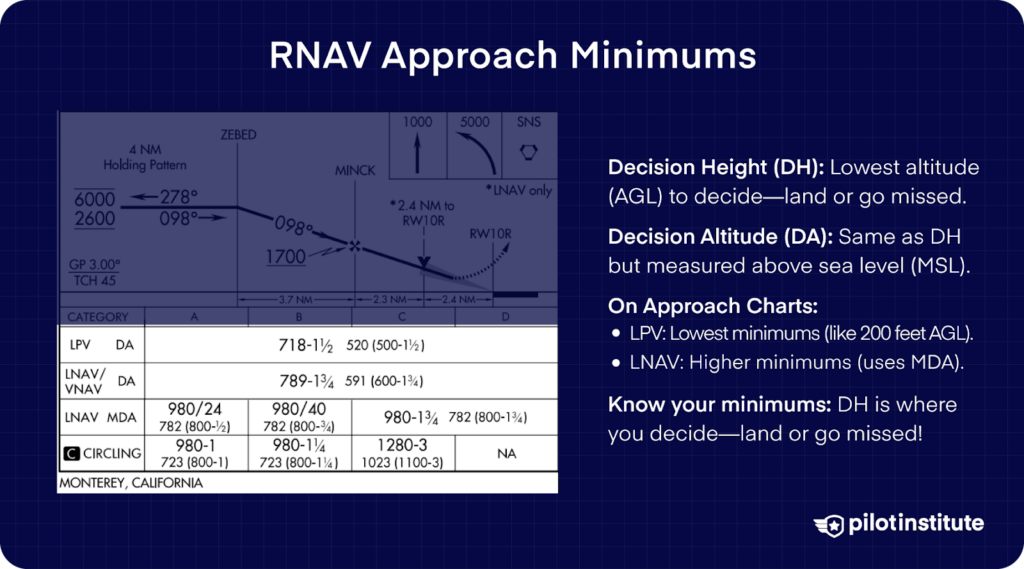
When you’re flying in bad weather and can’t see much, you can rely on your trusty instruments to guide you.
But at some point, you have to switch to looking outside to land the aircraft. So, when do you make that switch?
As you come down on an instrument approach, there’s a point called the decision height (DH). This is the lowest altitude you’re allowed to go while still using your instruments.
That’s why people often call it an “approach minimum.” At this point, you have to make a choice: land or go around.
Here’s how you decide:
- If you can see the runway (or certain lights or markers for the runway) when you reach the DH, you can keep going and land.
- If you can’t see anything, you must do a go-around and try again or go somewhere else.
On approach charts, you’ll usually see both the decision height (DH) and the decision altitude (DA). They’re pretty much the same thing, but here’s the difference:
- DH is measured above the ground (AGL).
- DA is measured above sea level (MSL).
So, just remember: DH is where you decide—can I land, or do I need to try again? Easy!
The image at the beginning of this section is an example of an RNAV approach plate for Monterey Regional, California. The minima table lists the DA and Height Above Threshold for each type of RNAV approach.
See how LNAV has the highest MDA, followed by LNAV/VNAV, with LPV showing the lowest DA.
Let’s look at each type of approach and see how it works.
LPV Approach
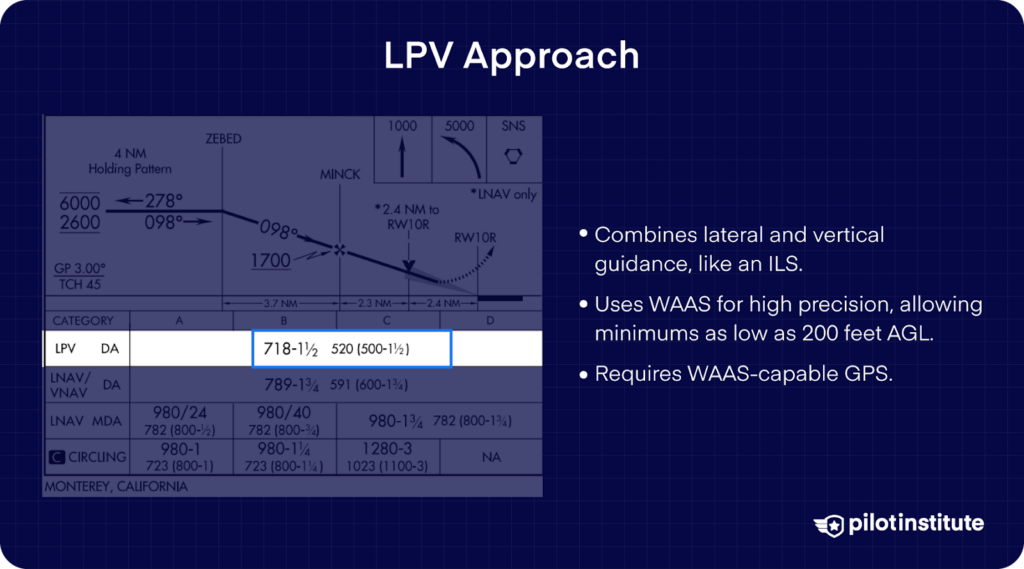
Let’s make this simple:
LPV stands for Localizer Performance with Vertical Guidance. It’s a type of approach that helps guide you side-to-side (lateral) and up-and-down (vertical), kind of like an ILS (Instrument Landing System).
LPV is the most accurate RNAV approach and can get you as low as 200 feet above the ground (AGL), just like an ILS Category I approach.
One cool thing about LPV is that your navigation gets more precise the closer you get to the runway—just like how an ILS works.
So, why is LPV so accurate? It’s not just regular GPS. LPV uses something called WAAS (Wide Area Augmentation System). WAAS fixes GPS errors and makes sure vertical guidance is super reliable. Here’s how it works:
- Ground stations watch the GPS signals for any errors.
- They calculate corrections and send those fixes to WAAS satellites.
- The satellites then send the corrected signals back to your airplane.
To fly an LPV approach, your aircraft needs a GPS receiver that’s WAAS-capable. If you’ve got that equipment, you’re set to take full advantage of LPV approaches!
LNAV Approach
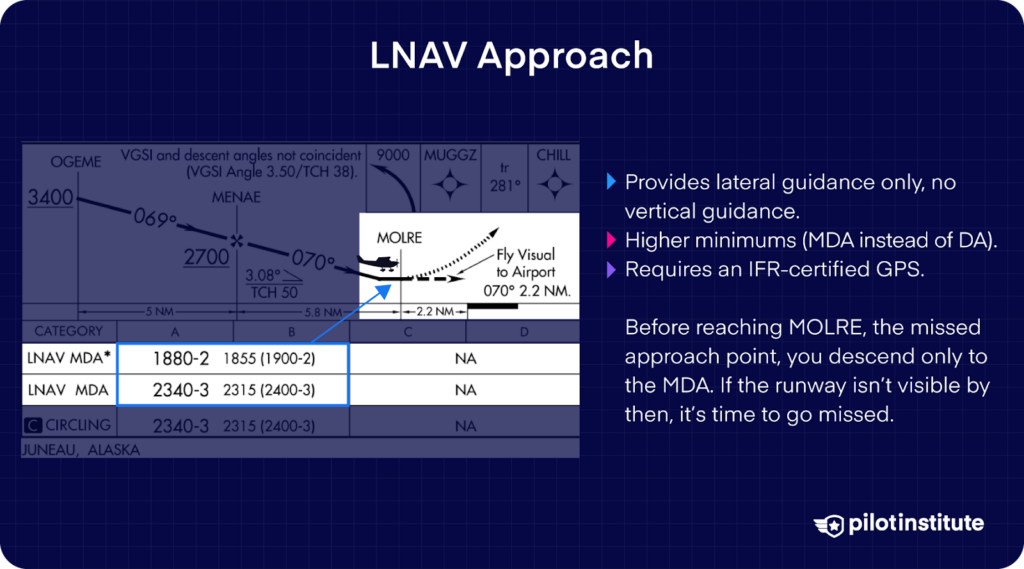
An LNAV (Lateral Navigation) approach helps guide you left and right toward the runway, but it doesn’t tell you how to control your descent. That’s up to you! You’ll lower your altitude step by step as you follow the approach.
When you look at your approach chart (also called an approach plate), you’ll see specific altitudes listed at different points, called fixes. These are like checkpoints for your altitude. As long as you stick to these, you’ll stay on track.
LNAV approaches are super common and don’t require any fancy equipment—just an IFR-certified GPS.
Since LNAV doesn’t include vertical guidance (no help with going up and down), its minimums are higher than something like an LPV approach.
Instead of a Decision Height (DH), you’ll use something called a Minimum Descent Altitude (MDA).
Here’s how it works with an MDA:
- Once you reach this altitude, you stay level until you hit the Missed Approach Point (MAP).
- At the MAP, if you can’t see the runway or certain visual markers, it’s time to go missed and follow the missed approach procedure.
The big difference between MDA and DH? A Decision Height is part of a smooth, continuous descent, while an MDA means stepping down and leveling off until you either land or go missed.
Easy, right?
The graphic at the beginning of this section shows an LNAV approach plate for Juneau, Alaska. You can see altitude restrictions marked for each waypoint.
Notice how the path flattens out before MOLRE, the missed approach point. You can only descend down to your MDA till that point. If you don’t see the runway before reaching MOLRE, you have to go missed.
LP Approach
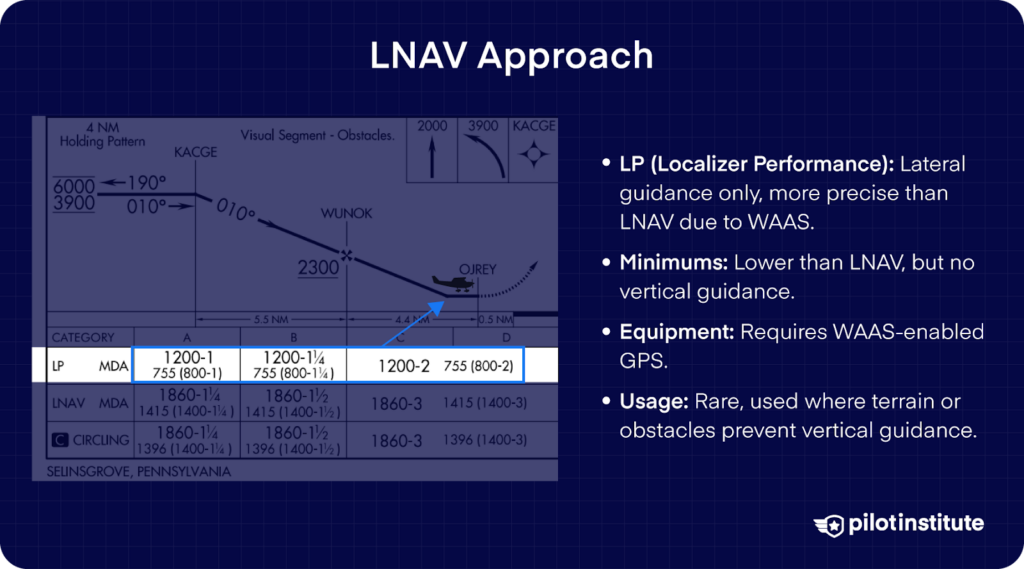
LP means Localizer Performance. These approaches use WAAS technology to provide highly accurate guidance. Unlike LPV, LP approaches only have lateral guidance available.
You use step-down altitudes at fixes here just like the LNAV method to manage your descent. The descent procedure is the same as before, come down to MDA before making the call to continue or go missed.
What’s the difference between LP and LNAV?
LP stands for Localizer Performance, and it’s more precise than LNAV because it uses WAAS (Wide Area Augmentation System). WAAS helps improve accuracy, which lowers the minimum altitude you can fly during an approach.
For example, at Penn Valley airport, airplanes using an LP approach can descend more than 600 feet lower than those using LNAV.
To fly an LP approach, your aircraft needs a WAAS-enabled GPS receiver. Without it, you’re limited to LNAV.
LP approaches are pretty rare. Why? Because the FAA usually tries to include vertical guidance (like LPV) when possible. But in some places, the terrain or obstacles make it hard to create a safe vertical path, so LP is used instead.
So, LP gives you better accuracy, but it doesn’t include vertical guidance like LPV. Make sense?
LP+V
Some GPS avionics systems show “LP+V” guidance on LP approaches. This is not LPV. The vertical guidance here is merely intended to be advisory.
It’s calculated by the avionics system and offered as a feature, but the FAA doesn’t officially recognize it. You won’t find any mention of LP+V on an approach plate.
LP+V approaches don’t always account for obstacle clearance, so they’re not an officially protected procedure. They’re only meant to keep the descent stable.
Don’t confuse it with LPV.
LNAV/VNAV Approach
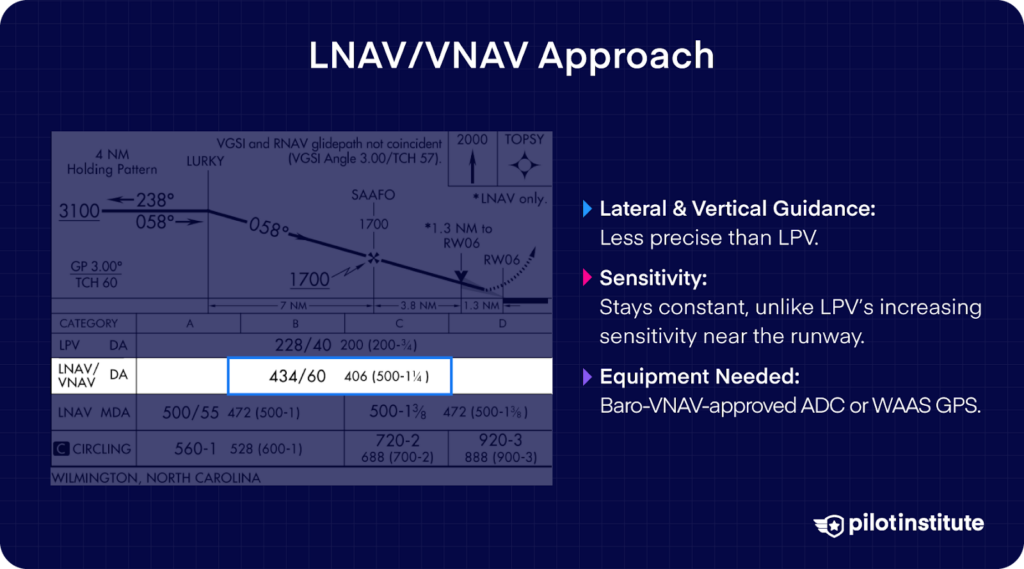
LNAV/VNAV stands for Lateral Navigation/Vertical Navigation. It helps guide you both side-to-side (lateral) and up-and-down (vertical), just like an LPV approach. But here’s the main difference: LNAV/VNAV isn’t as precise as LPV.
There’s another difference too. LPV works a lot like an ILS, getting more sensitive as you get closer to the runway. LNAV/VNAV doesn’t do that. Instead, it keeps the same sensitivity throughout the whole approach.
To fly an LNAV/VNAV approach, your airplane needs special equipment, like a baro-VNAV-approved Air Data Computer (ADC).
These systems are common in commercial airplanes, but they’re starting to appear in newer general aviation airplanes too. With this setup, the system creates a glideslope (a smooth descent path) that you can follow.
Of course, there’s always a downside: barometric VNAV can be less accurate in extreme hot or cold temperatures. That’s why some approach plates don’t allow LNAV/VNAV when the weather is too extreme. If your aircraft has a WAAS-capable GPS, though, you can avoid this issue and still use LNAV/VNAV.
Think of LNAV/VNAV as the middle-ground between LPV (super accurate with vertical guidance) and LNAV (no vertical guidance). It’s a great option when LPV isn’t available!
RNP Approach
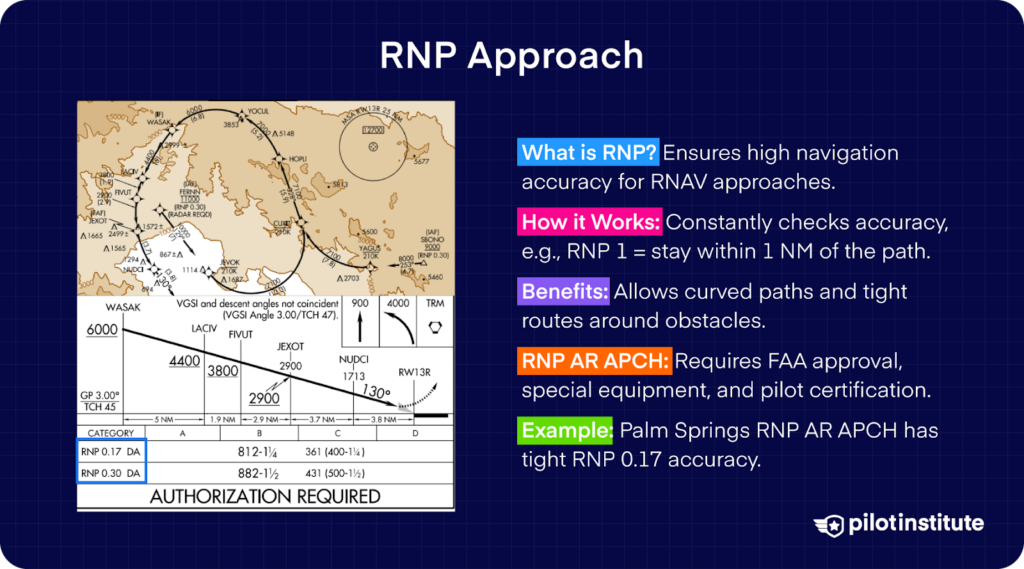
RNP stands for Required Navigation Performance. It’s not a way to navigate but a system that makes sure your RNAV approaches are super accurate.
Here’s how it works:
RNP means your airplane’s navigation system constantly checks how accurate it is.
For example, if you’re flying an approach labeled RNP 1, your aircraft has to stay within 1 nautical mile of its path 95% of the time. If it drifts off, the system will alert you to fix it.
This high accuracy lets pilots fly more complicated routes, like curved paths around mountains or obstacles, that wouldn’t be possible with older systems.
Most RNP approaches (RNP APCH) start with RNP 1 accuracy and get even tighter as you get closer to the runway—down to RNP 0.3 on the final approach.
Some approaches require even stricter accuracy. These are called RNP Authorization Required Approaches (RNP AR APCH). To fly these, the FAA needs to approve both your airplane and your training. You’ll need special equipment and extra pilot certifications for these kinds of approaches.
Think of RNP as a way to make sure you’re staying on track so you can fly safely even in tough spots!
The graphic at the start of this section is for an RNP AR APCH at Palm Springs, California.
Notice the shape of the approach path and the RNP going all the way down to 0.17. The all-caps ‘Authorization Required’ message makes it clear that this approach isn’t meant for just anyone.
How to Perform an RNAV Approach
Ready to tackle an RNAV approach? Let’s walk through the process step by step.
Briefing the Approach
Before you start an approach, brief it—this means go over all the details ahead of time. You won’t have time to read everything on the chart while flying, so this step is super important.
Here’s how to brief an approach:
- Pull out the chart and study it. Take a good look at all the information on the approach plate.
- Know your waypoints. These are the spots you’ll fly over, in order. Make sure you understand any altitude restrictions for each one.
- Check your minimums. Look for the Minimum Descent Altitude (MDA) or Decision Altitude (DA). This tells you how low you can go before deciding to land or go around.
- Learn the missed approach procedure. Know what to do if you can’t land, like how to climb, where to turn, and any holding patterns.
- Watch for special instructions. Some approaches have extra notes, like needing specific equipment or sticking to certain speeds.
Taking a few minutes to review this before you fly makes your approach better!
Programming Your GPS
After you’ve briefed the approach, it’s time to program your GPS. Here’s how to set up an RNAV approach step by step:
- Pick the airport. Enter the airport’s FAA or ICAO code into your GPS or Flight Management System (FMS).
- Choose the approach. Select the RNAV approach for the runway you’re planning to land on.
- Check your waypoints. Cross-check every waypoint and altitude on your GPS against the approach chart to make sure they match.
- Add your minimums. If your system allows it, input the Minimum Descent Altitude (MDA) or Decision Altitude (DA).
- Activate the approach. Make sure your GPS sequences through the waypoints in the correct order.
Double-check everything! Even a tiny mistake in the data can cause big problems later.
If you’re flying in a two-pilot crew, one pilot enters the information, and the other checks it. If you’re flying solo, it’s best to program the GPS as soon as you know which approach you’ll be flying.
Doing all of this early gives you more time to focus and avoid errors.
Flying the Approach
Now, it’s time to fly the approach! Here’s how to keep everything under control:
- Stay on course. Use your GPS and primary flight display to track your flight path. Check the moving map and the course deviation indicator (CDI) to make sure you’re staying on track.
- Follow altitude restrictions. Stick to the altitudes listed for each waypoint. These keep you clear of obstacles and help you avoid any violations.
- Think ahead. Always stay one step ahead of the airplane. Plan for turns and altitude changes before you get to them. This makes your adjustments smooth and keeps things stress-free.
- Cross-check your instruments. Don’t rely only on the GPS. Use your altimeter, vertical speed indicator, and other instruments to double-check that you’re flying the approach correctly.
- Fix small mistakes fast. If you notice you’re drifting off course or altitude, correct it right away. Small problems can grow quickly if you ignore them.
- Know when to go missed. If you lose track of where you are or can’t stay on course, don’t hesitate to go missed and try again. It’s always better to be safe!
Small deviations can become significant if not corrected promptly. If you lose your bearings or can’t stay on course, don’t hesitate to abandon the approach.
Completing the Landing
As you approach the runway, you’ll need to transition to landing:
- Crossing the Final Approach Fix (FAF): This is your last waypoint before the runway. Ensure you’re properly configured for landing. Check gear down and flaps set. Verify correct airspeed and a stable approach.
- Approaching minimums (DA or MDA): At this point, decide if you have the required visual references to continue.
- If Yes: Continue the approach.
- If No: Execute the missed approach procedure without hesitation.
Remember, you’re allowed to fly level at the MDA until reaching the MAP.
- As you gain visual contact, shift your focus from the instruments to the runway environment. Align yourself properly and adjust for any wind conditions.
RNAV Approaches vs. Traditional Approaches
RNAV’s Benefits for Airports
RNAV approaches are becoming super popular! In the U.S., there are over 4,100 LPV approaches at more than 2,000 airports—that’s double the number of ILS glideslopes out there! The FAA keeps adding more every year.
Airports love RNAV because it saves them money. Instead of installing and maintaining expensive navigation beacons, they can rely on satellite-based systems.
This is helpful for small or remote airports, which can now be used even in bad weather. It’s not just great for flying in and out of these airports; it also gives pilots more options for alternate airports when planning their flights.
RNAV’s Benefits for Pilots
Pilots like RNAV for a lot of reasons!
- Easier to fly: RNAV approaches, like LPV, are reliable. The WAAS signal doesn’t have the sensitivity jumps you might experience with an ILS.
- No temperature worries: Unlike barometric altimeters, WAAS signals aren’t affected by extreme temperatures.
- More efficient routes: RNAV allows for direct paths and continuous descents, saving time and fuel. Plus, fewer delays help reduce air traffic congestion!
Benefits of Traditional Approaches
If RNAV is so great, why do we still use traditional systems?
Ground-based navigation is a reliable backup. If GPS fails due to things like solar storms, jamming, or satellite issues, pilots can still use traditional NAVAIDs to land safely.
Also, traditional systems are simple and familiar. Every instrument-rated pilot learns how to use them, and you don’t need fancy avionics to fly these approaches. They’re a solid option when you need them!
Conclusion
By now, you should have a solid grasp of how to choose between LPV for more precise vertical guidance or LNAV for lateral-only navigation.
Keep practicing these techniques until they feel second nature. The more you fly them, the easier they become.
With RNAV approaches as one of your piloting skills, you’ll traverse the skies with more freedom and flexibility.
For a lot of pilots who earn their instrument rating, they discover that it brings them a sense of calmness and improves their skills as a pilot. If you’d like to improve your IFR knowledge, consider our Instrument Rating Made Easy course for a straightforward and enjoyable way to learn aviation.