-
Key Takeaways
-
METAR vs TAF: What’s the Difference?
- Learn About TAFs and METARs from Our "Your Flight Controls" Podcast
-
How To Read a METAR Weather Report
- 1. Type of Report (METAR)
- 2. Station Identifier (KLAX)
- 3. Date and Time of Report (180845Z)
- 4. Wind Speed and Direction (19004G10KT)
- 5. Visibility (10SM)
- 6. Present Weather (SHRA)
- 7. Clouds (FEW018 SCT028 OVC040)
- 8. Temperature and Dew Point (18/02)
- 9. Altimeter Pressure (A2990)
- 10. Remarks (RMK RAE10 P0000 T01920101)
-
How To Read a TAF Weather Forecast
- Example TAF:
- Decoded TAF:
-
Conclusion
Last Updated:
With the rise in the prevalence of drone flight, drone pilots are now at a stage where they are expected to operate within long-established aviation standards.
Part of these standards is understanding how weather conditions can affect the flight performance of their drones. To this end, drone pilots are expected to understand weather forecasts in the form of METAR and TAF reports.
Just those two terms may have already befuddled some people because METAR and TAF codes are far from how we are normally accustomed to reading weather reports.
To help out beginner drone pilots, here is our easy-to-under guide to reading METAR and TAF.
Key Takeaways
- METAR and TAF provide vital weather info for pilots.
- METAR shows current conditions; TAF gives 24-30 hour forecasts.
- Decoding these reports requires understanding aviation codes.
- Interpreting them ensures safer, FAA-compliant flights.

Start with the Right Study Plan
Use the sheet as your roadmap, then reinforce with lessons and quizzes.
- Fits any ground school.
- Find weak spots.
- Test-day essentials.
- Extra resources.
METAR vs TAF: What’s the Difference?
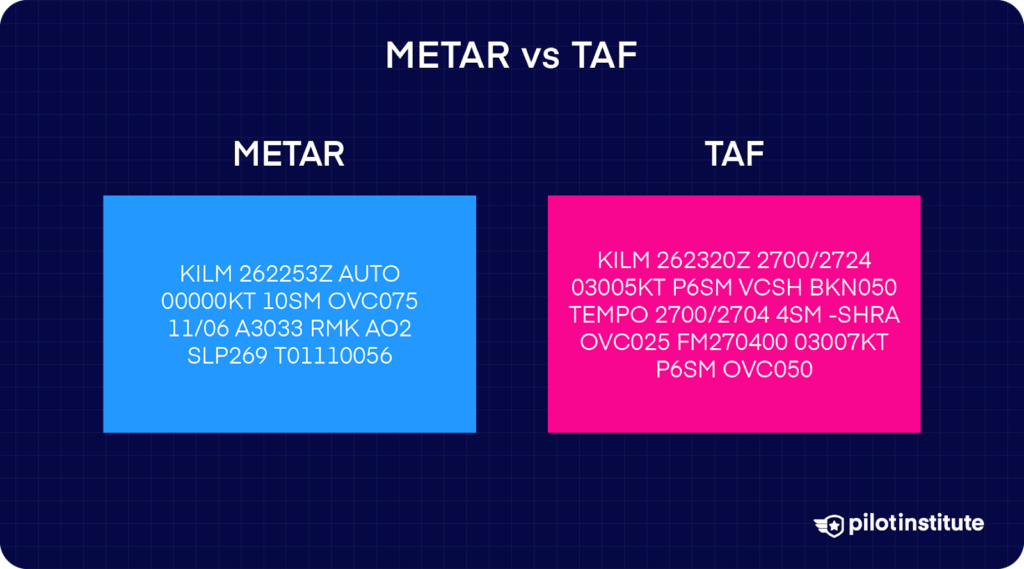
Both METAR and TAF pertain to the weather, specifically as they pertain to the flight of aircraft.
Another thing that is common to them is the fact that they are highly abbreviated, making them quick to transmit but difficult to interpret for a layperson without using an interpretation tool. They also use very similar abbreviations and definitions.
However, why is there a need for distinction, and how are the two different?
METAR stands for Meteorological Aerodrome Report. The format of METAR reports is standardized by the International Civil Aviation Organization (ICAO) globally.
The U.S. deviates slightly, using statute miles for visibility, feet for RVR, knots for wind speed, and inches of mercury for altimetry, while reporting temperature and dew point in Celsius. The U.S. also reports prevailing visibility rather than the lowest sector visibility.
A METAR report contains information on the current weather conditions of the facility releasing the report. It is released according to a regular schedule unless sudden or exceptional weather changes occur.
TAF stands for Terminal Aerodrome Forecast. It is a report released by large airports that summarizes the weather forecast for the area covered by five statute miles from the location of the airport.
A TAF report is valid for 24 to 30-hour time periods and is typically updated four times a day.
Thus, the distinction is quite clear – a METAR pertains to current weather conditions, while a TAF pertains forecasted weather for the next 24 to 30 hours.
Learn About TAFs and METARs from Our “Your Flight Controls” Podcast
How To Read a METAR Weather Report
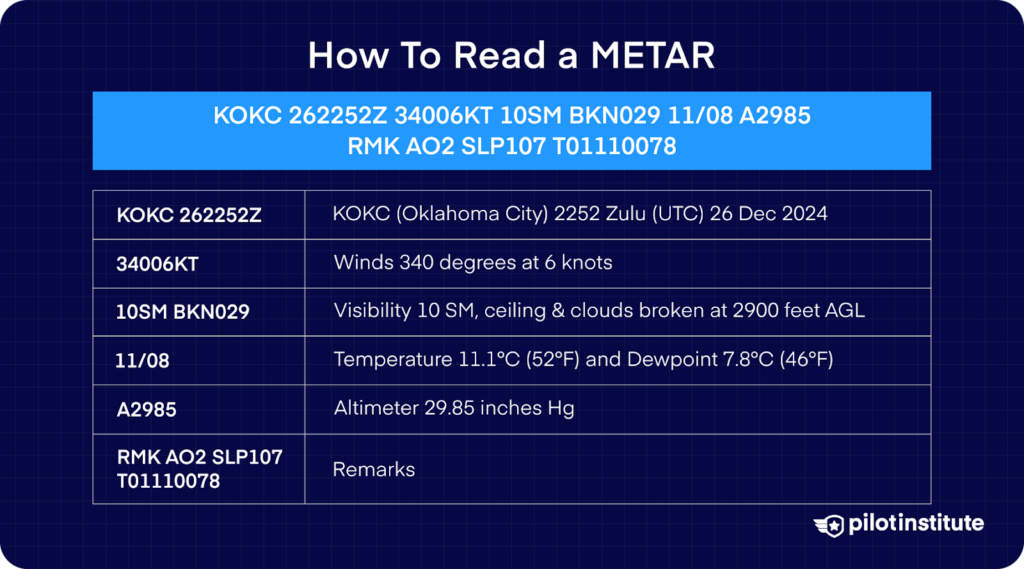
As we’ve mentioned, both METAR and TAF are comprised of highly abbreviated codes for which you’ll likely need a decoding tool if you’re not used to them. To make the learning process easier, let’s start with a standard METAR transmission and break it down by parts:
METAR KLAX 180845Z COR 19004G10KT 10SM SHRA FEW018 SCT028 OVC040 18/02 A2990 RMK RAE10 P0000 T01920101
1. Type of Report (METAR)
The first code to look for should be the identifier for the report. In our example, the report is clearly identified by the METAR term. In the absence of any identified, you can also assume that a weather report is transmitted in the METAR format.
While METAR reports are released regularly (usually hourly), unusual or rapidly changing weather conditions can warrant the transmittal of unscheduled reports. These can be identified by the SPECI tag at the start of the report.
2. Station Identifier (KLAX)
The next part of a METAR report identified the station from which the report has been issued. In our example, the report has been transmitted by the Los Angeles International Airport as indicated by the KLAX code.
Each airport has a unique identified code and the list of standard identifiers is maintained by the World Meteorological Organization (WMO).
While memorizing all the codes for all the airports in the US is next to impossible, it should be enough to know the codes for all the airports near where you usually fly your drone so that you’ll know which METARs to pay attention to.
3. Date and Time of Report (180845Z)
The third part of a METAR report indicates the date and time when it was issued. For our example, the first two numbers say that the report was released on the 18th of the month (18).
The next four numbers pertain to the time – 08:45 in the morning (0845). The Z suffix means that the time is indicated in Zulu, or Greenwich Mean Time. Converting it to the local time zone is up to you.
4. Wind Speed and Direction (19004G10KT)
The next term describes wind speed and direction. The direction is indicated by the first three numbers. For example, “190” means the wind is blowing from 190° on the compass (true north, not magnetic).
All the numbers after the wind direction tell us about the wind speed. In our case, the first two numbers are saying that the wind is blowing at a speed of 4 knots. However, the inclusion of ‘G10’ means that there are gusts blowing at the highest speed of 10 knots. The gust factor may not always be present in a METAR report.
5. Visibility (10SM)
In U.S. METARs, visibility is measured and reported in statute miles (SM) as observed from the ground. Elsewhere, visibility is typically reported in meters.
In our case, the current visibility is 10 statute miles. It’s also possible to report this information in fractions of a mile. For instance, visibility of 2.5 statute miles will be reported as 2 1/2SM.
6. Present Weather (SHRA)
Understanding the present weather conditions from a METAR will require knowledge of a lot of codes for descriptors and intensity indicators. These are described below:
| Intensity | Descriptor | Precipitation | Obscuration |
| (-) Light (No prefix) Moderate (+) Heavy | MI: Shallow BC: Patches DR: Low drifting BL: Blowing SH: Showers TS: Thunderstorm FZ: Freezing PR: Partial | DZ: Drizzle RA: Rain SN: Snow SG: Snow Grains IC: Ice crystals PL: Ice pellets GR: Hail GS: Small hail or Snow pellets UP: Unknown precipitation | BR: Mist FG: Fog FU: Smoke VA: Volcanic ash DU: Widespread dust SA: Sand HZ: Haze PY: Spray |
For our example, the SHRA term refers to moderate rain showers. As you can see from the table, some of the codes aren’t exactly intuitively related to their definitions.
7. Clouds (FEW018 SCT028 OVC040)
The next part of the METAR report can consist of several terms that will have to be interpreted together. These describe the condition of clouds, as well as the altitudes in which they occur.
Different cloud types can be found at different altitudes, thus the need for multiple descriptors.
The codes for cloud conditions are as follows:
| Code | Meaning |
| SKC (Manual report) or CLR (Automated report) | Clear |
| FEW | Few (1/8 to 1/4 of the sky covered) |
| SCT | Scattered (3/8 to 1/2 of the sky covered) |
| BKN | Broken (5/8 to 7/8 of the sky covered) |
| OVC | Overcast (Total sky coverage) |
Each of the codes is followed by a number that describes the altitude at which the clouds occur in terms of hundreds of feet. Describing this in detail, our example says that there are few clouds at 1800 feet (FEW018), scattered clouts at 2800 feet (SCT028), and overcast clouds at 4000 feet and above (OVC040).
8. Temperature and Dew Point (18/02)
The next part of the METAR indicates the actual measured temperature and the dew point temperature. While the actual temperature needs no explanation, the dew point temperature can be described simply as the temperature at which moisture starts to condense based on current humidity.
In our example, the measured temperature is 18 °C, and the dew point temperature is 2 °C. It’s also possible to report negative temperatures with an ‘M’ prefix. For example, a dew point temperature of -1 °C will be reported as (18/M01)
9. Altimeter Pressure (A2990)
The next part of the report indicates the local atmospheric pressure, measured in inches of mercury (inHg). Pilots use this value to adjust their altimeters, ensuring they display altitude as close to mean sea level (MSL) as possible.
10. Remarks (RMK RAE10 P0000 T01920101)
This part of the report contains information that the reporting station may seem relevant but does not fit into the standard parts of a METAR report.
It can be very long or may not exist at all. Examples of information included in remarks include the presence of localized precipitation, hourly temperature and dew point measurements, the onset of a thunderstorm, or any corrections made to previous reports.
Interpreting the remarks section can be tough, but it’s not as important as the rest of the information in the METAR.
The remarks section in our example contains a good deal of information. It says that the rain has ended 10 minutes past the hour (RAE10), there has been no precipitation within the hour (P0000) and that the hourly temperature and dew point has been measured to be 19.2 °C and 10.1 °C.
How To Read a TAF Weather Forecast
If you already understand how to read a METAR weather report, then reading a TAF forecast should be much easier. After all, they share a common language. The only adjustment you’ll need to make with a TAF report is recognizing that it can have different parts pertaining to different times of the day.
Example TAF:
TAF KNUW 2615/2715 13020G36KT 9999 VCSH SCT010 BKN030 OVC060 620509 560009 550909 QNH2916INS
Let’s break down this TAF to decode its meaning.
Decoded TAF:
| TAF for: | KNUW (Whidbey Island(NAS), WA, US) issued at 1512 UTC on 26 Dec 2024 |
| Text: | TAF KNUW 2615/2715 13020G36KT 9999 VCSH SCT010 BKN030 OVC060 620509 560009 550909 QNH2916INS |
| Forecast period: 2615/2715 | 1500 UTC 26 December 2024 to 1500 UTC 27 December 2024 |
| Forecast type: | FROM: standard forecast or significant change |
| Winds: 13020G36KT | From the SE (130 degrees) at 23 MPH (20 knots; 10.3 m/s) gusting to 41 MPH (36 knots; 18.5 m/s) |
| Visibility: 9999 | 6 or more sm (10+ km) |
| Weather: VCSH | VCSH (showers in the vicinity) |
| Clouds: SCT010 BKN030 OVC060 | Scattered clouds at 1000 feet AGL, broken clouds at 3000 feet AGL, overcast cloud deck at 6000 feet AGL |
| Ceiling: BKN030 | 3000 feet AGL |
| Icing: 620509 | Light rime in clouds from 5000 to 14000 feet AGL 1. The ice designator “6” follows the cloud group (620509). 2. The second digit is for icing type and intensity (620509). 3. The three following digits give the base of the icing layer in hundreds of feet (620509). 4. The fourth digit is the icing layer depth in thousands of feet (620509), so add this value to the base height to determine the top limit of the icing conditions. (5+9=14) |
| Turbulence: 560009 | (5 prefix) Severe in clear air, occassional from 0 to 9000 feet AGL |
| Turbulence: 550909 | (5 prefix) Moderate in cloud, frequent from 9000 to 18000 feet AGL |
| Altimeter Setting: QNH2916INS | QNH is the Altimeter setting that makes your altimeter read field elevation when on the ground. 2916INS is 29.16 inches of mercury (inHg). Most U.S. forecasts just write something like: A2916 |
Reading Turbulence Intensity
- 0 – None
- 1 – Light turbulence
- 2 – Moderate turbulence in clear air, occasional
- 3 – Moderate turbulence in clear air, frequent
- 4 – Moderate turbulence in cloud, occasional
- 5 – Moderate turbulence in cloud, frequent
- 6 – Severe turbulence in clear air, occasional
- 7 – Severe turbulence in clear air, frequent
- 8 – Severe turbulence in cloud, occasional
- 9 – Severe turbulence in cloud, frequent
- X – Extreme turbulence
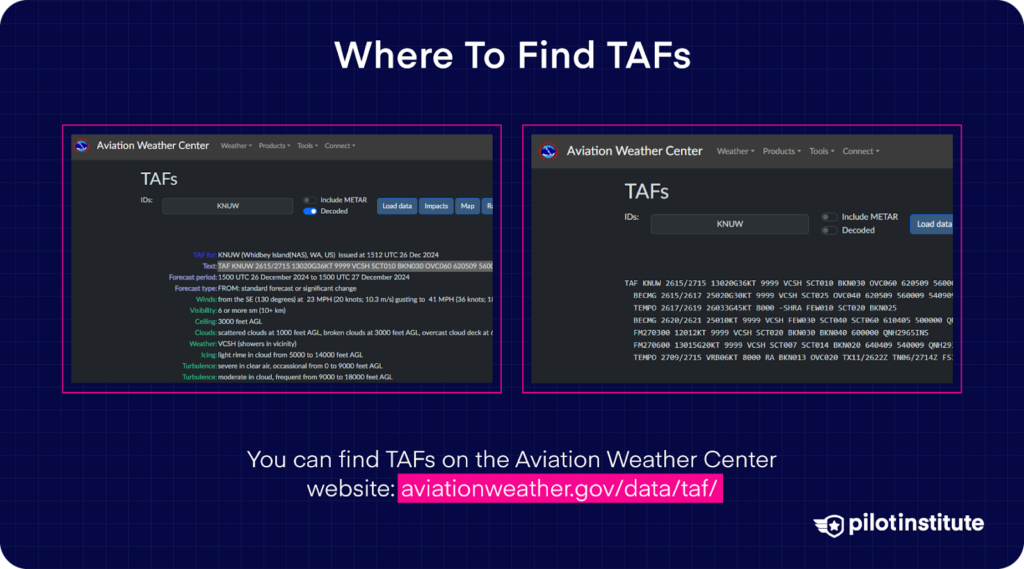
Now that you know how to read a TAF, try going to Aviation Weather Centers TAFs and reading a report for your local airport.
Conclusion
Understanding standard weather reports and forecasts is such an essential part of being a drone pilot that the FAA has included it in the topics to earn a professional drone pilot certification.
As legitimate participants in national airspace, this seems like a reasonable expectation that puts into consideration both your safety as a drone pilot and the people, property, and other aircraft in your surroundings.