-
Key Takeaways
-
Flying the Approach
- How to Improve Approach Path Control
- How to Improve Energy Management
-
Flying the Base Leg
-
Making the Base-To-Final Turn
-
How to Improve the Final Approach
-
How to Fly the Perfect Short Final
-
Managing the Flare and Touchdown
-
Performing the Rollout
-
Common Mistakes and How to Avoid Them
-
Tips and Exercises
-
Conclusion
Had a rough landing?
Even the best of pilots can mess up sometimes. But for new pilots, it can be tough to figure out where it all went wrong.
In this article, we’ll guide you through each phase of a landing step-by-step and give you suggestions for impressing your passengers with every touchdown.
Key Takeaways
- Start by setting up your approach correctly to ensure you arrive at the threshold perfectly every time.
- Perfect the approach phase by managing the aircraft’s energy and using references to improve positioning throughout the pattern.
- See how the wind affects the base leg and how you can compensate for it and safely execute the base-to-final turn.
- Learn to use aircraft references to establish a stable descent rate and pitch, ending up in a smooth roundout and flare.
- Watch out for some common mistakes, such as over-controlling and reacting incorrectly to visual cues.
Flying the Approach
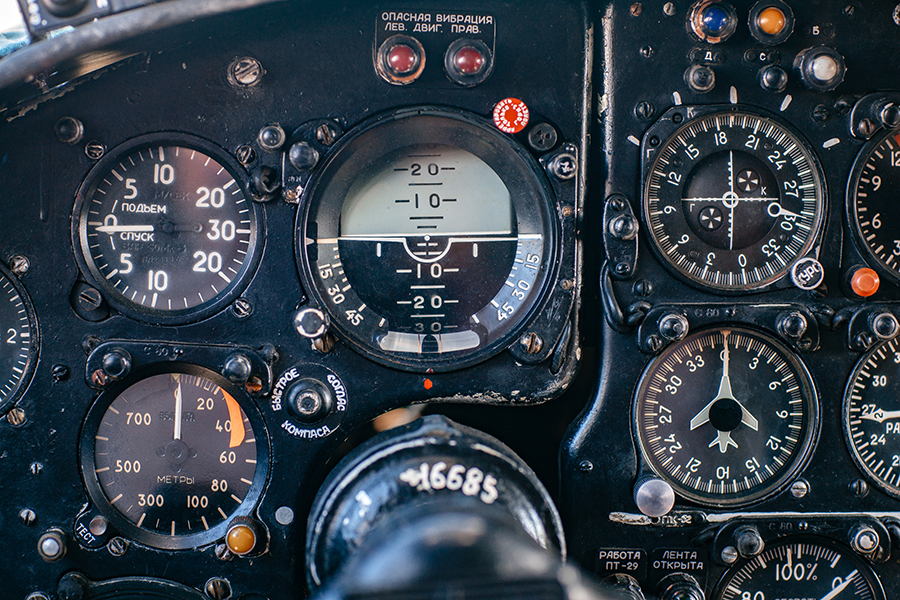
Haphazard approaches are very likely to lead to haphazard landings. You can only begin improving the touchdown if you’ve mastered positioning your aircraft above the runway threshold correctly. You should arrive at the threshold on the centerline at the proper height and speed each time. The easiest way to achieve this is by flying a stabilized approach.
So, what is a stabilized approach?
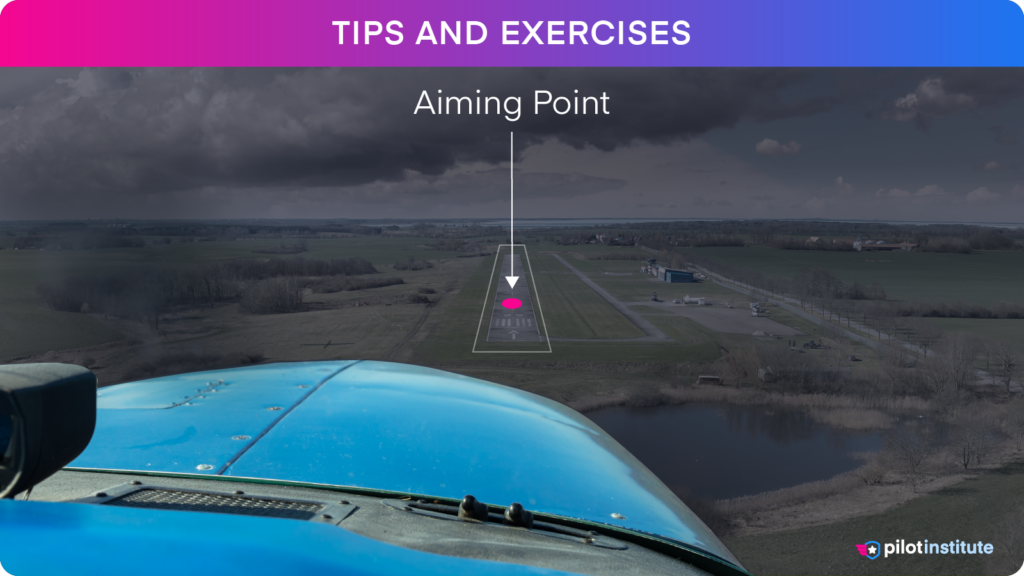
A stabilized approach requires the pilot to establish and maintain a constant angle glidepath towards an aiming point.
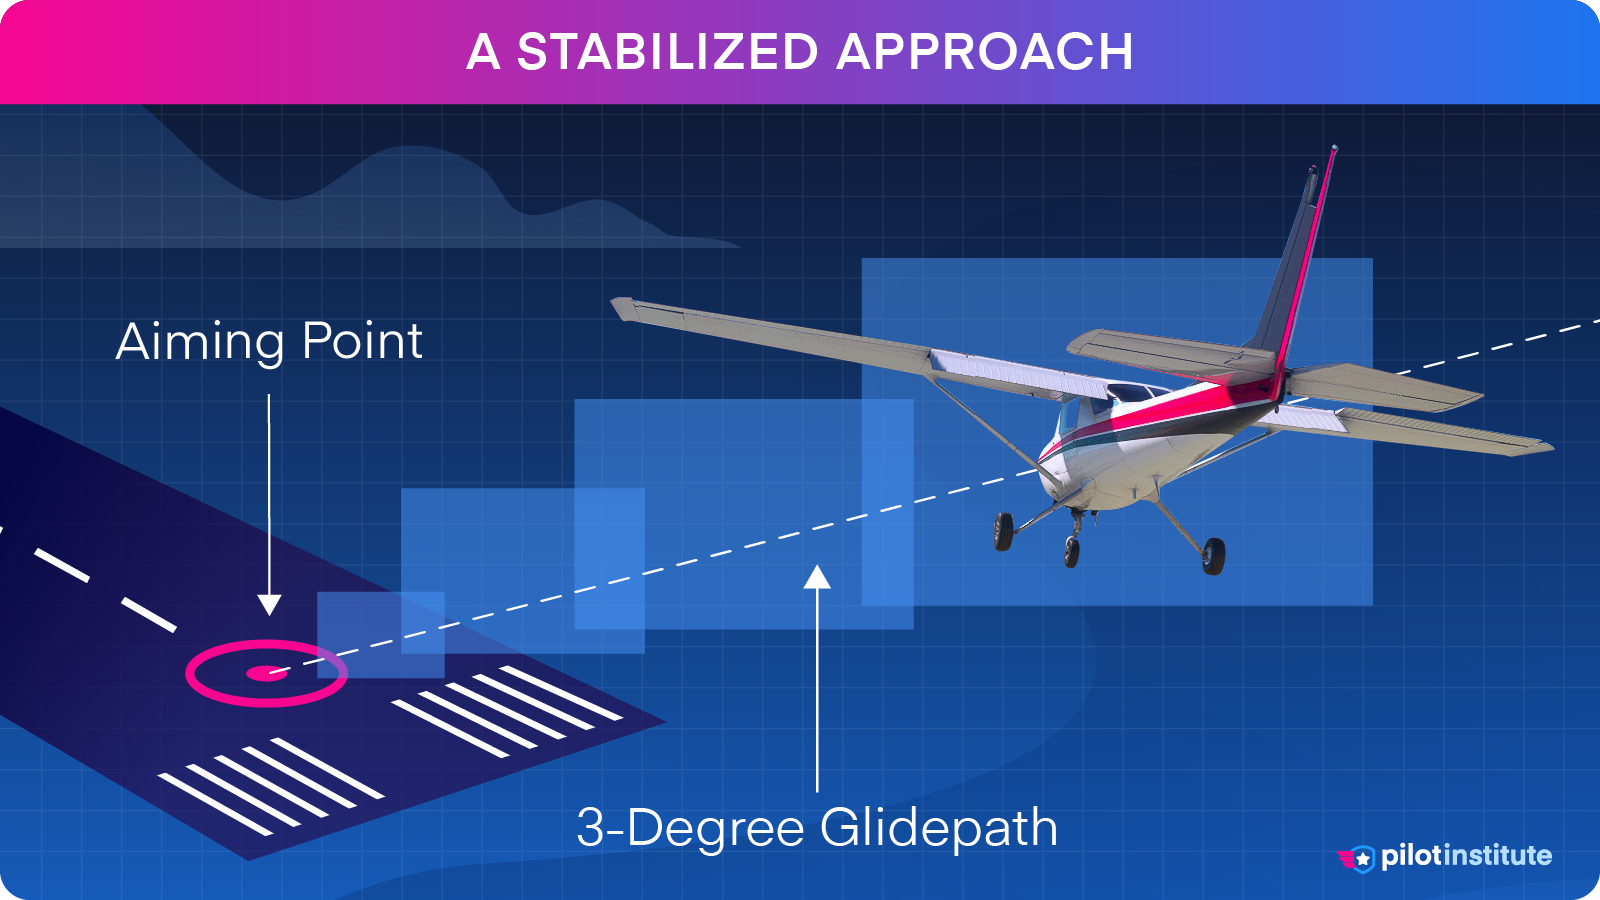
Most approaches use a 3:1 glidepath. That’s equivalent to a 3-degree glidepath. For every 3 nautical miles the aircraft flies forward, it should descend 1,000 feet.
According to the FAA, the probability of being unstable doubles the more you diverge from a 3:1 glidepath.
A quick way to estimate the correct descent rate for a 3-degree glidepath is to multiply your groundspeed by five.
Flying at 60 knots?
60 x 5 = 300 feet per minute is your recommended descent rate.
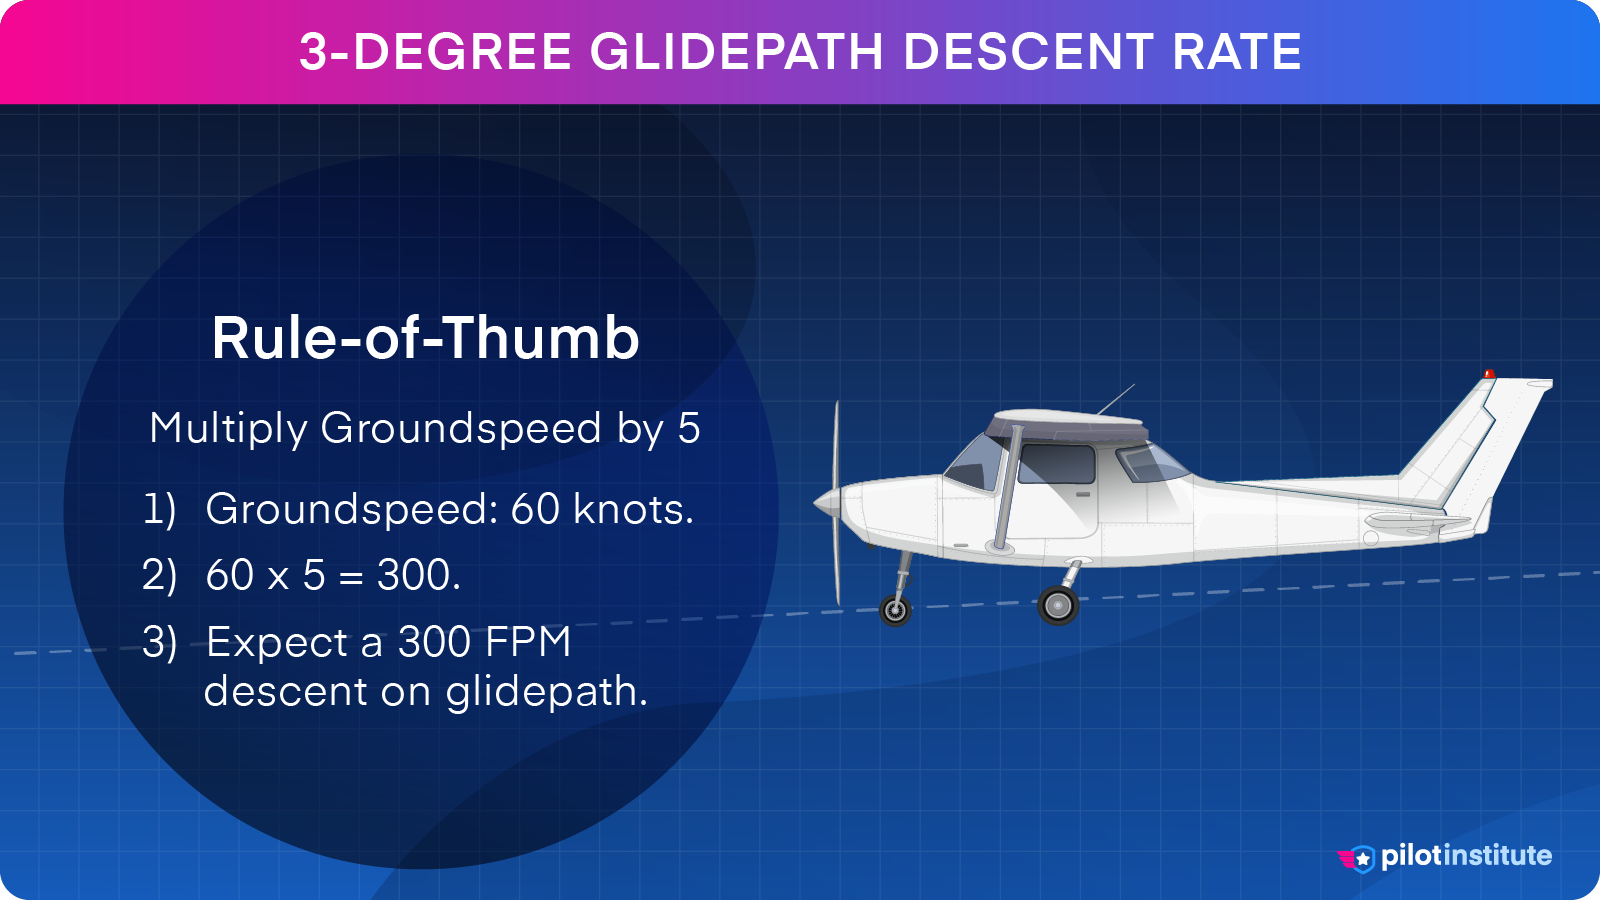
Of course, when an airport has a published glidepath available, follow that instead.
Two key aspects make good approaches.
- Approach Path Control
- Energy Management
How to Improve Approach Path Control
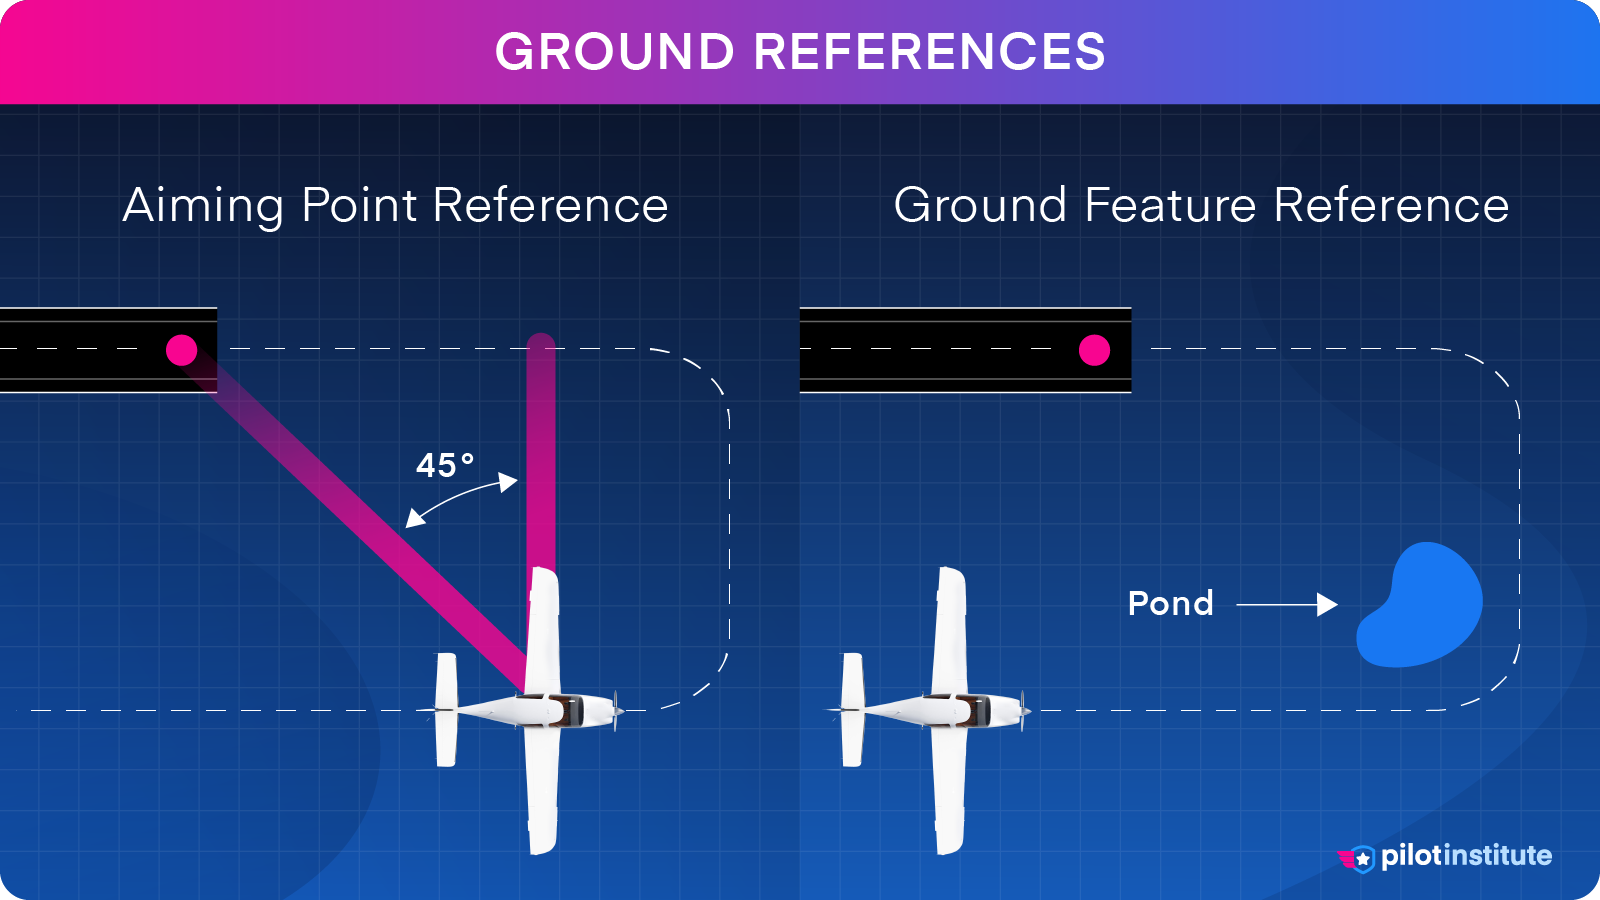
Using Ground References
Your pattern work will improve the more you standardize it. For example, if you’re at pattern altitude and airspeed, turn for the base leg when your touchdown point is at your eight o’clock. That puts it around 45 degrees behind the wing.
If you’re familiar with the airport, look at the surrounding environment to see if there’s a landmark you can use as a reference.
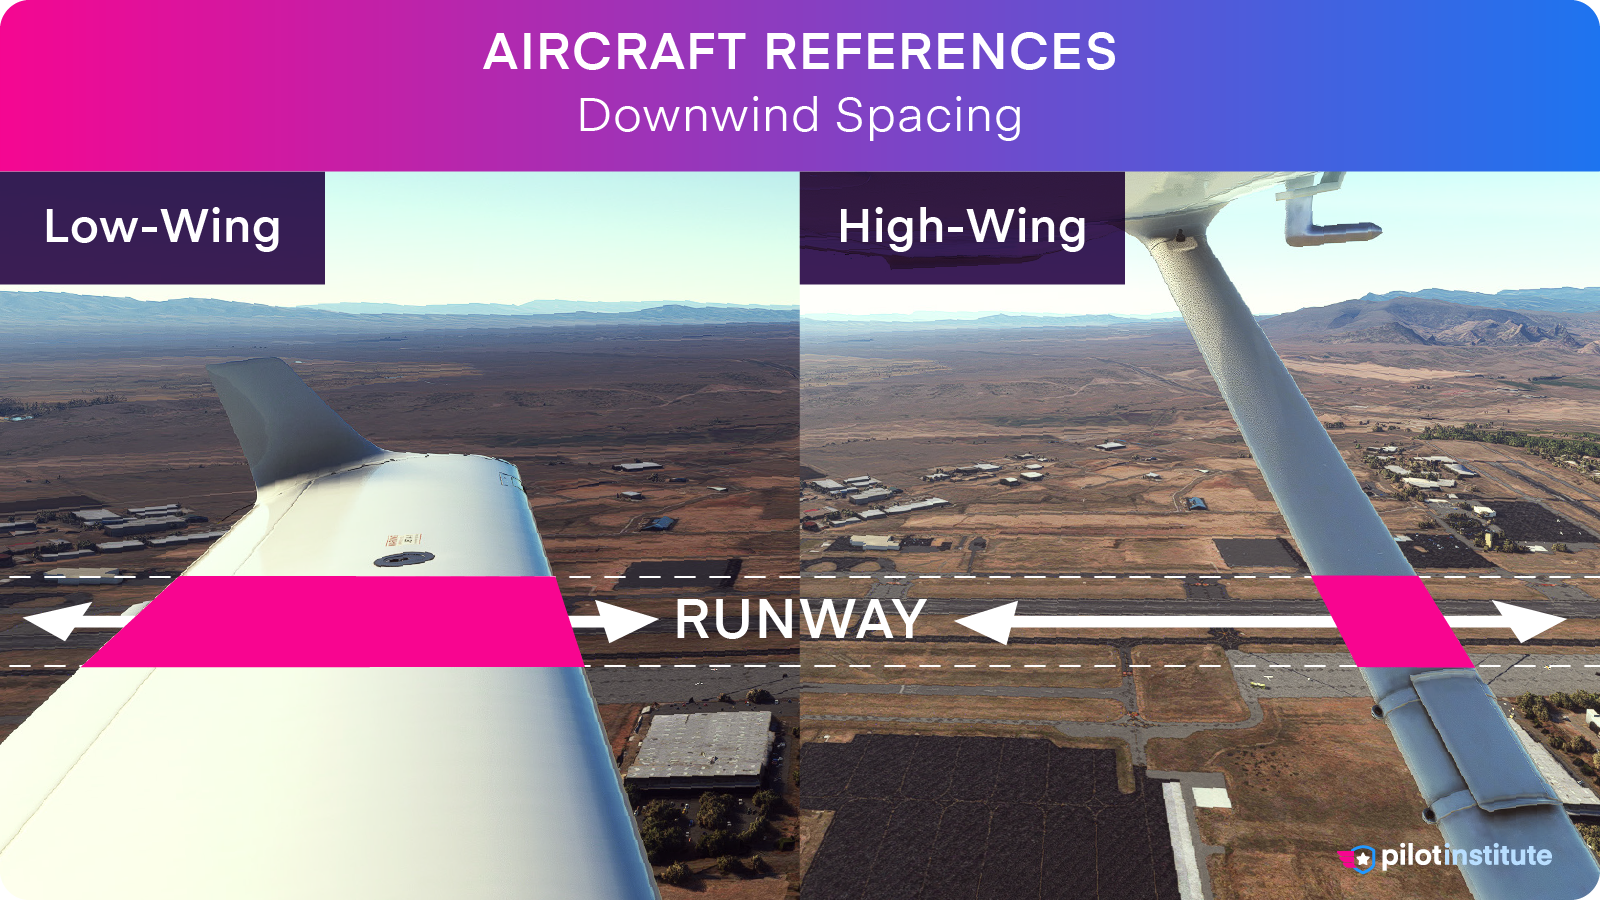
Using Aircraft References
References on the aircraft itself can help as well.
For example, if you fly a high-wing aircraft such as a Cessna 172, you can use the point where the runway cuts the wing strut as a reference. This lets you set the distance between the aircraft and the runway on the downwind leg.
You’ll have to determine the correct point for your particular airplane, but once you do, you can set up your downwind leg perfectly for any runway.
If you’re coming in on a straight-in approach, use the position of the runway in relation to the aircraft windshield to gauge your glidepath.
See if the runway appears to move relative to the windshield. If it does, you’re drifting away from your intended glidepath.
How to Improve Energy Management
Proper aircraft positioning will get you to the runway, but energy management will stick the landing. The target airspeed for the landing is called V-ref. Speeds at other points in the approach are expressed relative to Vref. For example, V-ref+10.
Your aircraft may have recommended V-ref speeds for different aircraft weights. You can find them in the Pilot Operating Handbook (POH) or the owner’s manual.
Pilots select their target airspeed for each approach. They may decide to increase it if the conditions demand it. For example, it’s good practice to add a few knots to V-ref when landing in gusty conditions.
If your target airspeed is too low, your margins to the stall speed narrow to unsafe levels. It’s recommended to maintain at least 1.3 times the aircraft’s stall speed on short final.
Conversely, if the airspeed is too high, you risk floating and consequently landing too long.
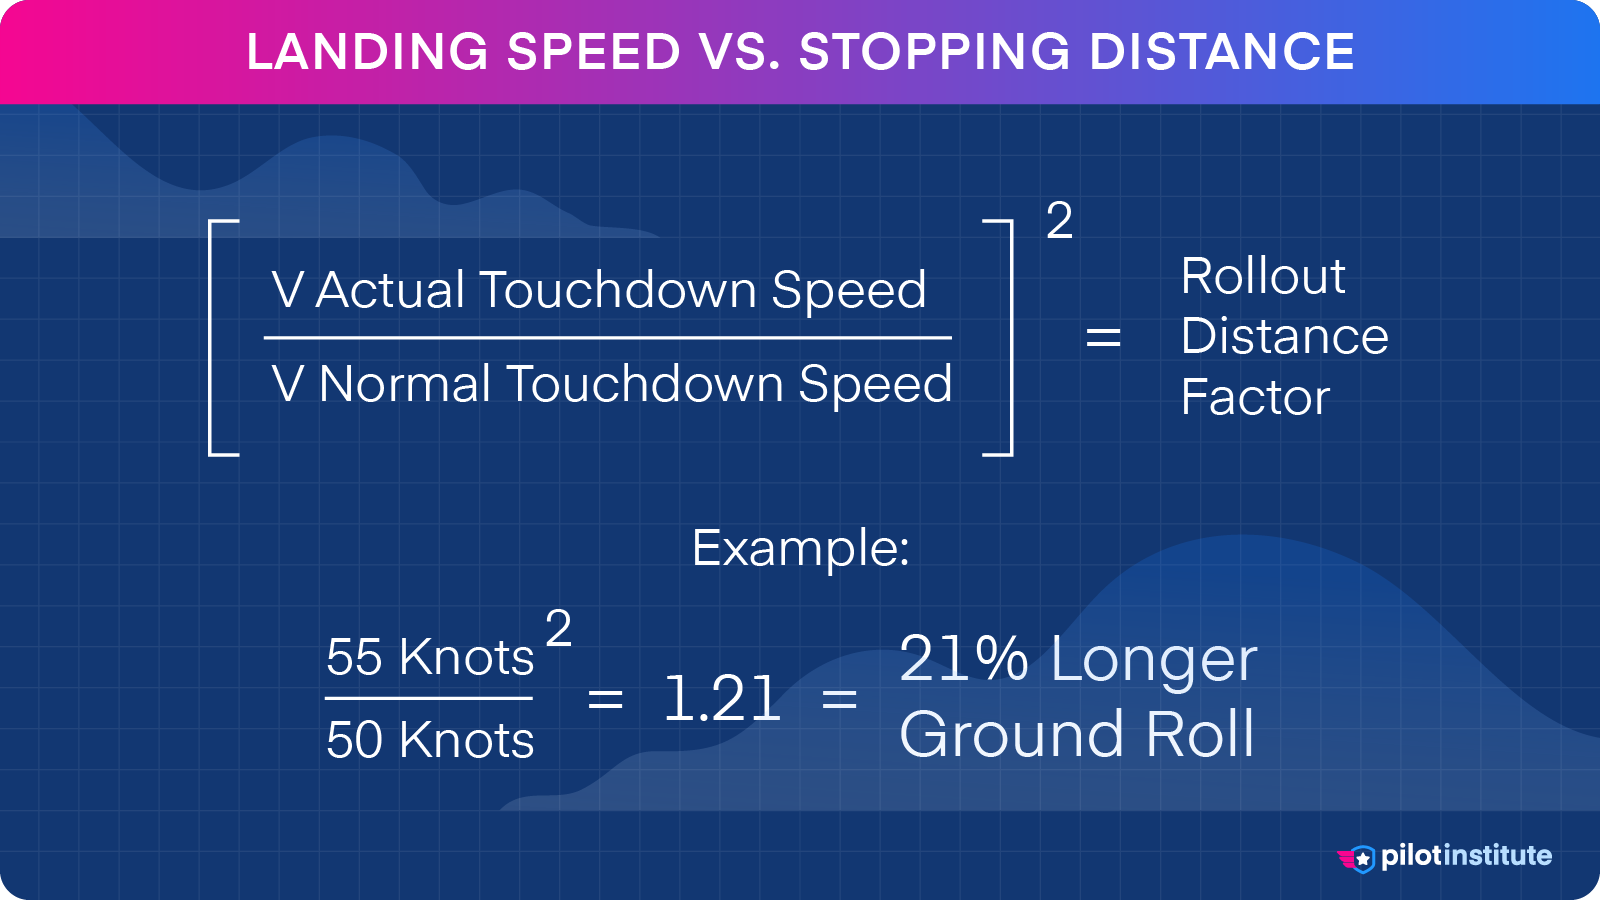
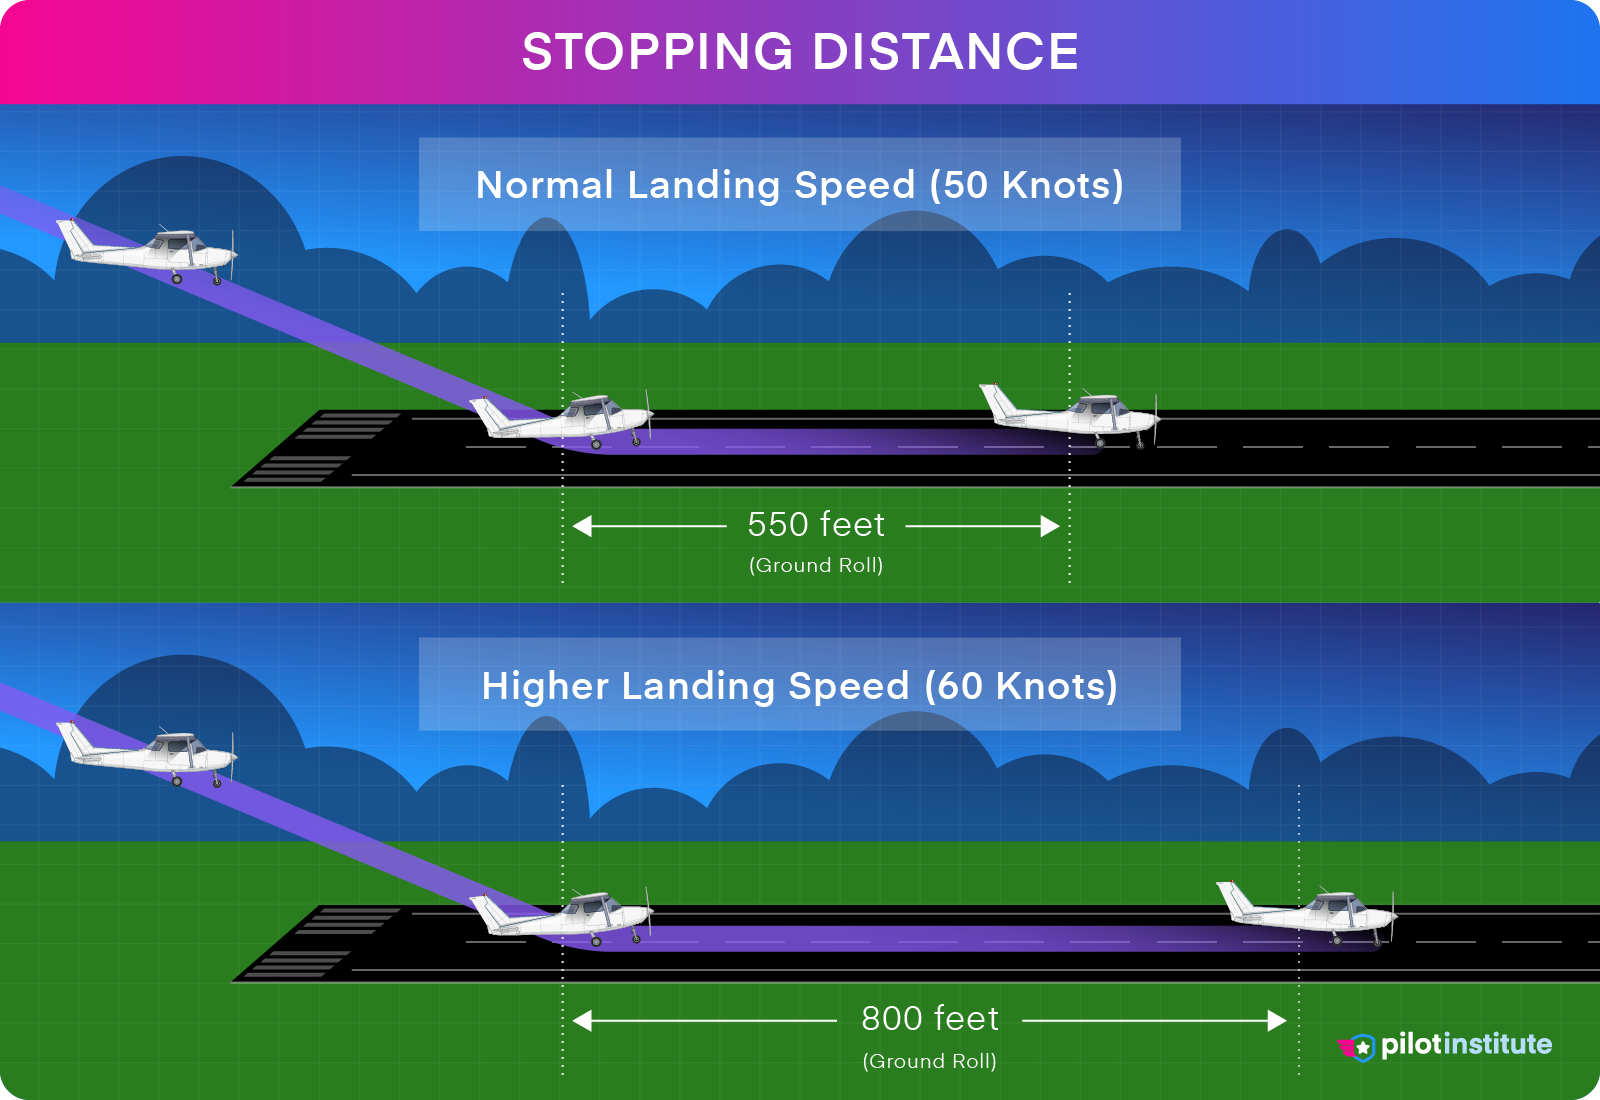
If you usually land at 50 knots but end up touching down at 55 knots, you might think the landing distance only increases slightly. But the truth is, for the 10 percent increase in airspeed, your ground roll will increase by 21 percent! The roll distance increases by the square of the factor of your increased speed.
Flying the Base Leg
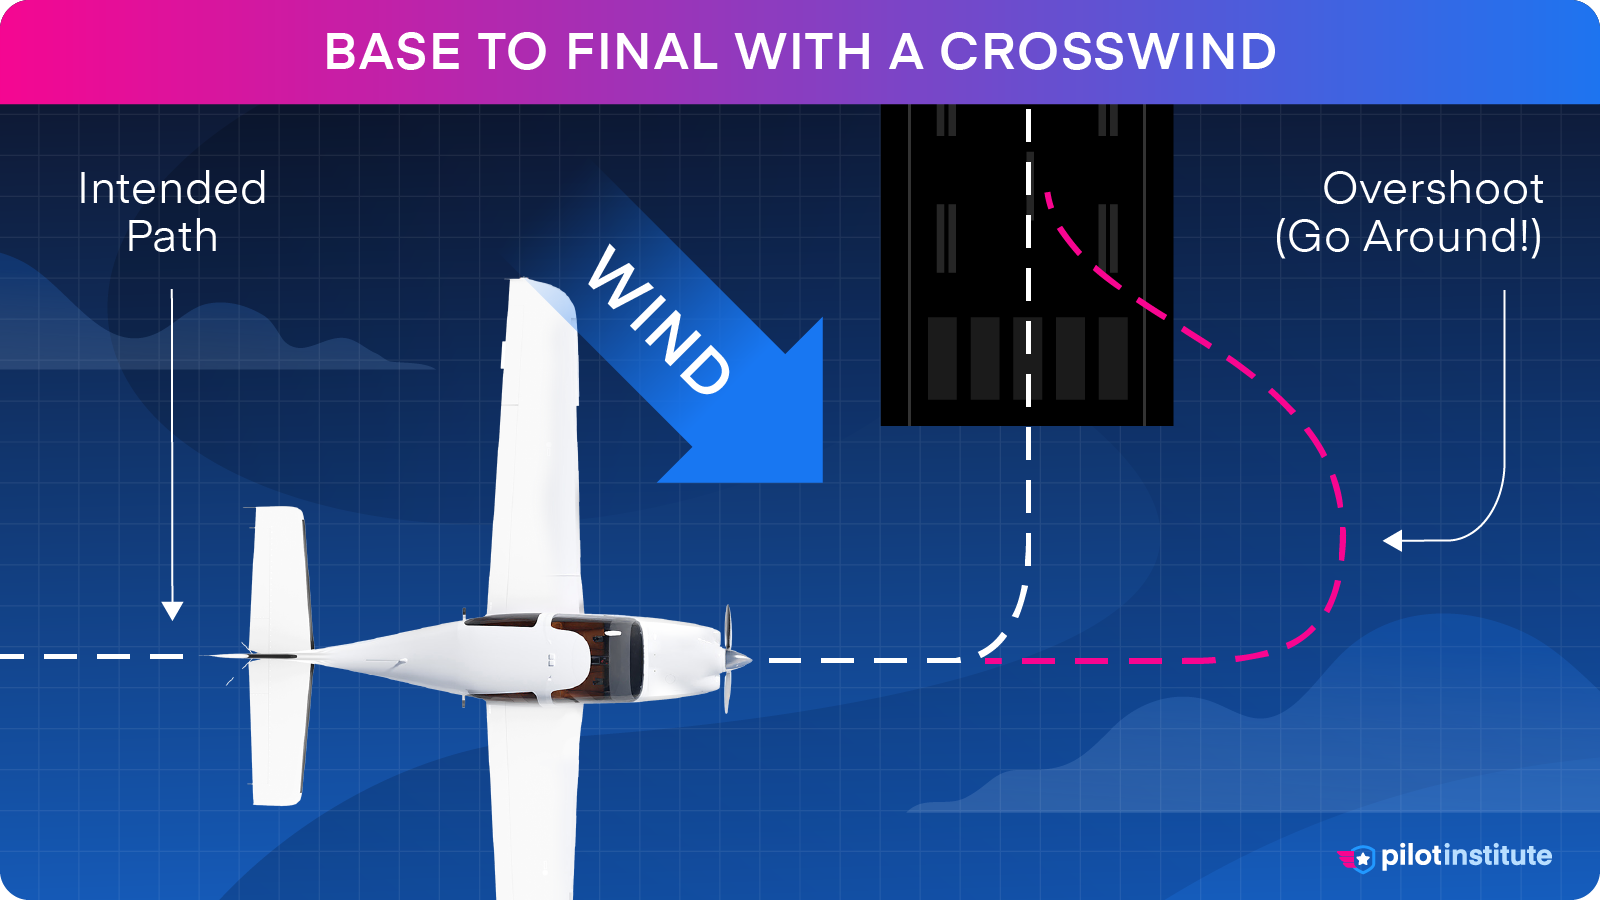
All aircraft land into the wind, so the base leg usually involves some crosswind. The crosswind can push you out and mess up your glidepath if you’re not careful.
A target airspeed of around 1.4 times the stall speed works well as a reference airspeed for most small aircraft on the base leg. So, for a stall speed of 50 knots, the reference airspeed would be:
50 x 1.4 = 70 knots.
For most small aircraft, this speed automatically places the aircraft at a reasonable descent rate for the runway. If you’re not descending fast enough, don’t dive! Hold a constant pitch angle. Check your speed and reduce power. The speed should gradually bleed off to the reference airspeed.
Deploy landing flaps in the first half of the base leg, but not full flaps. If you’re in an aircraft fitted with a carburetor, use the carb heat to prevent icing at low engine power. This is also a good time to check for traffic in the vicinity and make calls on the CTAF or to ATC. Try to leave the latter half of the base leg free of distractions to focus on making the turn to final.
Making the Base-To-Final Turn
There are two important considerations when you make your base-to-final turn.
Firstly, ensure you don’t overshoot the runway. Take special care if the airport has parallel runways.
Secondly, watch out for the base-to-final stall while trying not to overshoot the runway. When pilots are midway through the turn, they may realize they’re overshooting the runway and attempt to tighten the turn.
It’s tempting to increase the bank angle and add some rudder to rotate the aircraft. However, an increase in elevator pressure to counter the dropping nose can push the aircraft into a stall and even a spin, which can be irrecoverable given how low the aircraft is at this point. Keep all banks limited to 30 degrees.
Avoid distractions during this turn. Make your radio calls while in the first half of the base leg or after established on final. Similarly, avoid deploying the flaps while turning. An asymmetric flap deployment can be disastrous at this stage, and the pitch moment change that comes with a flap selection isn’t ideal in a turn.
How to Improve the Final Approach
After lining up with the extended centerline, assess if the aircraft is above or below the glidepath. Use the PAPIs if they’re available. Judge it according to the sight picture.
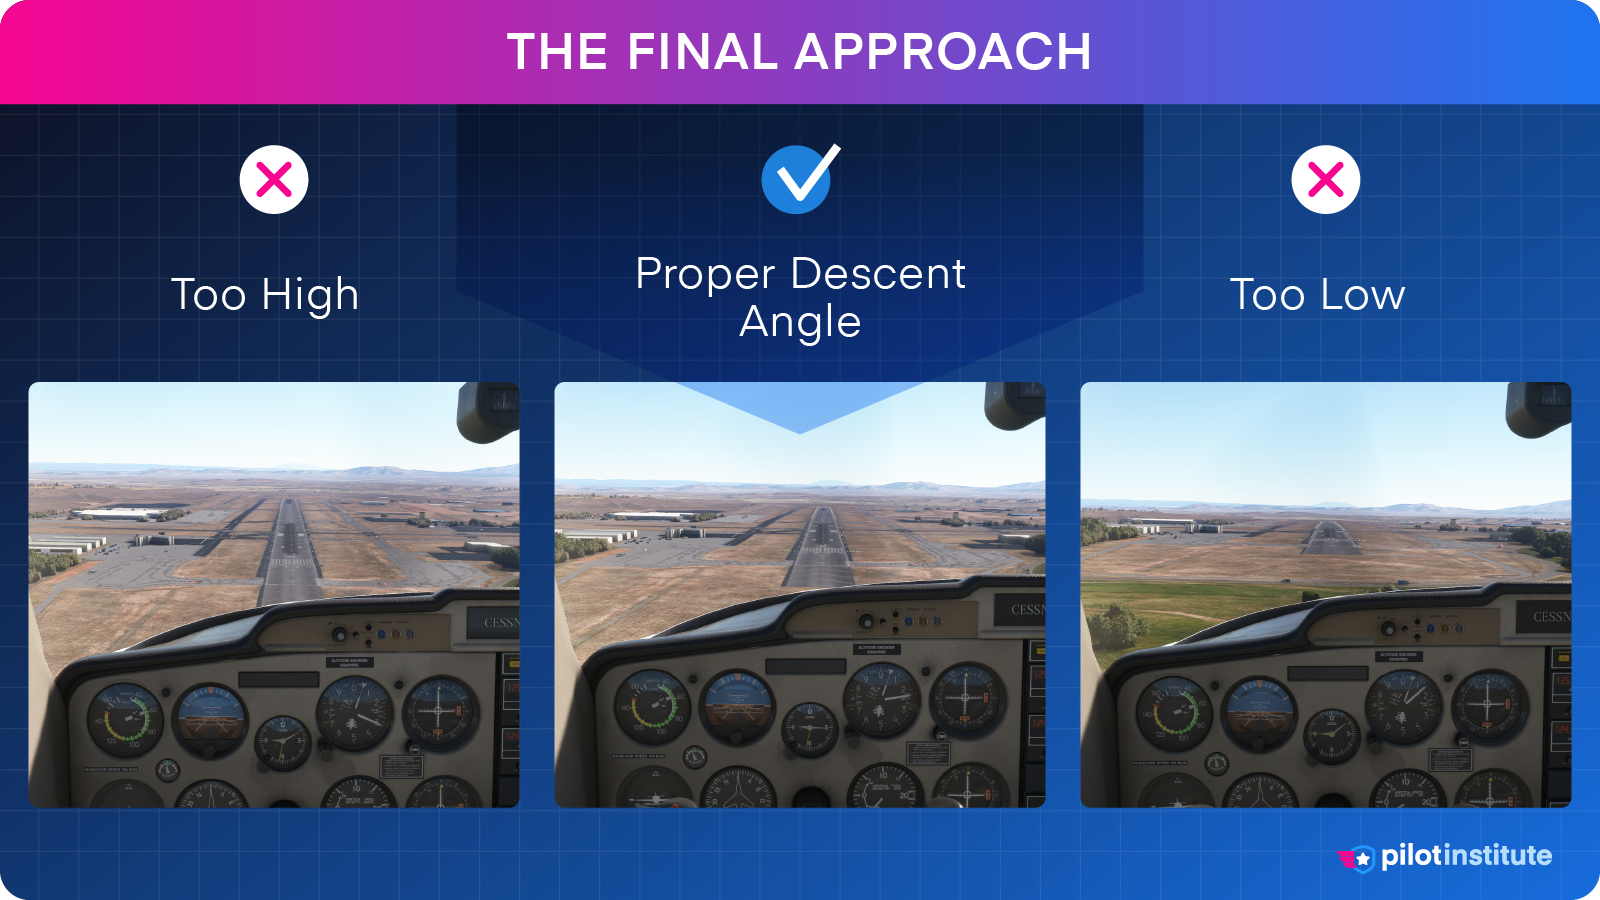
At this point, the aircraft is flying on the backside of the power curve, so pitch the aircraft for airspeed. Adjust power to control your descent rate.
The easiest way to judge your pitch? Look at the engine cowling or the edge of the instrument panel. The positioning of the edge relative to the horizon tells you if you’re coming in too steep or too shallow. Confirm your speed using the airspeed indicator.
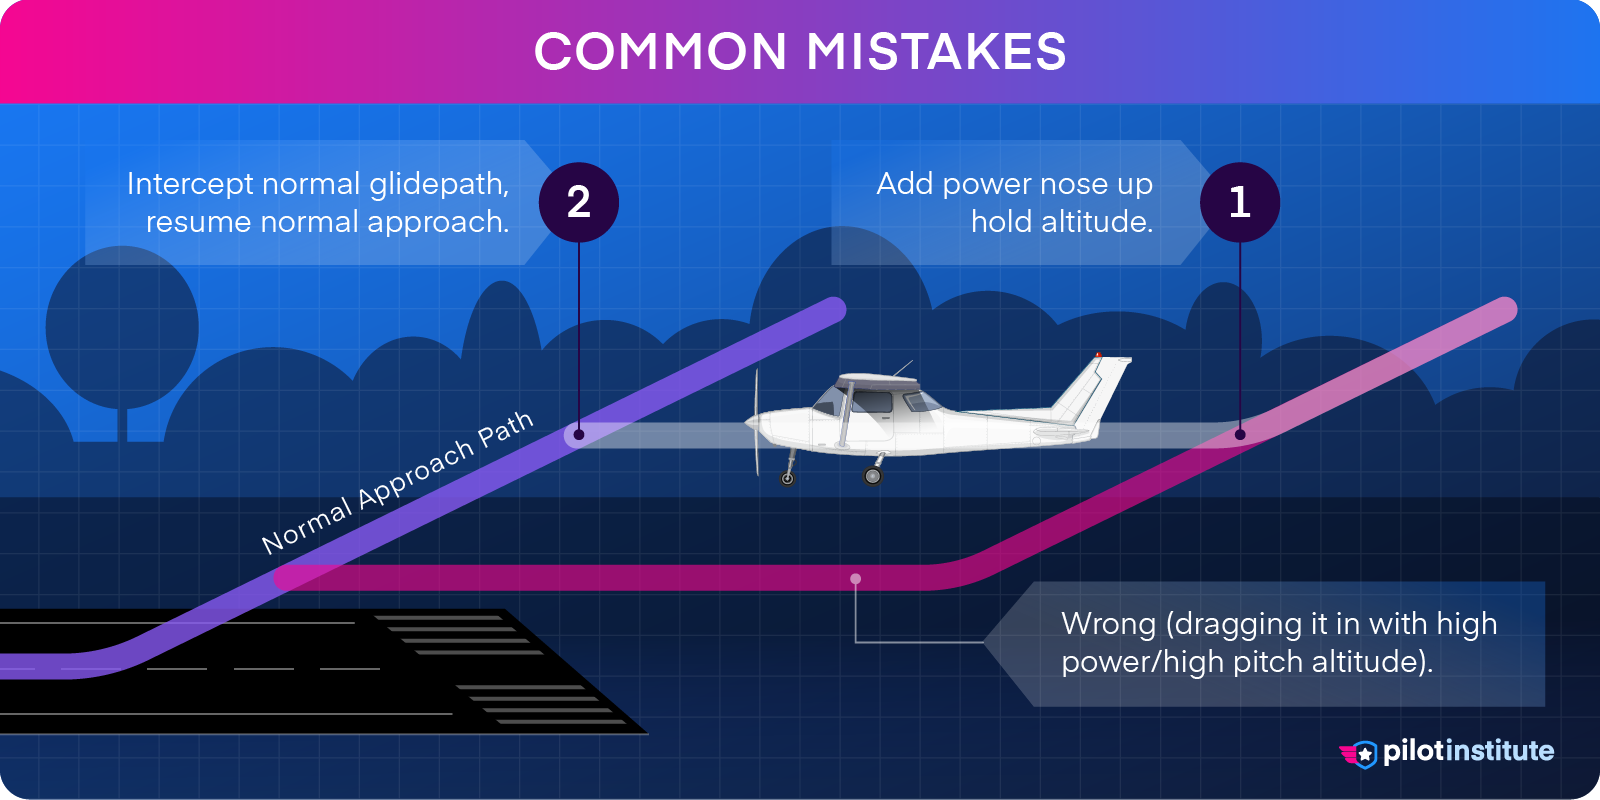
If you’re too low, maintain pitch and add power. Feel free to abandon the approach and go around if you’re not comfortable. If you’re too high, you have a few options available.
First, reduce power. If that’s not enough, extend more flaps. Flaps allow steep descents without skyrocketing airspeed, but they change the aircraft’s pitch. You’ll have to adapt to a new sight picture.
An alternate method for a safe steep descent is to enter a forward slip. Practice this technique in case you need it in an emergency, but always be cautious doing this maneuver.
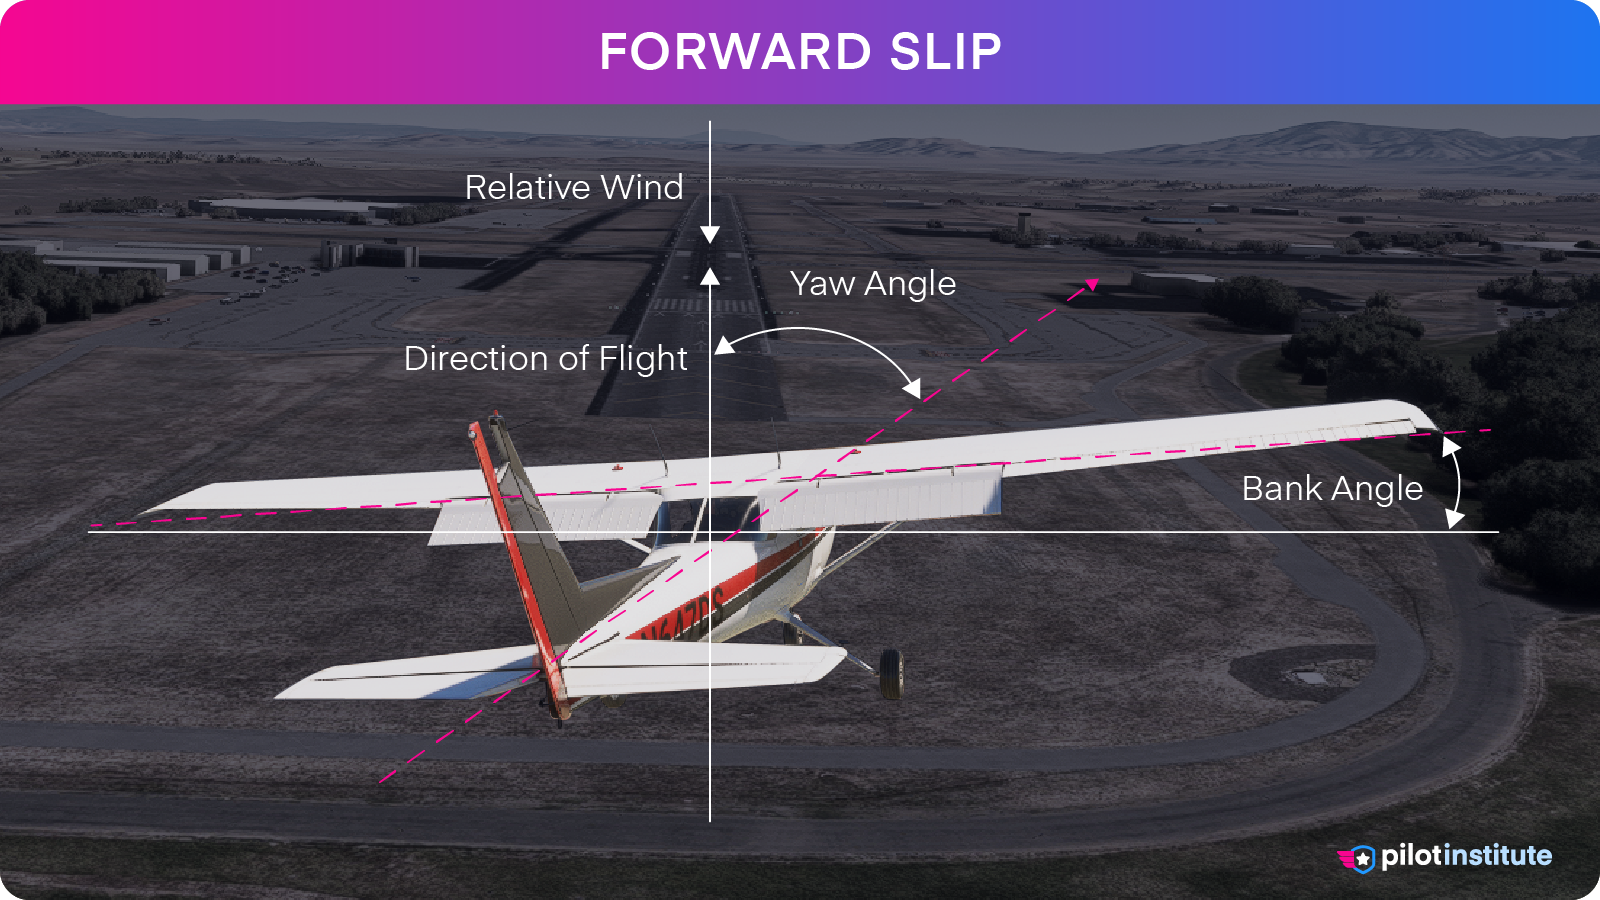
Forward slips are helpful in approaches where you can’t use too much flap, such as with gusting winds. Pilots also use this method if they know their aircraft’s flaps aren’t very effective. Slips are also handy since you can pull out of them very quickly. Electrically operated flaps take a long time to move.
Keep in mind that some aircraft manuals discourage forward slips with high degrees of flaps.
How to Fly the Perfect Short Final
Assess the situation when the aircraft is about 500 feet above the ground. Decide if the approach is stable and a safe landing is likely. If not, go around.
Once the landing is assured, you can choose to extend the last of the flaps to reduce your landing roll. The final notch of flaps drastically increases the descent rate. The abrupt change can catch unprepared pilots out!
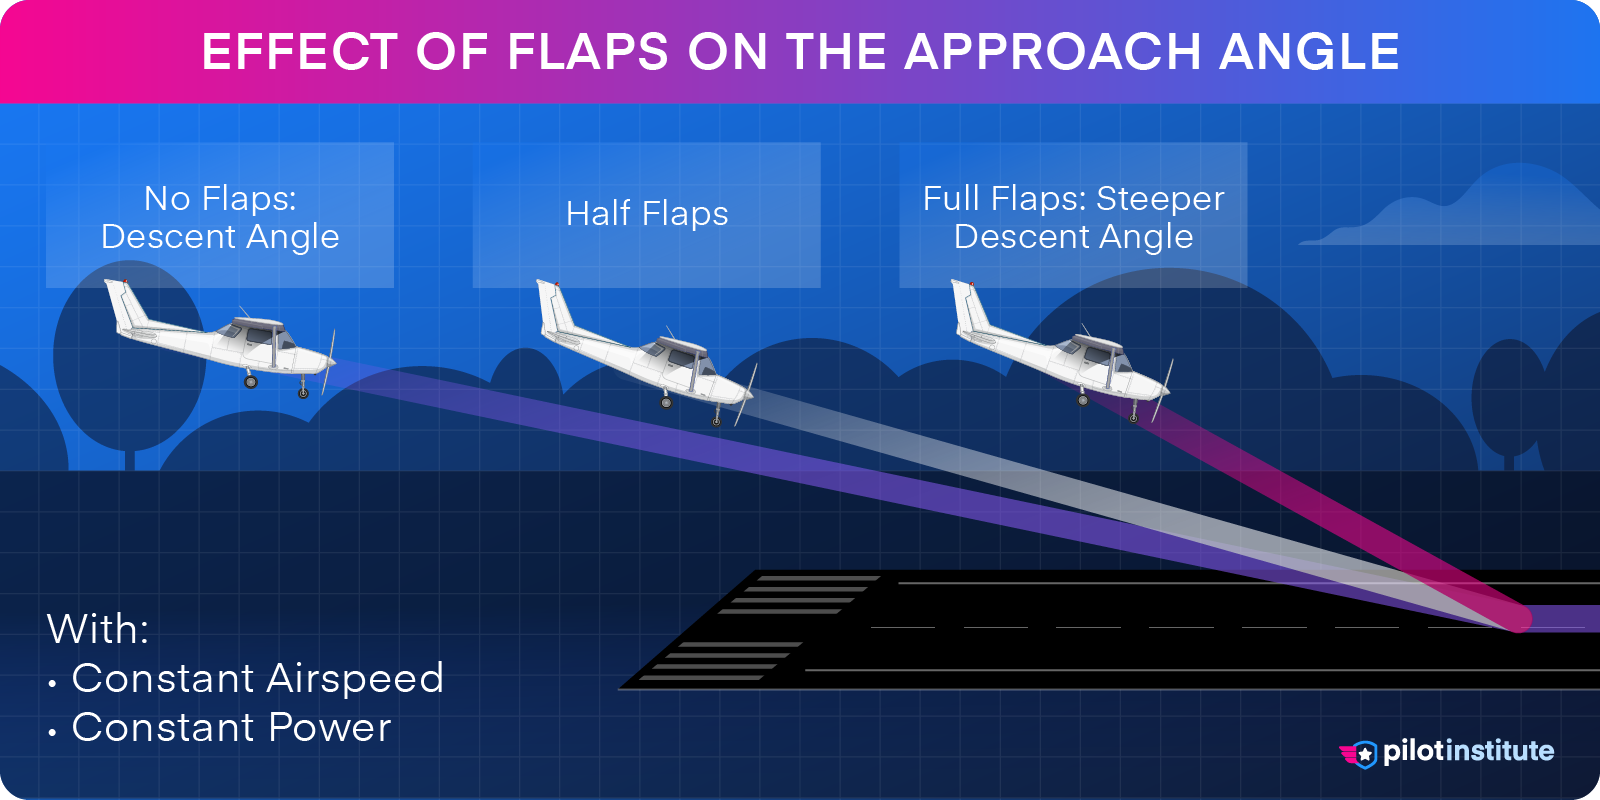
You don’t have to if you don’t need to, but it’s good to practice landing with full flaps to keep your skills sharp. Full flaps can make the aircraft balloon too much, especially at higher speeds. The higher descent rate also makes timing the roundout a greater challenge.
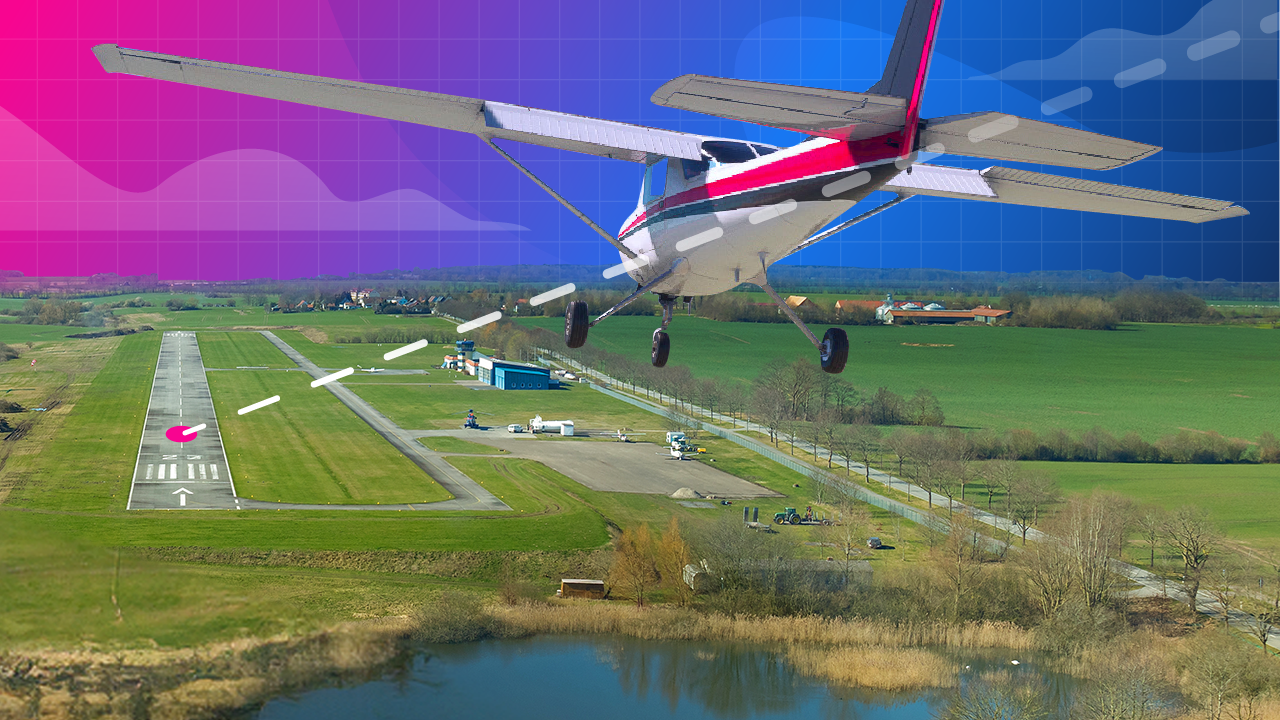
Managing the Flare and Touchdown
Assuming you flew the approach correctly, the aircraft should be stable and on target airspeed, descent rate, and heading.
At this point, you have to perform the roundout. The exact height for this maneuver depends on the aircraft you’re flying. When you get close enough to the runway, it seems to widen considerably. Stop focusing on the touchdown point and switch your gaze to the end of the runway. At this moment, slow the descent rate to near zero by raising the nose slightly higher than parallel to the runway and reducing power.
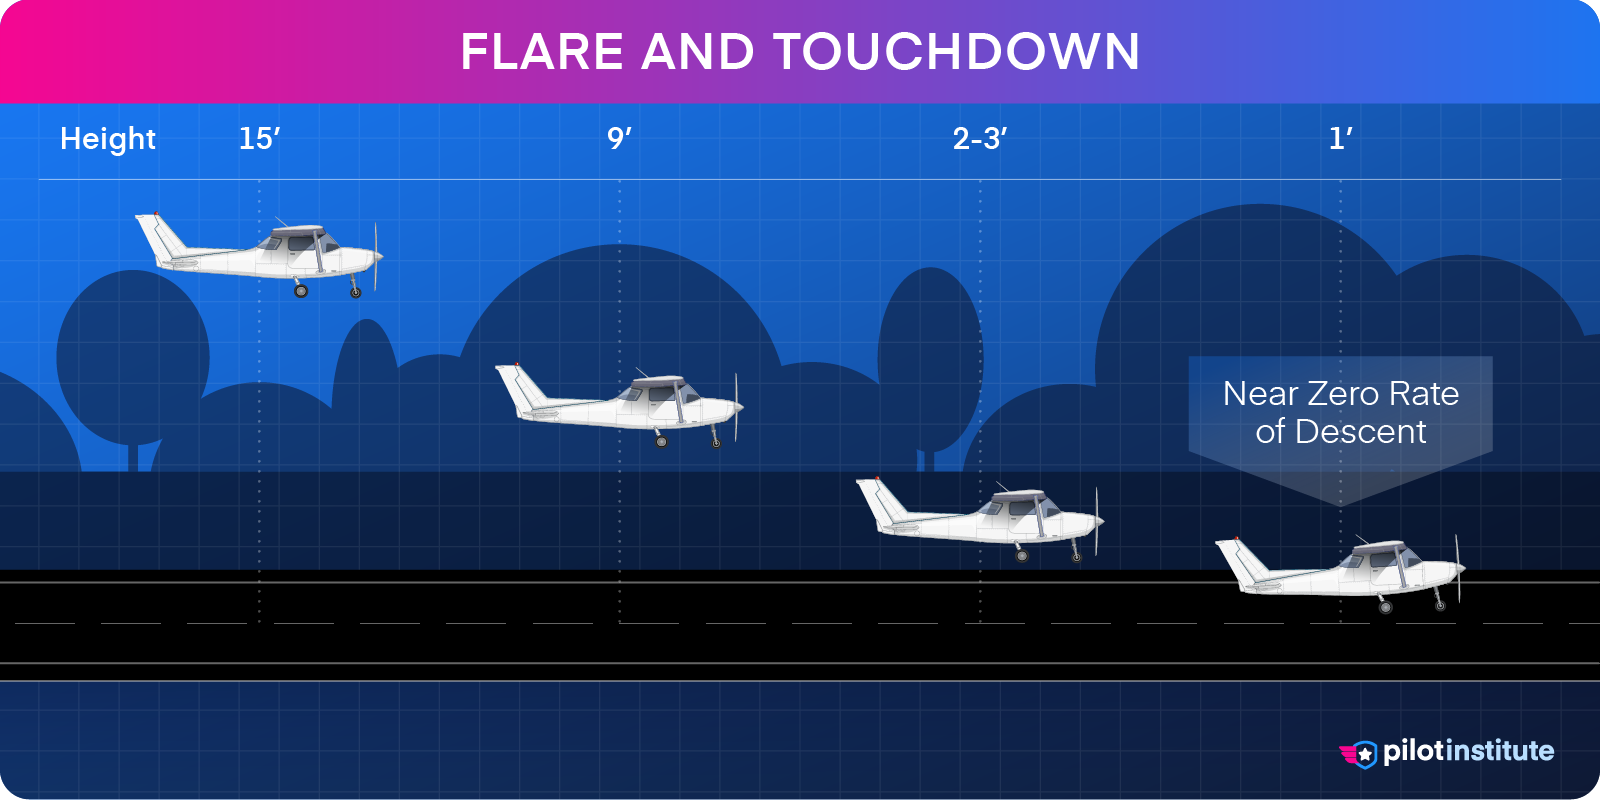
New pilots often try to ‘feel for the runway’ by repeatedly pulling the nose up and easing off. This may bring you in contact with the ground sooner, but it’s likely to result in a harder touchdown. If you’re constantly doing this, you may be rounding out higher than you should be. Your estimate should improve with practice.
If you round out too high, the eventual impact will be harder and could even damage the aircraft. If it’s too high, go around. If you’re somewhat more experienced, you can salvage a roundout at moderate height by adding a slight blip of power to cushion the touchdown.
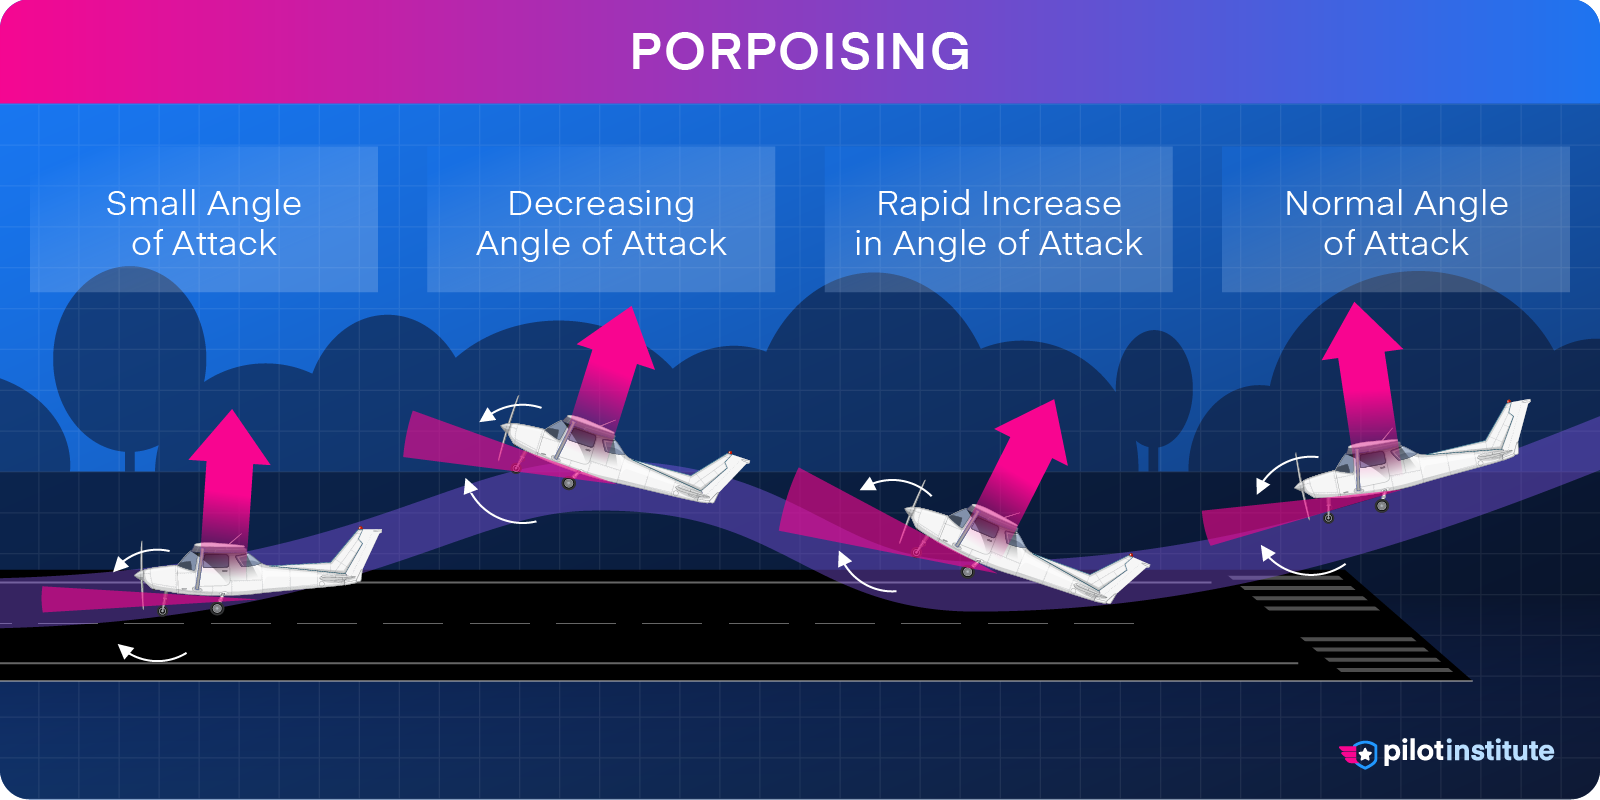
If the aircraft bounces or balloons, go around. You don’t want to end up porpoising.
Performing the Rollout
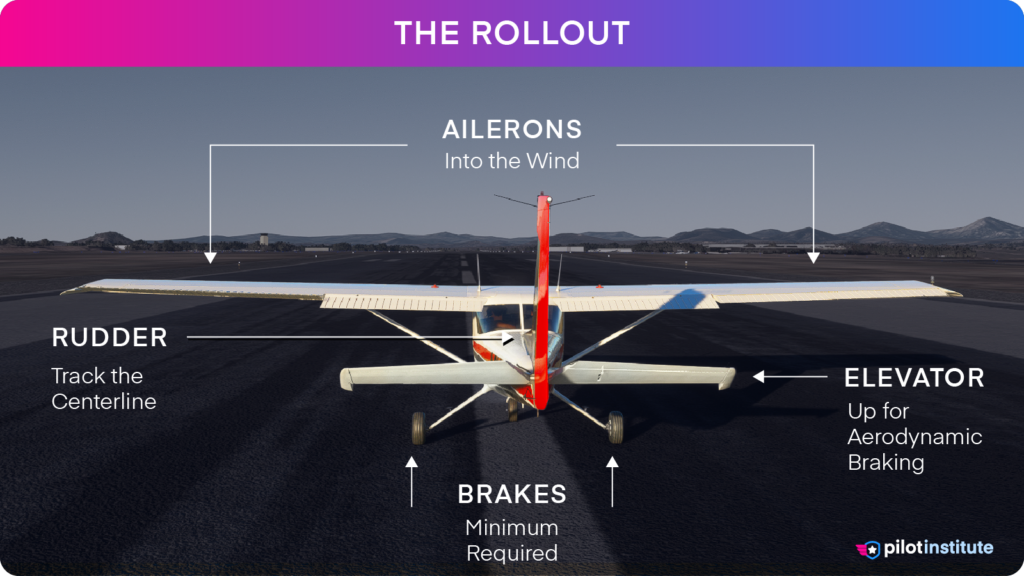
You’ve landed, but your job’s not over yet. Fly your aircraft all the way until it comes to a stop. You have to stay vigilant and in control throughout the landing roll.
Use the rudder pedals to maintain centerline. Arrest any drift from the centerline before it gets severe, but do it gently. A swerve can easily lead to a ground loop, especially in a tailwheel aircraft.
Keep the nosewheel up for as long as possible to take full advantage of aerodynamic braking. Once all wheels are down and the aircraft is under control, shift your feet up to the brakes.
Maximum braking has the wheels just on the verge of skidding. Add any more pressure, and the wheel will stop rotating and drag along the runway instead. This prevents directional control and creates flat spots on the tire.
You don’t always need to apply ideal brake pressure, though. Use just enough braking as necessary. It’s even possible to slow down without braking at all if the runway is long enough.
Keep the ailerons into the wind. If a crosswind catches the underside of the wing, it could cause a tip strike or even flip the aircraft upside down.
Common Mistakes and How to Avoid Them
- Don’t over-control the aircraft. Small, frequent movements are enough to stay on course. Similarly, make minor power adjustments. If you feel the aircraft needs a large correction, go around and try again.
- Try to stay ahead of the aircraft. Anticipate the wind and stay sharp on the rudder.
- Don’t neglect the wind! Even slow winds can gradually push you off course. Listen to the wind reading relayed by ATIS or ATC and predict their effect on each leg. For example, a headwind won’t just help you slow down on final but also push you outward on your base leg.
- Pilots tend to fixate on the runway and may fail to notice what the aircraft is doing. If you see the nose dropping under the aiming point, don’t be tempted to raise the nose too much. Add power instead.
- When you use the wing strut as a reference for your downwind leg, use the point where the runway centerline cuts the strut. This avoids problems with very wide or narrow runways.
- Raise your seat till you’re high enough to see the edge of your engine cowling. Try to sit at a consistent seat height every time so your references stay the same. Make sure the rudder and brake pedals are still within reach!
- You’ll flare too high if you fail to shift your gaze when close to the runway.
- Use your peripheral vision to estimate your height when the nose blocks the view ahead. This skill develops with consistent practice.
- Never compromise a safe touchdown by attempting to force a landing at your desired spot. If you miss your mark slightly, let it go. Don’t try to dive the aircraft.
- Landing in a crosswind? Don’t release the crosswind correction if the aircraft balloons or bounces.
- Don’t worry if the stall horn sounds just before touchdown. That’s the sign of a good landing since it means you landed at the slowest safe speed possible.
- Once you’ve landed, don’t linger on the runway. Adjust your braking to bring the aircraft close to the taxiway efficiently, and try to clear the runway as soon as possible.
Tips and Exercises
- Continuously judge your performance. Are you flying too fast? Were you higher than planned on your previous leg? Consequently, do you need to make any adjustments to the current leg?
- Aim to be comfortable landing with any flap setting. Practice no-flap, normal flap, and full-flap landings.
- Trim the aircraft for every configuration and significant power change. Most pilots make one adjustment when reducing power abeam the touchdown point and another after settling on final.
- Practice touch-and-gos without allowing the nosewheel to make contact. This teaches control at flare height and improves your short-field landing skills.
Conclusion
Consistent practice will make you an expert at landings. But how should you deal with landing if the aircraft faces strong crosswinds?
To find out, check out our Crosswind Landings Guide.