-
Key Takeaways
-
What Is an Instrument Approach Briefing?
-
Elements of an Approach Chart
-
Preflight Planning
-
Before You Brief
-
Briefing the Approach (Step-by-Step)
- 1) Declare the Approach
- 2) Check the Date and Plate Number
- 3) Review and Tune NAVAID and Comm Frequencies
- 4) Set Approach Minimums
- 5) Read the Notes
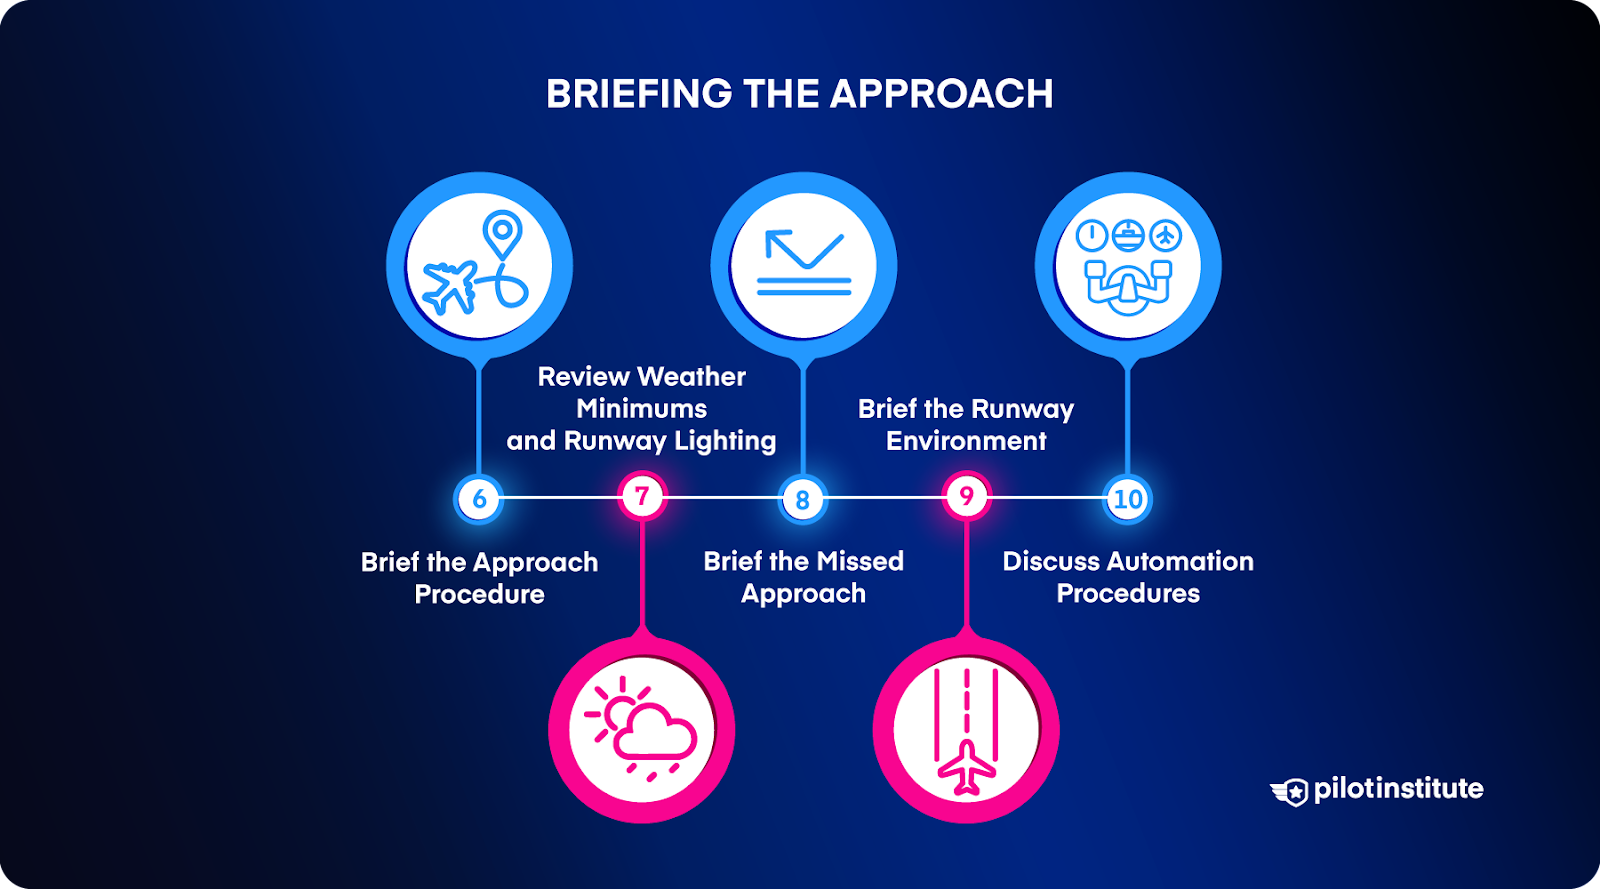
- 6) Brief the Approach Procedure
- 7) Review Weather Minimums and Runway Lighting
- 8) Brief the Missed Approach
- 9) Brief the Runway Environment
- 10) Discuss Automation Procedures
- Anything Else?
- Briefing Checklist
-
Conclusion
For new instrument pilots, flying an approach to minimums is a big challenge.
Adding an approach briefing to the mix feels like one task too many. But rushing a briefing puts you at serious risk of losing situational awareness.
Luckily, mastering approach briefings is not as hard as it seems.
This article breaks down how to deliver a top-notch approach briefing, every time.
Key Takeaways
- Instrument approach briefings help pilots maintain situational awareness during the approach.
- Use the chart as an approach checklist to cover the key elements.
- A good approach briefing begins during preflight.
- Establishing a consistent briefing method eliminates confusion.
What Is an Instrument Approach Briefing?

Instrument flying is all about mentally staying ahead of the aircraft. Things can happen fast, and there’s little time to improvise on the spot.
The approach procedure is often the most complicated part of instrument flight rules (IFR) operations. There are multiple frequencies to tune in, altitudes to maintain, and courses to fly. If things don’t go as planned, there’s the missed approach path to consider.
As pilots, we must review and brief the approach in detail before attempting to fly it. Whether flying single-pilot or as a flight crew member, a briefing helps us maintain situational awareness.
Elements of an Approach Chart
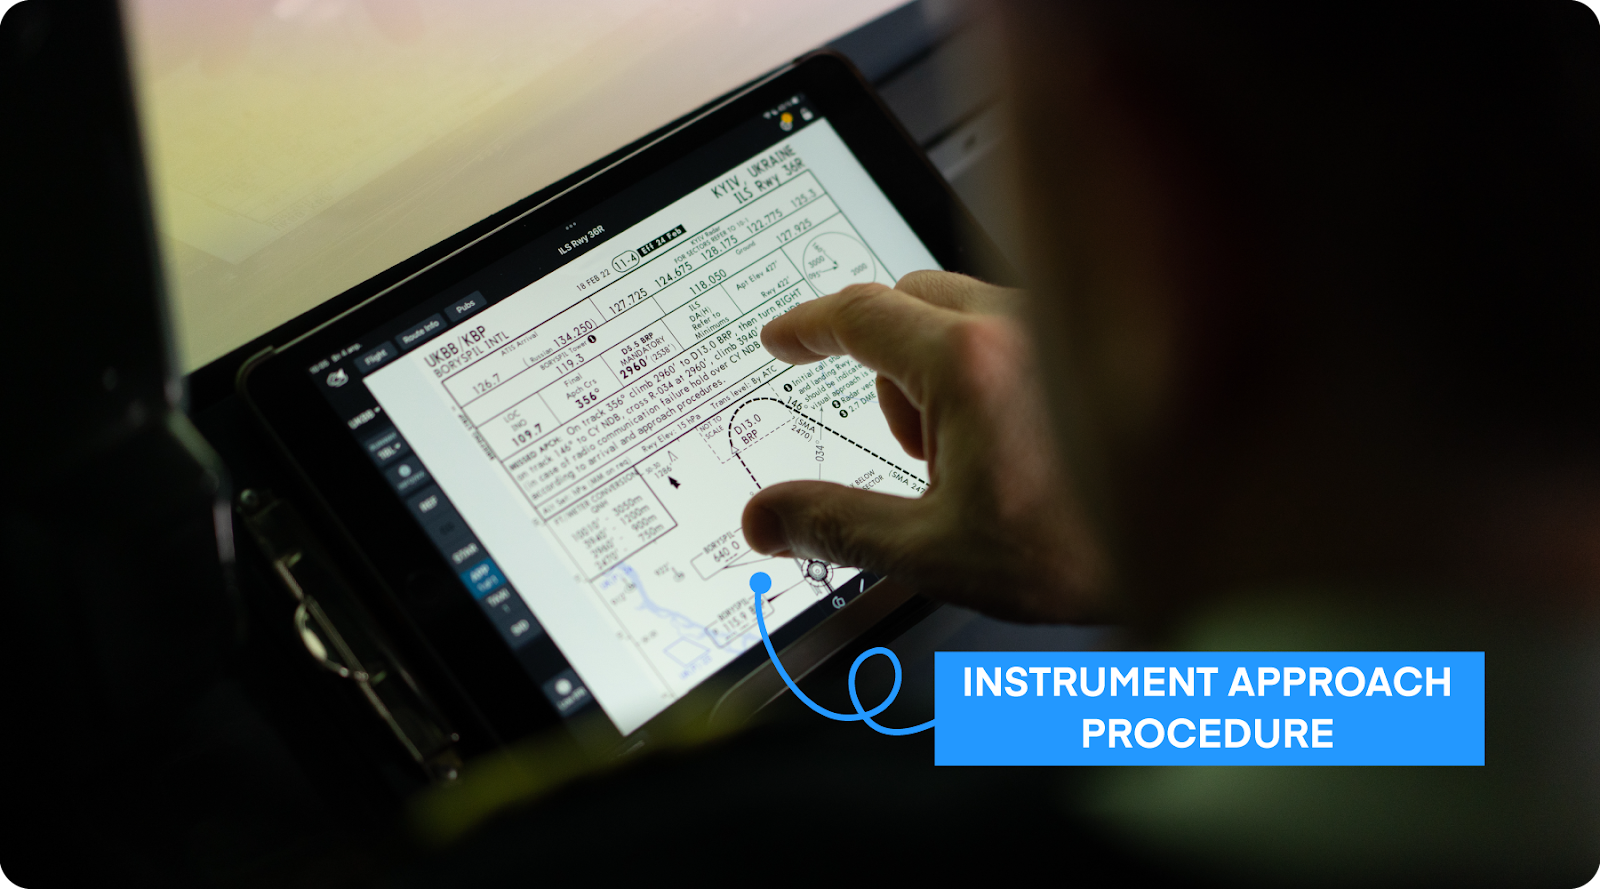
Instrument approaches are detailed procedures. Each one has its own Instrument Approach Procedure (IAP) chart. They’re informally called ‘approach plates.’
There are two primary providers for approach plates: the FAA and Jeppesen. Both contain essentially the same information, just arranged differently.
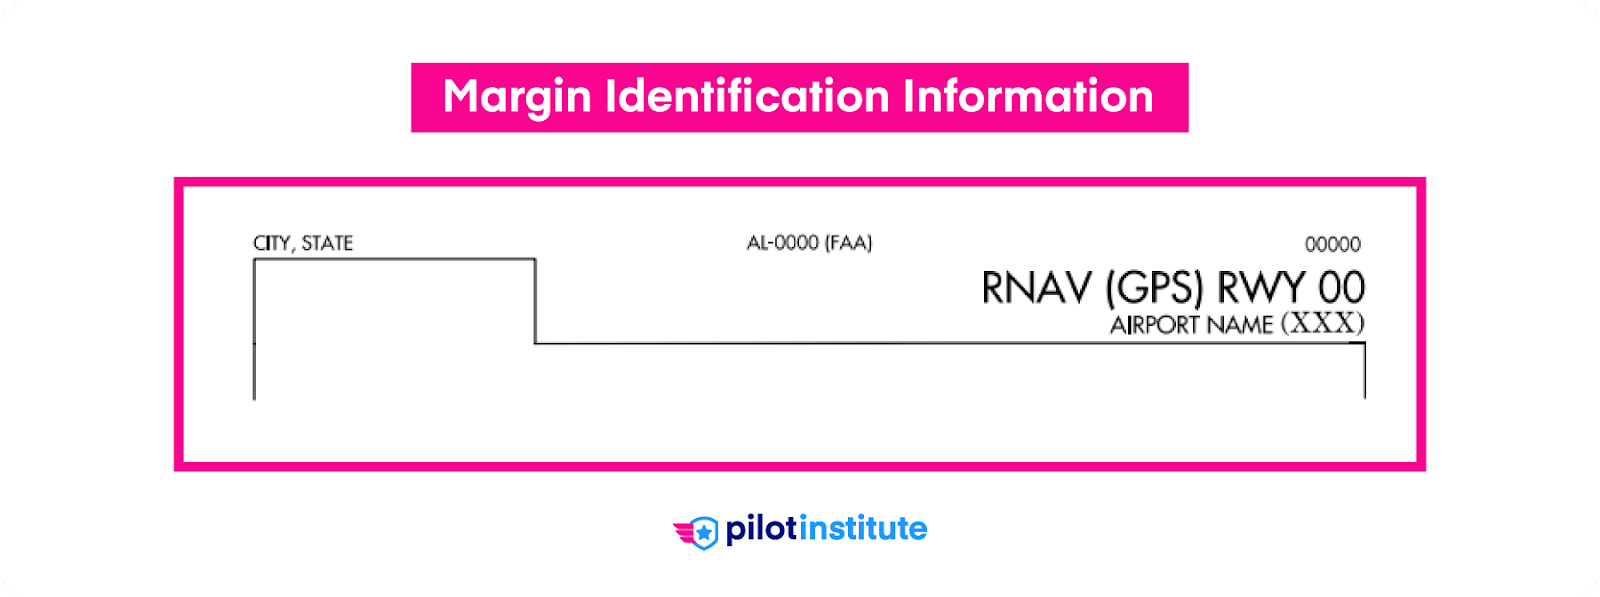
The heading contains the city, state, airport, runway, and approach name. An index number or revision date ensures pilots have the most up-to-date chart.
An approach plate has four main sections:
- Pilot briefing information.
- Plan view.
- Profile view.
- Landing minimums.
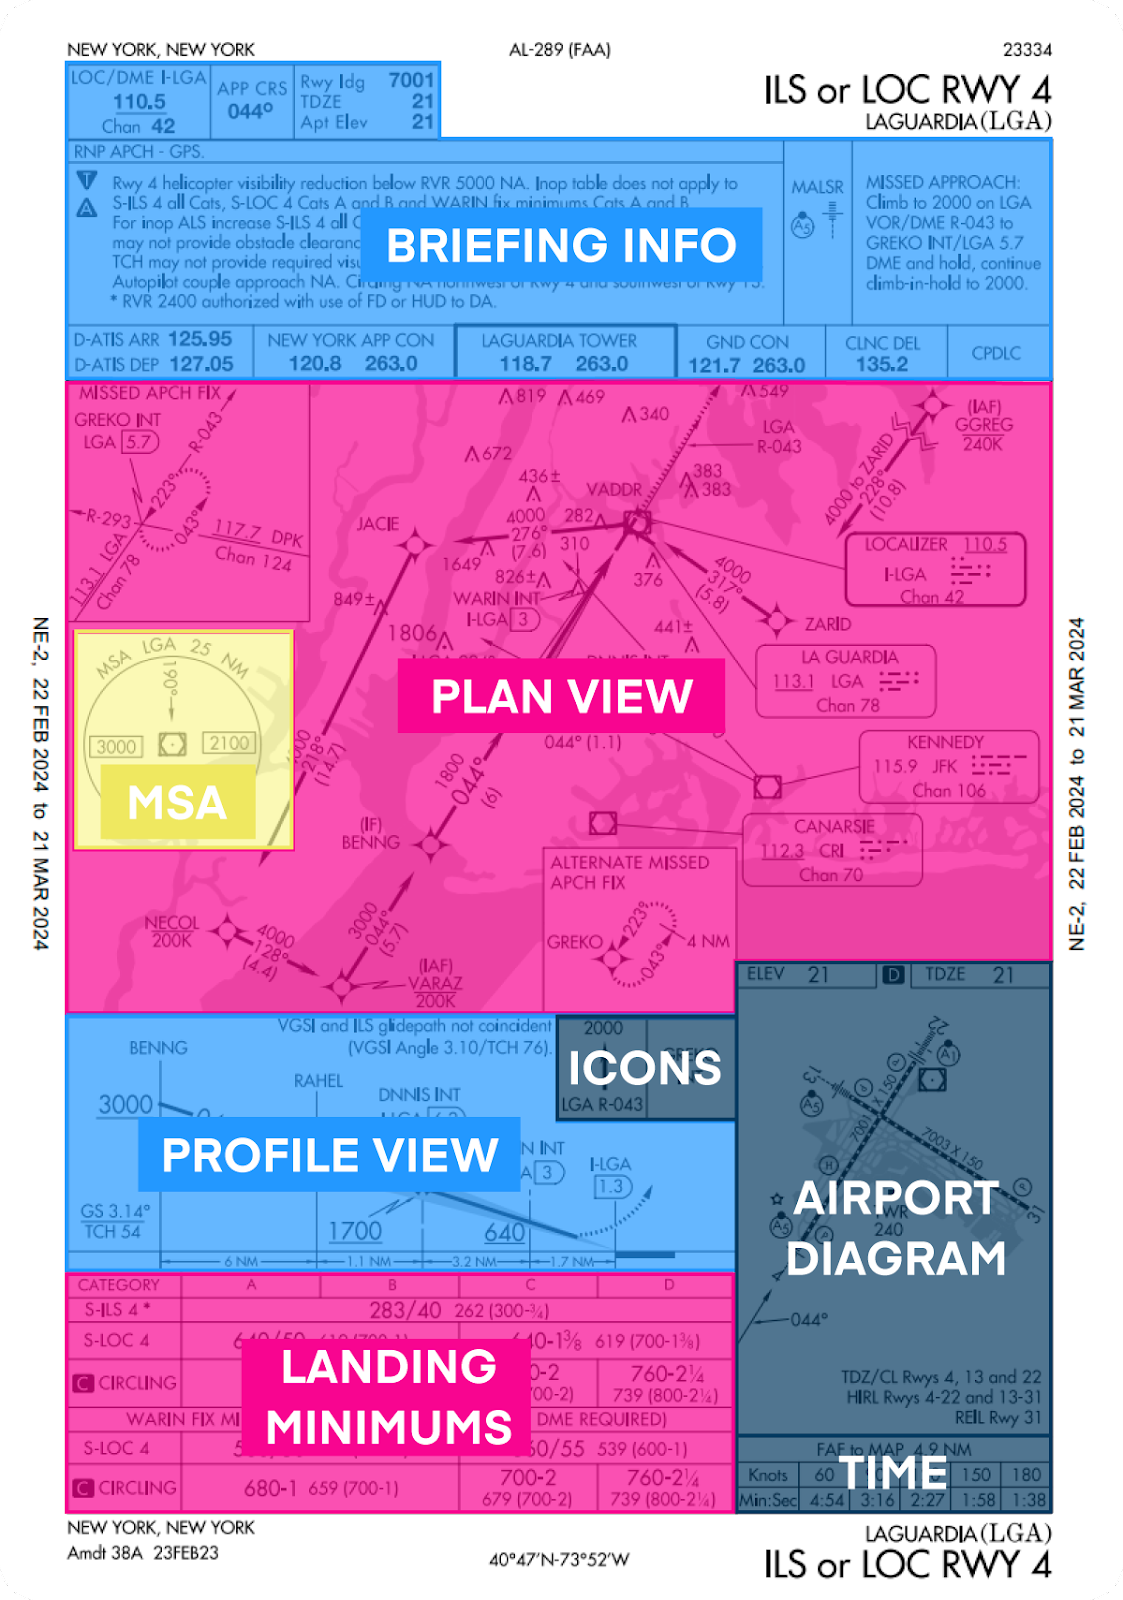
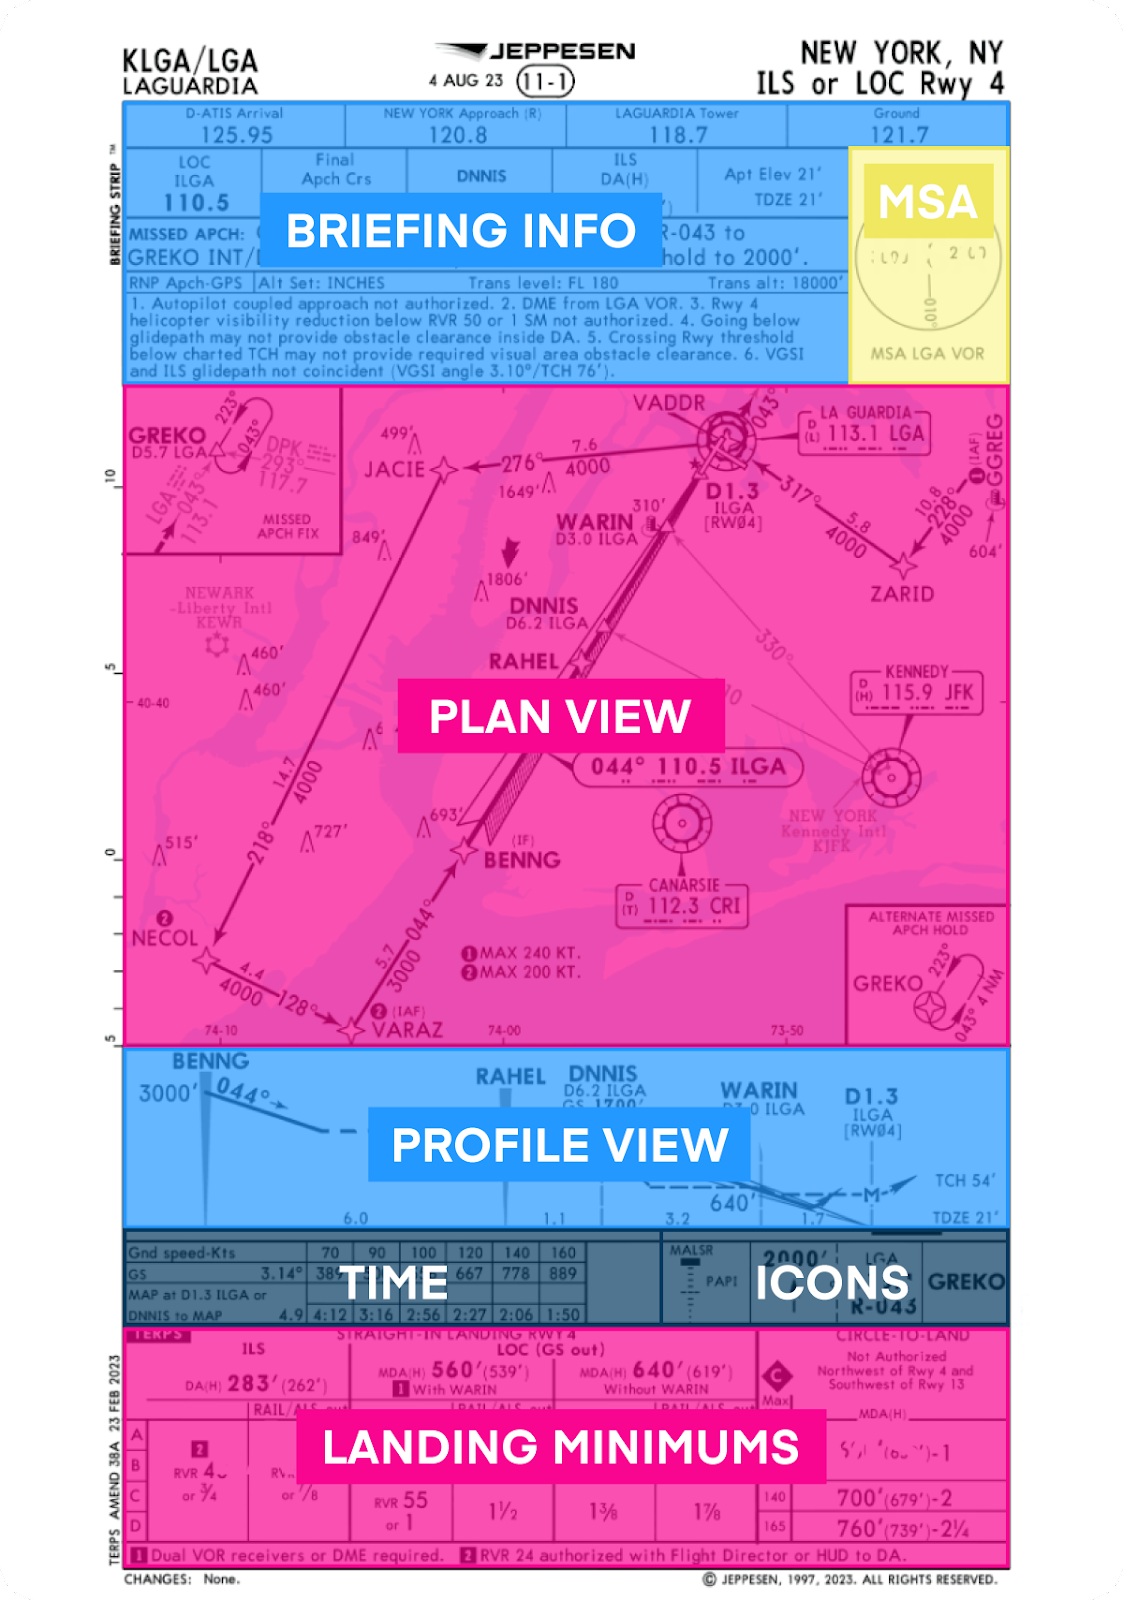
FAA approach charts include a simplified airport diagram, whereas Jeppesen charts do not. Jeppesen users must have a separate airport diagram available for reference.
The main sections of Jeppesen charts are placed similarly, with only minor variations. Pilots use both types of charts extensively.
The briefing information section contains the most important elements of the approach, including:
- NAVAID and communications frequencies.
- Final approach course.
- Airport and touchdown zone elevation.
- Approach notes.
- Missed approach procedures.
The plan view shows a top-down look at the approach path and includes:
- Courses and radials.
- NAVAIDs.
- Waypoints.
- Obstacles.
- Terrain.
The profile view shows a side perspective of the final approach course. It depicts the vertical path and important altitudes, including missed approach points.
The landing minimums section includes:
- Minimum descent altitudes.
- Decision altitudes/heights.
- Minimum visibilities.
- Limitations due to equipment outages.
Preflight Planning
Some pilots believe an approach briefing means skimming the chart right before descent. That won’t help at all. There’s too much information to absorb, particularly during single-pilot operations.
The best way to prepare for an approach is to review the charts during your pre-flight.
You can’t always be sure which approach you will fly when you arrive at your destination. The weather can change, and approach equipment can fail. However, you will know which approaches will likely be in effect at your ETA.
Familiarize yourself with the approaches and look out for possible complications. Cross-check the chart notes with the destination NOTAMs. Is the ILS operational? Will a localizer-only approach get you below the clouds? Are there runway closures? Now is the time to find out.
Ensure you know all the symbology used in your approach plate. Familiarize yourself with these before starting your flight. The approach briefing isn’t the time to thumb through chart manuals.
Before You Brief
Give yourself enough time to prepare for the approach as you near your destination.
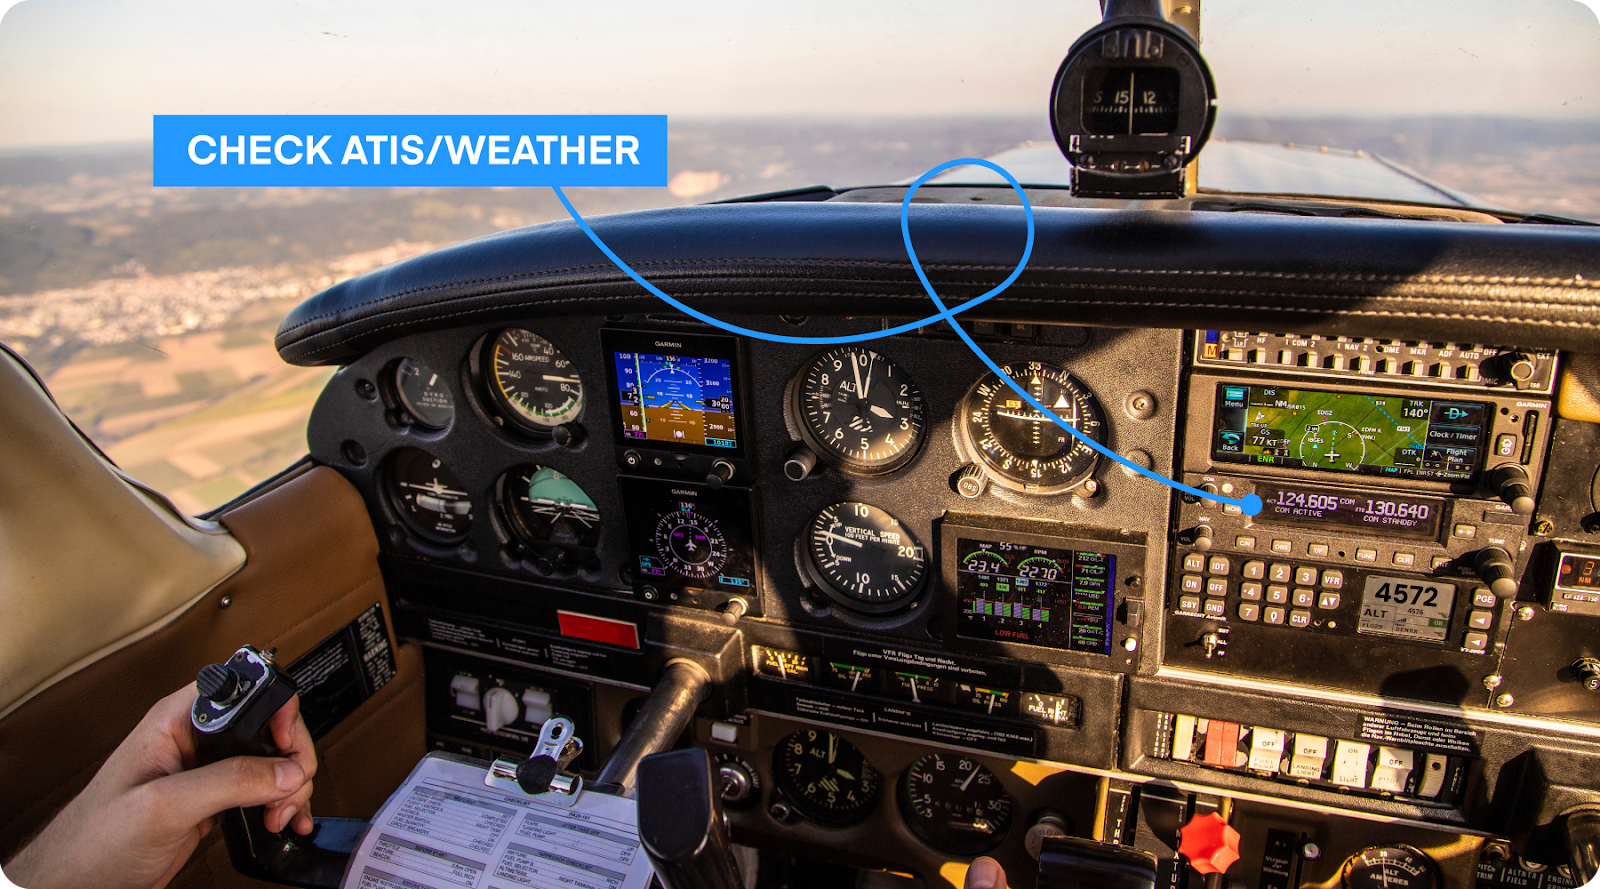
If you’re arriving at a towered airport, tune into the ATIS frequency by around 30 miles out. You must listen to the ATIS before contacting approach control or the tower.
ATIS broadcasts usually include active runways, available approaches, important NOTAMs, and the weather. This information lets you arrange your charts with the most likely approaches first. Approach control will assign you an approach when you check in with them, but they may accept a request.
Arriving at a non-towered airport? It’s up to you to choose the approach. Your preflight planning will have given you a good idea of the best options.
Get the destination weather as soon as possible. Use the weather (along with the NOTAMs) to ensure your chosen approach is still the best choice. Tell center or approach your selected procedure as soon as you can.
Briefing the Approach (Step-by-Step)
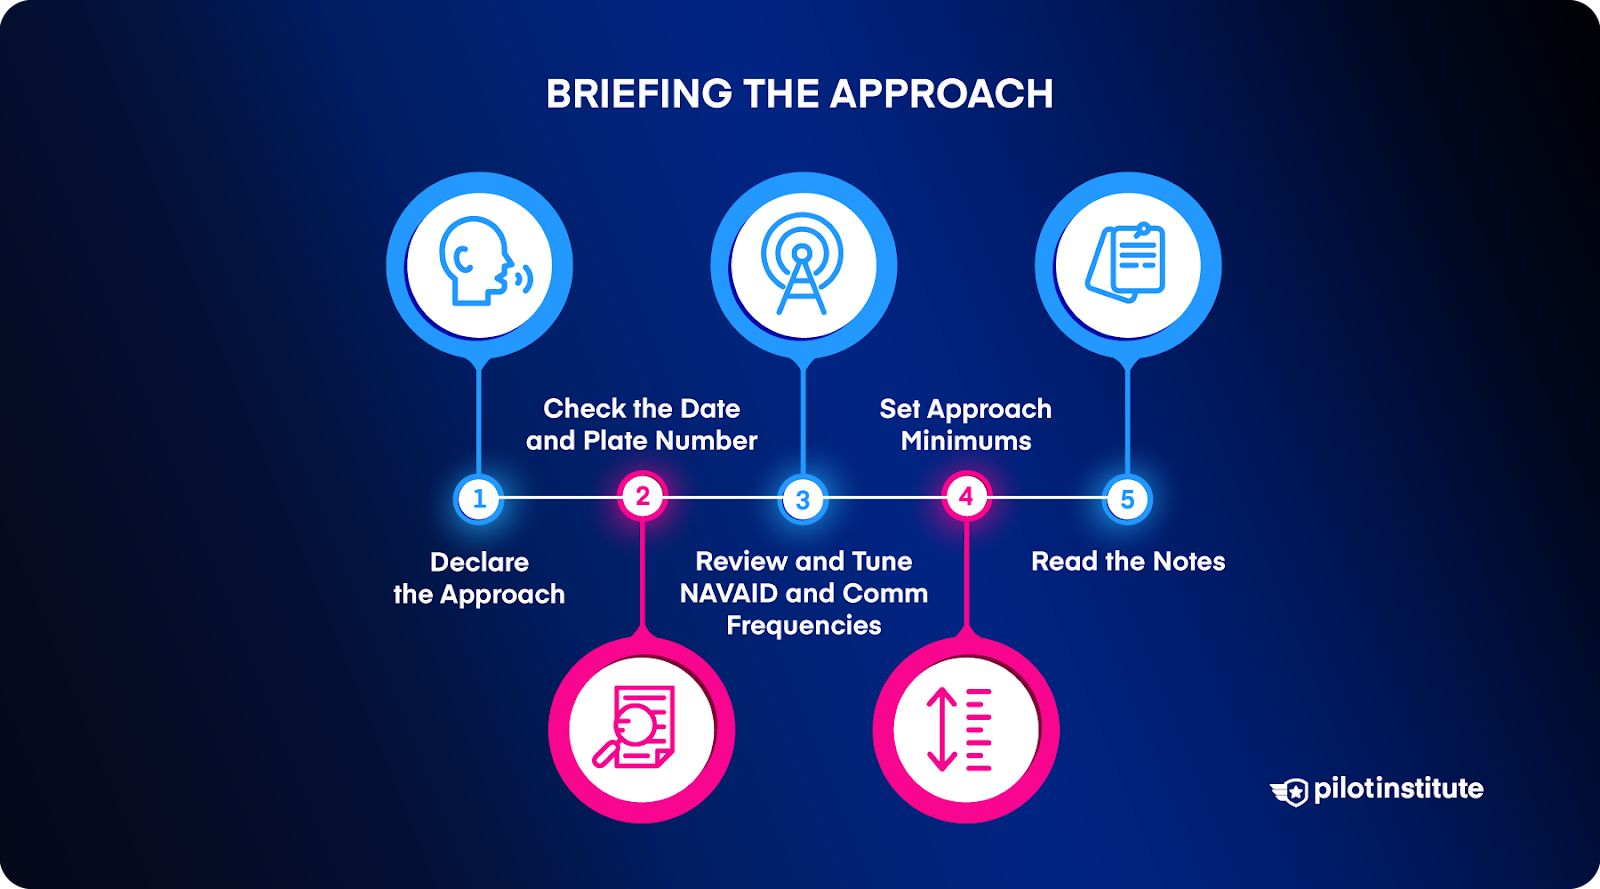
Approach plates contain a lot of information on a single small page. Get into the habit of briefing every approach systematically. Think of the approach chart as a checklist to ensure you don’t miss anything important.
Read the briefing aloud whether you’re flying solo or as a flight crew member.
If you’re flying solo, this helps you organize your thoughts. In a crew environment, it allows each pilot to cross-check and verify that they’re all on the same page. It also serves as a final opportunity to catch any misunderstanding among the crew.
1) Declare the Approach
Start by identifying the name of the airport, the arrival runway, and the approach name.
Does the approach match the clearance?
2) Check the Date and Plate Number
Is your approach plate current and valid?
Jeppesen and FAA plates use entirely independent (and unrelated) numbering systems. FAA plates list their chart numbers in the center of the top of the plate. Jeppesen plates display the index number under the Jeppesen logo.
Check the chart dates to see if you have the latest version. On FAA charts, the side margin shows the current and following issue dates.
FAA charts have a number written in the top right corner. The higher the number, the newer the plate.
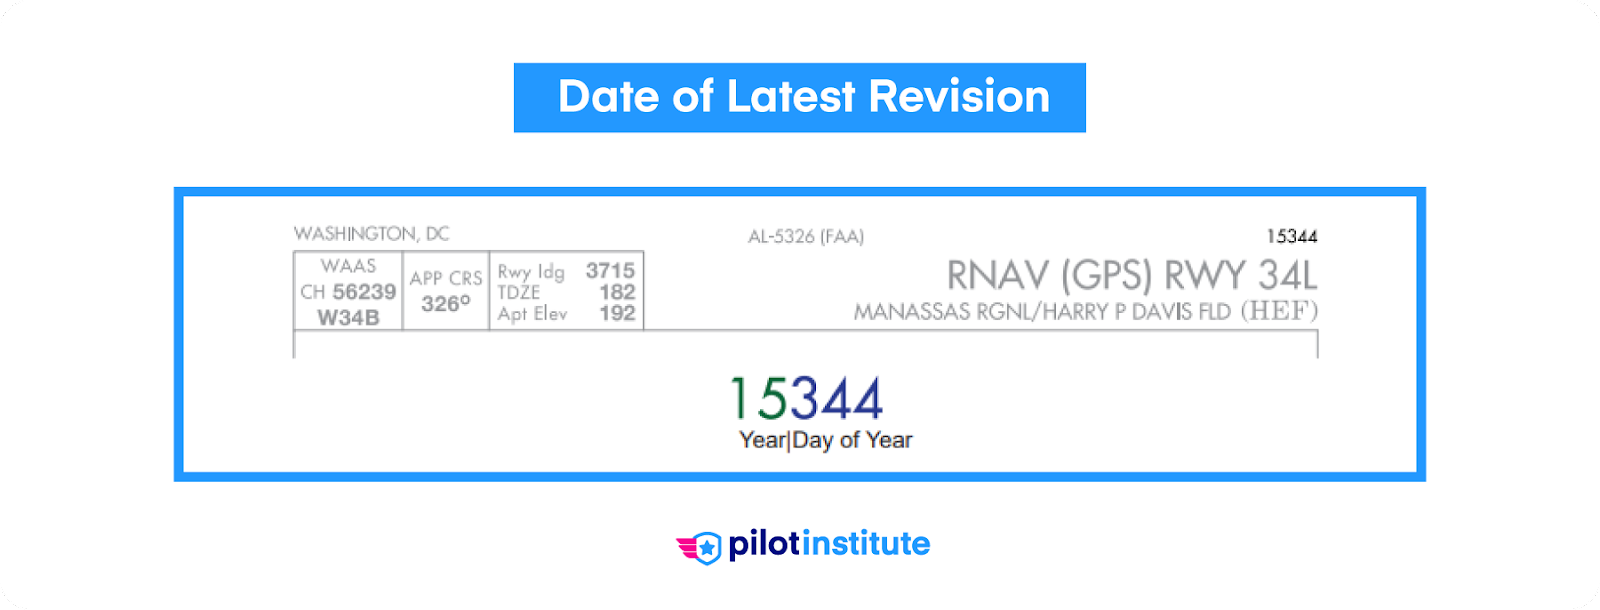
This number represents the year followed by the day of the chart’s last revision. Revision refers to any change made to the chart, such as spelling mistake fixes or new obstacles.
The Terminal Instrument Procedures (TERPS) amendment date is near the bottom of the chart. This is the date of the last procedural change made in the chart.
Jeppesen plates have the revision date at the top, next to the index number. The TERPS amendment date is on the plate’s bottom left edge.
If you’re part of a flight crew, ensure that everyone has the same chart number. Mismatched charts can cause confusion and disorientation at a critical moment. Outdated charts may lead to inadvertent airspace or procedural violations. Don’t miss this step whenever you brief the approach.
3) Review and Tune NAVAID and Comm Frequencies
IAP charts display the approach frequencies prominently in the briefing strip. Are you flying a radio-based approach? Set the ILS, LOC, or VOR frequency required for the approach on your navigation radio. Note the approach course from the chart and set it on the course deviation indicator (CDI).
Many modern radios automatically decode and display the relevant Morse code identifier. However, you should listen to the Morse code audio to verify the identifier.
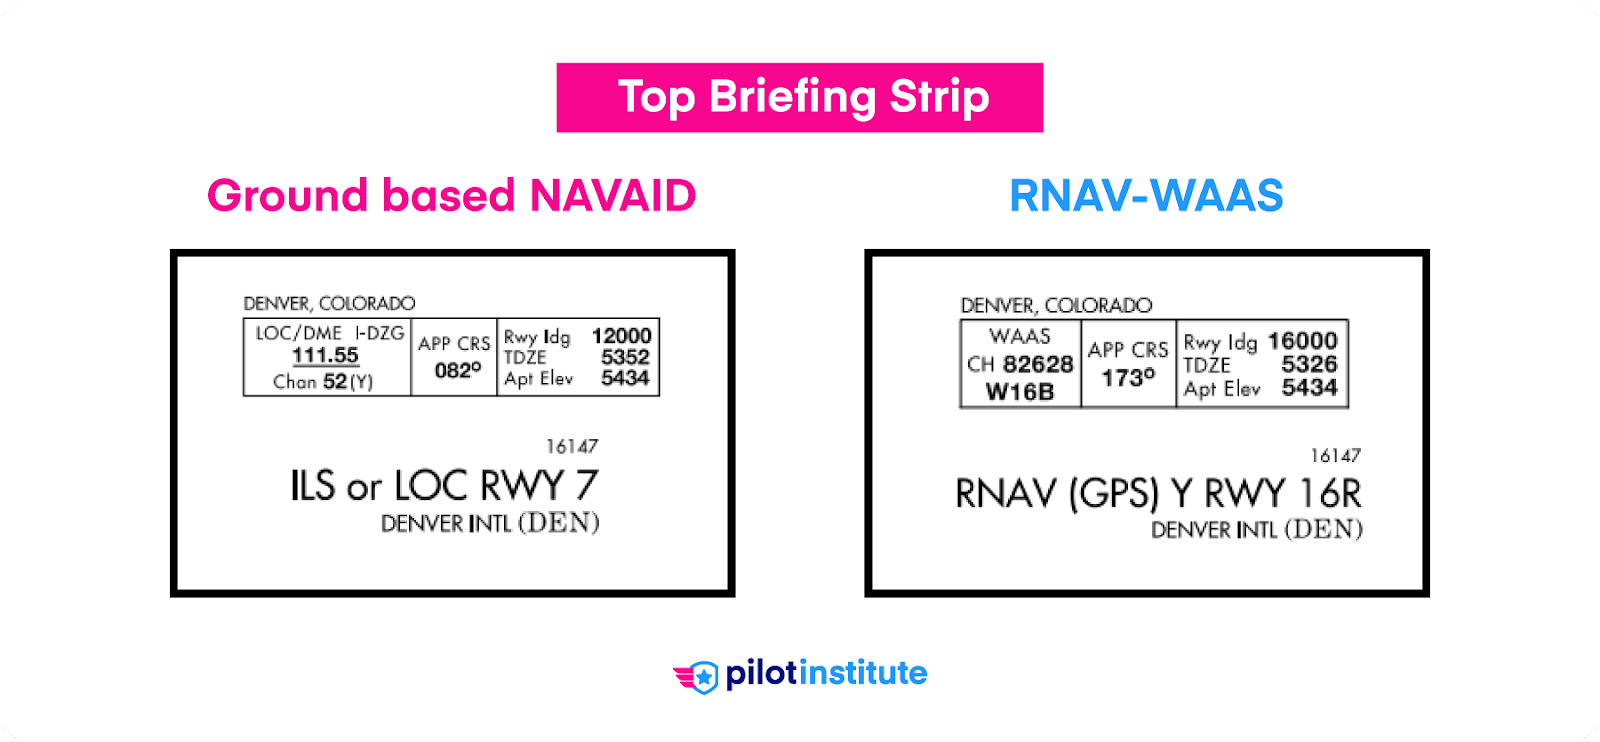
If you’re flying a GPS approach, load it into the GPS unit and verify that the approach matches the chart. Set the CDI to the correct nav source.
At this point, you should already be in contact with the approach controller. Set the tower frequency or the Common Traffic Advisory Frequency (CTAF) on standby. If your aircraft has a secondary communication radio, set it to the ground frequency.
4) Set Approach Minimums
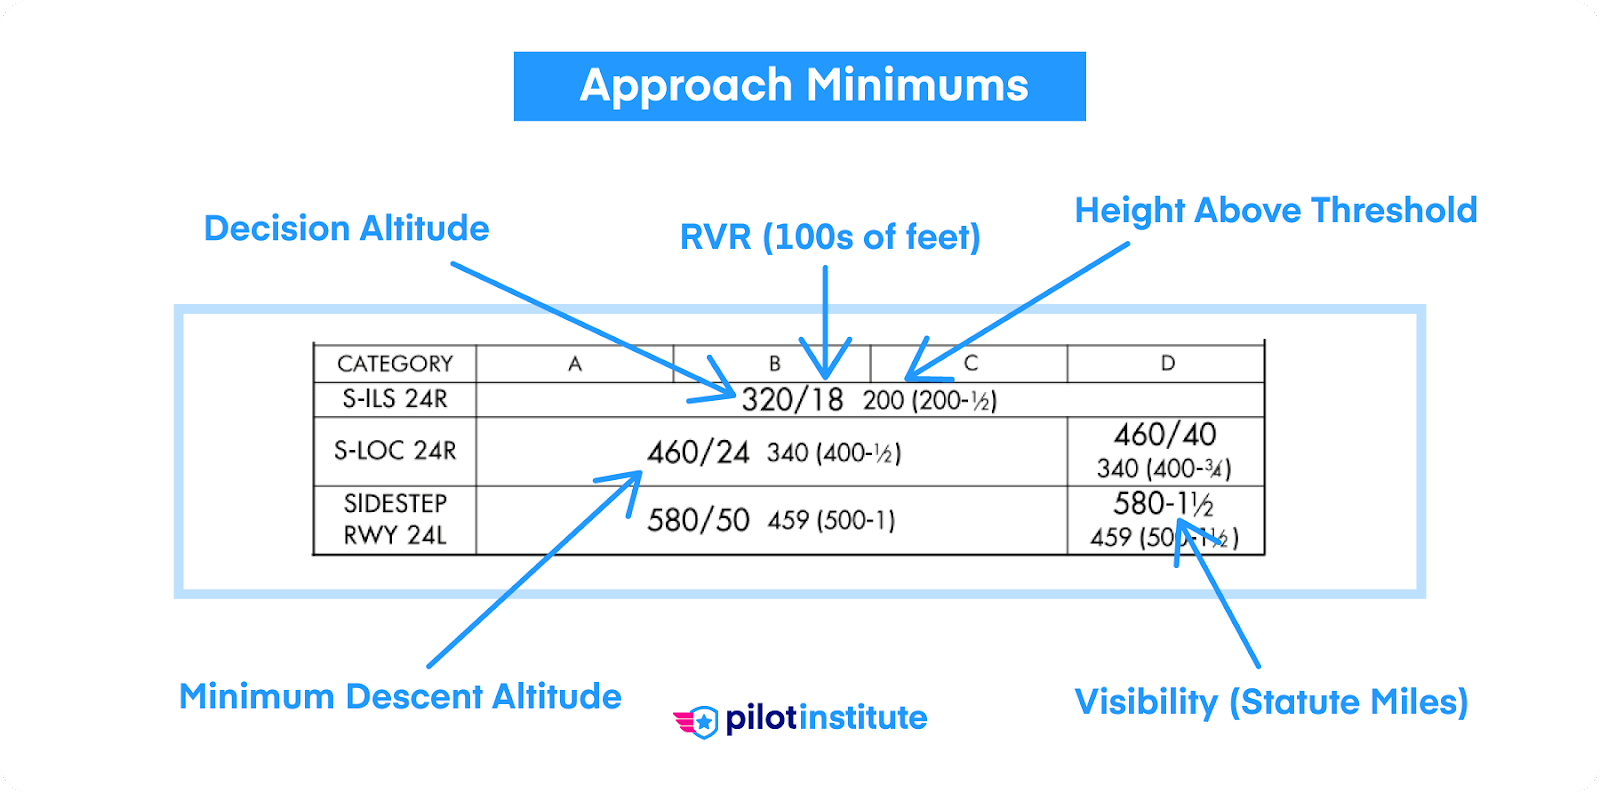
Look for the approach minimum altitudes in the lower half of the plate. Identify the decision altitude (DA) or minimum descent altitude (MDA) valid for your approach. Set your altimeter bug accordingly.
Weather minimums listed in parentheses are for military pilots only.
The minimums for your approach depend on your aircraft category and the type of approach. Some approaches have different minimums if ground equipment is inoperative.
5) Read the Notes
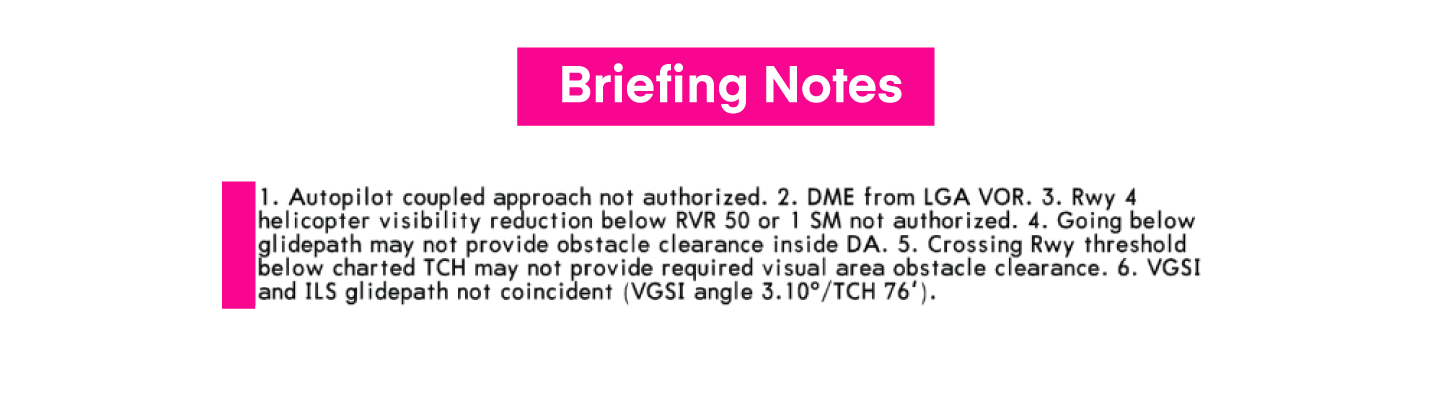
Scan the notes section to see if any information applies to your flight. Some notes require you to have checked NOTAMs and the ATIS. For example, some minima increase if the runway lighting system is inoperative. You’ll only know about the inoperative equipment if you review current NOTAMs.

The notes box may include symbols that you need to know.
The triangle A symbol indicates non-standard IFR alternate minimums exist. If you’re considering this airport as an alternate, review the IFR Alternate Airport Minimums section of the Terminal Procedures Publication (TPP) first.
The triangle T symbol means that non-standard takeoff minimums exist. Check the airport’s entry in the Takeoff Minimums section of the TPP.
The snowflake symbol indicates that this is a cold-temperature airport. You may need to apply cold-temperature altitude corrections.
FAA charts now include an equipment requirement box in the briefing strip. It will mention if the procedure requires specific equipment like DME or RNAV.
If part of the approach is not covered by any NAVAID, the chart may state “RADAR Required.” This also happens if no Initial Approach Fix (IAF) exists. You’ll need ATC vectors to join the approach.
6) Brief the Approach Procedure
Take a look at the plan view. Follow the route from the IAF (if applicable) all the way down to the runway. Ensure you brief any procedure turns along with their entries. Note any required altitudes at the fixes in between.
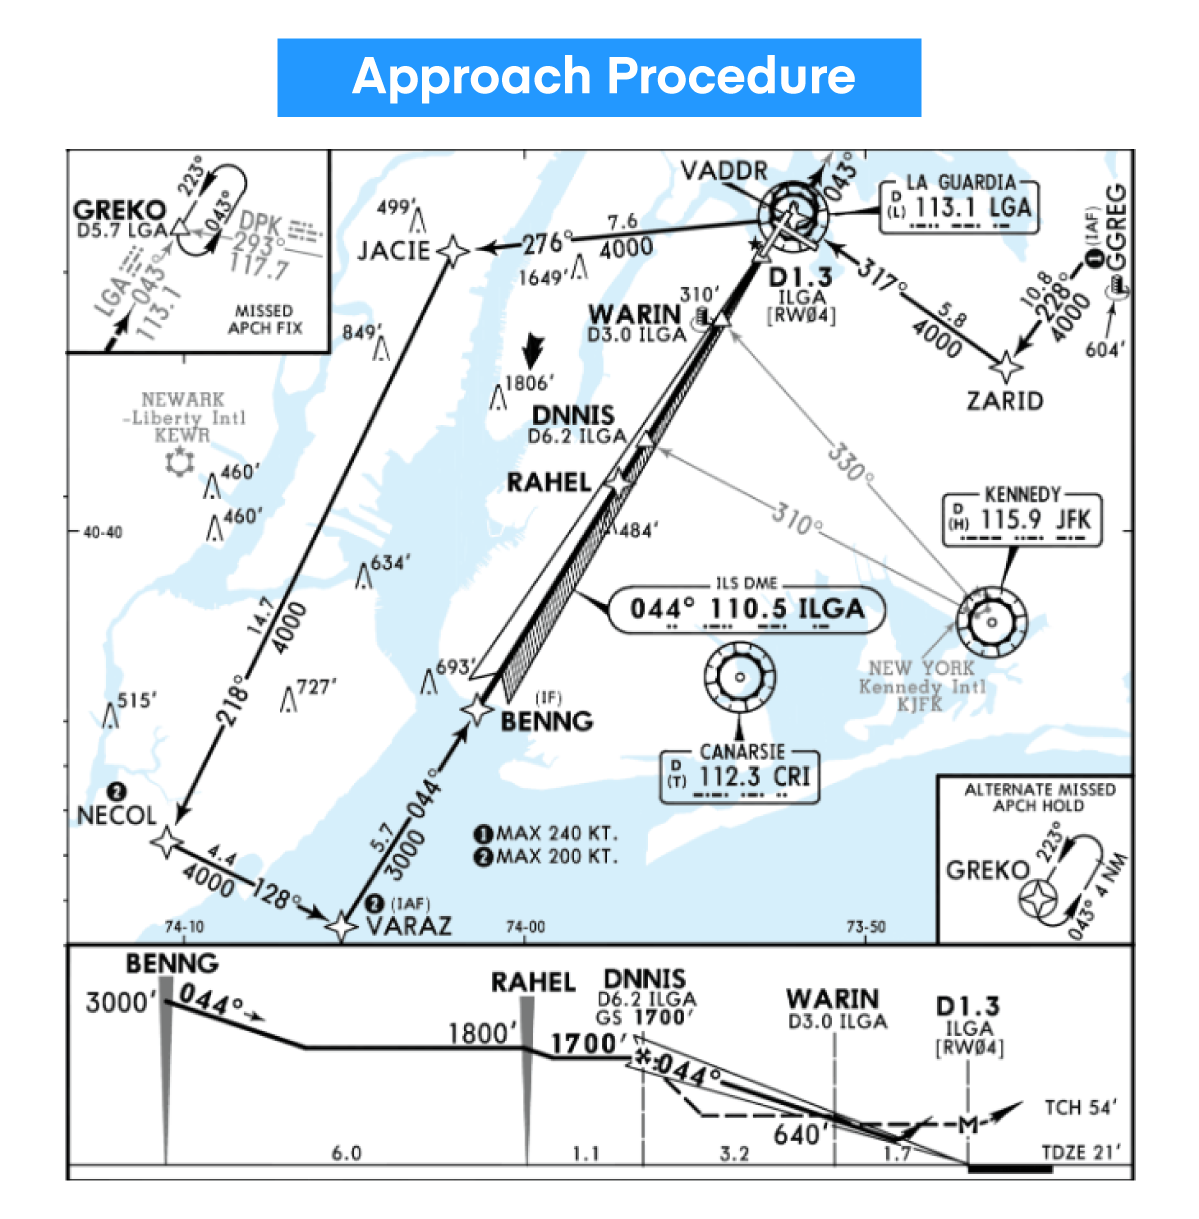
The profile view on FAA charts may include notes about the glidepath. Sometimes, the visual glide slope indicator (VGSI) and ILS glideslope differ. Include these notes in the briefing whenever relevant. Jeppesen charts have this information up in the briefing notes.
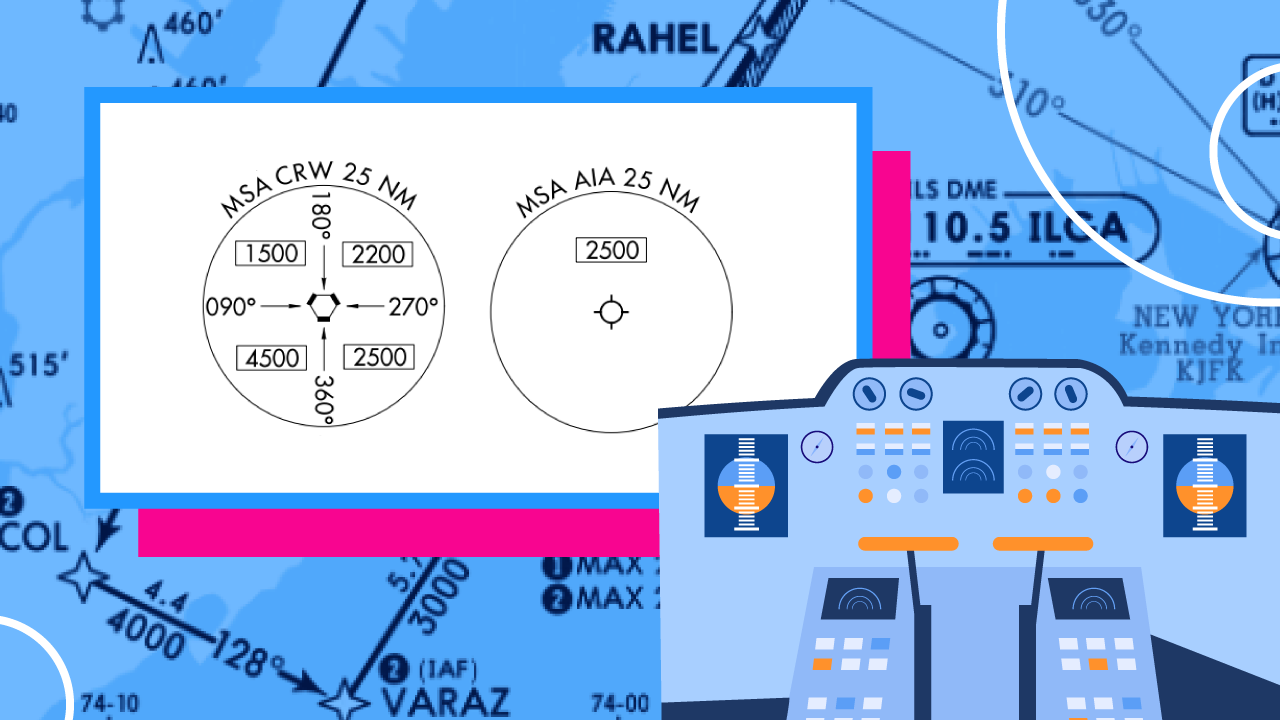
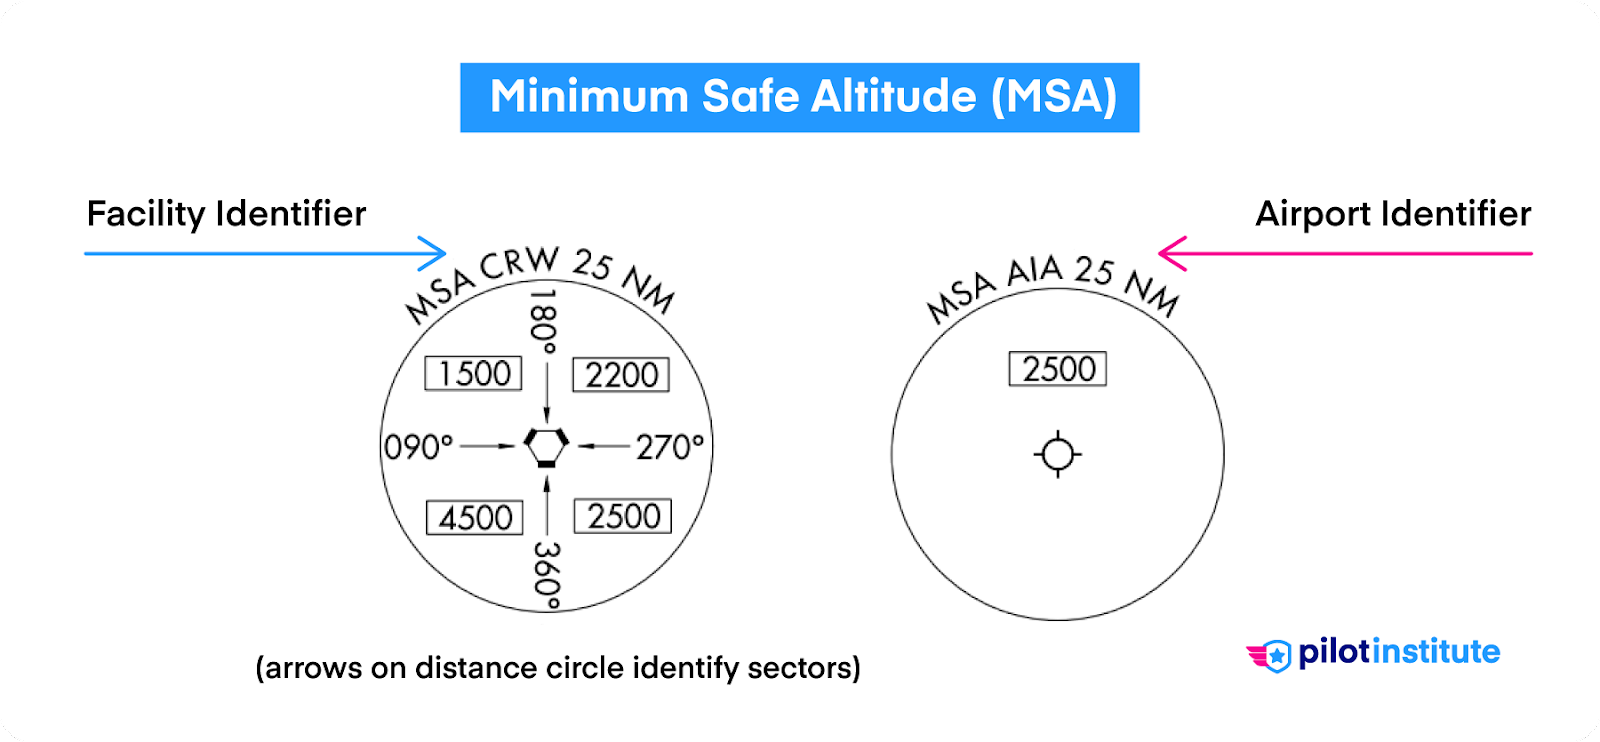
FAA plates include the minimum safe altitude (MSA) chart inside the plan view. Jeppesen plates display the MSA chart in the briefing strip. Note the MSA for the sector you’re arriving from. You’ll need to know this altitude if you must abandon the approach.
Jeppesen plates tend to display obstacles only close to the approach path to avoid cluttering the map. However, they do show nearby airports, which may be helpful in case you need to plan a diversion.
You might not see other airports on the FAA chart, but most obstructions in the vicinity are present. Decide if any are relevant to the approach and include them in the briefing.
7) Review Weather Minimums and Runway Lighting
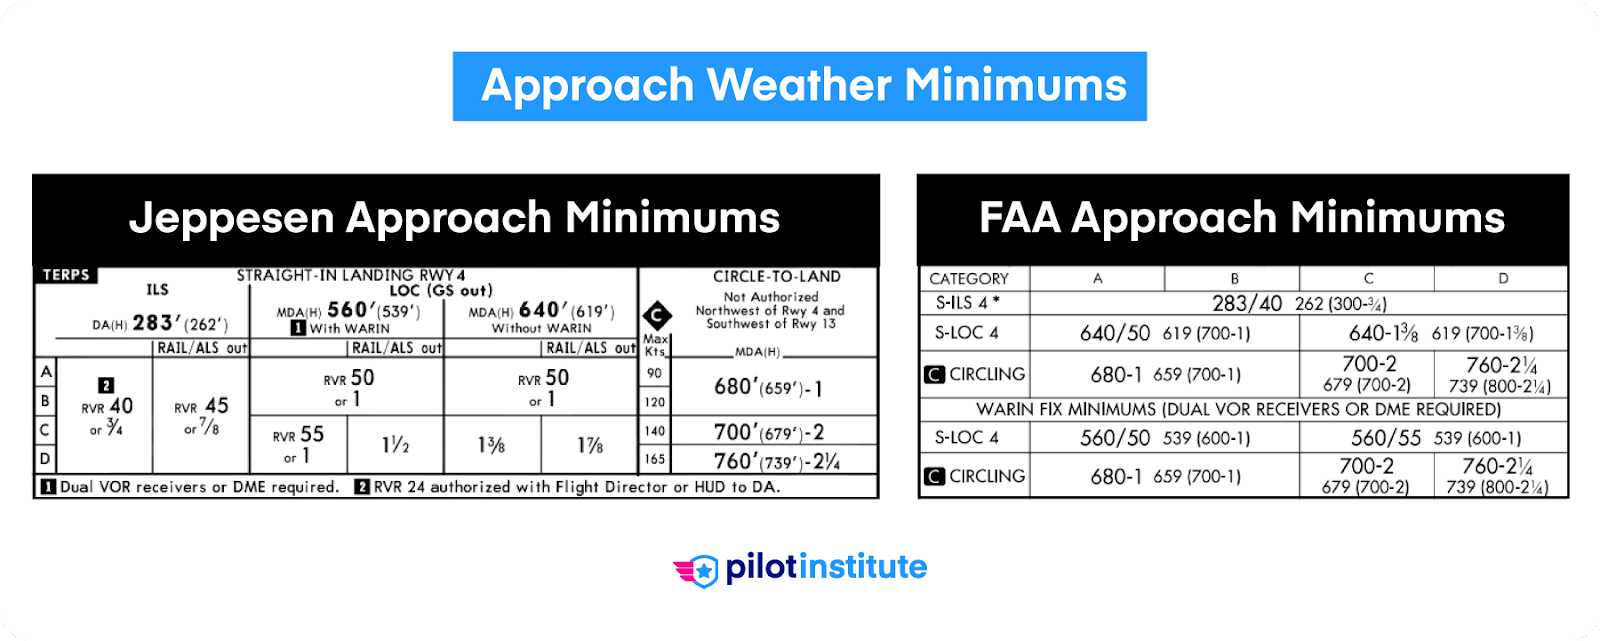
If the weather is close to minimums, review the conditions and see if it’s still legal to land. Minimums can be different for straight-in and circling approaches. They may also increase in case of inoperable navigation or lighting equipment.
Jeppesen charts helpfully list the increased minimums for inoperative approach lighting. FAA charts include this information in the briefing strip.
8) Brief the Missed Approach

The missed approach procedure should never be an afterthought. The hectic environment of a go-around should not be the first time you look at the procedure. Brief it as if you expect to fly it.
The plan view on FAA charts shows the missed approach track using a hash-marked line with an arrow. Jeppesen charts use a similar dashed line with an arrow at the end.
Brief the published missed approach procedure. ATC may issue instructions if you go missed, but don’t leave it to them to bail you out. Sometimes, they just ask you to follow the missed procedure as published.
The pilot briefing strip contains complete text instructions for the procedure. Both charts have simplified missed approach icons for quick reference. The FAA charts include them in the profile view, and Jeppesen charts have them below the profile view. A glance will give you a good idea of the actions needed.
The plan view includes the complete missed approach course and holding fix if possible. Sometimes, the procedure is depicted in a box overlaying the plan view.
9) Brief the Runway Environment
Familiarize yourself (and any crew) with the runway environment.
Check for anything unusual about the runway. Are there any nearby obstacles that call for caution? What about parallel runways or taxiways that increase the risk of a wrong surface event? Include it in the briefing.
Has the braking action changed due to runway contamination? Recheck the required stopping distance, accounting for any rain, snow, or ice.

Approach lighting may be the first sign of the runway in low visibility. Pay special attention to the lighting type in briefings during marginal weather.
Is there a PAPI or a VASI? If so, which side of the runway is it?
Anticipate which exit you’ll use to turn off from the runway. Ensure you have an airport diagram available. FAA charts include a small airport sketch for reference, but taxiways aren’t named. Jeppesen charts don’t include this feature.
10) Discuss Automation Procedures
The autopilot eases workload considerably during IFR operations. However, automation can take time to set up, so decide early on if you plan to use it. Also, decide which mode(s) you’ll use and when you’ll switch to hand-flying. Plan the automation for the missed approach as well.
Check the notes to ensure the approach procedure doesn’t prohibit autopilot use.
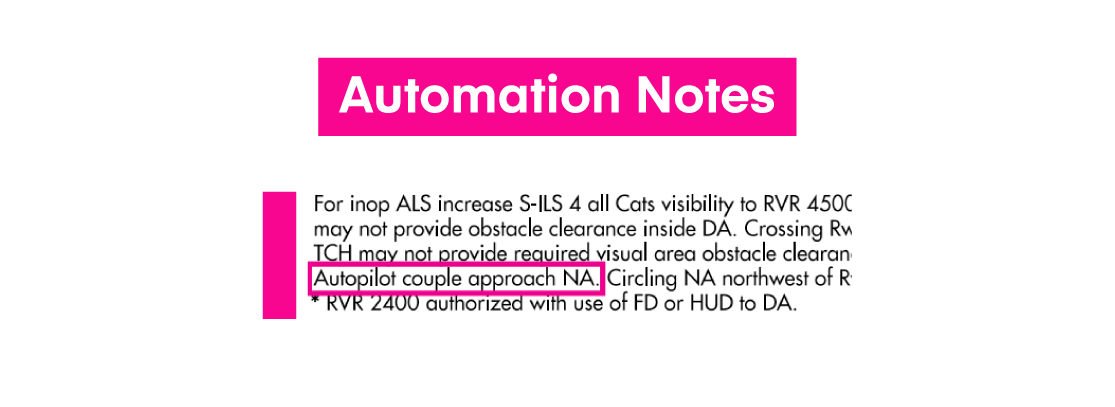
If you’re flying a non-precision approach, take extra care to set the correct MDA. You should be acutely aware of the active autopilot mode throughout the approach. A misunderstanding could create confusion at a critical moment.
Anything Else?
If you have crew members, ask them if they have any questions or concerns.
This is a good time to discuss anything unusual about this particular approach. Include any inoperable equipment onboard the aircraft or at the airport. You may also include significant weather conditions, wind shear, or excessive turbulence.
If you have passengers on board, brief them on what to expect during the landing.
Briefing Checklist
The final briefing should be fairly concise once you’ve gathered all the information.
- Announce the airport and approach name.
- Ensure that the chart is current (cross-check with any crew members).
- Verify the approach course and the nav source. Make sure any onboard nav data matches the IAP.
- Check the frequencies set on the nav and communication radios. If you plan to use the autopilot, verify it has been set correctly.
- Give an overview of the approach route, including mandatory altitudes at any fixes.
- Identify the minimum approach altitude and give a quick overview of the missed approach procedure.
- Identify the MSA and suggest a plan if you need to abandon the approach.
- Add anything significant that may make the approach unusual or challenging.
Conclusion
The mere sight of an IAP chart can seem intimidating. But if you systematically approach each briefing, you’ll soon find it easier than you thought. Nothing beats practicing this skill in the dynamic atmosphere of a real flight. But briefing approaches using a home flight simulator is an excellent way to stay sharp. If you don’t have a simulator setup, check out our complete flight sim setup guide.