Back in early 2021, DJI decided to make its foray into the exciting realm of FPV (first-person-view) flight. An already-assembled, out-of-box offering that included features known to DJI products, including automatic brake, hover, and Return to Home, was appealing since traditional FPV rigs don’t have it. Unfortunately, the world’s largest drone manufacturer gave us something with quite a few shortcomings, including a bulky size and fragile build. If you crashed this drone, you sent it back for repair but more likely replacement.
DJI listened to customer feedback and introduced its first cinewhoop-style offering a little over a year later. The Avata is roughly the size of DJI’s sub-250g Mini series, and the frame is much more in line with a typical FPV build. Speaking from experience, it could also withstand a crash or two in Normal and Sport mode.
Recently, the Avata 2 was released. Over the years, DJI has made each successor in a series sleeker and more aerodynamic while improving the camera’s overall quality. This release is no exception. DJI also included Easy ACRO modes that mimic more popular freestyle tricks, including flips and rolls, to appeal to a broader consumer base.
One main question is, if you already have the original Avata, is it really worth upgrading to this offering—especially when the previous Goggles, Remote Controller, and Motion Controllers aren’t compatible? Is it an ideal purchase for a beginner looking to experience FPV flight without learning radio frequencies, how to solder, or some of the other prerequisites needed to get going?
Those questions will be answered and more. Let’s dive in.
Key Features
- 377g (0.83 lbs.) total weight
- 185×212×64 mm frame
- Type 1/1.3 CMOS image sensor
- 12mm equivalent lens (155º FOV)
- Ability to capture photos and video clips on the same flight
- 4K/60p and 2.7K/100p flight at 130 Mbps
- 3 automated Easy ACRO modes
- D-Log M 10-bit color profile
- H.264 and H.265 video codecs
- Emergency brake and hover
- Downward obstacle sensing
- DJI’s O4 transmission system for 13km range, 60 Mbps bitrate
- 23-minute max flight time
- 27 m/s (60 mph) max speed
- Turtle mode that corrects the drone’s orientation before take-off
Comparison
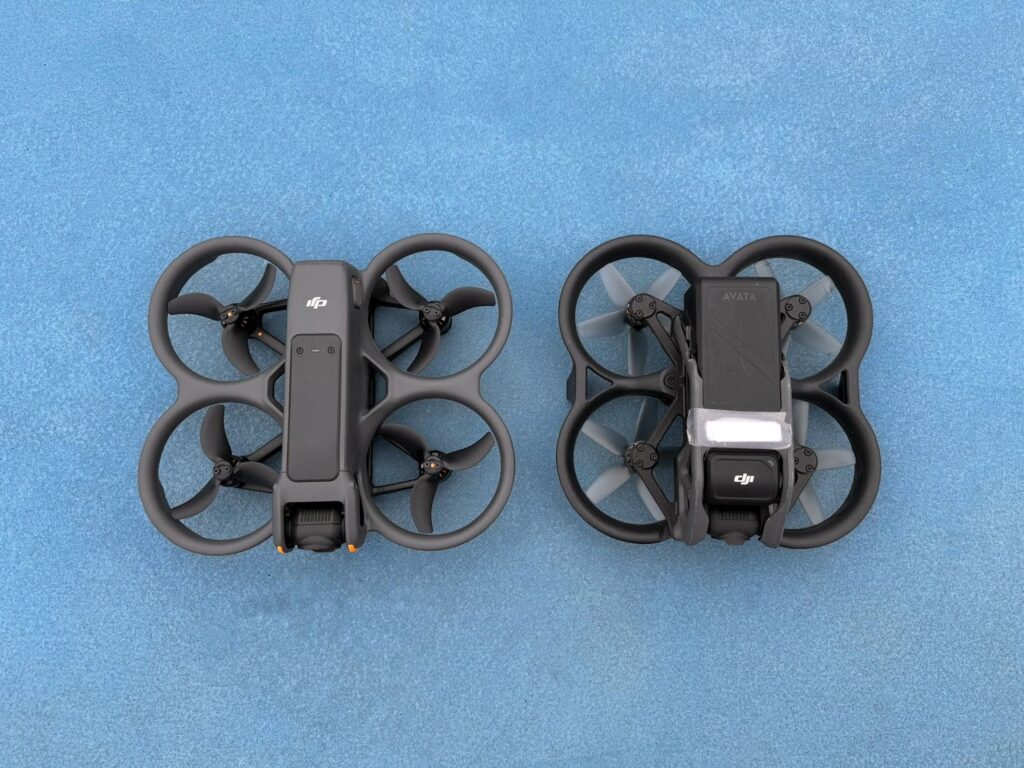
The Avata 2 is longer, leaner, and lighter than its predecessor. It also has a superior camera. One thing about a custom FPV build is that you can pick and choose between components. Some pilots find the flexibility to customize the camera, prop guards, and motors more appealing.
| DJI Avata 2 | DJI Avata | Other FPV drones | |
| Flight modes | Normal, Sport, Manual | Normal, Sport, Manual | Angle, Horizon, Acro |
| GPS | Yes | Yes | No |
| Prop Guards | Built-in | Built-in | Typically, prop guards can be more pliable, not to mention customizable and interchangeable |
| Obstacle avoidance | Downward and backward visual positioning | Downward | No |
| Camera | Type 1/1.3 CMOS sensor | Type 1/1.7 CMOS sensor | Depends, customizable, and dependent on budget plus rig size |
| Assembly | None | None | Requires knowledge of parts, radio frequencies, ESCs, motors, assembly, soldering |
| Flight Assistance | Return To Home, Emergency Brake and Hover | Return To Home, Emergency Brake and Hover | None |
| Auto-stabilization | Available for ‘N’ and ‘S’ modes | Available for ‘N’ and ‘S’ modes | None |
| Flight Time | Up to 23 minutes | Up to 18 minutes | 3–10 minutes |
| Battery Type | Intelligent Flight | Intelligent Flight | Lithium Polymer (LiPo) |
| Internal Storage | 46 GB | 20 GB | N/A |
| Size | 185×212×64 mm | 180×180×80 mm | Varies, typically 3 to 5 inches in diameter |
| Weight | 377g | 410g | Varies, and can easily be less than 250g |
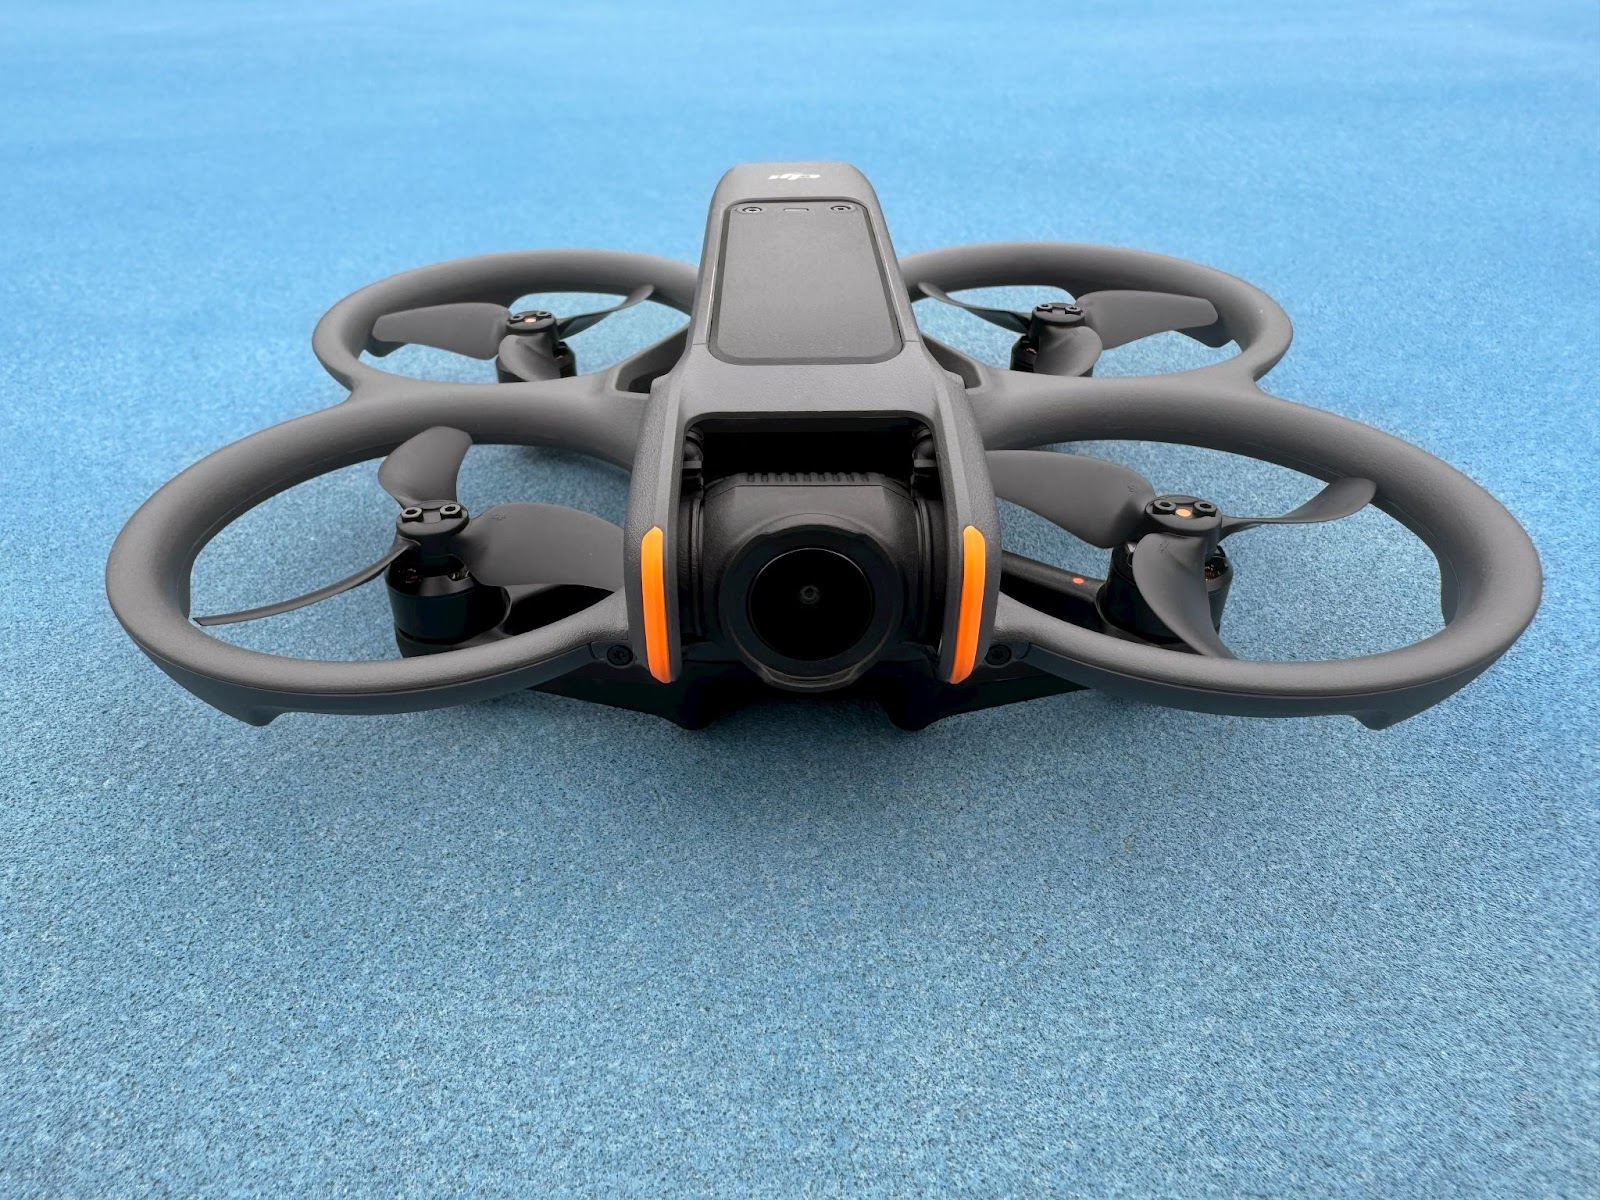
The Avata 2
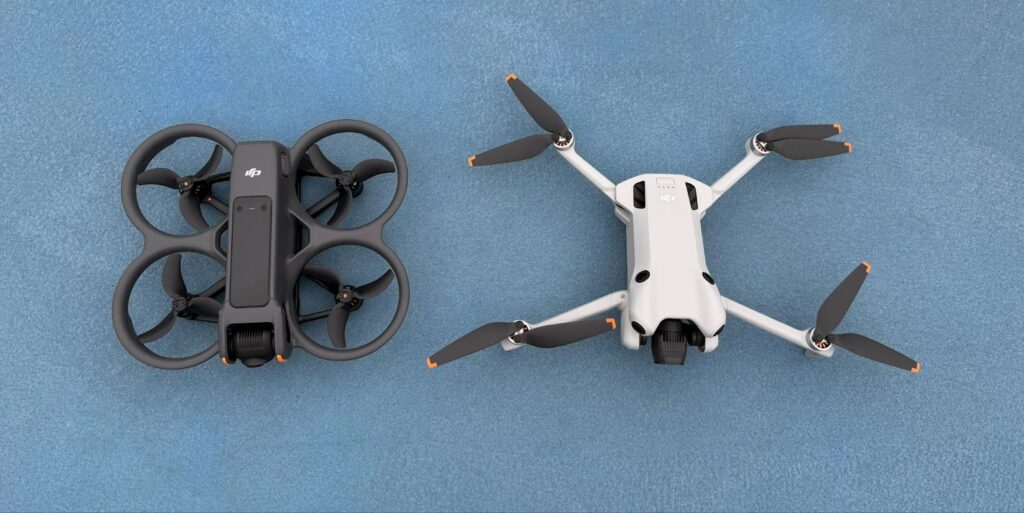
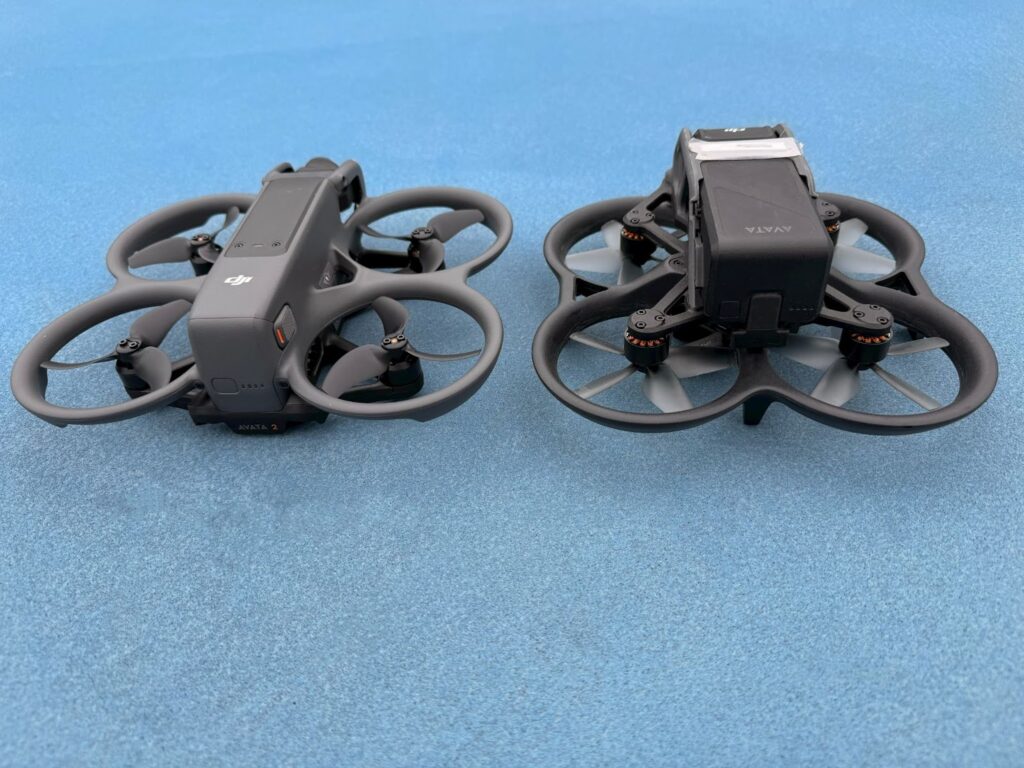
The Avata 2’s wheelbase has been slightly extended, making it wider and longer, at 185×212×64 mm, than the original Avata (180×180×80 mm), all while trimming roughly 33g off the aircraft’s overall weight. DJI continues with its trend of making each successive model in a series sleeker and more aerodynamic, and this latest release is hardly an exception. This being said, both Avata models are larger, sometimes twice the size, than a DIY cinewhoop that typically ranges from 3 to 5 inches in diameter.
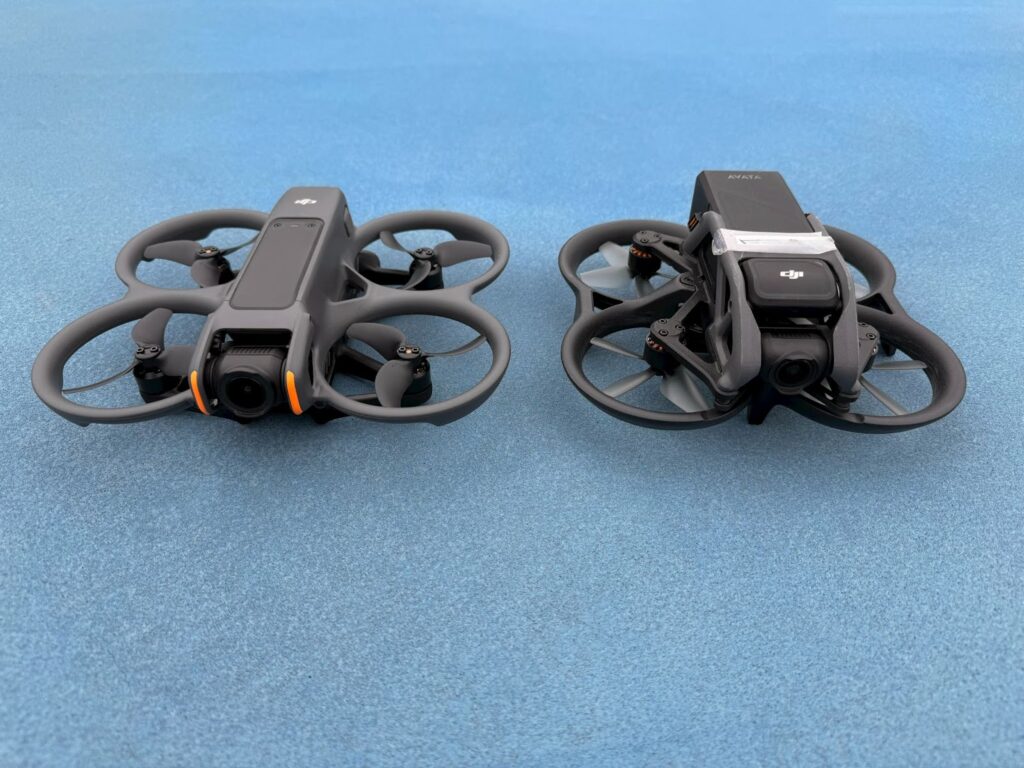
The Avata 2 sits lower to the ground at takeoff. While the original model felt slightly heavier in the front and tended to tilt forward slightly during flight, the center of gravity felt more pronounced. With the original Avata, if I flew too fast, causing the drone to pitch forward, the edges of the prop guards would sometimes enter the frame. This did not occur at all during my testing of the Avata 2, regardless of how fast it flew or which maneuvers I performed.
The Avata 2 can travel in 3 modes – Normal, Sport, and Manual. In Normal mode, it can travel at a speed of about 18 mph, while Sport mode doubles it to 36 mph. When switched to Manual mode, you can travel at a speed up to 60 mph. Even though the original DJI FPV was ill-equipped to handle a collision, my crash happened in that mode. While the Avata 2 is better equipped, it should be noted that it is possible to bust the frame when traveling at maximum speed.
Photo, Video, and Modes
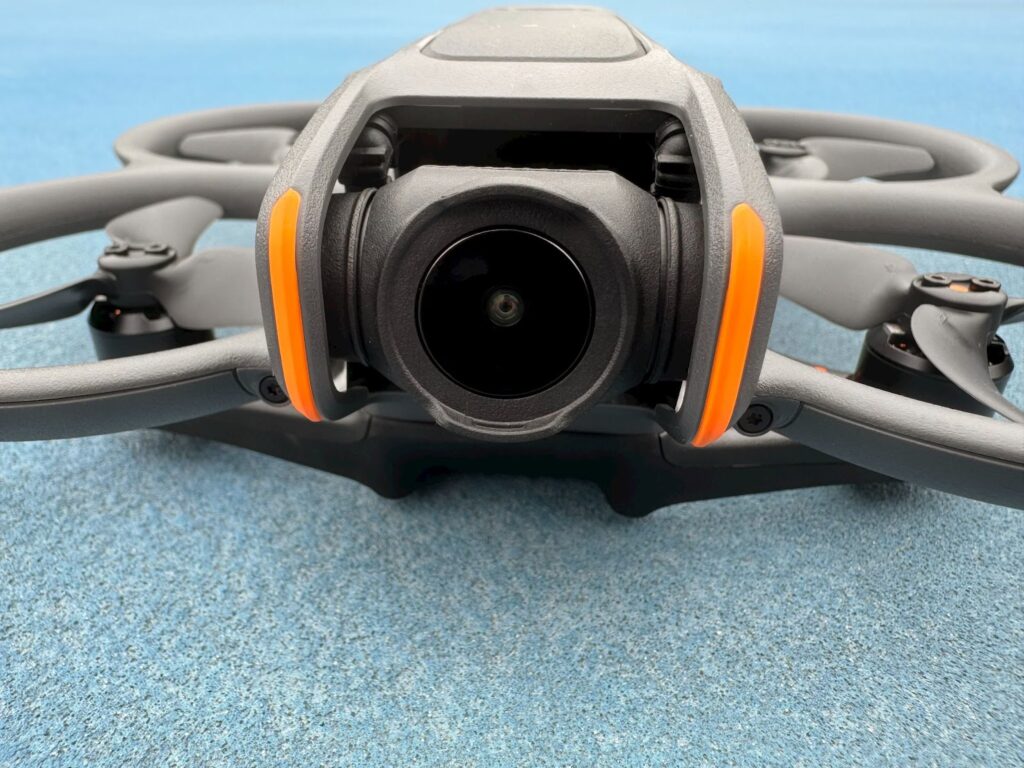
DJI equipped the Avata 2 with a larger Type 1/1.3 12MP sensor compared to the Type 1/1.7 found on the Avata. The camera has a fixed F2.8 aperture, a 155º FOV, and is mounted on a 1-axis gimbal. Still images are only available as JPEG files, once again, and Single Shot is the one available mode. It’s worth noting that no one really uses an FPV drone for photography, especially when there are far superior options from DJI for capturing still images.
The Avata 2 can capture video at resolutions up to 4K/60p HDR and 2.7K/120p (for slow motion) with a bit rate of 130 Mbps. DJI’s 10-bit D-Log M color mode is also available now for increased flexibility in post-production. The Avata, in comparison, offers D-Cinelike but is limited to 8-bit color. Both still imagery and video clips can be captured in ratios of 16:9 and 4:3. Like its predecessor, the Avata 2 supports standard, wide-angle, and super-wide-angle formats.
In a direct appeal to consumers who may not have the time, patience, or desire to learn how to operate in Manual mode, meaning without hovering or GPS enabled, DJI created Easy ACRO features. With one click of a button, users can flip the drone forward or backward, roll left or right, or create a lateral drift effect when the drone flies toward a subject, perform a 180º spin, before drifting off in the opposite direction.
DJI Googles 3 and Motion Controller

In order to operate the Avata 2, you need DJI’s Goggles 3. This is where you’ll connect to the Fly app on your smartphone with a USB-C cable and update the FlySafe database and firmware. It’s important to note that the drone will not take off or operate without the Goggles 3. A built-in cooling fan will also power on automatically, and the Anti-fog feature can be activated to increase fan speed and prevent fogging in the lenses.
| DJI Goggles 3 | DJI Integra | DJI Goggles 2 | |
| Size | 170×109×112 mm | 170×104×75 mm | 167×103×81 mm |
| Frequencies | 2.400-2.4835GHz5.170 -5.250GHz5.725-5.850GHz | 2.400-2.4835GHz5.725-5.850GHz | 2.400-2.4835GHz5.725-5.850GHz |
| Transmission | O4 | O3+ | Can only be used with DJI Avata |
| FOV | 44º | 44º | 51º |
| Weight | 470g | 410g | 290g |
| Operating time | 3 hours | 2 hours | |
| Lowest Latency | 1080p/100p, latency 24 ms | 1080p/100p, latency 30 ms | 1080p/100p, latency 30 ms |
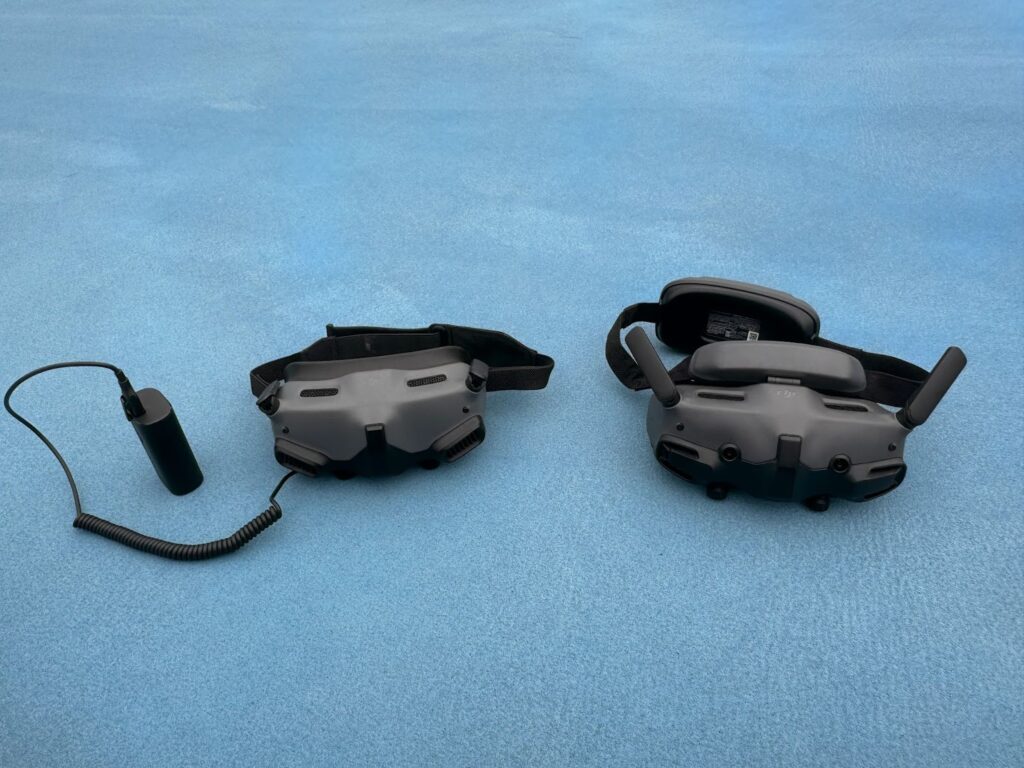
The Goggles 3 weigh 470g and are 170×109×112 mm with the antennas folded down. After the initial Avata was released, with the Goggles 2, which relied heavily on a touchscreen to navigate the screen’s menus, DJI upgraded those with Goggles Integra. Goggles 3 is a natural progression of the Integra and includes a new forehead pad to alleviate some of the pressure around your eyes and nose.
An integrated battery pack placed within an adjustable head strap means no more dangling battery. Because the battery is built in, you can’t change it out. That shouldn’t matter much as the 7.2V, 3000 MAh lithium-ion battery will give you about 3 hours of uptime between charges. The USB-C port also allows an external USB power bank to be attached should you need more time. You cannot remove the antennas and switch them out with an alternative, aftermarket solution.
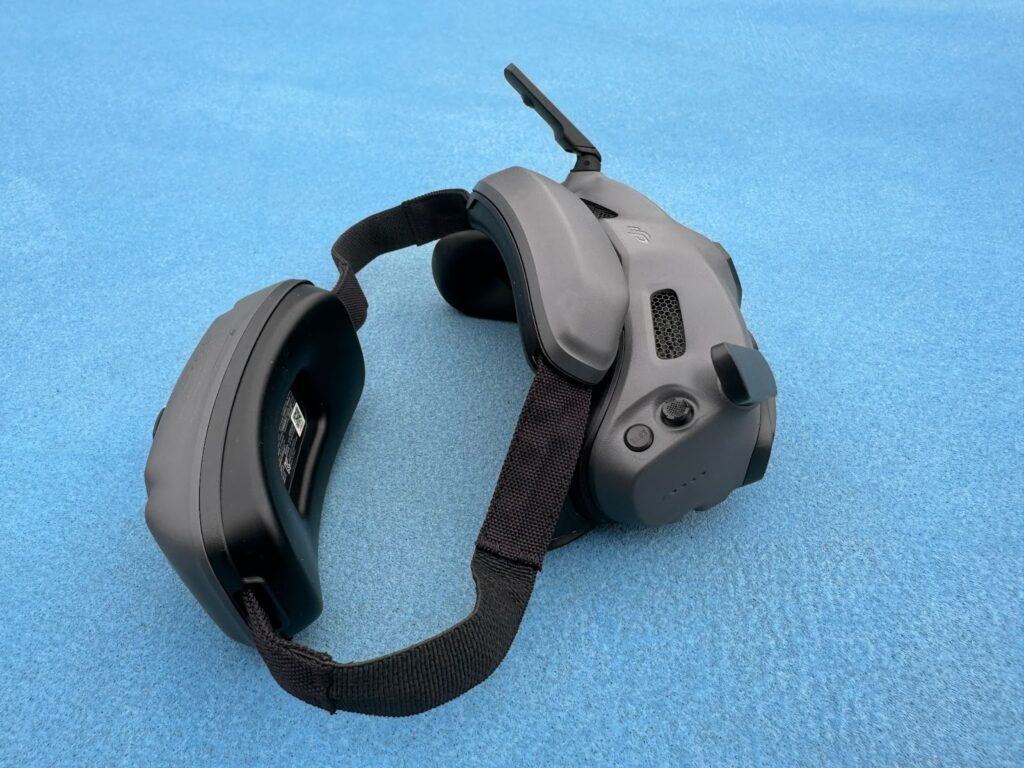
A joystick and button to assist with navigation have replaced the touchpad that dominated the Goggles 2. This makes it much easier to toggle between settings. You can tap the right-hand side, right below the joystick and button, to get a window displaying the real-time outside view, a feature DJI calls “Real-time Live View,” thanks to the two cameras strategically placed on the front of the Goggles 3.
Inside, on screen, the layout is almost identical, along with the same 2 x 0.49” OLED screen found on the Googles 2 and Integra. This makes the transition to the Avata 2 nearly seamless. The only difference is a smaller 44º FOV, compared to 51º on the Goggles 2. The MicroSD slot has been moved to the center, inside the Goggles, between each lens, while a proximity sensor sits between the eyes.
If the Goggles are removed, the screen will turn off automatically to preserve energy. Two knobs on the bottom allow you to adjust the focal range. This feature comes in handy if you wear glasses or don’t want to wear contact lenses. The Goggles 3 provides a range of -6.0 to +2.0. This is a marked difference from the -8.0 to 2.0 range from the Goggles 2. Therefore, a pair of additional -2.0 diopter lenses is provided to compensate for the difference.
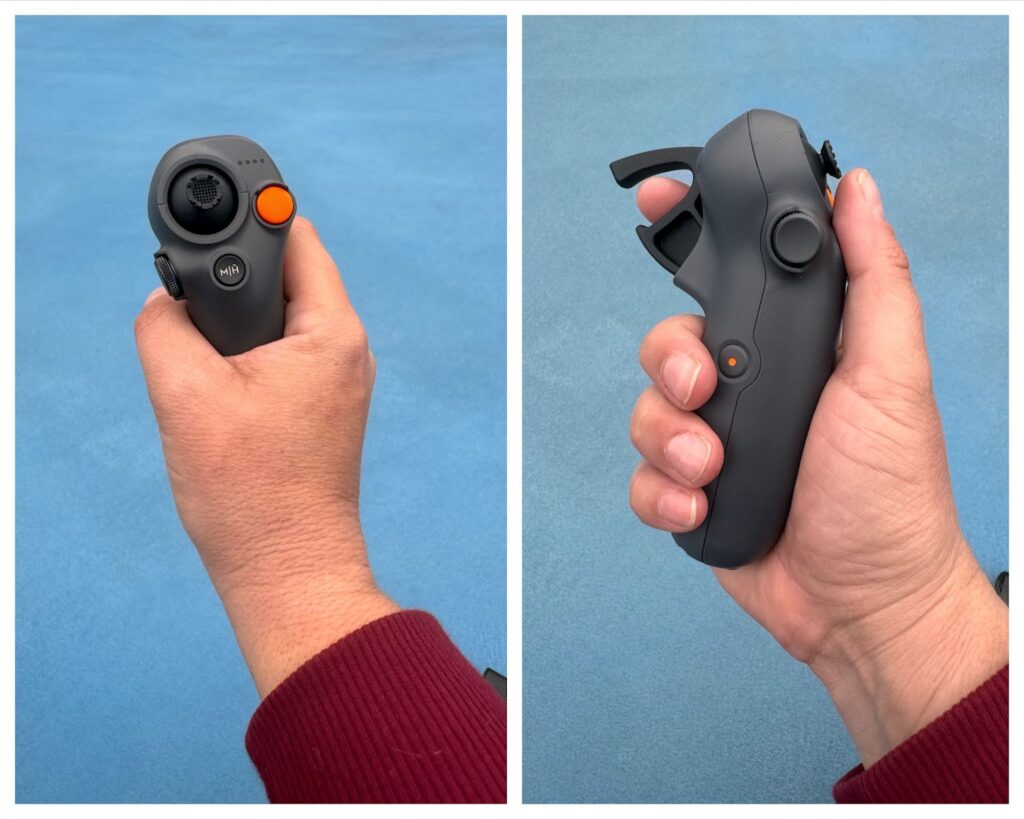
The Motion Controller 3 is the latest version of the handheld device that gives you control with the flick of a wrist. It is smaller, lighter, and has a trigger design that allows you to easily move the drone forward and backward. One issue is the peculiar placement of the record button. This part of the device is not intuitive. The good news is the controller boasts up to 10 hours of life on a full charge.
The battery compartment mimics the one introduced with the Air 3. It will prioritize charging the battery with the most juice, and a typical charge time for each is around 45 minutes. The slimmer, sleeker 2150 mAh lithium-ion batteries are advertised as providing up to 23 minutes of flight time, though 18 to 19 minutes is more accurate.
What It’s Like to Operate
DJI sent me the Fly More Combo ($1,199 USD) to try out. This includes the aircraft, DJI Goggles 3, Motion Controller 3, a carrying case, an extra forehead pad, replacement propellers, three batteries, and the charging hub. I highly recommend picking up this combo because you’ll want more than 18 or 19 minutes of flight time when you’re at any destination. You’ll also end up saving money versus waiting to add more batteries to your collection later on.
What I didn’t receive from DJI, and what you should budget for, is its FPV Remote Controller 3. While I can only speak on the change in specs, having used the Remote Controller compatible with the first Avata, I can confidently tell you that you won’t get the full experience of operating without it. You cannot operate in Manual mode using the Motion Controller 3. Also, it’s much easier to toggle between all the flight modes as that switch is strategically placed in the top left-hand corner.
| DJI Remote Controller 3 | DJI Remote Controller 2 | |
| Size | 165×119×62 mm | 190×140×51 mm |
| Weight | 240g | 346g |
| Battery Life | Up to 10 hours | Up to 9 hours |
| Compatibility | DJI Avata 2DJI Goggles 3 | DJI AvataDJI Goggles V2DJI Goggles 2DJI Goggles IntegraDJI FPV |
The first flight automatically defaults to Beginner Mode, where you’re limited on range and flight speed. Then, you can start operating in Normal or Sport Mode. I relied heavily on the Motion Controller, frequently using the prominent orange “Emergency Brake and Hover” button to launch or land the drone and pause the flight to toggle between settings. There’s a pointer you’ll see on the screen, and you’ll click on the Motion Controller’s accelerator to select some options.
On the top of the screen, you can pull down a menu where you’ll be able to adjust the brightness, access the record button, and activate Easy ACRO and Head Tracking. The latter was a feature available on the original Avata and, quite honestly, it’s tough to master and a silly feature overall. With Easy ACRO, once selected, you use the “FN Dial” to toggle between the options.
My favorite effect is the 180º drift. It definitely involves some practice to capture the desired effect of getting that half rotation around your subject, but this is also a move that is difficult, if not impossible, to achieve manually. As far as the flips and rolls go, though, it’s kind of a “blink and you’ll miss it” type of movement.
Perhaps with future firmware updates, you’ll have the option to tinker with the height of a flip or the number of seconds it takes the drone to roll – possibly to create a corkscrew effect. However, it also defeats the purpose of truly learning how to perform these maneuvers manually. You should learn this within a simulator before taking the drone out of Normal or Sport mode. It is intimidating, especially for beginners, not to have GPS and hover enabled.
The side menu pulls up more important settings. For the most part, I operated the Avata 2 with RockSteady EIS activated. The footage I captured was steady, and there weren’t any shaky parts when I played everything back after each shot. You can also activate HorizonSteady, which will keep the Horizon level if the drone is swaying, or disable both and clean up footage in post-production.
The side menu is where you’ll also select your desired frame rate for your video footage, whether you want to shoot it wide, ultra-wide, or regular. On the bottom, you’ll get into more specific camera settings. I found I could scroll through either with the pointer from the Motion controller or the FN Dial. It takes a moment to get accustomed to navigating the different menus.
What is it like to actually operate? Well, I remember the first time I flew the Mavic 3, back in November 2021. The drone seemed to glide through the air gracefully. The trend followed with the Mini 3 Pro, compared to previous models, and continued with the Air 3. The Air 2 felt clunky, in comparison. While the Avata was a significant step up from the original FPV drone, it doesn’t handle quite as well as the Avata 2.
One major upgrade, besides the quality of the camera, is the fisheye sensors found on the bottom rear of the aircraft. While I didn’t spend a lot of time operating indoors, I was able to coast through a bunch of hurdles at around 2 feet, AGL, and it sensed the obstacles while still allowing me to fly through them at a steady pace. Even with the Motion Controller, I felt like I had full control of the Avata and its movements.
There aren’t any obstacle detection and avoidance sensors, but that would also defeat the purpose of FPV flight. The whole point is to get in as close proximity to subjects as possible. There were two times during my testing I crashed, once in Normal mode and the other in Sport, and the frame remained intact. All I had to do, one time, was replace a broken propeller. If you are concerned, these ribbed duct guards from OriginaldoBo are a recommended add on.
Wrapping It Up
A beginner FPV kit costs starts at a few hundred dollars and depending on how much time and effort you invest in learning about this discipline, you can build rigs that are faster, capable of more sophisticated maneuvers, and can be outfitted with a better camera. Let’s face it, $1,199 is a lot of money for DJI’s Avata 2 Fly More kit and not everyone has that kind of disposable income.
DJI also likes to talk up specs on their releases. Even though wind resistance is classified as Level 5, or 23 mph, I had it out in 18 mph winds and it was basically unusable. Many people don’t see a remarkable difference or improvement with DJI’s D-Log M color profile, compared to D-Cinelike. But 10-bit is better than the 8-bit profile the Avata’s camera specifically maxed out at, and the footage you capture on the Avata 2 can be integrated with that captured on some of DJI’s other contemporary drones.
In press materials, DJI touted the two additional 44º cameras in front of its Goggles 3 as a useful feature. However, it doesn’t give you a very comprehensive live view of what’s happening outside. The camera quality, at 720p, is poor, and you only see objects directly in front of you. Those objects are magnified and the footage is grainy. In the future, it would be nice to have higher resolution imagery and more situational awareness. I’d like to know what’s happening off to the sides.
Regardless, I felt the Avata 2 offered enough overall improvements to warrant an upgrade. I handed my original Avata in and I’m thrilled to continue on my FPV journey with this more capable machine. All this being said, purists will criticize the fact that it has an emergency brake, it hovers unless you’re in Manual mode, and you can hit a Return-to-home button to bring it back. Others have already overestimated their flying skills in Manual and wrecked the frame.
Still, I feel motivated to improve my own skills significantly on the Avata 2 and if I get to the point where I want to invest more time with a deep dive into the dynamics of building my own FPV drone, I have a copy of Christian Mollica’s “FPV Flight Dynamics” at my disposal. Make sure you check out PiXL Drone Show’s interview with him, as well.