-
Key Takeaways
-
Circling Approach Fundamentals
- When You Must—or Must Not—Circle
- Approach Categories & Airspeed Limits
-
Protected Airspace: Old vs. Expanded Radii
- Classic TERPS Radii (Pre-2012)
- 2012 Expanded Criteria (“Negative C”)
- Practical Implications
-
Pre-Brief & Mental Rehearsal
- Choosing Pattern Direction—Left or Right?
- Wind, Terrain & Visibility
-
Flying the Circle: Step-by-Step Technique
- Pattern Geometry & Timing
- Airspeed, Configuration, Bank
- Transition to Final & Landing
-
The Missed Approach AFTER Circling Begins
- Re-Interception Strategies
- Single-Pilot Workload Hacks
-
Special Scenarios
- Night Circling
- High-Altitude & Mountain Airports
- Multi-Pilot & ATP Considerations
-
Training & Currency
- FAA ACS Standards—What DPEs Expect
- Building Proficiency
-
Safety Record & Lessons Learned
- Accident Spotlights
- Risk-Mitigation Mnemonic “C-I-R-C-L-E”
-
FAQs Quick-Reference
-
Conclusion
“Cleared ILS 16, circle north of the field, report runway in sight.”
You’ve probably heard that clearance before and felt your pulse tick up a notch. Even seasoned captains know that circling takes serious instrument precision within split-second decisions.
With just 300 feet of obstacle clearance and workload peaking near the ground, it’s easy to see why this maneuver commands so much respect.
We’ll walk you through the entire process step by step. Let’s go from briefing to touchdown, or, missed approach.
Key Takeaways
- A circling approach is a visual maneuver after an instrument approach to align with a different runway.
- Pilots received more protected space for stable visual maneuvering.
- Maintain airspeed ±10 knots, heading ±10°, and altitude +100/−0 feet until descending below MDA.
- Go missed immediately if you lose visual contact or can’t achieve runway alignment.
Circling Approach Fundamentals
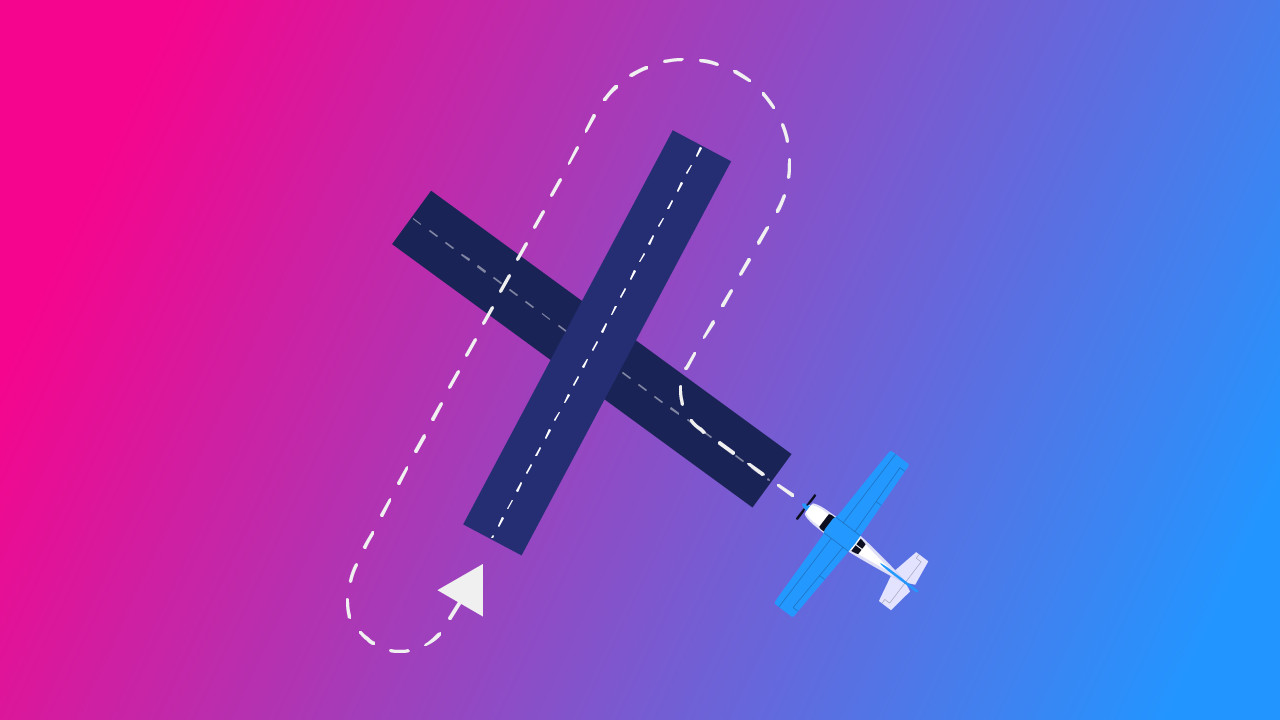
When lining up straight with the runway just isn’t possible (or desirable), you may have the option to make a circling approach. So instead of flying directly in for landing, you visually maneuver the aircraft around the airport to position yourself for a safe touchdown.
But you can also fly a straight-in instrument approach to one runway, and then request ATC permission to circle to land on a different runway. This is a pilot-requested circle from a straight-in.
Some charts even specify “circling only.” The instrument approach gives you no published straight-in minimums to that runway in that case.
On instrument approach charts, you’ll see a runway number or a letter designation. But when the title shows a runway number, it means straight-in minimums exist for that runway.
For example, “VOR-A” or “RNAV (GPS)-B” indicates “circling only” minimums.
When You Must—or Must Not—Circle
So, when does the FAA require circling only, and when should you approach straight-in? Typically, circling-only approaches are designed for one of the following reasons:
- The final approach course alignment with the runway centerline is greater than 30°.
- The descent gradient is greater than 400 ft/NM from the final approach fix (FAF) to the threshold crossing height (TCH).
That said, just because an approach is labeled circling only doesn’t mean you can’t land straight in. If you have the runway in sight and can make a normal descent and landing while meeting all the requirements under 14 CFR, a straight-in landing is still allowed. - A runway is not clearly defined on the airfield.
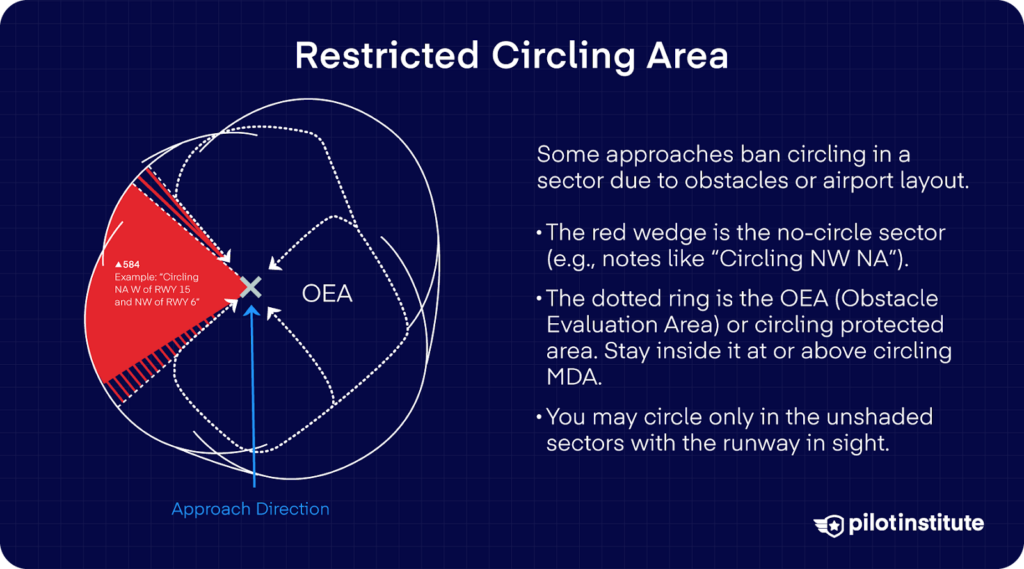
So, when are you not allowed to circle? If the approach chart includes a note such as “Circling NA”, “Circling NA at night”, or “Circling [direction] NA”, then the circling maneuver is prohibited under those conditions.
The chart designer has determined that circling is unsafe, possibly due to obstacle clearance or terrain conditions.
For example, if an approach plate says “Circling NW NA”, you cannot circle to the northwest side of the airport on that procedure.
Approach Categories & Airspeed Limits
Your aircraft approach category is defined in 14 CFR 97.3. It groups aircraft based on a speed of VREF, if specified. If there’s no VREF specified for your aircraft, you take 1.3 × VSO at the maximum certificated landing weight.
Which category does your aircraft belong to? Take a look at this chart:
| Category | VREF or VSO × 1.3 Range (kt) |
| A | < 91 |
| B | 91–120 |
| C | 121–140 |
| D | 141–165 |
| E | ≥ 166 |
But what if you go faster than the upper limit of your speed range? Then you simply have to use the minimums for the next higher category.
For example, a Category B aircraft flying at 145 knots on circling should apply Category D minimums.
Protected Airspace: Old vs. Expanded Radii
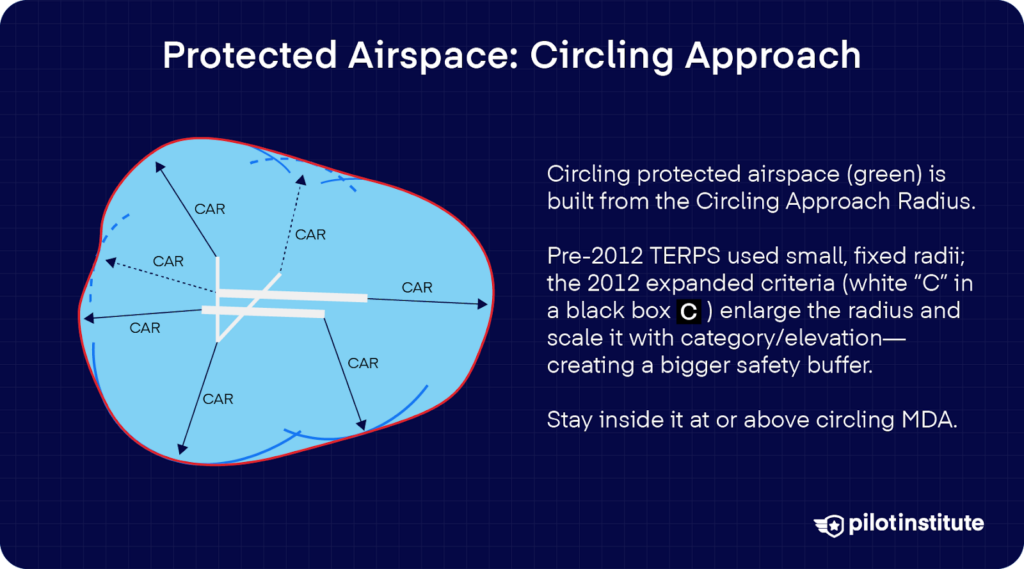
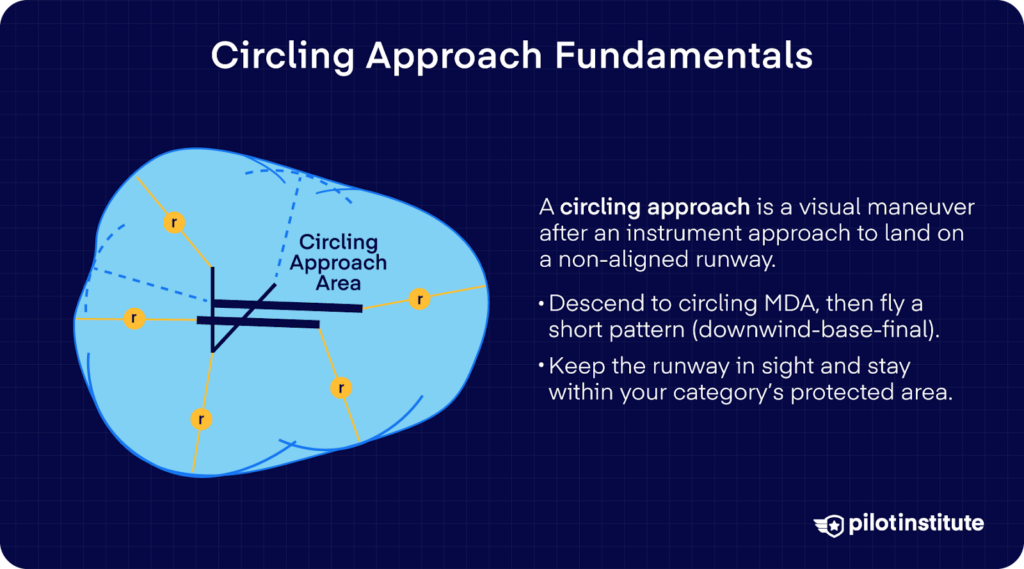
You’re operating within a defined “protected” airspace area around the landing runway when you circle to land.
That area is shaped by arcs from each runway threshold. The size of those arcs depends on your approach category and the criteria used in designing the instrument approach.
Classic TERPS Radii (Pre-2012)
Before Change 21, the radii used to define the circling-protected area were fixed by just the aircraft approach category, regardless of altitude or altitude above the airport. They were given as:
- Category A: 1.3 NM
- Category B: 1.5 NM
- Category C: 1.7 NM
- Category D: 2.3 NM
- Category E: 4.5 NM
2012 Expanded Criteria (“Negative C”)
Then, the FAA adopted expanded circling area criteria in FAA’s Terms for the Establishment of Terminal Instrument Procedures (TERPS) 8260.3B Change 21 beginning late 2012.
What changed? The radius is no longer fixed solely by approach category. Instead, it factors in the published circling minimum altitude (or height above airport) on top of your aircraft’s category.
| Circling MDA in feet MSL | Approach Category and Circling Radius (NM) | ||||
| Category A | Category B | Category C | Category D | Category E | |
| 1,000 or less | 1.3 | 1.7 | 2.7 | 3.6 | 4.5 |
| 1,001 – 3,000 | 1.3 | 1.8 | 2.8 | 3.7 | 4.6 |
| 3,001 – 5,000 | 1.3 | 1.8 | 2.9 | 3.8 | 4.8 |
| 5,001 – 7,000 | 1.3 | 1.9 | 3.0 | 4.0 | 5.0 |
| 7,001 – 9,000 | 1.4 | 2.0 | 3.2 | 4.2 | 5.3 |
| 9,001 and above | 1.4 | 2.1 | 3.3 | 4.4 | 5.5 |
You’ll find a “Negative C” ( C ) symbol in the charts that applied this change. That indicates that the circling protected area has been expanded under newer TERPS criteria.
Practical Implications
How does this change affect you? Before FAA Order 8260.3B Change 21, circling approaches were far more demanding for pilots.
Imagine trying to circle to land when the minimum descent altitude (MDA) was higher than about 1,200 feet above the airport. Pilots often had to make dangerously steep descents just to reach the proper “in-slot” position in such a tight area.
The FAA expanded the circling protected airspace, which gave you both better obstacle protection and more space to fly a stable approach.
This meant you no longer had to dive aggressively to stay within limits. Now, you’re less at risk of an unstabilized descent.
Pre-Brief & Mental Rehearsal
Let’s visualize what a circling approach will be like. Before anything else, take a moment to brief yourself thoroughly.
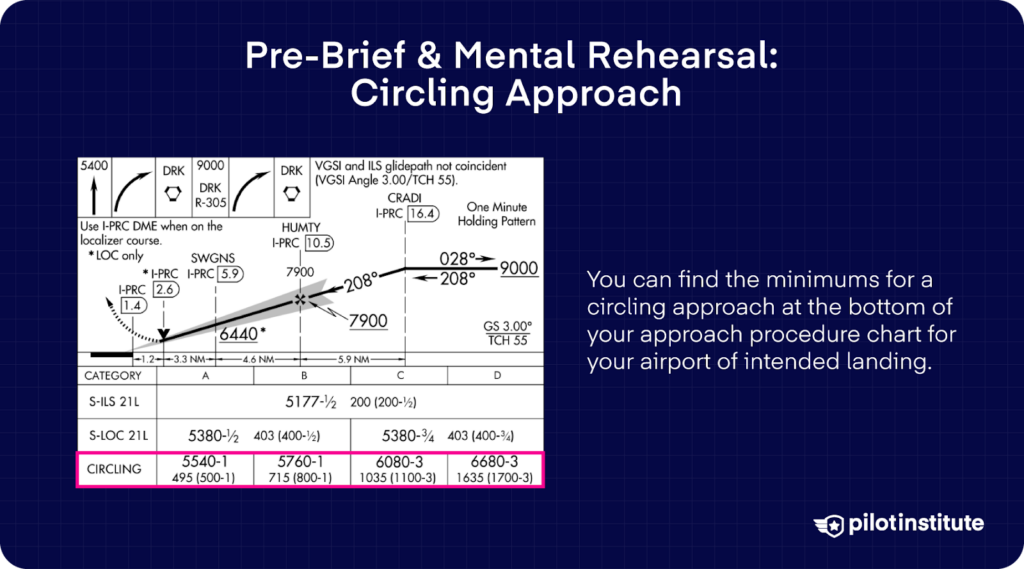
The procedural charts themselves include identification information that you should take note of during this briefing. Each chart lists the procedure name, the runway served, and the airport location. They’re both at the top and bottom of the page.
Where can you find the minimums for your runway? They’re in the chart at the bottom of the approach plate.
For example, at Prescott Regional Airport (PRC), the circling MDA is 5,540 feet, and the height above the airport is 495 feet. The minimum visibility is 1 statute mile.
Choosing Pattern Direction—Left or Right?
The default traffic-pattern direction is left unless otherwise noted on the chart or by air traffic control.
How about at non-towered airports? You still follow standard traffic-pattern operations unless there’s an indication otherwise. Also, factor in noise-abatement procedures or parallel-runway operations.
If the airport provides a published right-turn traffic pattern for one runway, or ATC assigns it, you must comply.
Wind, Terrain & Visibility
Don’t forget to account for weather and visibility for the circling segment. If the ceiling is above 1,000 ft above airport elevation and visibility is good, you get a full view of the airport and runway environment. That should give you room to maneuver comfortably.
Now, if the ceiling drops into the 700–1,000 ft range, you’ll have less maneuvering room. How should you adjust? Tighten your downwind leg and be ready for swift base/final turns.
If the ceiling falls below 700 ft (or visibility becomes marginal), then circling becomes very risky. You may want to consider a straight-in approach (if available) or divert.
| Ceilings | Suggested Pattern | Risk Note |
| > 1,000 ft | Standard | Full view of the airport |
| 700–1,000 ft | Tight downwind | Less maneuver room |
| < 700 ft | Consider straight-in or divert | Highest CFIT risk |
Flying the Circle: Step-by-Step Technique
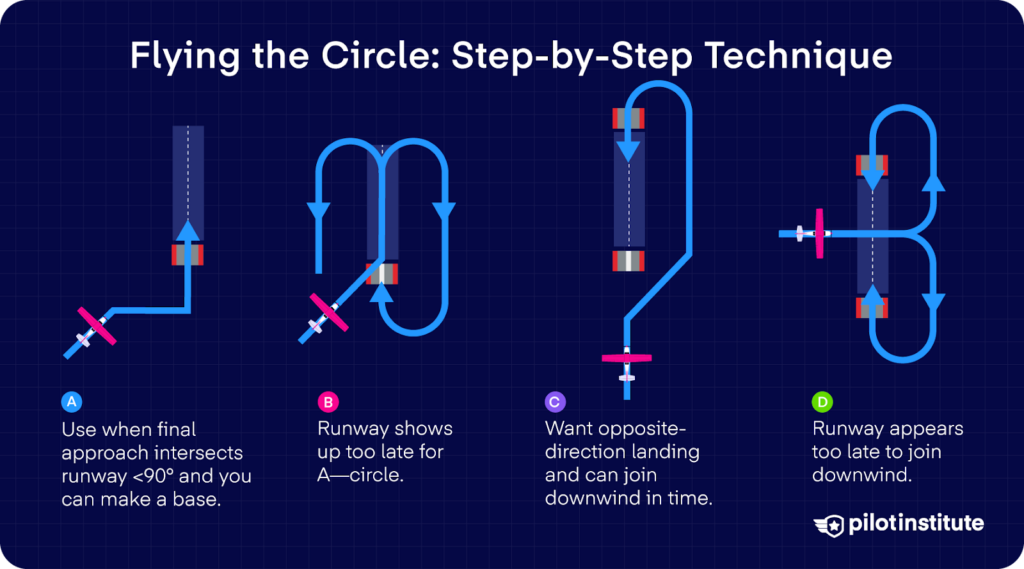
You’re mentally prepped and you’ve crossed out every threat. Now, it’s time to fly the maneuver.
And remember, in FAA terms, a circle-to-land is any visual maneuver from an instrument approach to align with a runway, usually just a modified traffic pattern.
The first stage is just like a standard instrument approach. Continue your descent and stay vigilant as you sink closer to the minimums.
Then, level off at or above the published circling minimum descent altitude or height above airport for your category.
Once you have it in sight and you’re in a position for a normal descent, initiate the visual maneuver. You should still keep your instruments in check while you look outside.
Pattern Geometry & Timing
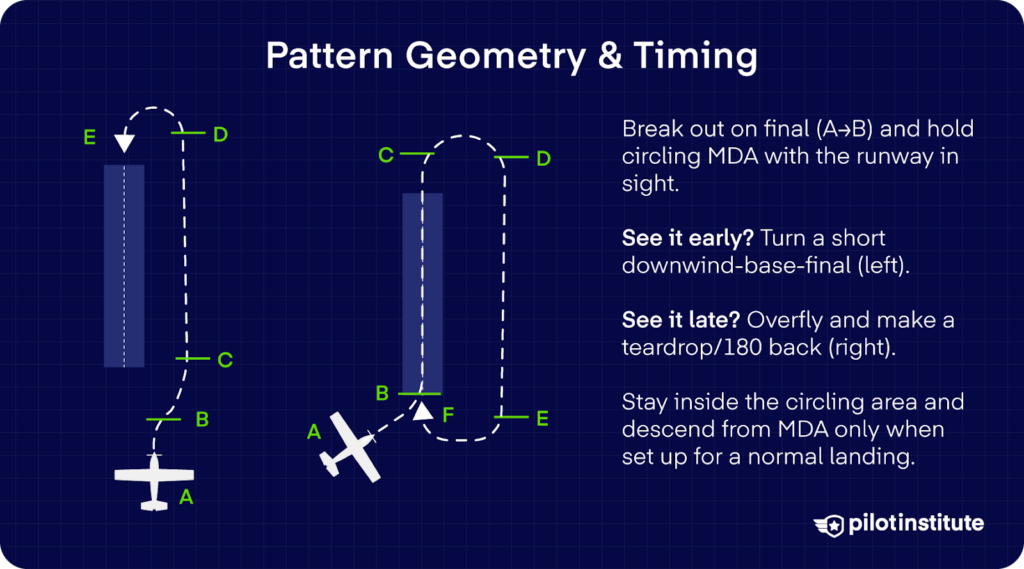
How should your flight path look? You’ll want to fly a geometry that keeps you well within the published circling area and allows you to make a stable final turn to land.
It’s best to have visual references. Perhaps there’s a shoreline, a taxiway centreline, or a familiar landmark in the area. They’ll help you orient yourself and make sure you’re not straying too far from the bubble.
Airspeed, Configuration, Bank
Make sure that you’re flying at a safe maneuvering airspeed. Different organizations have their own procedures, but VREF plus 10 knots is a good benchmark.
You should have gear down and ideally flaps set before your first turn so you’re already in final landing configuration. Limit your bank angle to around 30°, and even shallower at night.
How come? It’s easy to lose orientation and visual reference in the dark, so it’s best to make conservative control inputs.
Avoid last-second flap changes on the base leg, since those can cause ballooning or sudden changes in the descent path.
Transition to Final & Landing
As you turn final, use any visual aids available (a PAPI or VASI). Apply power as needed to arrest your sink rate, ideally at 500 fpm. Remember: this is not a dive.
Maintain your target airspeed. Keep lateral and vertical guidance within about a quarter scale of your instruments until you have full visual control and complete a normal landing.
Once you’re lined up with the runway, start to descend at a normal rate using standard, gentle maneuvers. The goal is to keep everything stable and predictable all the way to touchdown.
The Missed Approach AFTER Circling Begins
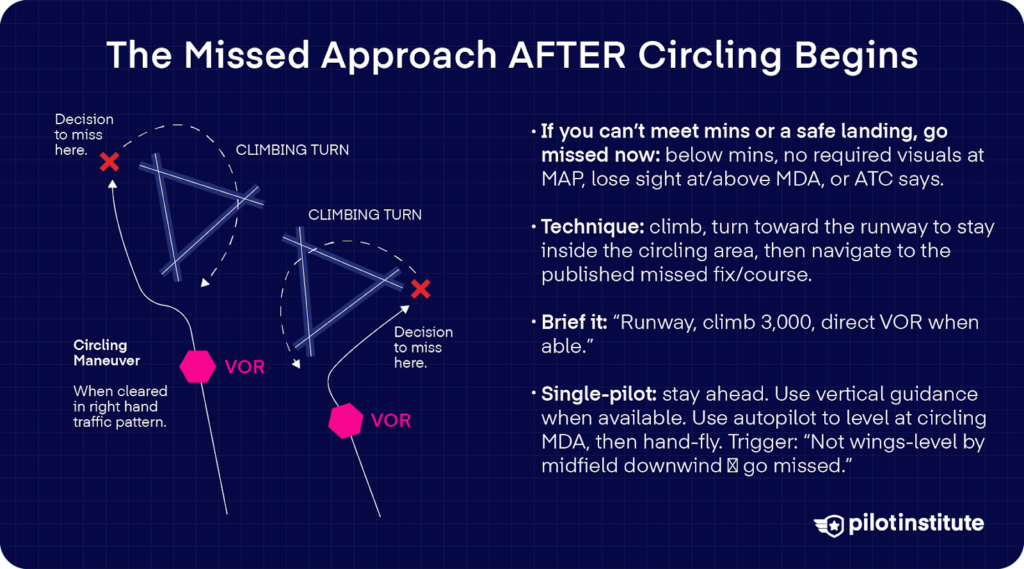
You should never hesitate to go missed when conditions call for it. The moment you realize you can’t meet the requirements to continue safely, it’s time to execute the missed approach procedure.
Remember that if you’re below the minimums or you’ve reached the missed approach point and still can’t see what you need to, you shouldn’t force the landing.
The same goes for a circling approach. If you lose sight of any part of the airport at or above the MDA, climb and follow the published missed approach.
And, of course, if ATC instructs you to go missed, comply immediately.
Re-Interception Strategies
How can you perform the maneuver effectively? A great technique is to initiate a climbing turn toward the landing runway right away.
You’d keep yourself within the circling protected area. And after gaining altitude, navigate to the published missed-approach fix or course.
For example, you could brief something like: “Heading to runway, altitude 3,000, direct VOR when able.” Practice it in the sim when you get the chance.
Single-Pilot Workload Hacks
When you’re flying single-pilot, you alone carry the workload normally shared in a multi-crew environment. So, how can you avoid buzzing any minimums? Always stay two steps ahead.
Since some instrument approaches with vertical guidance can offer a more stable transition to visual, make the most of that stability.
Call out, “If not wings level by midfield downwind, I’m going missed.”
Use your autopilot to level at the circling minimum or at the altitude where you will commence the circle, then hand-fly the visual portion once you’re configured and ready.
Special Scenarios
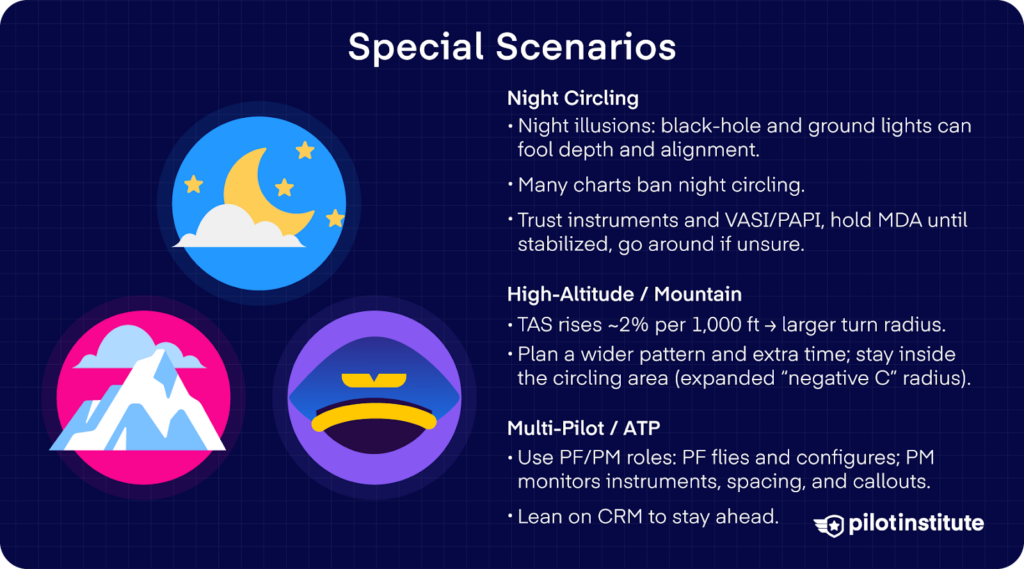
Night Circling
Flying at night can differ greatly from during the day. Your eyes can easily play tricks on you at night, especially when circling to land.
Have you heard of the black-hole illusion? It happens when you approach a runway surrounded by darkness, such as over water or unlit terrain.
Your depth perception can suffer with only the runway lights in view. The runway could look closer or farther than it really is. When left unchecked, you might descend too early and risk landing short.
There’s also the ground lighting illusion. Lights from roads or even moving trains can look like runway lights.
That’s why many approach charts prohibit night circling altogether. These illusions make it far too easy to misjudge your descent in the dark.
The remedy? Cross-check with your instruments and visual aids, and don’t just rely on your eyes.
Use glide slope indicators or your altimeter to stay on a stable path. And if you’re unsure of your position, go around.
High-Altitude & Mountain Airports
You’ll want to visualise how your pattern grows in high-altitude flying. You should also save extra time and distance to complete the circling maneuver safely.
At high-altitude and mountainous airports, your true airspeed for a given indicated airspeed will be higher because of lower air density. In fact, your true airspeed increases by around 2% for every thousand feet of altitude.
So, what happens to your radius of turn in this instance? It grows. That’s also why Change 21 has linked the circling radius to both true airspeed and altitude of the MDA.
Multi-Pilot & ATP Considerations
Teamwork is everything when there are two pilots in the cockpit. Some airlines practice delegating roles to these two pilots: one pilot flying and one pilot monitoring.
What do these roles mean? The pilot flying focuses on maneuvering the aircraft and managing the landing configuration. On the other seat, the pilot monitors the instruments and makes sure the circling segment stays within limits.
This is where crew resource management (CRM) really comes in handy. You and your fellow pilot make the most of every available resource to stay ahead of the airplane.
Training & Currency
You’ve learned how to fly a circling approach well, but proficiency takes ongoing training, and it’s just as important as the check ride.
FAA ACS Standards—What DPEs Expect
If you’re tasked to make a circling approach on your IR checkride, there’ll be specific performance standards you’ll have to meet. The Designated Pilot Examiner (DPE) will evaluate you under the Airman Certification Standards (Instrument Rating – Airplane) (ACS).
What targets should you hit? During circling, you should maintain airspeed ±10 knots and a desired heading/track ±10°.
Your altitude can only be off by around +100/-0 feet until descending below the MDA or the preselected circling altitude above the MDA.
| Task | Altitude | Airspeed | Heading/Track |
| Task D. Circling ApproachIR.VI.D.S5 | +100/−0 ft | +10/−0 kt | ±10° |
Building Proficiency
Currency and proficiency come from structured practice. You’ll want to schedule simulation sessions at least quarterly.
Incorporate challenging scenarios such as night circle-to-land and engine-out circle approaches.
Where can you start? You can practice at a benign airport with ample maneuvering room and minimal complicating factors. Then, as you build confidence, you can dial up the complexity. More wind, higher terrain, reduced visibility.
Safety Record & Lessons Learned
Every circling approach carries a bit more risk than a straight-in landing. Let’s look at a past accident so you can make ways to build your own safety margin.
Accident Spotlights
In May 2017, a Learjet 35A (N452DA) was executing a circling approach to runway 01 at Teterboro Airport (TEB), New Jersey.
The crew hadn’t properly set up the navigation equipment for the instrument approach they were cleared to fly. And as a result, they flew the vertical profile incorrectly.
They crossed both the intermediate and final approach fixes several hundred feet above the required altitudes.
ATC had cleared them for the ILS Runway 6 approach with instructions to circle to Runway 1. But by the time they began the circling maneuver, the aircraft was already 2.8 nautical miles past the final approach fix, and only about a mile from the Runway 6 threshold.
Can you still line up for landing from that position? Absolutely not. A go-around should have been called immediately.
But instead, the pilot in command took control and continued turning toward the runway. Radar data later showed their airspeed was below the company’s required approach speed.
The airplane stalled during the turn and crashed roughly half a mile short of Runway 1.
What can we learn from this accident? Set your stable parameters early. Be ready to go missed without hesitation.
Brief thoroughly before starting the circling segment, and don’t rely only on visual cues until you’re well aligned and properly configured.
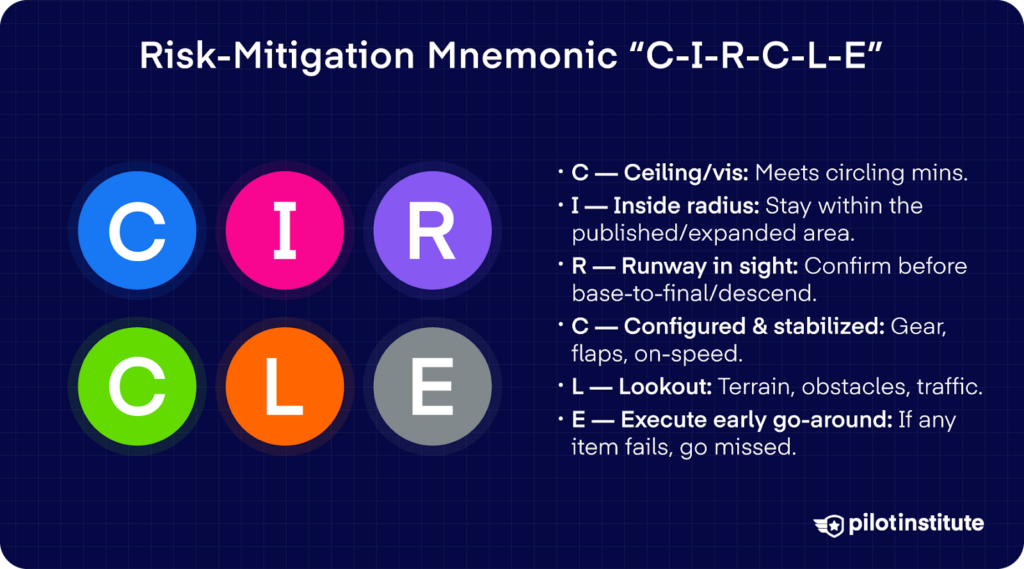
Risk-Mitigation Mnemonic “C-I-R-C-L-E”
Here’s a simple mnemonic you can carry in your mind or a brief sheet when planning a circling approach. Use each letter as a reminder of a safety checkpoint:
- Ceiling: Check the cloud ceiling and visibility. Do they support the circling segment? If not, plan an alternate or go missed early.
- Inside radius: Always make sure you’re inside the published circling area or expanded radius.
- Runway in sight: Do you have the runway environment clearly in sight? Is the aircraft aligned for landing? Only then can you begin your final turn or descent.
- Configured & stabilized: Be in your landing configuration before the maneuver starts and maintain control. Call out: gear, flaps, airspeed.
- Lookout (terrain/traffic): Keep an eye out for obstacles and traffic (both in the air and on the ground).
- Execute go-around early: If any of the above is not satisfied (ceiling drops, runway disappears, speed grows unstable, you drift outside the protected area), initiate the missed approach right away.
FAQs Quick-Reference
Even with plenty of practice, circling approaches can still raise a few tricky questions in the cockpit. To wrap things up, let’s answer the most common questions pilots have when circling to land.
- “Why can’t I descend below MDA until aligned?”
Let’s look at 14 CFR 91.175(c). It says that you are not allowed to go below the minimum descent altitude until you’re continuously in a position from which a normal rate of descent to landing using normal maneuvers can be made.
The visibility must meet the published minimum, and you must be able to see the approach light system or any other runway element. - “How do I confirm my correct aircraft category?”
Your aircraft approach category is defined in 14 CFR 97.3. Aircraft approach category means a grouping of aircraft based on a speed of VREF, if specified, or if VREF is not specified, 1.3 × VSO at the maximum certificated landing weight.
So, to confirm your category, just take a look at the aircraft’s VREF (if given in the aircraft flight manual) or calculate 1.3 times VSO at max landing weight. Then, find where that speed falls in the category definitions. - “Is a right base legal at an untowered field?”
At untowered airports in Class G (or when the tower is closed), your traffic pattern turns are governed by 14 CFR 91.126(b). It requires you to fly left turns unless otherwise indicated. - “Can I request circling on an RNAV approach without circling minima?”
The AIM puts it plainly. You can’t circle if you’re flying a GLS, an ILS that doesn’t have a localizer line of minima, or an RNAV (GPS) approach without an LNAV line of minima.
Conclusion
Circling to land is one of the most demanding skills you’ll ever need to master under IFR. But, it’s also one of the most rewarding.
Every successful circle is an opportunity to hone your awareness and ability to stay ahead of the aircraft. Keep practicing in the simulator and never rush the decision to go missed when things don’t look right.
Keep sharpening your technique. You’re building the kind of confidence and control that separates a good pilot from a great one.