-
Key Takeaways
-
What Is an Off-Airport Landing?
- Three Use Scenarios
- Common Surface Types & Quirks
-
Regulatory & Liability Landscape
- State & Local Layer
-
Is Your Aircraft—and You—Up to the Task?
- Honest Performance Math
-
Site Selection: The Three-Pass Method
- First Pass: 1,000 ft AGL
- Second Pass: 300–500 ft AGL
- Third Pass: 50–100 ft AGL Offset
-
Off-Airport: Approach & Landing Techniques
- Touchdown Discipline
-
Ground Operations in the Rough
- After-Landing Checklist
- Departure Brief
-
Safety Gear & Survival Mindset
-
Training Path & Proficiency Plan
- Resources to Hand the Reader
-
When Choice Disappears: Emergency Off-Airport Landings
- Remember ABC
- Glide Planning
- Field Hierarchy
- Pre-Impact Checklist
-
Case Studies & Lessons Learned
- Extract Actionable Lessons
-
Conclusion
The sun is barely up as a Super Cub settles gracefully onto a quiet river bar. Overhead, a Cessna circles, the pilot wondering how anyone lands there safely (or legally).
Off-airport operations look effortless. But the truth is, misjudged landings cause violations and hull losses more than engine failures do.
Together, we’ll make a clear framework for off-airport landings. We’ll talk about the rules and effective techniques to make every off-airport landing a memorable one.
Key Takeaways
- An off-airport landing is any takeoff or touchdown on land or water outside certified airports.
- You can land off-airport if it’s not prohibited locally, and do so without careless operation.
- Scout the site, calculate performance margins, and maintain full control of your aircraft.
- Decision-making and flexibility help you adapt safely to changing off-airport conditions.
What Is an Off-Airport Landing?
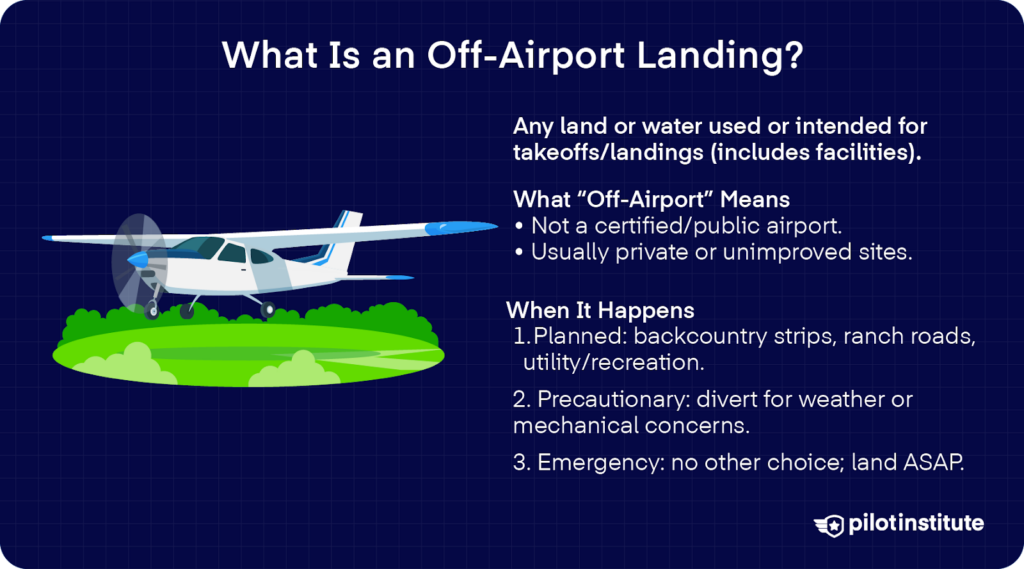
Before we dive into off-airport landings, first of all, what is an airport? Let’s take a look at 14 CFR 1.1. It defines an airport as:
“An area of land or water that is used or intended to be used for the landing and takeoff of aircraft, and includes its buildings and facilities, if any.”
That means the term “airport” isn’t restricted to the paved, marked strips we associate with general aviation or commercial travel. Any tract of land or body of water that’s intended for aircraft to land and take off qualifies.
That should help you understand the scope of “off-airport.” The distinction is typically between a certified/public airport and a private/unimproved one.
Three Use Scenarios
You might set out to land on a back-country strip or a ranch road for a leisurely trip. You could land off-airport for recreation or utility work.
But sometimes, this is a decision you make to avoid disaster. When an airport is out of reach, you could perform a precautionary off-airport landing because of weather or mechanical issues.
But in the worst cases, you could simply be left with no other choice.
Off-airport emergency landings are unplanned and urgent situations. You may be forced to do them due to an engine failure or other immediate threat that demands landing as soon as practical.
Common Surface Types & Quirks
What’s it like to land off-airport? Because they’re out of the ordinary, they will feel out of the ordinary. You can expect your landing surface to feel unfamiliar, and the surface you pick will have its own quirks.
A county road might allow a straight-in landing, but you have to consider overhead wires and vehicles. Some states even prohibit aircraft landings on roads.
If you plan to land on gravel or a sandbar, you should watch for hidden rocks and shifting sands. Is it near a body of water? Then think about water-rise and changing tides.
Regulatory & Liability Landscape
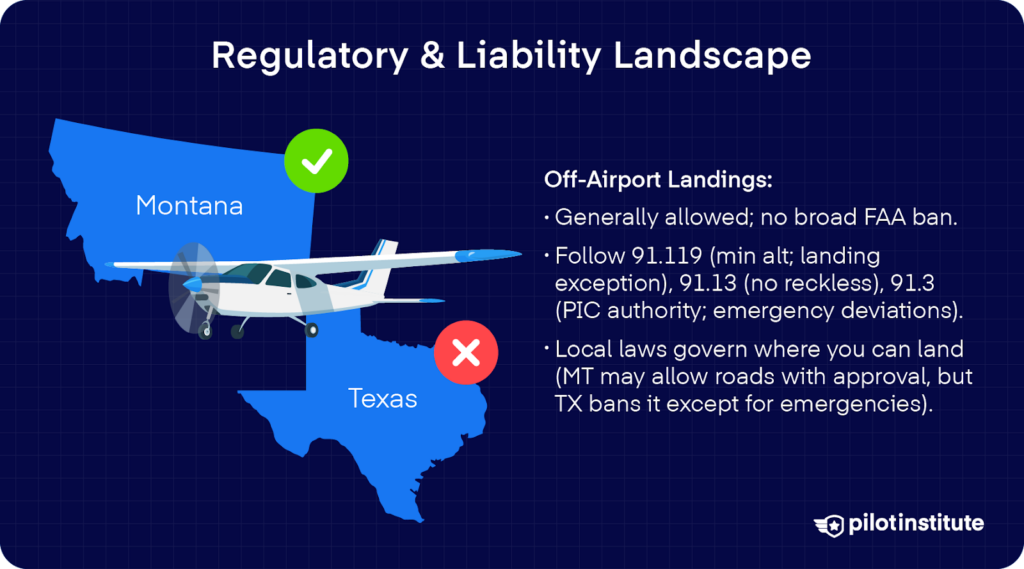
Technically, there’s no broad federal regulation that prohibits off-airport landings. There’s also a legal maxim that says “Everything which is not forbidden is allowed.”
So, does that effectively mean you can land just anywhere?
Not so fast. Regulations still give us guidelines on performing off-airport landings properly and safely.
14 CFR 91.119 says that you must maintain a minimum safe altitude “except when it is necessary for takeoff or landing.” So even if you are landing off-airport, you’re still covered by that exception.
But there’s also 14 CFR 91.13, which prohibits operating an aircraft “in a careless or reckless manner so as to endanger the life or property of another.” That’s a catch-all. Off-airport landings aren’t prohibited, but flying recklessly certainly is.
Pilot-in-command (PIC) responsibilities are set out in 14 CFR 91.3. It gives you the responsibility and authority over the operation of your aircraft.
It also allows you to operate outside of 14 CFR in an emergency, like when you need to make an off-airport precautionary landing.
State & Local Layer
Since federal regulations don’t prohibit off-airport landings, it’s now a question of where you can land. And that’s usually up to local ordinances.
For instance, Montana Code 67‑1‑204 actually allows pilots to use public roads for takeoffs and landings. They just have to be done safely and approved by the local authorities.
On the other hand, Texas Transportation Code 24.021 prohibits landing on a public road except during an emergency. Permission to use county roads can be given only at the county level and under certain conditions.
Is Your Aircraft—and You—Up to the Task?
When planning your flight, pull up the take-off and landing performance tables in your Pilot Operating Handbook (POH) or Aircraft Flight Manual (AFM).
Honest Performance Math
POH/AFM Tables
Many off-airport strips are shorter and uneven. Give yourself a safety margin to stay on the safe side.
For example, if your POH table says you need 1,200 ft of landing roll under current conditions, multiply a factor of 1.5 to that number. You’ll get 1,800 ft of required distance.
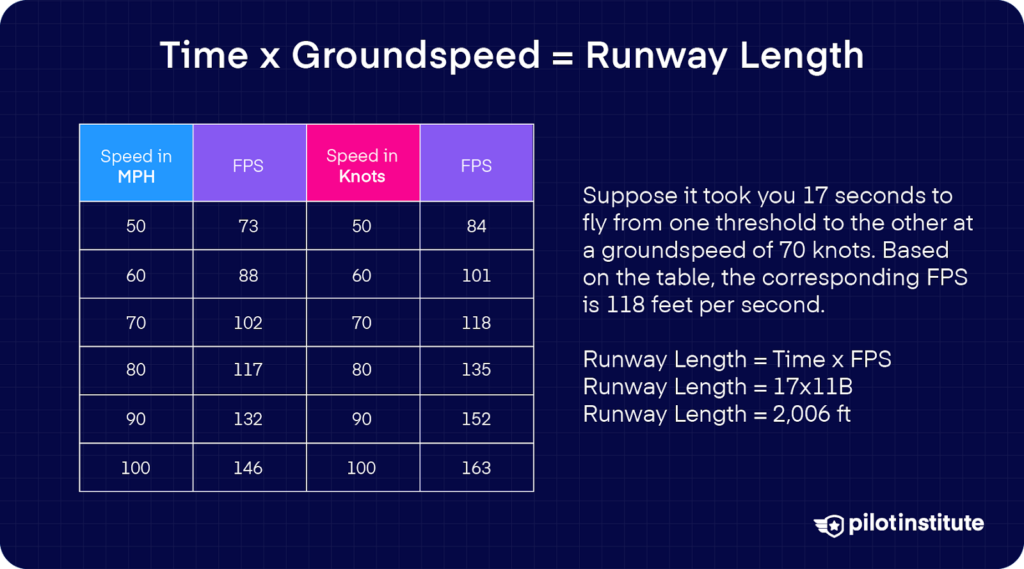
But from the air, how can you tell if your landing roll will fit in your selected field? All you’ll need is a stopwatch and a device that can read your ground speed, like a GPS.
Measure the time it takes to fly the full length of your selected runway. Also track your ground speed as you do this and keep it steady the whole time.
Now, let’s look at the table. You then multiply the time in seconds by the FPS that corresponds to your groundspeed.
Here’s an example. Suppose it took you 17 seconds to fly from one threshold to the other at a groundspeed of 70 knots. Based on the table, the corresponding FPS is 118 feet per second.
Crunching the numbers gives us:
Runway length = Time x FPS
Runway length = 17 x 118
Runway length = 2,006 ft
You have a runway length of 2,006 feet, which fits in your calculated landing roll nicely with more distance to spare!
Take a screenshot of this table or print it so you can have a handy cheat sheet in the cockpit.
Also, do you remember how density altitude affects performance? Higher altitudes and temperatures reduce air density, which slows acceleration and reduces climb rate.
Site Selection: The Three-Pass Method

Before you commit to landing on a remote or unimproved surface, you have to survey it thoroughly. A great way to do this is through the three-pass method.
First Pass: 1,000 ft AGL
The first pass will give you the big picture. You want to be high enough, around 1,000 feet above ground level (AGL), and circle the area from different directions.
How can you tell how the wind is behaving? You’ll find the clues in ripples on water, drifting grass, moving branches, or even dust trails. They’ll help you gauge the wind’s direction and speed.
Then, scan your approach and departure paths. Are there trees or rising terrain waiting to catch you off guard? The more you know before you land, the safer that touchdown will be.
Second Pass: 300–500 ft AGL
As you descend, make a second pass from both directions along either side of your chosen strip.
Mark your touchdown and rollout zones in your mind. What landmarks can you use when lining up your final approach? A lone tree or a bend in a river can make great visual cues.
Timing makes a difference, too. Have you noticed how early morning or late afternoon light throws long shadows? They can reveal rock sizes and surface texture far better than harsh midday light.
Third Pass: 50–100 ft AGL Offset
Once you’re around 50 to 100 ft AGL, it’ll be easier to spot what you can’t see from higher up. You might see cuts in the gravel, loose rocks, or bumps that could turn a landing into a rough ride.
It is important to be at an angle to the runway, not above it. That diagonal view can reveal uneven surfaces or soft spots that sunlight might be hiding.
If it’s a new landing area or one that’s seen high water since your last visit, don’t take any chances. Check it, then double-check.
Off-Airport: Approach & Landing Techniques
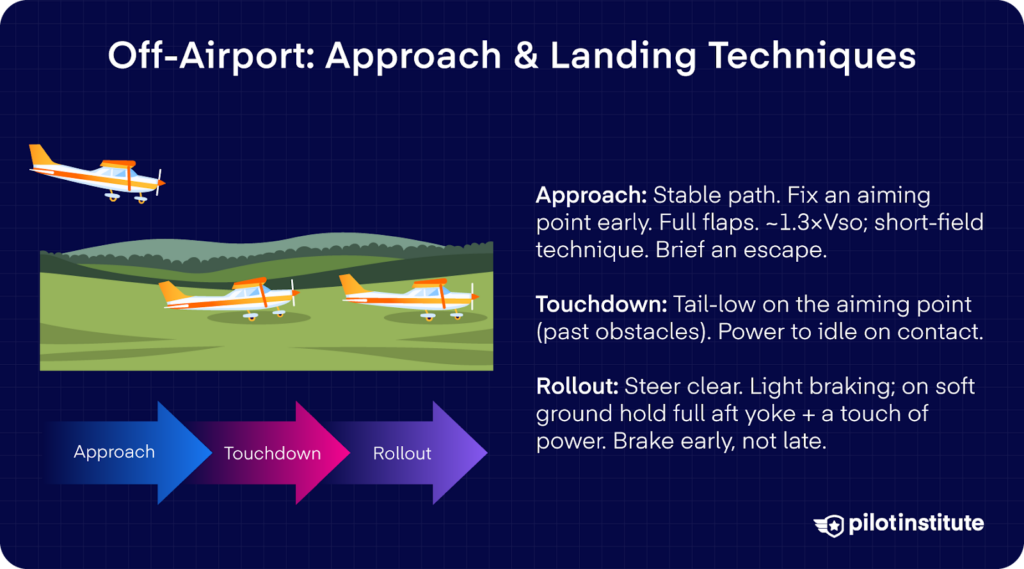
Part of good operating techniques for landing is to keep things steady and familiar when setting up for your approach. You want to fly a stable, controlled descent that positions you well for the surface you’ve selected.
Give yourself enough distance to really capture the landing zone and build a solid mental picture of your aiming point.
Once you’re lined up, drop full flaps. Then, slow to about 1.3 Vso and treat it like a short-field approach.
Touchdown Discipline
Stay alert all the way down, especially when landing off-airport. Maintain a safe flight speed right to touchdown, and before you commit, ask yourself, What’s my way out?
Always identify a safe escape path in case you need to go around. What if something doesn’t feel right? There’s no shame in adding power and trying again.
Touch down in a tail-low attitude precisely on your pre-selected aiming point. Make sure it’s far from any obstacles at the beginning of your landing zone. Be mindful of your propeller; you don’t want it to strike the ground, especially if there is grass.
Then, as your wheels make contact, smoothly pull the power to idle and let the aircraft settle on its own momentum.
Keep your focus once on the ground. Steer clear of obstacles and use only light braking to avoid kicking up rocks that could damage your tail.
Don’t let your guard down just yet. The landing isn’t over until the airplane has come to a complete stop. In fact, the most critical moment often comes right before that final halt. As the aircraft slows, it tends to sink deeper into soft terrain.
Stay ready to add a touch of power while holding full back pressure on the yoke. That prop wash helps push the tail down, keeping the nose from digging in.
And whatever you do, avoid braking at this stage. If you need to use brakes at all, do it early in the roll.
Ground Operations in the Rough
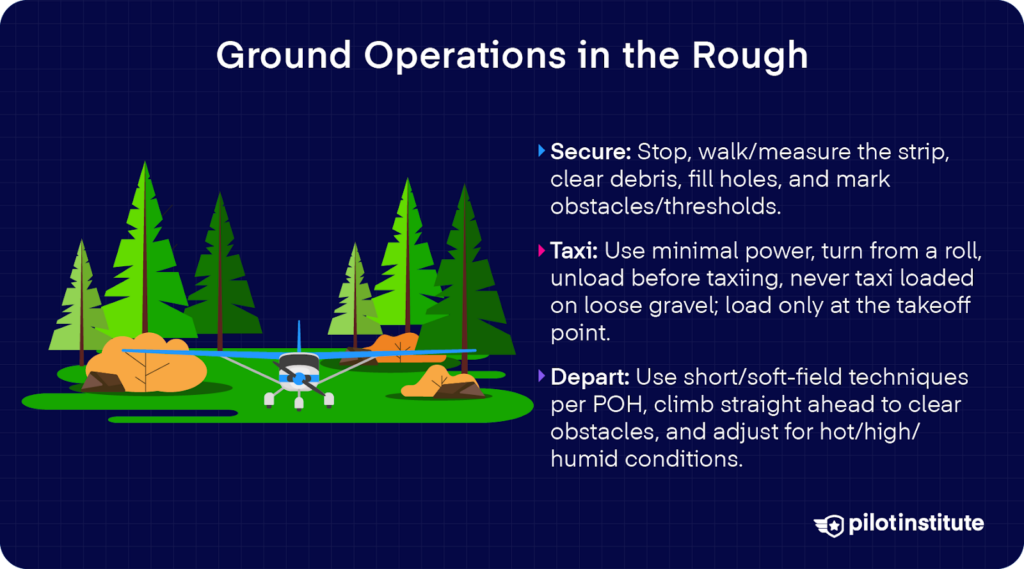
Touching down safely is only half the battle. Once you’re on the ground, the focus shifts to protecting your aircraft and preparing the site.
After-Landing Checklist
Secure the Site
What’s your next task? As soon as you’ve rolled to a stop and before you taxi any further, you need to secure the site.
Walk the usable area to check its actual length. There could be obstacles strewn about, like branches or rocks that could endanger the next takeoff.
If you spot holes or uneven spots, fill and level them as best you can.
Can’t move an obstruction? Mark it clearly with something that stands out, like branches or rocks of a different color. It’s also a good idea to mark your thresholds so you can easily identify your landing zone later.
Safe Taxi Procedures
Make turns with the least amount of power possible, and always from a rolling start, not a dead stop.
Why should you avoid turning from a dead stop? It demands too much thrust, and that’s a quick way to chew up your propeller with flying gravel.
Once you’ve rolled to a stop, unload the aircraft immediately before taxiing again. Never taxi a loaded aircraft on loose gravel. Also, you should only load it at the takeoff point rather than taxiing after loading.
Departure Brief
Ready to head back home? Treat it like a short or soft-field operation following the techniques in your aircraft flight manual. Climb straight ahead until you clear every obstacle, then transition to your normal climb.
And don’t forget that performance changes with the environment. Hot, high, and humid conditions can rob your engine of power.
Safety Gear & Survival Mindset
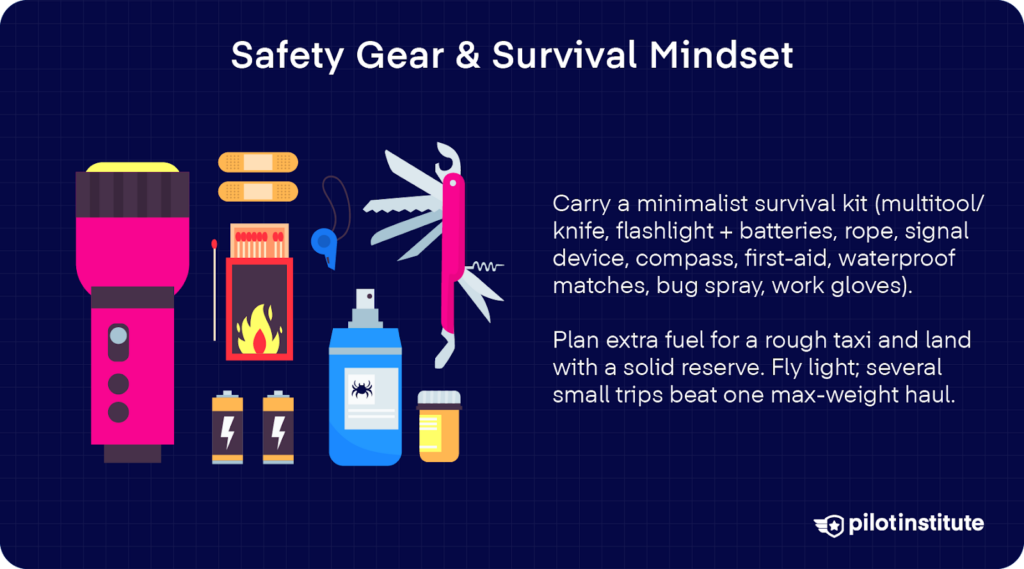
When you’re heading into off-airport territory, you’re stepping into an environment where self-reliance matters. Having the right gear only improves your chances of safety.
A minimum survival kit is a must-have. What should be in your bag? Here’s a comprehensive checklist:
- Multitool or knife
- Flashlight with extra batteries
- Rope
- Signaling device
- Compass
- First-aid supplies
- Waterproof matches
- Bug repellant
- Work gloves
But equally important is fuel management. If you taxi on rough or uneven surfaces, you’ll use more fuel than expected. That’s why you should plan for extra taxi burn. Always arrive at your touchdown site with ample margin.
Go lightly when operating off-airport. More trips with lighter loads are safer than fewer trips loaded to maximum.
Training Path & Proficiency Plan
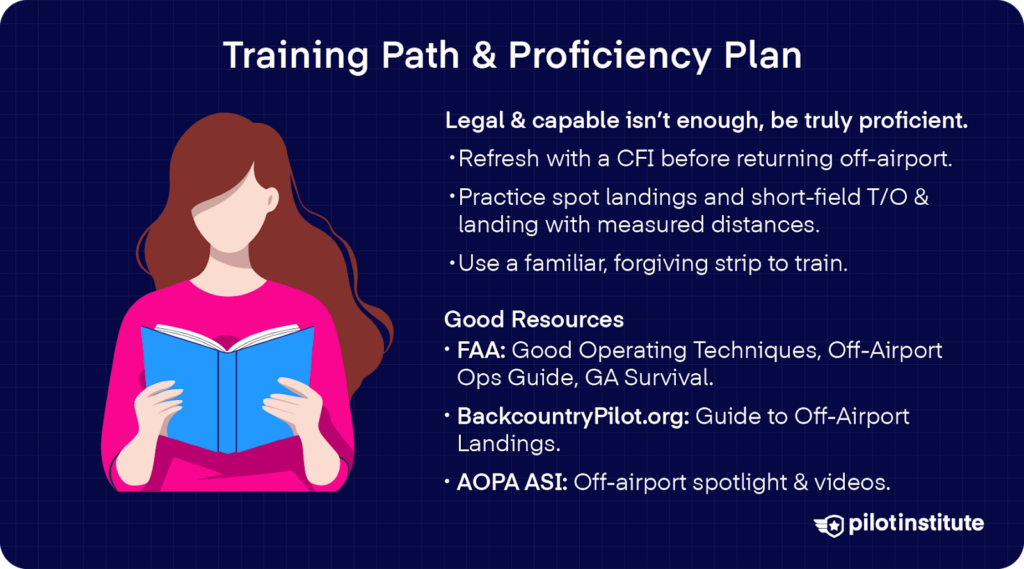
The flight may be legal and your aircraft may be capable, but are you ready? It’s one thing to meet currency requirements, but it’s another to be truly proficient for off-airport operations.
If it’s been a while since your last off-airport landing, don’t rush back into it just yet. Take the time to fly with a qualified flight instructor and brush up on those specialized takeoff and landing techniques.
Once you’ve regained your touch, you can sharpen your accuracy. Work on spot landings and short-field takeoffs using a measured distance.
Choose a familiar strip with enough room for error, somewhere that lets you practice without pressure.
Resources to Hand the Reader
Here are some valuable resources to help you with your proficiency:
- FAA Resources:
- BackcountryPilot.org: “Guide to Off-Airport Landings.”
- AOPA Air Safety Institute: Off-Airport spotlight & videos
When Choice Disappears: Emergency Off-Airport Landings
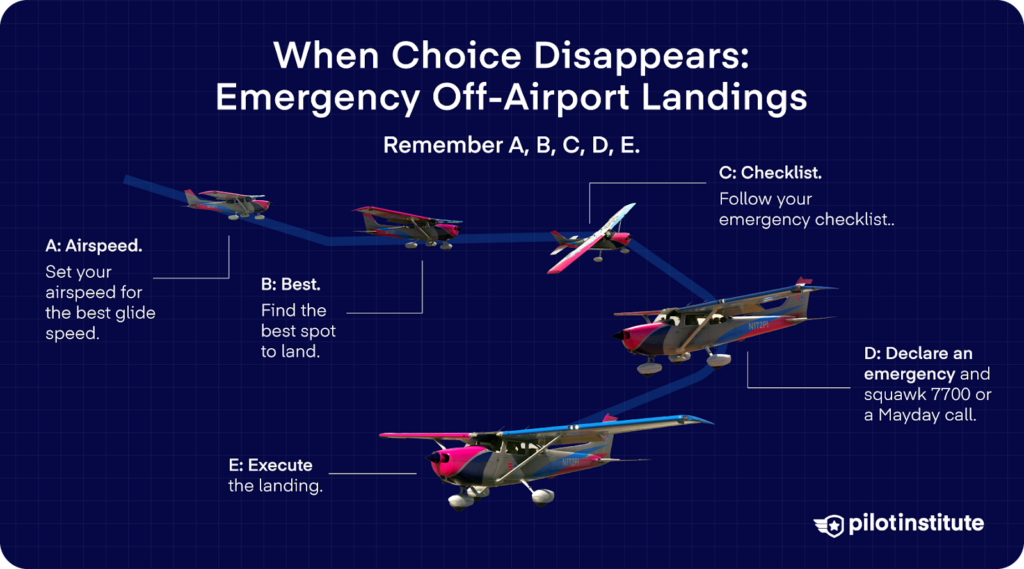
When you find yourself in a situation where continuing to a certified airport is no longer viable, an off-airport landing becomes your only real option.
Remember ABC
In an emergency situation where an off-airport landing is necessary, an easy to remember mnemonic is A,B,C,D,E.
- A: Airspeed. Set your airspeed for the best glide speed.
- B: Best; find the best spot to land.
- C: Checklist. Follow your emergency checklist..
- D: Declare an emergency and squawk 7700 or a Mayday call.
- E: Execute the landing.
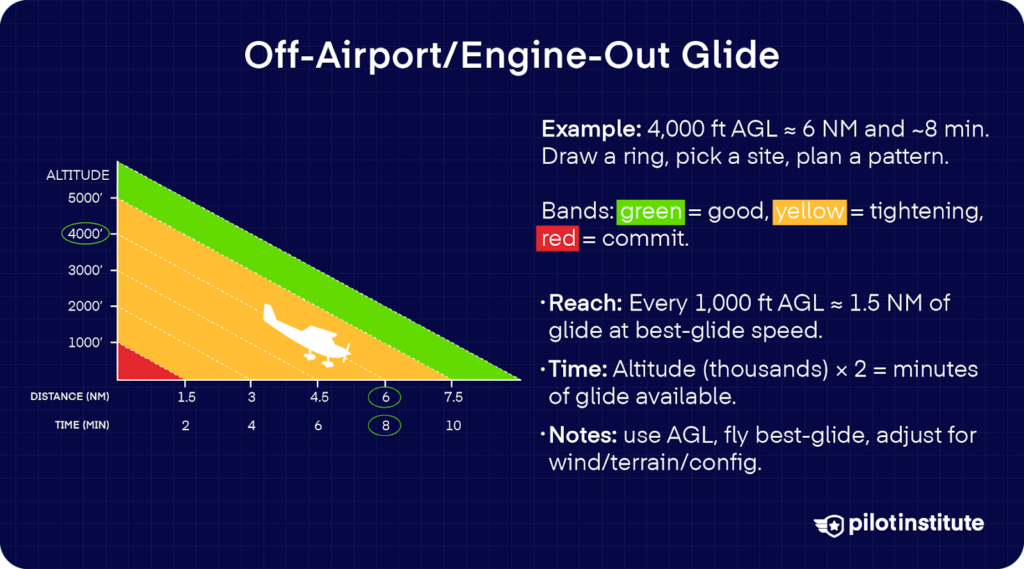
Glide Planning
Once you lose engine power, you’re committed to a glide toward a landing area. One good tool is a visible best-glide-speed card on your panel so you can immediately pitch for that speed.
For a Cessna 172, that’s 65 knots. It should give you the most distance forward for each increment of altitude lost.
Is your goal to stay aloft for as long as possible? Then you’ll want to fly at your minimum sink speed. You might not find that number in the POH/AFM, but it’s typically a bit slower than your best glide speed for maximum range.
Field Hierarchy
At a low altitude, your choices narrow fast. If you’re beyond gliding distance from a suitable open area, focus on terrain that can absorb impact energy.
What are your best bets? Fields, soft brush, or snow are far better than hard surfaces or obstacles.
Start by choosing a general area, then narrow down your choice as you descend. Terrain can look deceptively smooth from above, and you might lose more altitude than you think while zeroing in on your target.
You want to be decisive and flexible at the same time, but never second-guess yourself. If you spot a clearly better landing area, go for it. But once committed, stick with your plan.
A well-controlled landing in rough terrain often ends far better than a last-minute turn toward a “better” field you can’t quite reach.
Pre-Impact Checklist
If time and conditions allow, extend the flaps to improve control and lower touchdown speed. Just remember that doing so increases drag and shortens your glide distance.
There’s no universal rule about whether to land with the landing gear up or down. In rough or wooded terrain, having the gear extended can help absorb impact and protect the cabin.
That said, a collapsing gear could also rupture fuel tanks. So, what’s the best move? Always follow the manufacturer’s guidance in the AFM or POH when deciding.
Once a normal landing is assured and there’s enough space to stop safely, a gear-up landing on soft or uneven ground might actually cause less damage than landing gear-down.
Before touchdown, cut electrical power to help reduce the risk of post-impact fire. But keep the master switch on until you no longer need electrical power for essential systems.
During the final approach, maintaining full control of the aircraft should take priority over all other actions. Yes, even checklist items. So, if the engine is still producing partial power, use it to aid your approach.
That said, though, it’s usually safer to shut off the engine and fuel just before touchdown. It’ll give you control over the situation. Plus, it can reduce the chance of fire from a hot engine.
Case Studies & Lessons Learned
It was the night of January 28 when PIC Izzy Slodowitz and his friend, Daniel Gross, took off from San Diego in a 1971 Beechcraft G33 Bonanza. Then suddenly, the engine made a harsh grinding noise and went quiet.
Slodowitz immediately turned toward the lights of the runway and declared an emergency. But as the Bonanza descended through 2,000 feet, it became painfully clear they weren’t going to make it.
Slodowitz scanned the ground for options. He spotted some dark, open patches in the urban sprawl below, but didn’t trust them.
His next best option? A road, busy with headlights. But strangely, no tail lights.
The multi-lane highway wasn’t one-way; it just had one side completely clear! The empty northbound lanes of State Route 55 suddenly looked like the best possible runway.
Lining up for a glide approach, he hadn’t extended the electrically powered landing gear yet. He was saving what little battery power remained.
He’d earlier ignored repeated radio calls from the tower while trying to restart the engine. When he finally got through, he asked for the airport’s wind information and learned he’d been flying into nearly 30 knots of headwind.
He shut the battery off completely to save power for the landing gear. His passenger used a cellphone flashlight to illuminate the airspeed indicator in the dark cockpit.
But when the time came, Slodowitz flipped the battery back on and extended the gear and flaps.
In an expert display of decision-making, he touched down smoothly and rolled to a stop near the Del Mar exit.
Extract Actionable Lessons
What can we learn from this incident? You’ll find it the moment the engine fails.
Slodowitz didn’t freeze or fixate on a single option. Instead, he continuously evaluated his surroundings. He balanced the risks, then he adapted to changing conditions.
It’s a lesson on situational awareness and disciplined decision-making under pressure, which are skills you use every day in flying.
Conclusion
Off-airport flying is an exercise of your judgment. Each landing on rough or remote ground tests how well you balance preparation with respect for the terrain.
Make seasonal dual instruction part of your routine. Keep learning from instructors who know the backcountry.
And, treat every site as borrowed ground. Each one deserves care and preservation.
Get the judgment right, and that empty gravel bar feels safer (and far more rewarding) than any 5,000-ft paved runway.