
-
Key Takeaways
-
What is a Holding Pattern?
- Holding Fix
- Inbound Leg
- Outbound Leg
- Protected Airspace
-
Types of Holding Patterns
-
How to Enter a Hold
- Types of Holding Entries
- How to Determine the Type of Entry in the Aircraft
-
Flying the Holding Pattern
- Entry
- Turning Inbound
- The Inbound Leg
- The Outbound Leg
-
Conclusion
Holding patterns are the aviation equivalent of a stop light. Air Traffic Control (ATC) uses these procedures to delay aircraft. This can be for spacing or other reasons, such as waiting for adverse weather conditions to pass. Pilots also request holding patterns when extra time is required. For example, to set up the aircraft for landing or troubleshooting.
Unfortunately, holding patterns are not the most intuitive of procedures. They’re difficult for students to pick up and tedious, even for experienced instrument pilots. In this article, we’ll look at holding patterns, what you should know about them, and how to fly them perfectly every time.
Key Takeaways
- Holding patterns are a delay tactic akin to a stop light in the air.
- Choosing the correct entry into a holding pattern can be challenging, but there are “tricks” that help.
- The pilot should adjust the time flown on the outbound leg to maintain a one-minute inbound leg.
- The wind correction angle is often forgotten, leading to the aircraft drifting off course.

Free Private Pilot Study Sheet
Grab a printable PDF that highlights must-know PPL topics for the written test and checkride.
- Airspace at-a-glance.
- Key regs & V-speeds.
- Weather quick cues.
- Pattern and radio calls.
What is a Holding Pattern?

A holding pattern is an instrument procedure in which an aircraft flies a racetrack-shaped pattern. A plane in a hold is considered to be in protected airspace. The primary purpose of a holding pattern is to delay an aircraft.
The holding pattern is made up of multiple parts. They are:
- Holding fix
- Inbound leg
- Outbound leg
- Protected airspace
We will now look at each of these in detail.
Holding Fix

A holding fix is a reference point used to mark the start of the hold. It is a fixed point easily identifiable to both ATC and flight crew. Most holding fixes are NAVAIDs such as VORs, RNAV (GPS) waypoints, and even ILS markers.
When VORs are used as holding fixes, the fix is usually a specific DME distance on a particular radial. If the VOR doesn’t have DME capability, it will be the intersection between two radials from two separate VORs.
Inbound Leg
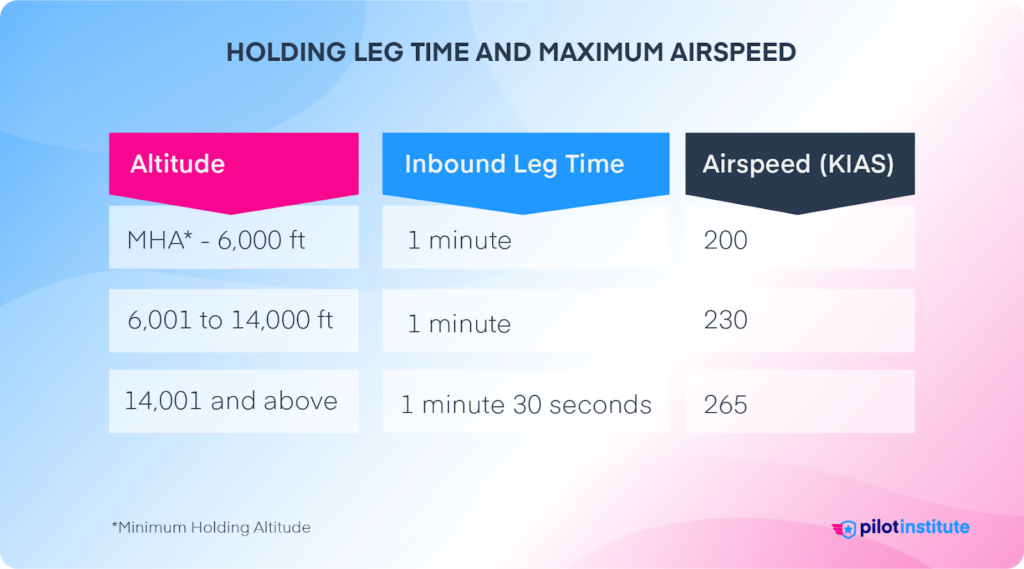
Depending on the specific hold, the inbound leg is based on either time or distance. In a standard hold, the inbound leg lasts one minute if the aircraft is below 14,000 ft. If the aircraft is above 14,000 ft, it lasts one and a half minutes. If the hold is non-standard, then the times differ.
Outbound Leg
The outbound leg begins abeam the holding fix and ends when the pilot starts the turn toward the inbound leg. The time flown on the outbound leg has to be adjusted so that the inbound leg is one minute. For example, if you’re holding at 100 knots and have a 10-knot tailwind on the outbound leg, the outbound leg should be shorter than one minute because you’ll have a headwind on the inbound leg.
Protected Airspace
The space between the inbound and outbound legs is considered protected airspace. ATC will keep this area free of other aircraft so that holding aircraft can maneuver freely. The hold has to be performed within this area to ensure obstacle and traffic clearance. A secondary protected airspace surrounds the main holding area, which serves as a buffer.
Types of Holding Patterns
There are two main types of holding patterns: standard and non-standard. The properties of the hold change based on the type of the holding pattern.
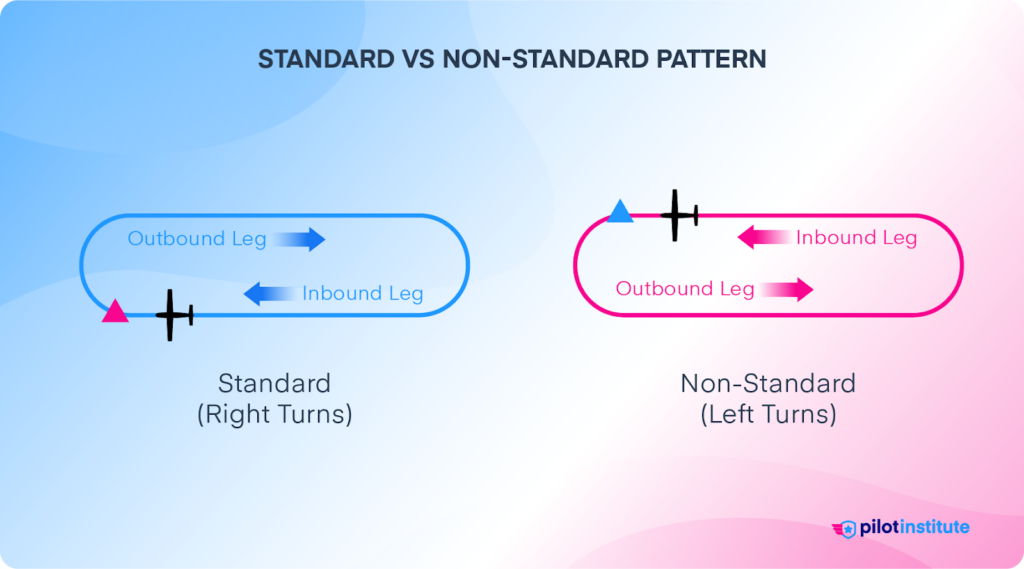
Standard holding patterns consist of turns to the right. When ATC gives holding directions and doesn’t specify a direction or explicitly state non-standard holding, you are expected to fly a standard holding pattern.
Non-standard holding patterns involve turns to the left. These can also include different timed legs and specific speeds.
When ATC issues holding instructions, make sure to note down the following:
- The holding fix.
- The direction of the hold.
- The inbound course.
- The direction of the turns.
- Time or distance of the inbound leg.
- Time to expect further clearance.
If the hold is published on the charts, ATC will simply ask the pilot to hold as published.
How to Enter a Hold
Types of Holding Entries
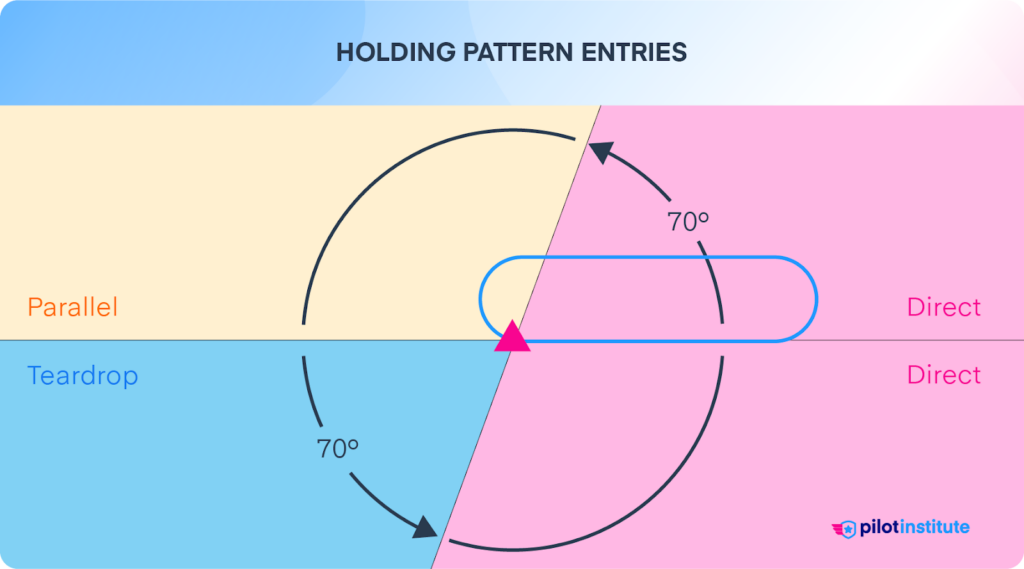
Three types of holding entries exist: direct, parallel, and teardrop (also known as offset). The pilot will fly a specific entry based on the sector from which they approach the holding fix.
Pilots must be able to identify which entry is required to join the hold while flying. This can be challenging, especially in disorienting IFR conditions.
The image above shows the sectors for a standard holding pattern. The sectors are named after the type of holding entry. The parallel sector is 110 degrees, the teardrop sector is 70 degrees, and the direct entry sector is 180 degrees.
Be aware that if you’re within 10 degrees of two sectors, you’re in a buffer zone and can choose the easiest entry.
Using these holding entries is not a requirement. No specific regulation requires a pilot to use these entries, and ATC won’t care how you enter a hold. However, the FAA recommends using these entries, and your check pilot will test you on the appropriate entry.
Direct Entry
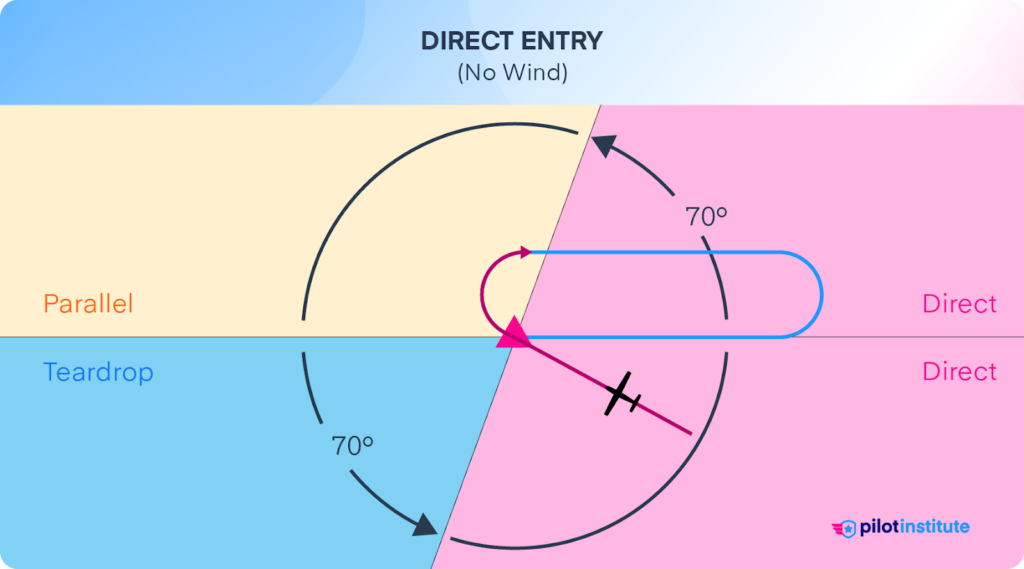
The direct entry is the most straightforward type of entry. Simply fly directly to your holding fix, cross the fix, and begin turning to your outbound course. You are established in the hold once you complete the outbound leg and turn inbound.
Parallel Entry
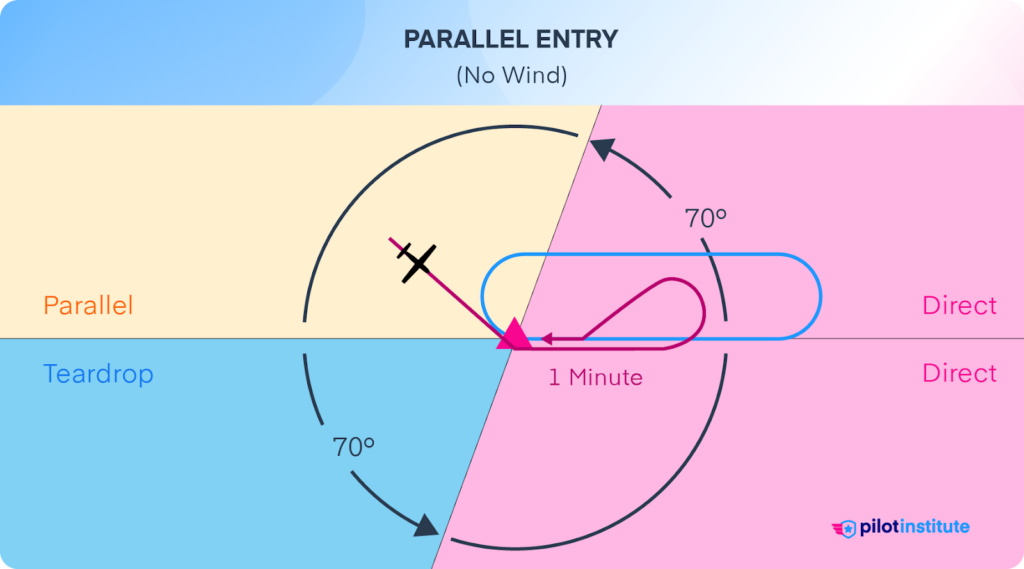
When trying to join the hold from the parallel sector, you fly to your holding fix and then head outbound on the inbound leg for 1 minute. Afterward, turn towards the protected side of the hold to intercept the inbound course, which will require a turn greater than 180 degrees.
Teardrop Entry
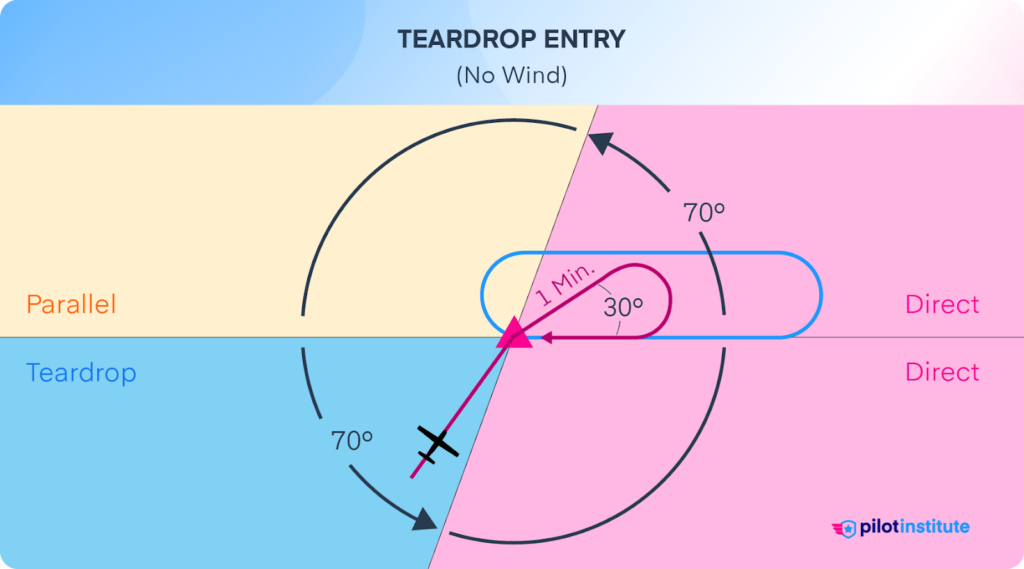
When entering the hold from the teardrop sector, you fly to the holding fix and turn towards the hold’s protected side. The heading has to be 30 degrees off the outbound leg. After flying for 1 minute, you turn and intercept the inbound radial.
How to Determine the Type of Entry in the Aircraft
The trickiest part for most pilots is figuring out the holding entry. There are multiple ways to do this. You can draw it out on the chart if you have an electronic flight bag (EFB) or even use an app or website. You can also use your thumb!
Applications
Various applications on both the Google Play Store and the Apple App Store can calculate the appropriate holding entry for you. But, you might not be able to use these aids during a check ride. Also, should your device fail, you’ll be in a precarious position.
The Thumb Method
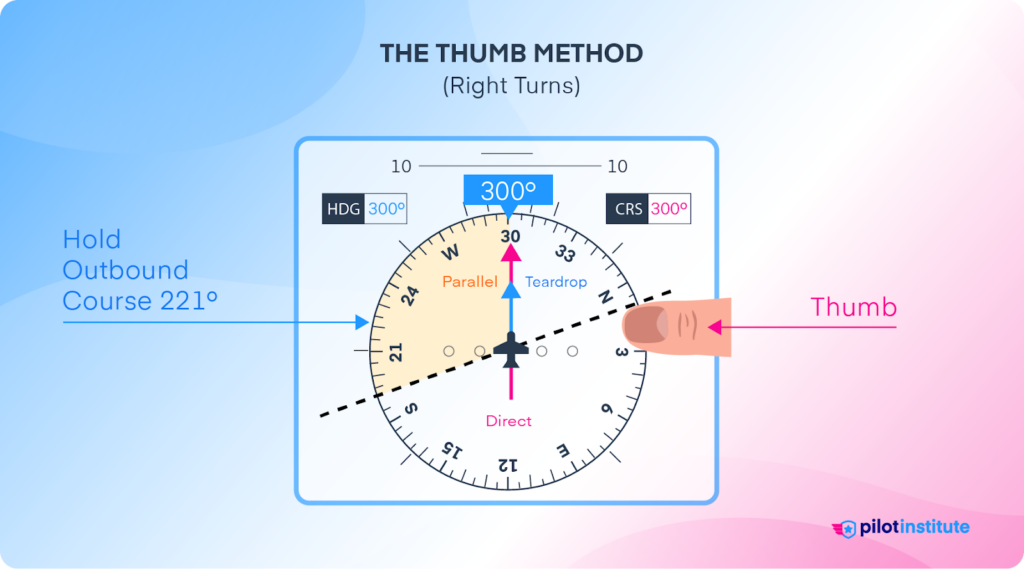
The thumb method is an analog, foolproof method for visualizing your holding entry. Pilots of all ages worldwide use it, and it is one of the fastest ways to figure out your holding entry.
The thumb method doesn’t need mental mathematics, and you don’t need to look away from your instruments. It allows you to maintain situational awareness and focus on flying the plane.
You just need your two thumbs and an HSI or heading indicator to perform this. The logic is that your thumb is roughly 20 degrees, which can help you separate the HSI into the holding sectors.
- Step 1: Choose the correct thumb.
- If you’re flying a standard holding pattern, use your right thumb. If you’re flying a non-standard holding pattern, use your left thumb.
- Step 2: Figure out your outbound course.
- The outbound course is the reciprocal of your inbound radial. Your outbound leg is provided on certain types of approach charts.
- Step 3: Where to place your thumb.
- Place your thumb above the 3 o’clock (right turns) or 9 o’clock (left turns) position on the HSI so that the bottom of your thumb touches the line. You can now draw a line across the HSI to separate your sectors.
- Step 4: Figure out which sector you’re in.
- The sector in which your outbound course falls is the entry you will need.
Draw It Out Method
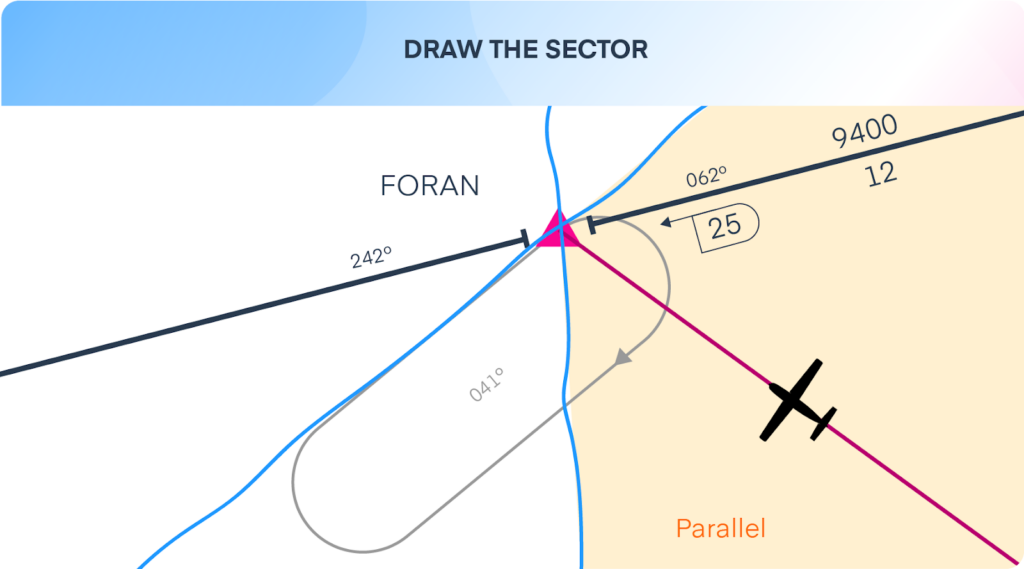
The second method is to draw out the procedure to visualize the entry sectors better. Find your published hold, or draw out the hold on the appropriate radial as per ATC instructions.
Once you have your hold, separate the sectors and then draw a line from your plane to the holding fix. After this step, you should see which sector you are in and fly the hold as required.
Flying the Holding Pattern
Once you have figured out the appropriate entry, you must focus on holding. Aviators use the Five T’s to help them track what they should do in the hold: time, turn, twist, throttle, and talk.
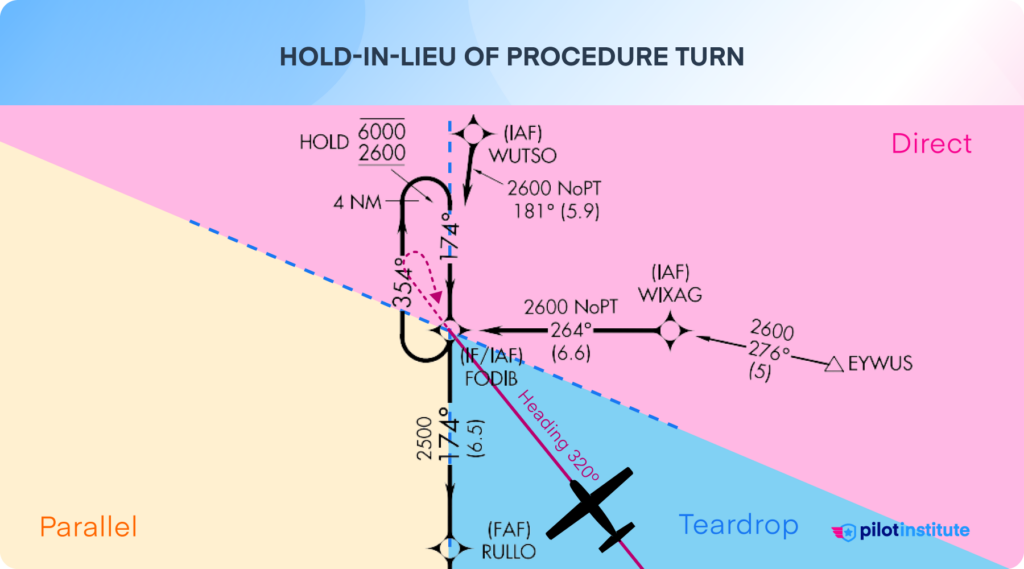
Let’s apply the current scenario: you’re inbound to Grand Forks International Airport (KFGK). You are looking for the RNAV approach into runway 17R. You’re flying a heading of 320 towards the holding fix FODIB in a C172.
Using the approach chart, we can see that our inbound leg has a course of 174 degrees, and we are inbound for teardrop entry. As a result, we will start our holding procedure directly when we pass FODIB.
You will use the Five T’s at four points during the hold:
- Abeam the fix on the outbound leg.
- When turning onto the inbound leg.
- Once you’re wings level and established on the inbound leg.
- When you reach the holding fix.
Entry
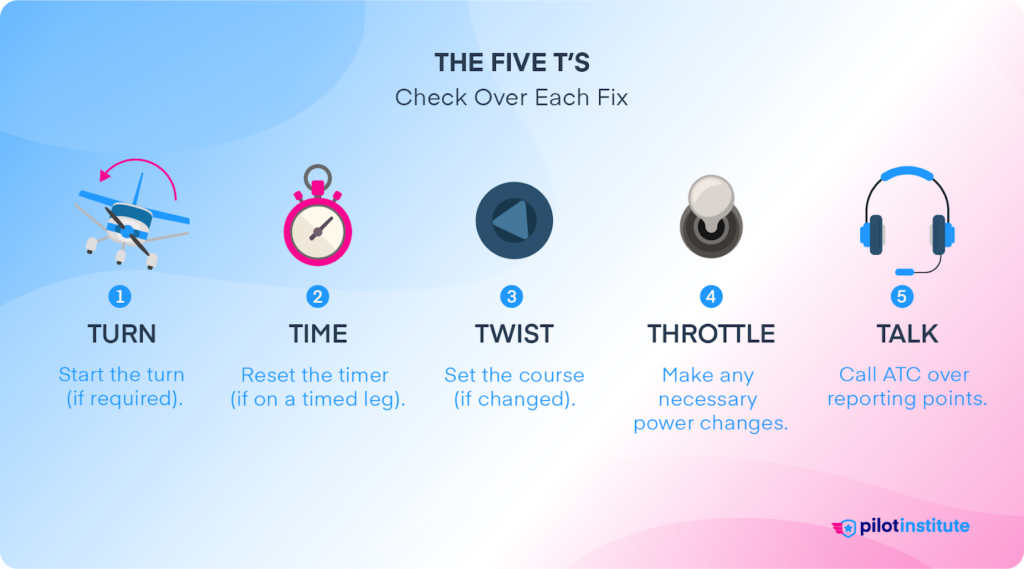
As we reach FODIB and prepare for our teardrop entry, we will use the Five T’s as follows:
- Turn: Begin your turn so that you’ll be on a course of 324 degrees. Remember that turns in the hold must be made at a standard rate (3 degrees per second) or 25 degrees of bank, whichever requires less bank.
- Time: Start our timer to measure one minute.
- Twist: Set the OBS to the inbound course.
- Throttle: Adjust power to maintain holding speed and altitude.
- Talk: Give ATC a position report. E.g., “N123AB, over FODIB 6,000 ft, 1200 Zulu.”
Turning Inbound
Once you reach one minute, think of the Five T’s again:
- Turn: Begin your turn towards the inbound course of 174 degrees.
- Time: Stop the timer.
- Twist: You don’t need to change the OBS.
- Throttle: You should already be set up for the hold.
- Talk: You don’t need to talk to ATC yet.
The Inbound Leg
Now that we know what to do with the Five T’s, let’s focus on staying on the inbound leg and adjusting the plane to fly the course.
Timing
Once you’re wings level on the inbound course, begin your timer. You’ll stop it once you reach the holding fix. Depending on the time, you’ll extend or shorten your outbound leg as required.
If the inbound leg is more than one minute, shorten the outbound leg. If the inbound leg is less than one minute, extend the outbound leg.
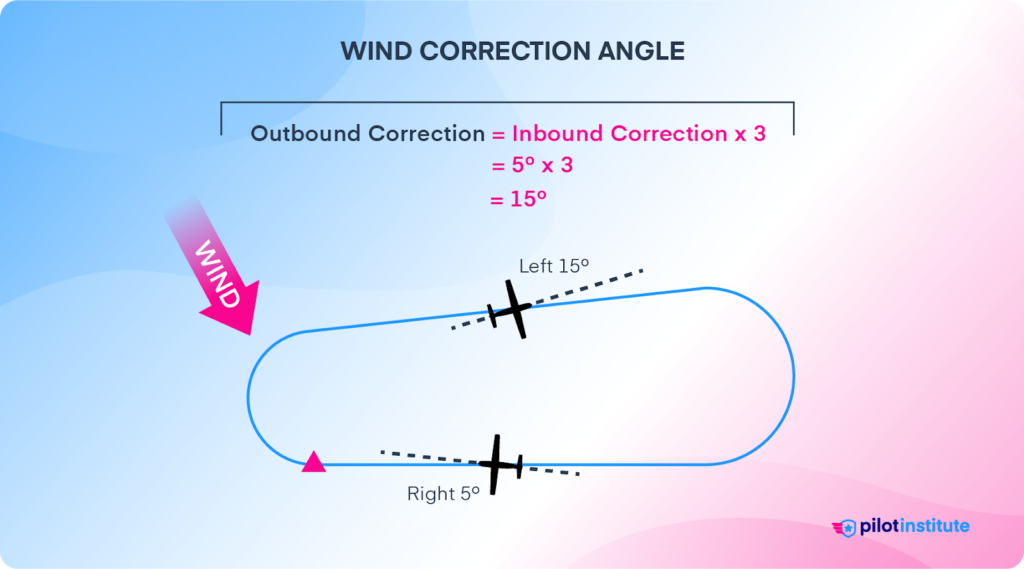
Wind Correction Angle
Another thing to adjust on the inbound leg is your wind correction angle. Find the correct heading you need to fly to maintain your inbound course.
If there is a left crosswind, your heading will be less than 174. Inversely, if you have a right crosswind, your heading will be more than 174.
Radio Communication
When you’re on the inbound leg, some instructors and pilots like to let ATC know that they’re “established on the hold,” but this is not required. ATC simply wants to know when you arrive at the fix and then leave the fix.
That being said, if ATC specifically asks you to “report established in the hold,” you should do so.
The Outbound Leg
Let’s look at how to fly the outbound leg during a hold.
Turning
The outbound leg begins once you’re abeam the holding fix. Your turn to the outbound leg should be adjusted so that you’ll arrive at the abeam point after reaching wings level. The abeam point is also where you start your timer.
Timing
Remember that we’ll have to extend or shorten the outbound leg depending on the timing of the inbound leg. Note how long the outbound leg takes to replicate the result for future turns. It will reduce your mental workload.
Wind Correction Angle
We will take the inbound wind correction angle and triple it on the outbound leg. This rule of thumb compensates for wind pushing or pulling you away from your inbound course not only during the outbound leg but also during your turns to and from the inbound leg.
For example, if you have a 5-degree correction to the right on the inbound leg, you will need a 15-degree correction to the left on the outbound leg.
Conclusion
Holding isn’t complicated once you understand the procedures and the why behind performing them.
The most difficult areas of holding for pilots are the few minutes of uncertainty when they’re figuring out which entry to use, what the wind correction angle is, and how long the outbound leg needs to be to get their one-minute inbound leg.
Holding is important for IFR operations and is often used by ATC and pilots to delay an approach for any reason. It is a vital skill for instrument flying and should be practiced often.