
-
Key Takeaways
-
What Is an E6B and Why Do Pilots Use It?
-
What’s on the E6B’s Circular Slide Rule?
- What’s on the Middle and Outer Scales?
- What’s on the Inner Scale?
- Using the Air Density Windows and the Baseplate
-
What’s on the E6B’s Wind Side?
-
Step-by-Step: How to Use the E6B for Time and Speed Calculations
- Calculating Time en Route
- Calculating Groundspeed Using Time and Distance
-
Step-by-Step: How to Use the E6B for Fuel Calculations
- Calculating Range
- Calculating Fuel Endurance
- Calculating Fuel Consumption
-
Step-by-Step: How to Use the E6B’s Air Density Window
- Calculating Density Altitude
- Calculating True Airspeed
-
Step-by-Step: How to Use the E6B for Unit Conversions
- Converting Between Nautical Miles and Statute Miles
- Converting Miles to Kilometers
- Weight Conversions
-
Mastering Wind Correction Angles and Groundspeed
-
Tips for Mastering the E6B
-
Conclusion
The student pilot may initially struggle to understand the functions of an E6B flight computer. They may even begin to question the necessity of learning this skill in today’s world, where digital devices are always readily available for assistance.
But pilots around the globe rely on this indispensable gadget for charting their flights, crunching numbers to determine time in transit, fuel usage, and necessary adjustments for wind shifts.
The E6B is important because it is independent of batteries or incessant software upgrades. You won’t have to worry about it losing power or being faulty.
So, let’s roll up our sleeves and get started on this guide, which will empower you to wield this tool properly.
Key Takeaways
- The E6B is a mechanical slide rule that helps pilots make calculations useful for flight planning.
- Use the slide rule side to calculate time, speed, fuel, and air density calculations.
- Learn how to use the wind side to find groundspeed and wind correction angles.
- Be careful interpreting the scales. The numbers aren’t always meant to be read literally.
What Is an E6B and Why Do Pilots Use It?
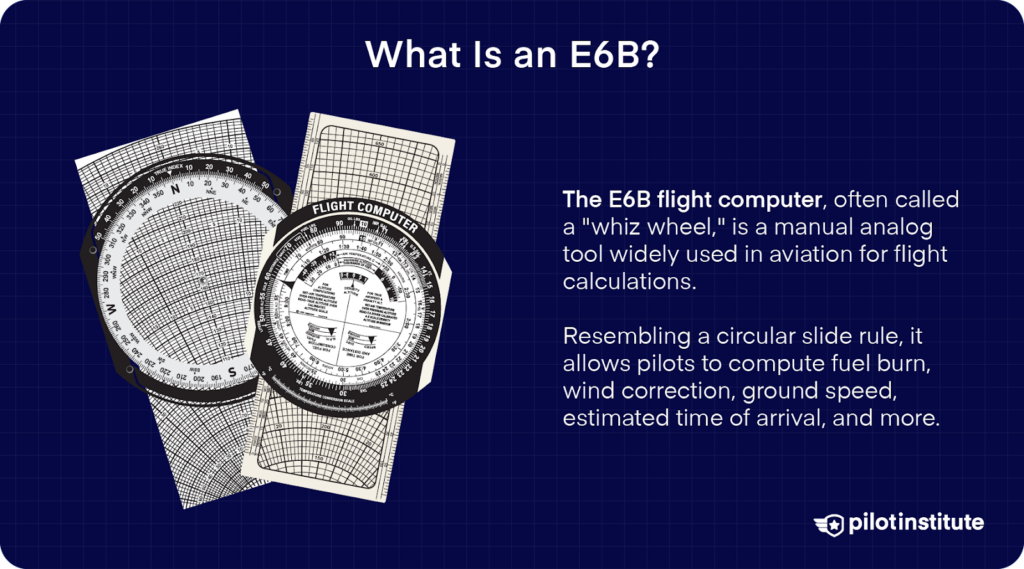
An E6B is a manual flight computer pilots use to perform flight calculations. It’s a circular slide rule, calculator, and an aviation graph plotter all packed into one tool.
It’s still widely used today because it gives immediate results and needs no batteries or software updates. Plus, many FAA exams test your knowledge of the E6B. Mastering this tool will let you solve calculations in an instant, saving you lots of time in exams.
Here’s why the E6B’s so popular in the real world as well. Say you’re going on a cross-country flight. What do you need to know to plan your flight?
- The time needed to fly between two points.
- Your groundspeed (which will differ from your airspeed as the wind pushes you around).
- The fuel consumption for your flight.
The E6B can help you solve all three types of calculations.
That’s not all. You can also use it for unit conversions, estimating wind correction angles, and figuring out density altitude. It even has rulers and scales on the edges to help plot your route on sectional charts.
That’s a lot of information, and the E6B organizes it into two halves.
The E6B’s front has the circular slide rule. The rear has the wind side for calculating wind correction angles and groundspeed.
Let’s talk about both sides in detail.
What’s on the E6B’s Circular Slide Rule?
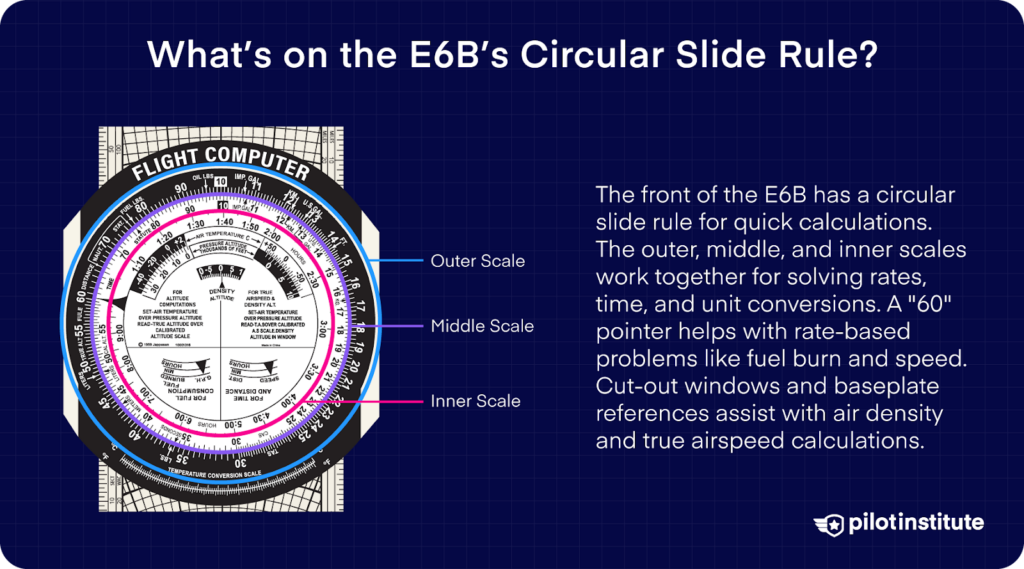
The front side has the circular slide rule. It involves a large circular dial with a movable inner wheel. The entire scale slides up and down the baseboard. It might look intimidating at first glance, but we can break it down into parts to make sense of it.
What’s on the Middle and Outer Scales?
The fixed dial has an outer scale. The edge of the movable disk has another scale known as the middle scale. You rotate the disk to set up the problem and read the answer right off the other scale.
Confused about the numbers on the scale? Both scales have 10 at the top and the middle scale has a pointer where 60 should be.
Here’s the explanation: The scale is designed to work for different quantities, so the numbers aren’t always meant to be read literally. 10, for example, could be read as 100, 1000, or even 0.1 or 1, depending on the context.
Confused about dealing with small numbers like 3 or 7? Simply read 30 as 3 and 70 as 7 for those calculations.
You’ll see a prominently marked pointer where the number 60 should be on the dial. It’s marked this way because you use it to set up rate-based calculations, many of which involve 60 minutes or seconds.
For example, you may calculate fuel in gallons per hour (GPH) or speed in miles per hour (MPH). Both calculations deal with 60 minutes.
The pointer just helps you find the number 60 easily. On some E6Bs, the pointer has the word ‘RATE’ written on it.
What’s on the Inner Scale?
The disk has another scale; this one graduated in hours and minutes. This is the inner scale; used for time calculations. Notice how the time on the inner scale aligns with the numbers on the middle scale.
So why do we need this scale?
Whenever you use the middle and outer scales to carry out your calculations, you’ll get the answer in minutes. For example, let’s say you get 210 minutes as an answer. That’s not very easy to understand at a quick glance.
But looking at 21 on the middle scale, you’ll see it lines up with 3:30 on the inner scale. That’s how you know 210 minutes equals three and a half hours.
Using the Air Density Windows and the Baseplate
The disk also features cut-out windows designed for air density-related calculations. You need to know the density altitude when flying on hot days and at high-altitude airports.
This section is also needed when you’re calculating your true airspeed, which you need to know to plan your flight.
Slide the movable part up and down, and you’ll see even more information written on the base plate. You’ll find various helpful reference data, tables, and graphs there.
What’s on the E6B’s Wind Side?
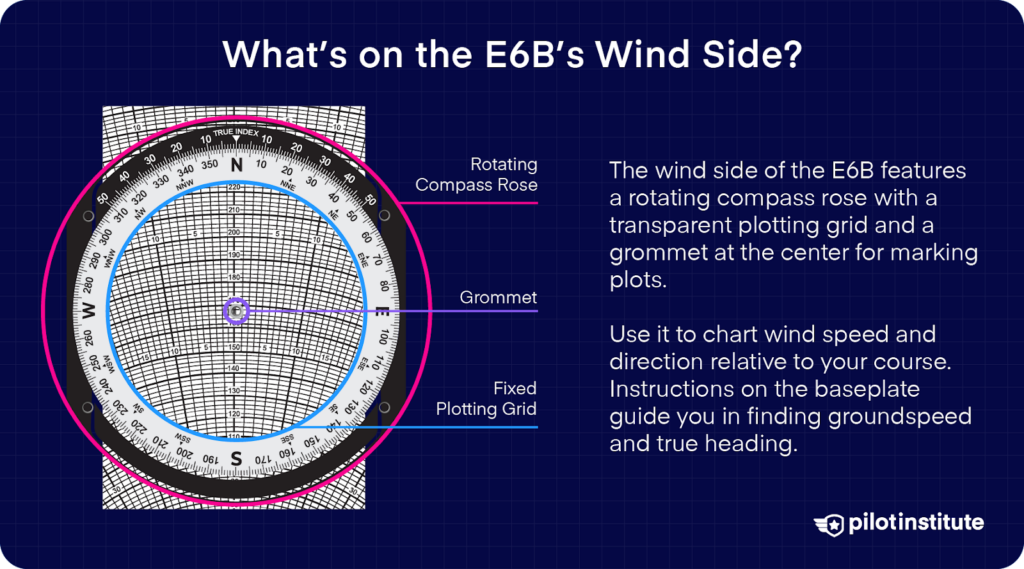
The other side of the E6B is called the ‘wind side’. The rotating compass rose has a transparent plotting grid you can mark with a pencil.
There’s a small hole in the middle called a grommet. This grommet acts as the origin of your plot. The fixed part has a plotting grid for you to plot the wind speed and direction relative to your aircraft’s course.
Think of this side of the E6B simply as a reusable plotting graph.
The top of the baseplate has instructions for using the wind side to find the groundspeed and your true heading.
Step-by-Step: How to Use the E6B for Time and Speed Calculations
Calculating Time en Route
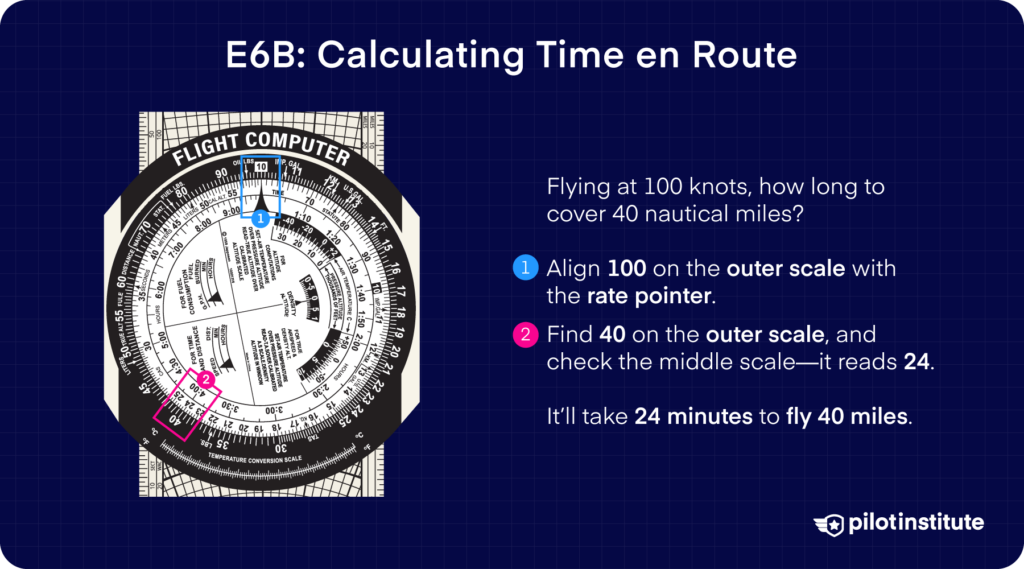
Let’s say we’re flying at a constant airspeed of 100 knots. How long would it take for us to fly 40 nautical miles?
- Align the rate pointer on the middle scale to 100 on the outer scale.
- Find 40 on the outer scale.
- Look at the number on the middle scale closest to 40 on the outer scale. In this case it’s 24. That means it’ll take 24 minutes to fly 40 miles at 100 knots.
Calculating Groundspeed Using Time and Distance
If you know the distance between two ground reference points and you note the time you flew over each of them, the E6B can tell you your groundspeed.
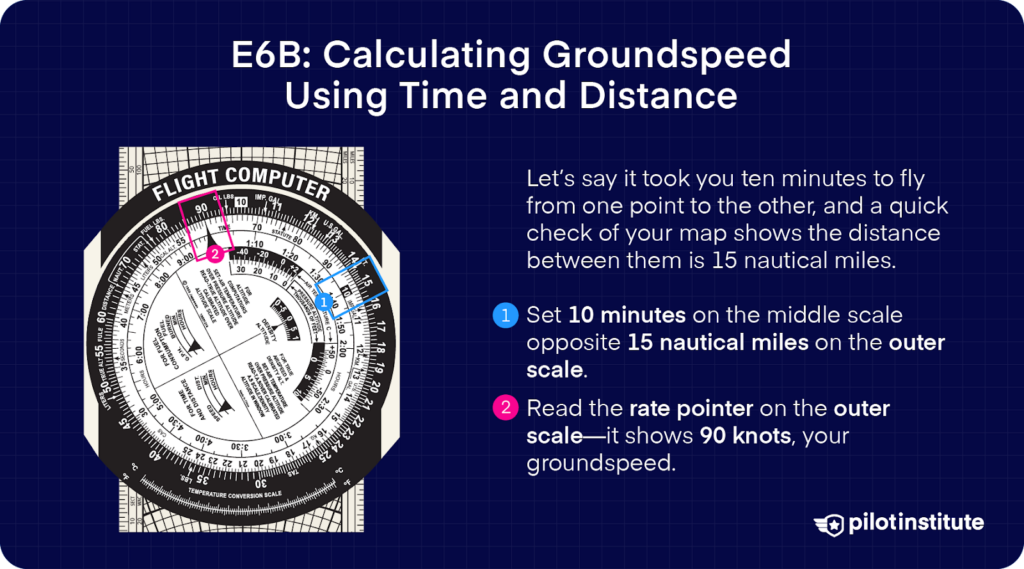
Let’s say it took you ten minutes to fly from one point to the other, and a quick check of your map shows the distance between them is 15 nautical miles.
- Set ten minutes on the middle scale opposite 15 on the outer scale.
- Find the rate pointer. It points to 90 on the outer scale. That means our groundspeed was 90 knots.
Step-by-Step: How to Use the E6B for Fuel Calculations
Calculating Range
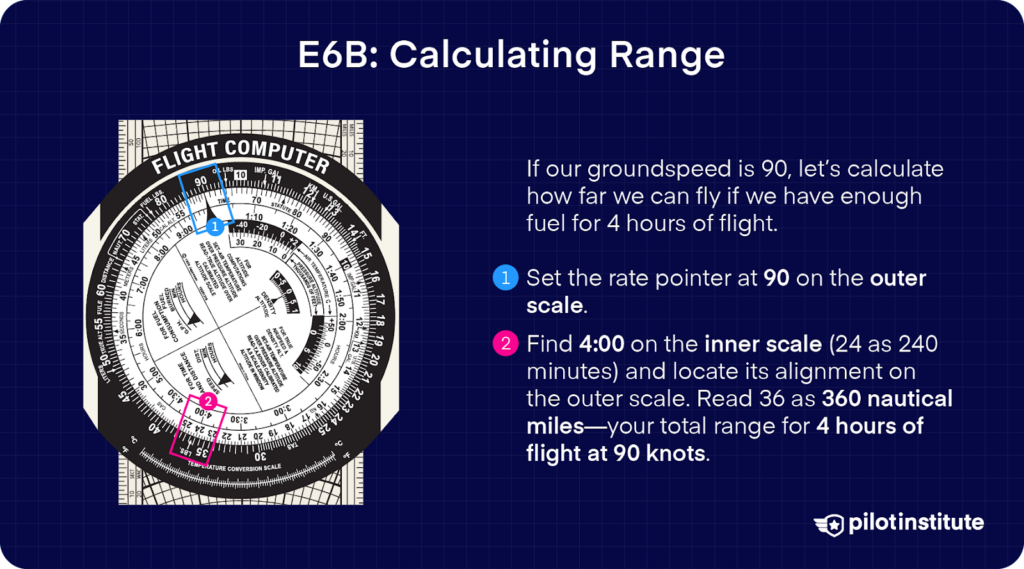
If our groundspeed is 90, let’s calculate how far we can fly if we have enough fuel for 4 hours of flight.
- Set the rate pointer at 90 on the outer scale.
- Find 4:00 on the inner scale. That translates to 240 minutes since we can see it aligns with 24 on the middle scale. Look at the corresponding number on the outer scale. We can see that it aligns with one long mark after 35. That means 36.
- We know that our range can’t possibly be 36 nautical miles. We’re flying 90 nautical miles an hour for four hours, so 36 nautical miles doesn’t make sense. That’s how we know to read the number 36 as 360 in this case. This means our range comes out to 360 nautical miles.
Calculating Fuel Endurance
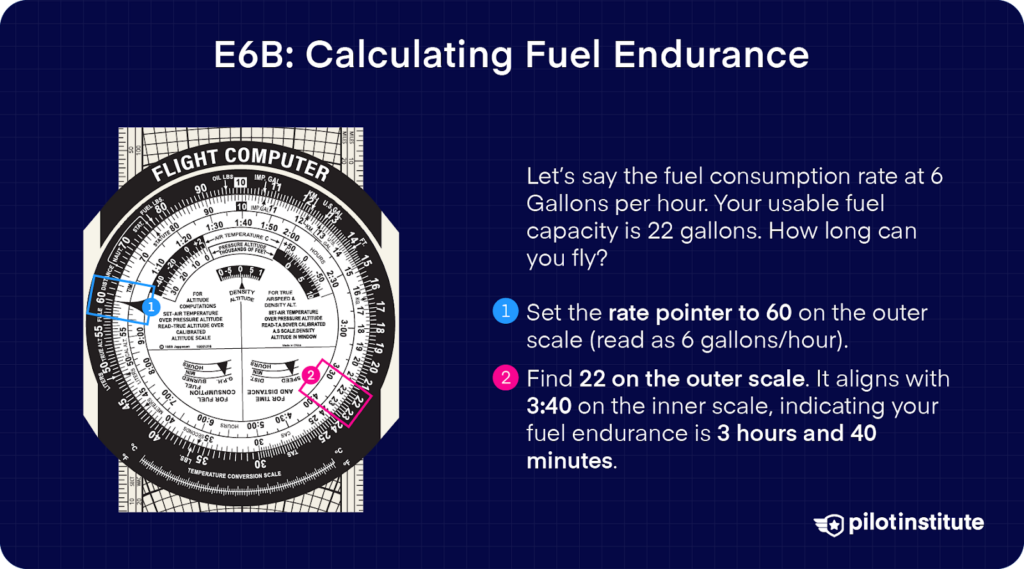
Let’s say your aircraft’s flight manual gives you the fuel consumption rate at 6 Gallons per hour. Your usable fuel capacity is 22 gallons. How long can you fly?
- Set the rate pointer to 60 on the outer scale. (Since the numbers on the scale don’t go below 10, we read 60 as 6 here)
- Find 22 on the outer scale. This number aligns with one mark after 3:30 on the inner scale. That means 3:40 is our fuel endurance.
Calculating Fuel Consumption
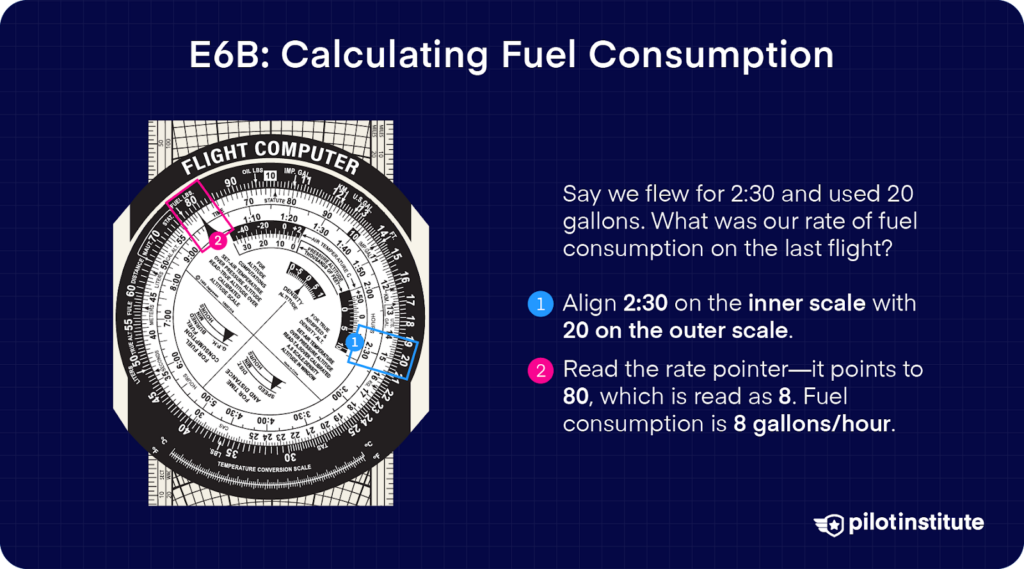
Say we flew for two hours and thirty minutes and then landed to top up our fuel tanks. The fuel receipt shows it took 20 gallons to fill the tanks. What was our rate of fuel consumption on the last flight?
- Find 2:30 on the inner scale.
- Rotate the disk till this number aligns with 20 on the outer scale.
- Find the rate pointer. It’s pointing to 80. It doesn’t make sense for our fuel consumption to be 80 gallons per hour. That means we should read 80 as 8. Our fuel consumption was 8 Gallons per hour.
Step-by-Step: How to Use the E6B’s Air Density Window
Calculating Density Altitude
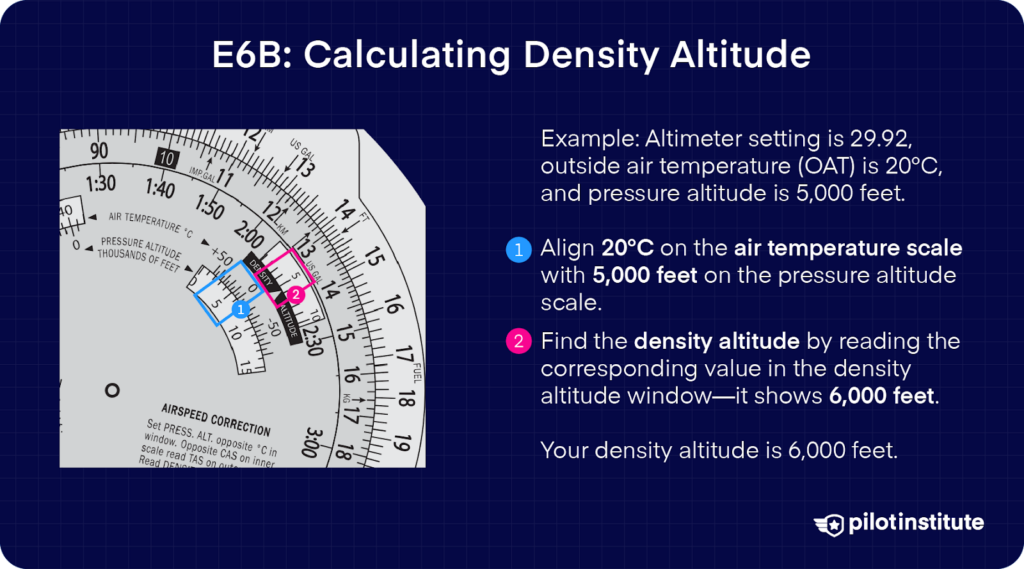
- Find the pressure altitude. If you’re in the aircraft, set the altimeter to 29.92 and read the altitude shown. If you don’t have access to an altimeter, you can manually calculate the pressure altitude.
- Find out the current pressure reading from the ATIS or METAR.
- Subtract it from 29.92.
- Multiply it by 1000.
- If you end up with a negative number, subtract that reading from your current elevation. If the number is positive, add it to your elevation.
- Find out the outside air temperature. Many aircraft have an outside air temperature gauge.
- Take a look at the pressure altitude window on the E6B’s movable disk. Align the pressure altitude you calculated with the air temperature you’ve found out.
- The pointer above the window points to your density altitude.
Calculating True Airspeed
- Follow steps 1-3 from the section above.
- Find your Calibrated Airspeed on the middle scale on the movable disk. For example, if it’s 120, look for the number 12 on the scale.
- Read the corresponding number on the outer scale. That’s your true airspeed.
Calibrated airspeed is not the same as indicated airspeed. However, the difference is a few knots for general aviation airspeeds and altitudes.
You can substitute the CAS for IAS here in a pinch, but only if you understand your answer will just be an approximation. The difference becomes significant above 200 knots, but most light aircraft don’t fly that fast.
Step-by-Step: How to Use the E6B for Unit Conversions
Unit conversions are practically inevitable in aviation. Luckily, the E6B can solve most common conversions for you.
Converting Between Nautical Miles and Statute Miles

Many navigational charts measure distances in statute miles. Your airspeed indicator shows airspeed in knots, which is nautical miles per hour.
- Find the NAUT and STAT arrows on the top left part of the outer scale.
- Simply put the value you know under one arrow and read the converted value under the other arrow. For example, convert 40 nm by aligning 40 on the middle scale with the NAUT arrow.
- The STAT arrow points to the answer on the middle scale, about 46 statute miles.
Converting Miles to Kilometers
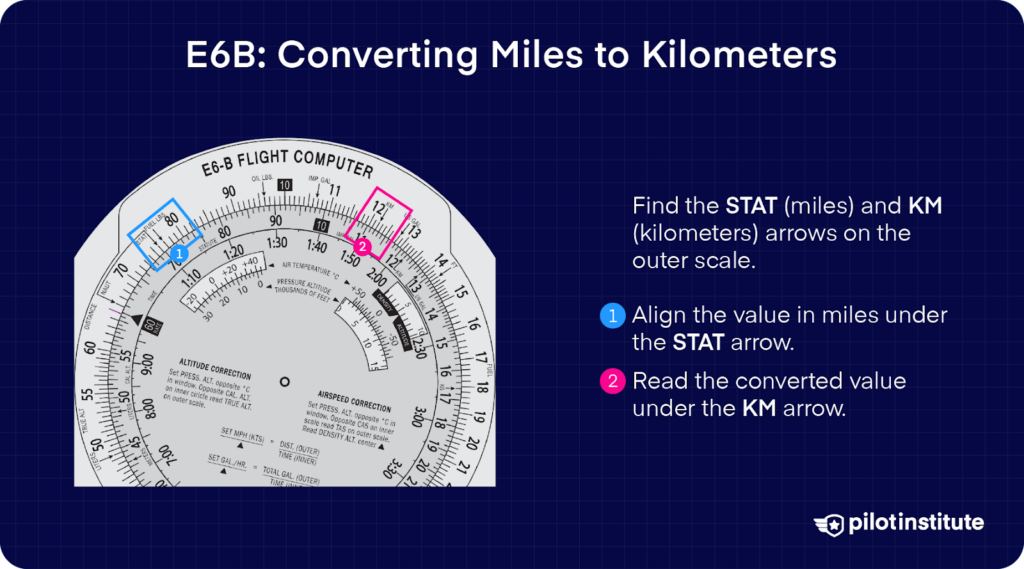
- Align the known value with its respective arrow, as in the last section.
- Find the KM arrow on the fixed scale near the number 12 on the outer scale.
- Read the number on the middle scale the KM arrow points to.
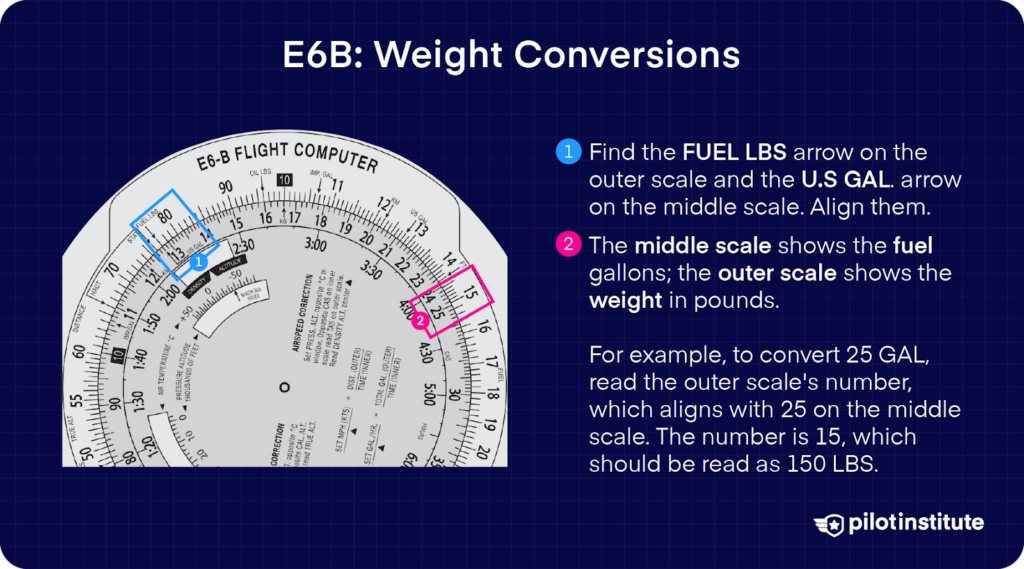
Weight Conversions
Aviation uses weight to measure fuel and oil to simplify weight and balance calculations. Here’s how you can convert between them.
- Find the FUEL LBS arrow on the outer scale and the U.S GAL. arrow on the middle scale. Align them.
- The middle scale shows the fuel gallons; the outer scale shows the weight in pounds.
For example, to convert 25 U.S. gallons, read the outer scale’s number, which aligns with 25 on the middle scale. The number is 15, which should be read as 150 pounds.
You can convert oil weight and volume with the same method. Just make sure you align the OIL LBS arrow on the outer scale with the U.S GAL arrow on the middle scale. You’ll find similar arrows for imperial weights on the scale as well.
Mastering Wind Correction Angles and Groundspeed
No flight plan is complete without considering the effect of wind. The E6B’s wind side helps you figure out how much the wind will affect your course and speed. Here’s how to use it:
Let’s say you plan to fly a true course of 090 degrees. The weather station reports wind from 030 degrees at 20 knots. Your true airspeed is 100 knots. What would be your groundspeed and wind correction angle (WCA)?
- Rotate the disk till 030 degrees is at the top.
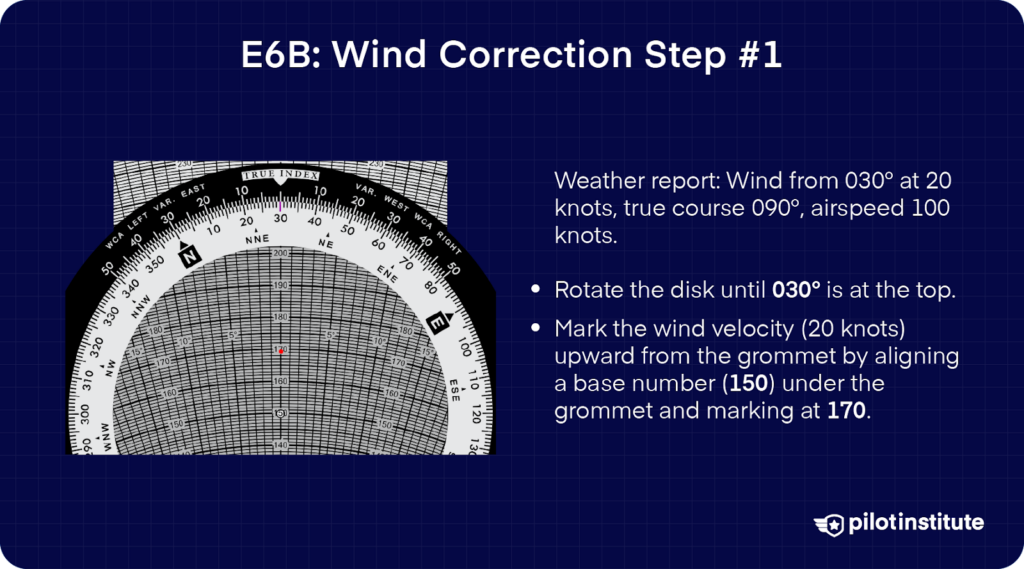
- Use a pencil to mark the wind velocity 20 knots upward from the grommet. How do we do that? Slide the dial up or down so there’s a number under the grommet. You can pick any number; we used 150. Adding 20 knots gives us 170, so put a pencil mark at 170.
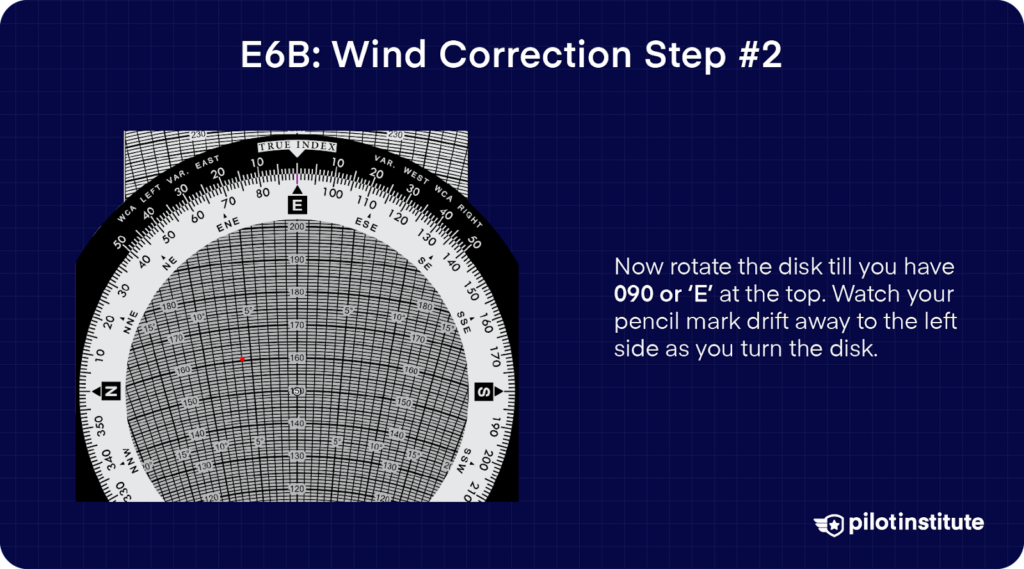
- Now rotate the disk till you have 090 or ‘E’ at the top. Watch your pencil mark drift away to the left side as you turn the disk.
- Slide the disk downwards until your pencil mark falls in line with your true airspeed, 100 knots.
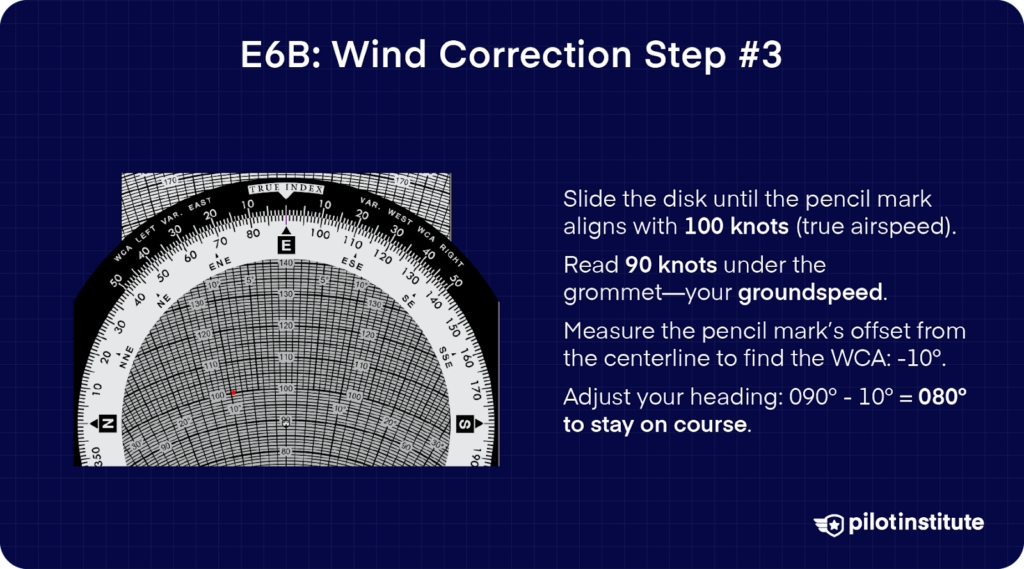
- Look under the grommet. The reading under the grommet shows your groundspeed.
Remember, there are five divisions between the numbers on the graph, so each line means an interval of two knots. Our groundspeed comes out to 90 knots.
- Finding the wind correction angle involves figuring out how far left or right the pencil mark is from the center line. In our case, the WCA is -10 degrees.
What does a WCA of -10 degrees mean?
A negative WCA means the wind will be pushing you towards your right, which means you’ll have to compensate by pointing the nose to the left to stay on course. In this case, your true heading would be:
090 – 10 = 080 degrees.
So, point the nose at 080 degrees, and the wind will push your aircraft to fly on course at 090 degrees.
Tips for Mastering the E6B
- Always check your units.
- Try to see if the answer you came up with sounds reasonable. If it’s extremely high or low, check to see if you made a mistake interpreting the scale.
For example, if you come up with a fuel endurance of 20 hours for a Cessna 152, that seems unreasonable. Reading the 20 as 2 gives you a more realistic answer. - Similarly, think about the answer you calculate for your wind correction angle. Does it make sense? Visualize the scenario to estimate the right answer, then cross-check it with your calculation.
- Always make calculations in the right direction on the slide rule.
Some values should be set on the middle scale and read on the outer scale. Don’t reverse this process. - If you’re more comfortable with digital E6Bs, try them out. Keep in mind you’ll have to ensure the batteries don’t run out in the middle of your flight.
Another potential drawback of digital E6Bs is that reading the screen in direct sunlight can be tricky. - Familiarize yourself with both manual and digital E6Bs. You never know which one you might have available when flying at different airports or during exams.
Conclusion
The E6B is an incredible tool, and once you understand how to use it, you will find that it empowers you in the cockpit.
If for any reason your electronic devices go out and you need to run quick calculations, you can whip out your whiz wheel and quickly work them out during your flight.
A good pilot is a pilot who is prepared for any circumstance.
Ready to take your knowledge further? Check out our E6B Deep Dive at Pilot Institute to sharpen your skills even more!